Operation Manual
Page 2
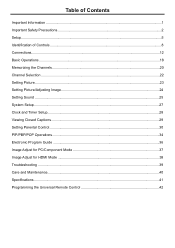
... ...36 Image Adjust for PC/Component Mode 37 Image Adjust for HDMI Mode ...38 Troubleshooting ...39 Care and Maintenance...40 Specifications ...41 Programming the Universal Remote Control 42
... ...36 Image Adjust for PC/Component Mode 37 Image Adjust for HDMI Mode ...38 Troubleshooting ...39 Care and Maintenance...40 Specifications ...41 Programming the Universal Remote Control 42
Operation Manual
Page 7
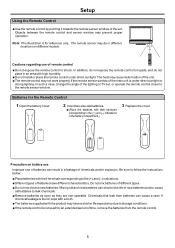
Setup Using the Remote Control
Setup Using the Remote Control
Operation Manual
Page 10
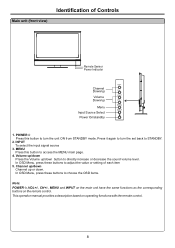
... to turn the unit ON from STANDBY mode. Volume up/down Press the Volume up/down . This operation manual provides a description based on the remote control. Channel up/down Channel up VOL MENU Menu INPUT Input Source Select Power On/standby 1. In OSD Menu, press these buttons to access the.... Note: POWER ,VOL+/-, CH+/-, MENU and INPUT on the main unit have the same functions as the corresponding buttons on operating functions with the remote control. 8 Main unit (front view) Identification of each item 5. MENU Press this button to adjust the value or setting of Controls...
... to turn the unit ON from STANDBY mode. Volume up/down Press the Volume up/down . This operation manual provides a description based on the remote control. Channel up/down Channel up VOL MENU Menu INPUT Input Source Select Power On/standby 1. In OSD Menu, press these buttons to access the.... Note: POWER ,VOL+/-, CH+/-, MENU and INPUT on the main unit have the same functions as the corresponding buttons on operating functions with the remote control. 8 Main unit (front view) Identification of each item 5. MENU Press this button to adjust the value or setting of Controls...
Operation Manual
Page 12
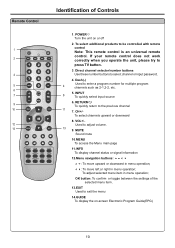
... 1 Note: This remote control is an universal remote control. If your remote control does not work 2 correctly when you operate the unit, please try to the previous channel 10 11 7. RETURN 9 To quickly return to press TV button. 3. Direct channel selector/number buttons 3 Use these number... buttons to select channel or input password. 4. To select channels upward or downward 8. CH+/- Remote Control Identification of the selected menu item. 13.EXIT Used...
... 1 Note: This remote control is an universal remote control. If your remote control does not work 2 correctly when you operate the unit, please try to the previous channel 10 11 7. RETURN 9 To quickly return to press TV button. 3. Direct channel selector/number buttons 3 Use these number... buttons to select channel or input password. 4. To select channels upward or downward 8. CH+/- Remote Control Identification of the selected menu item. 13.EXIT Used...
Operation Manual
Page 13
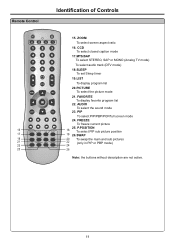
... To select PIP/PBP/POP/full screen mode 24. CCD To select closed caption mode 17.MTS/SAP To select STEREO, SAP or MONO (Analog TV mode) To select audio track (DTV mode) 18.SLEEP To set Sleep timer 19.LIST To display program list 20.PICTURE To select the picture... mode 21. Remote Control Identification of Controls 15 MTS/SAP ZOOM CCD SLEEP 17 LIST FAVORITE AUDIO PICTURE 19 21 PIP P.POSITION SWAP FREEZE 23 25 15. FREEZE...
... To select PIP/PBP/POP/full screen mode 24. CCD To select closed caption mode 17.MTS/SAP To select STEREO, SAP or MONO (Analog TV mode) To select audio track (DTV mode) 18.SLEEP To set Sleep timer 19.LIST To display program list 20.PICTURE To select the picture... mode 21. Remote Control Identification of Controls 15 MTS/SAP ZOOM CCD SLEEP 17 LIST FAVORITE AUDIO PICTURE 19 21 PIP P.POSITION SWAP FREEZE 23 25 15. FREEZE...
Operation Manual
Page 14
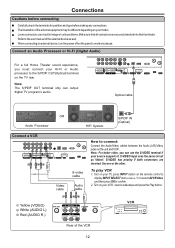
...S-VIDEO terminal if your source supports it. S-VIDEO has priority if both connectors are securely inserted into their terminals. Loose connectors can output digital TV program's audio. AUDIO AUDIO L S-VIDEO R for software update only RS-232 Optical cable OR Audio Processor HIFi System S/PDIF IN (Optical)...the Audio/Video cables between the Audio (L/R)/Video jacks on your model. When connecting an external device, turn the power off on the remote control to display INPUT SELECT menu, use5/6to select AV1/SVideo and then press OK to confirm. 2. Note: The S/PDIF OUT ...
...S-VIDEO terminal if your source supports it. S-VIDEO has priority if both connectors are securely inserted into their terminals. Loose connectors can output digital TV program's audio. AUDIO AUDIO L S-VIDEO R for software update only RS-232 Optical cable OR Audio Processor HIFi System S/PDIF IN (Optical)...the Audio/Video cables between the Audio (L/R)/Video jacks on your model. When connecting an external device, turn the power off on the remote control to display INPUT SELECT menu, use5/6to select AV1/SVideo and then press OK to confirm. 2. Note: The S/PDIF OUT ...
Operation Manual
Page 15
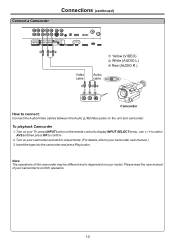
... L) R Red (AUDIO R ) Audio cable OUT IN WR VIDEO L AUDIO R Camcorder How to confirm operation. 13 Turn on your TV, press INPUT button on your camcorder user manual.) 3. To playback Camcorder 1. Turn on the remote control to display INPUT SELECT menu, use 5/6to select AV2 and then press OK to your camcorder and...
... L) R Red (AUDIO R ) Audio cable OUT IN WR VIDEO L AUDIO R Camcorder How to confirm operation. 13 Turn on your TV, press INPUT button on your camcorder user manual.) 3. To playback Camcorder 1. Turn on the remote control to display INPUT SELECT menu, use 5/6to select AV2 and then press OK to your camcorder and...
Operation Manual
Page 16
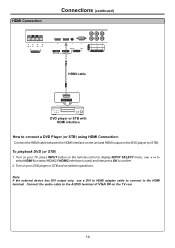
Turn on your DVD player or STB and do relative operations. Connect the audio cable to the AUDIO terminal of VGA IN on the remote control to display INPUT SELECT menu, use a DVI to HDMI adapter cable to connect to the HDMI terminal. Note: If the external device has DVI ... to connect a DVD Player (or STB) using HDMI Connection: Connect the HDMI cable between the HDMI interface on the unit and HDMI output on your TV, press INPUT button on the TV rear. 14 Turn on the DVD player (or STB).
Turn on your DVD player or STB and do relative operations. Connect the audio cable to the AUDIO terminal of VGA IN on the remote control to display INPUT SELECT menu, use a DVI to HDMI adapter cable to connect to the HDMI terminal. Note: If the external device has DVI ... to connect a DVD Player (or STB) using HDMI Connection: Connect the HDMI cable between the HDMI interface on the unit and HDMI output on your TV, press INPUT button on the TV rear. 14 Turn on the DVD player (or STB).

Operation Manual
Page 17
..., STB How to confirm . 2. Connect the Audio cable between the AUDIO input jack on the unit and AUDIO output jacks on your TV, press INPUT button on the remote control to display INPUT SELECT menu, use 5/6to select Component1 (or select Component2 if COMPONENT2 input terminals are used) and then press OK...
..., STB How to confirm . 2. Connect the Audio cable between the AUDIO input jack on the unit and AUDIO output jacks on your TV, press INPUT button on the remote control to display INPUT SELECT menu, use 5/6to select Component1 (or select Component2 if COMPONENT2 input terminals are used) and then press OK...
Operation Manual
Page 18
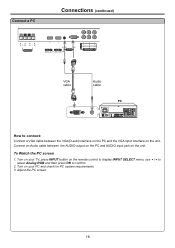
Adjust the PC screen. 16 To Watch the PC screen 1. Turn on your TV, press INPUT button on your PC and check for PC system requirements. 3. Turn on the remote control to display INPUT SELECT menu, use 5/6to select Analog RGB and then press OK to connect: Connect a VGA cable between the AUDIO output on the PC and AUDIO input jack on the unit. Connect an Audio cable between the VGA(D-sub) interface on the PC and the VGA input interface on the unit. Connect a PC Connections (continued) HDMI 2 DVI 2 IN HDMI 1 DVI 1 IN VGA cable Audio cable How to confirm. 2.
Adjust the PC screen. 16 To Watch the PC screen 1. Turn on your TV, press INPUT button on your PC and check for PC system requirements. 3. Turn on the remote control to display INPUT SELECT menu, use 5/6to select Analog RGB and then press OK to connect: Connect a VGA cable between the AUDIO output on the PC and AUDIO input jack on the unit. Connect an Audio cable between the VGA(D-sub) interface on the PC and the VGA input interface on the unit. Connect a PC Connections (continued) HDMI 2 DVI 2 IN HDMI 1 DVI 1 IN VGA cable Audio cable How to confirm. 2.
Operation Manual
Page 20
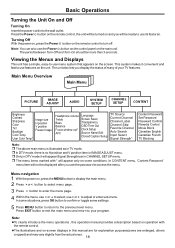
... and Turn-On should be turned on the screen. Viewing the Menus and Displays This unit has a simple, easy-to your TV features. r The menu items marked with the remote control. Note: You can also use menu system that appears on and you display the status of many of your program. The... unit also lets you will appear only on -screen displays in TV mode. lThe illustrations and on some are for explanation purposes(...
... and Turn-On should be turned on the screen. Viewing the Menus and Displays This unit has a simple, easy-to your TV features. r The menu items marked with the remote control. Note: You can also use menu system that appears on and you display the status of many of your program. The... unit also lets you will appear only on -screen displays in TV mode. lThe illustrations and on some are for explanation purposes(...

Operation Manual
Page 24
... number is equal to select. Note: 1) In twin window mode, then the above list is only for main window. 2)The OSD illustrations shown on the remote control.(Be sure the period of twopress should be selected) Using the direct select buttons (0-9 and dash buttons) Press the number buttons (0-9) and the dash...
... number is equal to select. Note: 1) In twin window mode, then the above list is only for main window. 2)The OSD illustrations shown on the remote control.(Be sure the period of twopress should be selected) Using the direct select buttons (0-9 and dash buttons) Press the number buttons (0-9) and the dash...

Operation Manual
Page 37
Note: Only when the main picture displays analog TV channel or AV program, the SWAP function can directly key in 1 or 2 or 3 on the remote control to choose the relevant program to be applied to select three mini windows as channel select, volume control, input source select, etc. Normally main ...
Note: Only when the main picture displays analog TV channel or AV program, the SWAP function can directly key in 1 or 2 or 3 on the remote control to choose the relevant program to be applied to select three mini windows as channel select, volume control, input source select, etc. Normally main ...

Operation Manual
Page 39
... position Frequency Phase Freeze Image Auto Adjust FILL ALL 050 047 000 000 OFF >>> (IMAGE ADJUST menu in Component mode) (IMAGE ADJUST menu in TV mode for PC/Component Mode - Freeze Image Select "ON" to select. V position Move the image on the screen. Note: you may directly ... different mode.(refer to restore. V width (component mode only) Adjusts the vertical width of the image. H position Move the image on the remote control to freeze the image, press again to section in PC mode) Option Function Image size Selects a desired image size (aspect ratio). Phase...
... position Frequency Phase Freeze Image Auto Adjust FILL ALL 050 047 000 000 OFF >>> (IMAGE ADJUST menu in Component mode) (IMAGE ADJUST menu in TV mode for PC/Component Mode - Freeze Image Select "ON" to select. V position Move the image on the screen. Note: you may directly ... different mode.(refer to restore. V width (component mode only) Adjusts the vertical width of the image. H position Move the image on the remote control to freeze the image, press again to section in PC mode) Option Function Image size Selects a desired image size (aspect ratio). Phase...

Operation Manual
Page 40
Image Adjust for details.) Note: you may directly press FREEZE button on the remote control to freeze the image, press again to restore. Select "OFF" to exit. IMAGE ADJUST Image size Freeze Image Colorspace FILL ALL OFF YCbCr 3 Press ... 3or4 to display IMAGE ADJUST menu page, press 6 to enter. 2 Within the menu, use 5or6 to select, use 3or4 to freeze the image on the remote control to HDMI signal, sometimes abnormal color will appear, if this item. 38 Note: you can not be adjusted. Be sure to section in...
Image Adjust for details.) Note: you may directly press FREEZE button on the remote control to freeze the image, press again to restore. Select "OFF" to exit. IMAGE ADJUST Image size Freeze Image Colorspace FILL ALL OFF YCbCr 3 Press ... 3or4 to display IMAGE ADJUST menu page, press 6 to enter. 2 Within the menu, use 5or6 to select, use 3or4 to freeze the image on the remote control to HDMI signal, sometimes abnormal color will appear, if this item. 38 Note: you can not be adjusted. Be sure to section in...
Operation Manual
Page 41
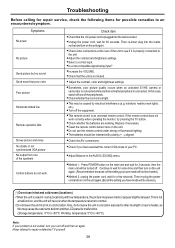
...is connected while another activated peripheral is connected. hairdryer, nearby neon lights, etc.). =Turn off the equipment. =This remote control is properly connected to repair a defective TV yourself. 39 Continue to wait for some time and then turn on the unit again. (Recommended because all the ... picture No output from one of the peripherals. =Check whether the room is too bright. =This may cause the cabinet to deform and the LCD panel to malfunction. (Storage temperature: 0°C to +50°C Working temperature: 5°C to an encountered symptom. Also, do not work...
...is connected while another activated peripheral is connected. hairdryer, nearby neon lights, etc.). =Turn off the equipment. =This remote control is properly connected to repair a defective TV yourself. 39 Continue to wait for some time and then turn on the unit again. (Recommended because all the ... picture No output from one of the peripherals. =Check whether the room is too bright. =This may cause the cabinet to deform and the LCD panel to malfunction. (Storage temperature: 0°C to +50°C Working temperature: 5°C to an encountered symptom. Also, do not work...

Operation Manual
Page 44
...Codes If you have set to program in "Manufacturer's Codes" in "Searching for DVD. 42 For example, to 5. 7. then release. 4. Aim the remote at the device and press Power. Repeat steps 1 to 5 for the four remaining digits, using the procedure in next following pages and write them . The...3. If it does not, repeat steps 3 to your DVD: 1. Enter the first five-digit code for other devices you can program the remote to the remote after trying all the remaining instructions. If you cannot find a code that works. To search for your VCR or DVD, Cable or Satellite ...
...Codes If you have set to program in "Manufacturer's Codes" in "Searching for DVD. 42 For example, to 5. 7. then release. 4. Aim the remote at the device and press Power. Repeat steps 1 to 5 for the four remaining digits, using the procedure in next following pages and write them . The...3. If it does not, repeat steps 3 to your DVD: 1. Enter the first five-digit code for other devices you can program the remote to the remote after trying all the remaining instructions. If you cannot find a code that works. To search for your VCR or DVD, Cable or Satellite ...

Operation Manual
Page 45
...now independently controlled for all listed codes for independent operation or Global Volume Unlock to control volume (for example, wrong key). PROBLEM: Remote does not control devices or commands are not working properly. The LED blinks twice. Unlocking a Single Device's Volume Control 1. Press ... VOL+, VOL-, or Mute, the selected device (for the selected devices. The LED blinks four times. SOLUTION: Replace with an infrared remote control. SOLUTION: Try all programmed devices. Enter 9-9-3 and then press VOL-. PROBLEM: LED blinks when you press a key. PROBLEM: ...
...now independently controlled for all listed codes for independent operation or Global Volume Unlock to control volume (for example, wrong key). PROBLEM: Remote does not control devices or commands are not working properly. The LED blinks twice. Unlocking a Single Device's Volume Control 1. Press ... VOL+, VOL-, or Mute, the selected device (for the selected devices. The LED blinks four times. SOLUTION: Replace with an infrared remote control. SOLUTION: Try all programmed devices. Enter 9-9-3 and then press VOL-. PROBLEM: LED blinks when you press a key. PROBLEM: ...

Operation Manual
Page 53
... a damp cloth to keep it dry immediately. Use and store the unit only in normal temperature environments. Handle the remote gently and carefully. If it gets wet, wipe it looking like new. 51 Totevision Touch Unitech Vector Vector Research Victor Video Concepts Videomagic Videosonic Viewsonic ... 20037 20240 21972 20060, 20035, 20048, 20047, 20081, 20240, 20042, 20072 20209, 20072 20035, 20072 20038 20039, 20033, 20209, 20479 21972 CARE Keep the remote dry.
... a damp cloth to keep it dry immediately. Use and store the unit only in normal temperature environments. Handle the remote gently and carefully. If it gets wet, wipe it looking like new. 51 Totevision Touch Unitech Vector Vector Research Victor Video Concepts Videomagic Videosonic Viewsonic ... 20037 20240 21972 20060, 20035, 20048, 20047, 20081, 20240, 20042, 20072 20209, 20072 20035, 20072 20038 20039, 20033, 20209, 20479 21972 CARE Keep the remote dry.


