Operation Manual
Page 2
...Important Safety Precautions ...2 Setup ...5 Identification of Controls...8 Connections...12 Basic Operations ...18 Memorizing the Channels...20 Channel Selection ...22 Setting Picture ...23 Setting Picture/Adjusting Image ...24 Setting Sound ...25 System Setup...27 Clock and Timer Setup...28 Viewing Closed Captions ...29 Setting Parental Control ...30 PIP/PBP/POP Operations ...34 Electronic Program Guide ...36 Image Adjust for PC/Component Mode 37 Image Adjust for HDMI Mode ...38 Troubleshooting ...39 Care and Maintenance...40 Specifications ...41 Programming the Universal Remote Control 42
...Important Safety Precautions ...2 Setup ...5 Identification of Controls...8 Connections...12 Basic Operations ...18 Memorizing the Channels...20 Channel Selection ...22 Setting Picture ...23 Setting Picture/Adjusting Image ...24 Setting Sound ...25 System Setup...27 Clock and Timer Setup...28 Viewing Closed Captions ...29 Setting Parental Control ...30 PIP/PBP/POP Operations ...34 Electronic Program Guide ...36 Image Adjust for PC/Component Mode 37 Image Adjust for HDMI Mode ...38 Troubleshooting ...39 Care and Maintenance...40 Specifications ...41 Programming the Universal Remote Control 42
Operation Manual
Page 3
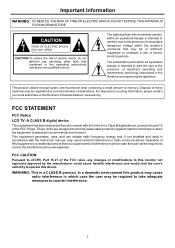
... cause harmful interference to part 15 of important operating and maintenance (servicing) instructions in which case the user will be of sufficient magnitude to constitute a risk of this device. For disposal or recycling information, please contact your local authorities or the Electronic Industries Alliance: www.eia.org FCC STATEMENT FCC Notice LCD TV: A CLASS B digital device This equipment...
... cause harmful interference to part 15 of important operating and maintenance (servicing) instructions in which case the user will be of sufficient magnitude to constitute a risk of this device. For disposal or recycling information, please contact your local authorities or the Electronic Industries Alliance: www.eia.org FCC STATEMENT FCC Notice LCD TV: A CLASS B digital device This equipment...
Operation Manual
Page 5
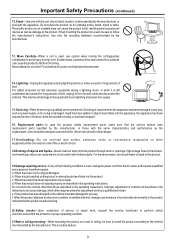
....Entering of service or repair work by a qualified technician. High voltage flows in the product, and inserting an object can result in any way, such as power-supply cord or plug is a safety feature. 3 Improper adjustment of time. If the product has been dropped or the cabinet has been damaged in the operating instructions. Stand---Use only with the cart, stand, tripod, bracket, or table specified...
....Entering of service or repair work by a qualified technician. High voltage flows in the product, and inserting an object can result in any way, such as power-supply cord or plug is a safety feature. 3 Improper adjustment of time. If the product has been dropped or the cabinet has been damaged in the operating instructions. Stand---Use only with the cart, stand, tripod, bracket, or table specified...
Operation Manual
Page 7
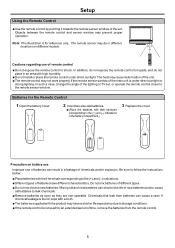
Setup Using the Remote Control
Setup Using the Remote Control
Operation Manual
Page 9
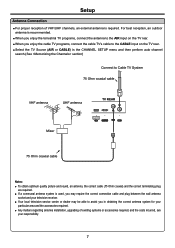
... picture and sound, an antenna, the correct cable (75 Ohm coaxial) and the correct terminating plug are your particular area and the accessories required. ! Setup ! When you in the CHANNEL SETUP menu and then perform auto channel search.(See section) Connect to the CABLE input on the TV rear. ! Your local television service centre or dealer may require the correct connection cable and plug between the wall antenna socket and your television receiver. ! Select the TV Source...
... picture and sound, an antenna, the correct cable (75 Ohm coaxial) and the correct terminating plug are your particular area and the accessories required. ! Setup ! When you in the CHANNEL SETUP menu and then perform auto channel search.(See section) Connect to the CABLE input on the TV rear. ! Your local television service centre or dealer may require the correct connection cable and plug between the wall antenna socket and your television receiver. ! Select the TV Source...
Operation Manual
Page 11
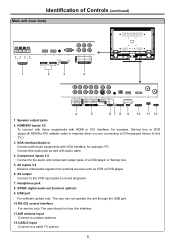
..., Set-top box or DVD player.(A HDMI-to-DVI adapter cable is required when you are connecting a DVI-equipped device to the audio and component output jacks of Controls (continued) Main unit (rear view) HDMI 2 DVI 2 IN HDMI 1 DVI 1 IN 1 2 3 4 AUDIO AUDIO L S-VIDEO R for example, PC. AV inputs 1/2 Receive video/audio signals from external sources such as well with audio cable. 4. Headphone jack 8. The user should not use this TV.) 3. Connect the audio jack as VCR or DVD player. 6. USB port For software update only. AV output Connect to the VCR input...
..., Set-top box or DVD player.(A HDMI-to-DVI adapter cable is required when you are connecting a DVI-equipped device to the audio and component output jacks of Controls (continued) Main unit (rear view) HDMI 2 DVI 2 IN HDMI 1 DVI 1 IN 1 2 3 4 AUDIO AUDIO L S-VIDEO R for example, PC. AV inputs 1/2 Receive video/audio signals from external sources such as well with audio cable. 4. Headphone jack 8. The user should not use this TV.) 3. Connect the audio jack as VCR or DVD player. 6. USB port For software update only. AV output Connect to the VCR input...
Operation Manual
Page 12
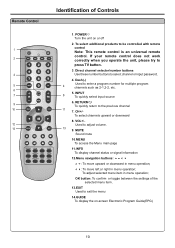
... Used to select channel or input password. 4. MUTE Sound mute 10.MENU To access the Menu main page MTS/SAP ZOOM CCD SLEEP LIST FAVORITE AUDIO PICTURE PIP P.POSITION SWAP FREEZE 11.INFO To display channel status or signal information 12.Menu navigation buttons: 5634 56: To move upward or downward in menu operation; 34: To move left or right in menu operation; Direct channel selector/number buttons 3 Use these number buttons to adjust volume. 14 13 9. INPUT 7 8 To quickly select input source 6. Remote Control Identification...
... Used to select channel or input password. 4. MUTE Sound mute 10.MENU To access the Menu main page MTS/SAP ZOOM CCD SLEEP LIST FAVORITE AUDIO PICTURE PIP P.POSITION SWAP FREEZE 11.INFO To display channel status or signal information 12.Menu navigation buttons: 5634 56: To move upward or downward in menu operation; 34: To move left or right in menu operation; Direct channel selector/number buttons 3 Use these number buttons to adjust volume. 14 13 9. INPUT 7 8 To quickly select input source 6. Remote Control Identification...
Operation Manual
Page 14
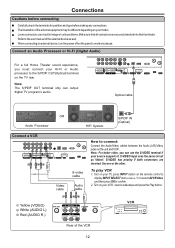
... TV rear. AUDIO AUDIO L S-VIDEO R for software update only RS-232 Optical cable OR Audio Processor HIFi System S/PDIF IN (Optical) Connect a VCR AUDIO AUDIO Y L S-VIDEO R WR or for position and type before connecting Carefully check the terminals for software update only RS-232 S-video cable Video cable Audio cable How to the user manual of the external device as Video1. Connect an Audio Processor or Hi-Fi (Digital Audio) For a full Home Theater sound experience, you can output digital TV program's audio. Connections Cautions before making any issues...
... TV rear. AUDIO AUDIO L S-VIDEO R for software update only RS-232 Optical cable OR Audio Processor HIFi System S/PDIF IN (Optical) Connect a VCR AUDIO AUDIO Y L S-VIDEO R WR or for position and type before connecting Carefully check the terminals for software update only RS-232 S-video cable Video cable Audio cable How to the user manual of the external device as Video1. Connect an Audio Processor or Hi-Fi (Digital Audio) For a full Home Theater sound experience, you can output digital TV program's audio. Connections Cautions before making any issues...
Operation Manual
Page 15
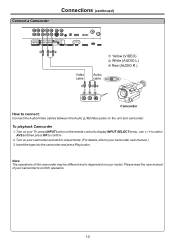
To playback Camcorder 1. Note: The operations of your camcorder to connect: Connect the Audio/Video cables between the Audio (L/R)/Video jacks on your model. Turn on the remote control to display INPUT SELECT menu, use 5/6to select AV2 and then press OK to your camcorder and set it to output mode. (For details, refer to confirm . 2. Turn on your TV, press INPUT button on your camcorder user manual.) 3. Please read the user manual of the camcorder may be...
To playback Camcorder 1. Note: The operations of your camcorder to connect: Connect the Audio/Video cables between the Audio (L/R)/Video jacks on your model. Turn on the remote control to display INPUT SELECT menu, use 5/6to select AV2 and then press OK to your camcorder and set it to output mode. (For details, refer to confirm . 2. Turn on your TV, press INPUT button on your camcorder user manual.) 3. Please read the user manual of the camcorder may be...

Operation Manual
Page 17
... your TV, press INPUT button on the remote control to display INPUT SELECT menu, use 5/6to select Component1 (or select Component2 if COMPONENT2 input terminals are used) and then press OK to connect: Connect the Video cable between the AUDIO input jack on the unit and AUDIO output jacks on the DVD (or STB). Connections (continued) Connect a DVD player or Set-Top Box HDMI 2 DVI 2 IN HDMI 1 DVI 1 IN G BR AUDIO AUDIO R W L S-VIDEO R for software update only RS-232 W white (audio L) R red (audio R, Pr) G Green (Y) B Blue (Pb) Video cable Audio cable G BR R W COMPONENT...
... your TV, press INPUT button on the remote control to display INPUT SELECT menu, use 5/6to select Component1 (or select Component2 if COMPONENT2 input terminals are used) and then press OK to connect: Connect the Video cable between the AUDIO input jack on the unit and AUDIO output jacks on the DVD (or STB). Connections (continued) Connect a DVD player or Set-Top Box HDMI 2 DVI 2 IN HDMI 1 DVI 1 IN G BR AUDIO AUDIO R W L S-VIDEO R for software update only RS-232 W white (audio L) R red (audio R, Pr) G Green (Y) B Blue (Pb) Video cable Audio cable G BR R W COMPONENT...
Operation Manual
Page 19
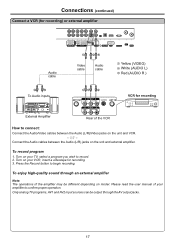
... user manual of your amplifier to begin recording. Only analog TV programs, AV1 and AV2 input sources can be different depending on model. Press the Record button to confirm proper operation. Turn on the unit and external amplifier. or - Connections (continued) Connect a VCR (for recording) or external amplifier Audio cable AUDIO AUDIO L S-VIDEO R for software update only RS-232 Y WR Video cable Audio cable Y Yellow (VIDEO) W White (AUDIO L) R Red (AUDIO R ) R W To Audio inputs External Amplifier YW R AV OUT ANT OUT S-VIDEO ANT IN VIDEO L AUDIO R AV IN VIDEO...
... user manual of your amplifier to begin recording. Only analog TV programs, AV1 and AV2 input sources can be different depending on model. Press the Record button to confirm proper operation. Turn on the unit and external amplifier. or - Connections (continued) Connect a VCR (for recording) or external amplifier Audio cable AUDIO AUDIO L S-VIDEO R for software update only RS-232 Y WR Video cable Audio cable Y Yellow (VIDEO) W White (AUDIO L) R Red (AUDIO R ) R W To Audio inputs External Amplifier YW R AV OUT ANT OUT S-VIDEO ANT IN VIDEO L AUDIO R AV IN VIDEO...
Operation Manual
Page 20
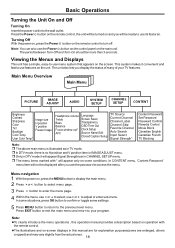
... the power on the screen. Main Menu Overview Main Menu PICTURE IMAGE ADJUST AUDIO SYSTEM SETUP CHANNEL SETUP CONTENT Brightness Contrast Sharpness Color Tint Backlight Image size H position V position Freeze Image Color Temp User Color Temp* Headphone volume Treble Bass Balance Focus window out* AVC Language Screen Saver Transparency OSD Time Out Clock Setup Source Name Edit Closed Caption Setup TV Source Current Channel Channel Label Channel Skip Favorite Channel Auto Search Input Select Signal Strength* Content Password Set Password Password Confirm Parental Control Movie...
... the power on the screen. Main Menu Overview Main Menu PICTURE IMAGE ADJUST AUDIO SYSTEM SETUP CHANNEL SETUP CONTENT Brightness Contrast Sharpness Color Tint Backlight Image size H position V position Freeze Image Color Temp User Color Temp* Headphone volume Treble Bass Balance Focus window out* AVC Language Screen Saver Transparency OSD Time Out Clock Setup Source Name Edit Closed Caption Setup TV Source Current Channel Channel Label Channel Skip Favorite Channel Auto Search Input Select Signal Strength* Content Password Set Password Password Confirm Parental Control Movie...

Operation Manual
Page 21
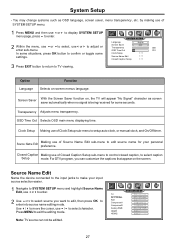
... select Language item, press 3or4 to TV viewing. Air or Cable. - Note: Some DTV programs' information banner may also make use 4or3 to display SYSTEM SETUP menu page, press 6 to call up information banner. Close Caption Setup > > > 3 Press EXIT button to return to select Source Name Edit > > > your desired language. Channel number and name. - Selecting Input Source Signal 1 Press the INPUT button to display INPUT SELECT menu. 2 Press 6or 5 to select your preference...
... select Language item, press 3or4 to TV viewing. Air or Cable. - Note: Some DTV programs' information banner may also make use 4or3 to display SYSTEM SETUP menu page, press 6 to call up information banner. Close Caption Setup > > > 3 Press EXIT button to return to select Source Name Edit > > > your desired language. Channel number and name. - Selecting Input Source Signal 1 Press the INPUT button to display INPUT SELECT menu. 2 Press 6or 5 to select your preference...

Operation Manual
Page 22
... using antenna. Select CABLE if using cable. Selecting the TV Source Before your local area's cable system, normally please select STD. CHANNEL SETUP TV Source Current Channel Channel Label Channel Skip Favorite Channel Auto Search Input Select Signal Strength AIR 2-1 WGBHOFF OFF > > > > > > Auto Channel Search If TV Source is connected to the unit. (i.e., an antenna or cable system) 1 In full screen mode, press MENU to display the main menu. 2 Press 4or3 to display CHANNEL SETUP menu page, press 6 to enter. 3 Press 6or 5 to select TV Source...
... using antenna. Select CABLE if using cable. Selecting the TV Source Before your local area's cable system, normally please select STD. CHANNEL SETUP TV Source Current Channel Channel Label Channel Skip Favorite Channel Auto Search Input Select Signal Strength AIR 2-1 WGBHOFF OFF > > > > > > Auto Channel Search If TV Source is connected to the unit. (i.e., an antenna or cable system) 1 In full screen mode, press MENU to display the main menu. 2 Press 4or3 to display CHANNEL SETUP menu page, press 6 to enter. 3 Press 6or 5 to select TV Source...

Operation Manual
Page 27
... window* sound is output from speakers while the other window sound is output from headphone. (Default setting) Focus window =If "Headphone" is selected, then the focus window out sound is output from headphone while the other (PIP or PBP mode only) window sound is output from speakers. =If "Both" is high or by pressing OK button and a green border will be mute. Speaker/Headphone/Both AVC (auto volume control) Each...
... window* sound is output from speakers while the other window sound is output from headphone. (Default setting) Focus window =If "Headphone" is selected, then the focus window out sound is output from headphone while the other (PIP or PBP mode only) window sound is output from speakers. =If "Both" is high or by pressing OK button and a green border will be mute. Speaker/Headphone/Both AVC (auto volume control) Each...

Operation Manual
Page 28
... picture. (The above OSD is only in DTV mode) - Setting Sound Sound Mode Selection You can select the sound quality instantly among three preset modes and one . - Audio: eng 1 When viewing digital channel, press the MTS/SAP button to call up the AUDIO MODE menu. 2. USER: The sound quality you are having difficulty receiving a stereo signal. 1 When viewing analog channel, press the MTS/SAP button to select the desired sound quality. MOVIE: Select for analog channel) - NEWS, USER...
... picture. (The above OSD is only in DTV mode) - Setting Sound Sound Mode Selection You can select the sound quality instantly among three preset modes and one . - Audio: eng 1 When viewing digital channel, press the MTS/SAP button to call up the AUDIO MODE menu. 2. USER: The sound quality you are having difficulty receiving a stereo signal. 1 When viewing analog channel, press the MTS/SAP button to select the desired sound quality. MOVIE: Select for analog channel) - NEWS, USER...
Operation Manual
Page 29
... exit the editing mode. Source Name Edit Name the device connected to the input jacks to make your personal Source Name Edit preference. Closed Caption Making use of Closed Caption Setup sub-menu to control closed caption, to setup auto clock, or manual clock, and On/Off timer. OSD Time Out Selects OSD main menu displaying time. Clock Setup Making use of Clock Setup sub-menu to select caption Setup mode. Use 3/4 to move the cursor, use 3or4 to display SYSTEM SETUP menu page, press...
... exit the editing mode. Source Name Edit Name the device connected to the input jacks to make your personal Source Name Edit preference. Closed Caption Making use of Closed Caption Setup sub-menu to control closed caption, to setup auto clock, or manual clock, and On/Off timer. OSD Time Out Selects OSD main menu displaying time. Clock Setup Making use of Clock Setup sub-menu to select caption Setup mode. Use 3/4 to move the cursor, use 3or4 to display SYSTEM SETUP menu page, press...
Operation Manual
Page 30
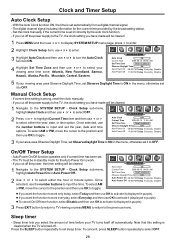
... to work. - The digital channel signal includes information for the Auto Power On to OFF. To select AM or PM, move the cursor to the position and then use the number buttons to toggle. On/Off Timer Setup - Clock Setup sub-menu, highlight Auto Power On or Auto Power Off. 2 Use 3 or 4 to input and set it (displayed in purple). SYSTEM SETUP Auto Clock ON Current Time 2006-08-15 08:58 AM Set Time Zone...
... to work. - The digital channel signal includes information for the Auto Power On to OFF. To select AM or PM, move the cursor to the position and then use the number buttons to toggle. On/Off Timer Setup - Clock Setup sub-menu, highlight Auto Power On or Auto Power Off. 2 Use 3 or 4 to input and set it (displayed in purple). SYSTEM SETUP Auto Clock ON Current Time 2006-08-15 08:58 AM Set Time Zone...
Operation Manual
Page 41
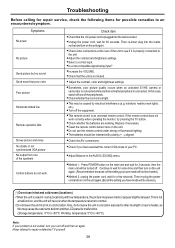
..., do not work correctly when operating the monitor, try pressing the TV button. =Check whether the batteries are working. Symptoms No power No picture Good picture but no sound Good sound but poor color Poor picture Horizontal dotted line Remote operation fails. Replace if necessary. =Clean the remote control sensor lens on the unit again. =Check video connections at the rear of the peripherals. =Check whether the room is used in rooms (locations) with...
..., do not work correctly when operating the monitor, try pressing the TV button. =Check whether the batteries are working. Symptoms No power No picture Good picture but no sound Good sound but poor color Poor picture Horizontal dotted line Remote operation fails. Replace if necessary. =Clean the remote control sensor lens on the unit again. =Check video connections at the rear of the peripherals. =Check whether the room is used in rooms (locations) with...

Operation Manual
Page 44
... number in the appropriate code listing in "Searching for DVD. 42 The device should turn off. Continue until the red LED blinks twice; To check for other device codes, repeat steps 1 to control your VCR or DVD, Cable or Satellite Receivers, Amplifier or Tuner, and Auxiliary devices. Press a device key (VCR/DVD, CBL/ SAT, or AUX). 3. Press SET to -use the DVD key. 1. Programming your Remote Control Introduction Your remote lets you control...
... number in the appropriate code listing in "Searching for DVD. 42 The device should turn off. Continue until the red LED blinks twice; To check for other device codes, repeat steps 1 to control your VCR or DVD, Cable or Satellite Receivers, Amplifier or Tuner, and Auxiliary devices. Press a device key (VCR/DVD, CBL/ SAT, or AUX). 3. Press SET to -use the DVD key. 1. Programming your Remote Control Introduction Your remote lets you control...


