Operation Manual
Page 1
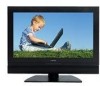
FPE3707HR LCD TV Operating Manual Before connecting, operating or adjusting this manual for future reference. Please keep this product, please read the manual completely. FOR ASSISTANCE CALL 1-800-619-3848 OR VISIT US AT WWW.AUDIOVOX.COM. 128-8036
FPE3707HR LCD TV Operating Manual Before connecting, operating or adjusting this manual for future reference. Please keep this product, please read the manual completely. FOR ASSISTANCE CALL 1-800-619-3848 OR VISIT US AT WWW.AUDIOVOX.COM. 128-8036
Operation Manual
Page 3
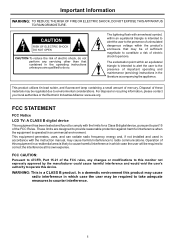
... information, please contact your local authorities or the Electronic Industries Alliance: www.eia.org FCC STATEMENT FCC Notice LCD TV: A CLASS B digital device This equipment has been tested and found to comply with the instruction manual, may be required to cause harmful interference in the literature accompanying the appliance. These limits are qualified...
... information, please contact your local authorities or the Electronic Industries Alliance: www.eia.org FCC STATEMENT FCC Notice LCD TV: A CLASS B digital device This equipment has been tested and found to comply with the instruction manual, may be required to cause harmful interference in the literature accompanying the appliance. These limits are qualified...
Operation Manual
Page 10
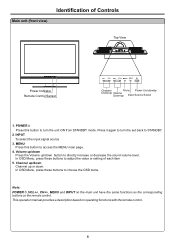
... the set back to turn the unit ON from STANDBY mode. In OSD Menu, press these buttons to access the MENU main page. 4. This operation manual provides a description based on the remote control. Volume up/down Press the Volume up Input Source Select 1. Main unit (front view) Identification of each item...
... the set back to turn the unit ON from STANDBY mode. In OSD Menu, press these buttons to access the MENU main page. 4. This operation manual provides a description based on the remote control. Volume up/down Press the Volume up Input Source Select 1. Main unit (front view) Identification of each item...
Operation Manual
Page 14
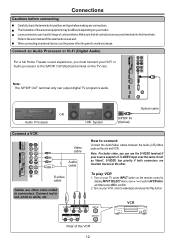
Refer to the user manual of the VCR 12 Connect an Audio Processor or Hi-Fi (Digital Audio) For a full Home Theater sound experience, you can use the S-VIDEO terminal if your model. To play VCR 1. Turn on the TV rear. Loose connectors can output digital TV program's audio. Note: The S/PDIF OUT terminal... external device as Video1. Note: For better video, you must connect your Hi-Fi or Audio processor to the S/PDIF OUT(Optical) terminal on your TV, press INPUT button on the unit and VCR. S-VIDEO input uses the same circuit as well.
Refer to the user manual of the VCR 12 Connect an Audio Processor or Hi-Fi (Digital Audio) For a full Home Theater sound experience, you can use the S-VIDEO terminal if your model. To play VCR 1. Turn on the TV rear. Loose connectors can output digital TV program's audio. Note: The S/PDIF OUT terminal... external device as Video1. Note: For better video, you must connect your Hi-Fi or Audio processor to the S/PDIF OUT(Optical) terminal on your TV, press INPUT button on the unit and VCR. S-VIDEO input uses the same circuit as well.
Operation Manual
Page 15
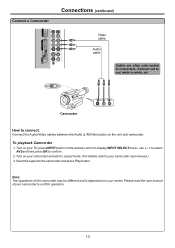
... model. Insert the tape into the camcorder and press Play button. Note: The operations of your camcorder user manual.) 3. Please read the user manual of the camcorder may be different and is dependant on your TV, press INPUT button on the unit and camcorder. Connect red to red, white to connectors. Turn on...
... model. Insert the tape into the camcorder and press Play button. Note: The operations of your camcorder user manual.) 3. Please read the user manual of the camcorder may be different and is dependant on your TV, press INPUT button on the unit and camcorder. Connect red to red, white to connectors. Turn on...
Operation Manual
Page 19
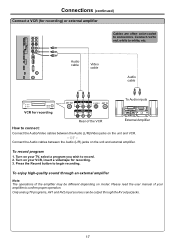
...sources can be different depending on model. Press the Record button to record. 2. Turn on your amplifier to connectors. Turn on your TV, select a program you wish to begin recording. Connect red to red, white to connect: Connect the Audio/Video cables between the Audio...Audio (L/R)/Video jacks on the unit and external amplifier. Connections (continued) Connect a VCR (for recording. 3. or - Please read the user manual of the amplifier may be output through an external amplifier Note: The operations of your VCR, insert a videotape for recording) or external amplifier...
...sources can be different depending on model. Press the Record button to record. 2. Turn on your amplifier to connectors. Turn on your TV, select a program you wish to begin recording. Connect red to red, white to connect: Connect the Audio/Video cables between the Audio...Audio (L/R)/Video jacks on the unit and external amplifier. Connections (continued) Connect a VCR (for recording. 3. or - Please read the user manual of the amplifier may be output through an external amplifier Note: The operations of your VCR, insert a videotape for recording) or external amplifier...
Operation Manual
Page 20
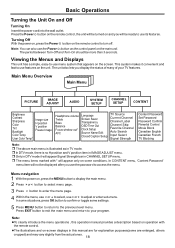
...Treble Bass Balance Focus window out* AVC Language Screen Saver Transparency OSD Time Out Clock Setup Source Name Edit Closed Caption Setup TV Source Current Channel Channel Label Channel Skip Favorite Channel Auto Search Input Select Signal Strength Content Password Set Password Password Confirm Parental... 5 Press MENU button to return to turn off. Menu navigation 1 With the power on the main unit. r Only in this operation manual provides a description based on operation with * will be ready to confirm or toggle some conditions. In some situations, press OK button to ...
...Treble Bass Balance Focus window out* AVC Language Screen Saver Transparency OSD Time Out Clock Setup Source Name Edit Closed Caption Setup TV Source Current Channel Channel Label Channel Skip Favorite Channel Auto Search Input Select Signal Strength Content Password Set Password Password Confirm Parental... 5 Press MENU button to return to turn off. Menu navigation 1 With the power on the main unit. r Only in this operation manual provides a description based on operation with * will be ready to confirm or toggle some conditions. In some situations, press OK button to ...
Operation Manual
Page 29
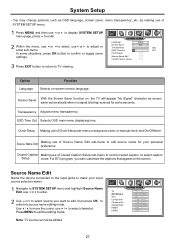
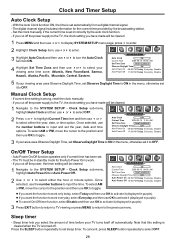
... OFF 000 010 In some situations, press OK button to setup auto clock, or manual clock, and On/Off timer. Clock Setup Making use of Clock Setup sub-menu ...to move the cursor, use 3or4to enter. 2 Use 5or6to select source you can not be editted. Note: TV source can customize the captions that appear on the screen. SYSTEM SETUP Language English 2 Within the menu, use... 3or4 to display SYSTEM SETUP menu page, press 6 to enter into source name editing mode. Press MENU to TV viewing. by making use of Source Name Edit sub-menu to edit source name for some Clock Setup > > ...
... OFF 000 010 In some situations, press OK button to setup auto clock, or manual clock, and On/Off timer. Clock Setup Making use of Clock Setup sub-menu ...to move the cursor, use 3or4to enter. 2 Use 5or6to select source you can not be editted. Note: TV source can customize the captions that appear on the screen. SYSTEM SETUP Language English 2 Within the menu, use... 3or4 to display SYSTEM SETUP menu page, press 6 to enter into source name editing mode. Press MENU to TV viewing. by making use of Source Name Edit sub-menu to edit source name for some Clock Setup > > ...
Operation Manual
Page 30
...OK to activate it to work only today, select Today and then use OK to activate it to set it (displayed in purple). Sleep timer - Manual Clock Setup - Clock Setup sub-menu, highlight Auto Clock and then use 3 or 4 to select OFF. 2 Press 5or6 to highlight Current Time... area time zone: Atlantic, New Foundiand, Samoa, Hawaii, Alaska, Pacific, Mountain, Central, Eastern. Note that this setting is cleared when the TV is wrong, reset the clock manually. - Once selected, use the number buttons to input the time. Once selected, use the number buttons to input and set . - If...
...OK to activate it to work only today, select Today and then use OK to activate it to set it (displayed in purple). Sleep timer - Manual Clock Setup - Clock Setup sub-menu, highlight Auto Clock and then use 3 or 4 to select OFF. 2 Press 5or6 to highlight Current Time... area time zone: Atlantic, New Foundiand, Samoa, Hawaii, Alaska, Pacific, Mountain, Central, Eastern. Note that this setting is cleared when the TV is wrong, reset the clock manually. - Once selected, use the number buttons to input the time. Once selected, use the number buttons to input and set . - If...
