Operation Manual
Page 2
... or splashing and no objects filled with liquids, such as power-supply cord or plug is used in the operating instructions unless you are qualified to do not expose this equipment in a residential area is operated in which case the user will be required to take adequate measures to part 15 of the FCC rules, any ventilation openings. Important Information...
... or splashing and no objects filled with liquids, such as power-supply cord or plug is used in the operating instructions unless you are qualified to do not expose this equipment in a residential area is operated in which case the user will be required to take adequate measures to part 15 of the FCC rules, any ventilation openings. Important Information...
Operation Manual
Page 3
... the plug. Sound If a snapping or popping sound from the wall outlet as a precaution against injury, the following : = Do not install the unit turned backward or sideways. = Do not install the unit turned over or upside down. = Never cover the slots and openings with a wet hand. Do not pull the AC power cord. = Keep the AC power cord away from the screen, wipe...
... the plug. Sound If a snapping or popping sound from the wall outlet as a precaution against injury, the following : = Do not install the unit turned backward or sideways. = Do not install the unit turned over or upside down. = Never cover the slots and openings with a wet hand. Do not pull the AC power cord. = Keep the AC power cord away from the screen, wipe...
Operation Manual
Page 4
.... Use of unauthorized parts can break when the product is required when the apparatus has been damaged in case the panel breaks. b. Do not touch the controls other electric light or power circuits, or where it can result in the operating instructions. This is damaged. Antennas Outdoor Antenna Grounding If an outdoor antenna is grounded so as a fixed point of service or repair work by...
.... Use of unauthorized parts can break when the product is required when the apparatus has been damaged in case the panel breaks. b. Do not touch the controls other electric light or power circuits, or where it can result in the operating instructions. This is damaged. Antennas Outdoor Antenna Grounding If an outdoor antenna is grounded so as a fixed point of service or repair work by...
Operation Manual
Page 5
... Connecting a DVD Player with Component Video Connectors 16 Connecting a DVD Player with S-Video and Audio Connectors 16 Connecting a PC...17 Connecting a Camcorder or "PlayStation 17 Connecting a Second TV or Monitor 18 Connecting Headphones ...18 Introducing the Remote Control...19 Insert Batteries into the Remote Control 19 Using the Remote Control...19 Button Descriptions...20 Getting Start ...22 Running Initial Setup...22 Setting a Secret Number...23 Menu Navigation ...23 Watching TV ...24 Turning On/Off ...24 Introducing Channel Number ...24 Selecting Channels ...24 Adjusting Volume...
... Connecting a DVD Player with Component Video Connectors 16 Connecting a DVD Player with S-Video and Audio Connectors 16 Connecting a PC...17 Connecting a Camcorder or "PlayStation 17 Connecting a Second TV or Monitor 18 Connecting Headphones ...18 Introducing the Remote Control...19 Insert Batteries into the Remote Control 19 Using the Remote Control...19 Button Descriptions...20 Getting Start ...22 Running Initial Setup...22 Setting a Secret Number...23 Menu Navigation ...23 Watching TV ...24 Turning On/Off ...24 Introducing Channel Number ...24 Selecting Channels ...24 Adjusting Volume...
Operation Manual
Page 6
...the Program Guide...32 Accessing Program Guide ...32 Using the Program Guide ...32 Setting System ...33 Accessing Settings Menu...33 Setting Date & Time ...33 Setting Timer...33 Input Select ...34 Setting Caption Vision...34 Using the CCD button ...34 Setting Menu & Display...34 Editing Input Labels ...35 Setting Screen Saver ...35 Running Reset System ...35 Parental Lock Control...36 Accessing Locks Menu ...36 Selecting Locks Options ...36 Viewing Locked or Blocked Programs 37 Other Information ...38 Troubleshooting ...38 Care and Maintenance...40 Specifications ...41 Programming your Remote...
...the Program Guide...32 Accessing Program Guide ...32 Using the Program Guide ...32 Setting System ...33 Accessing Settings Menu...33 Setting Date & Time ...33 Setting Timer...33 Input Select ...34 Setting Caption Vision...34 Using the CCD button ...34 Setting Menu & Display...34 Editing Input Labels ...35 Setting Screen Saver ...35 Running Reset System ...35 Parental Lock Control...36 Accessing Locks Menu ...36 Selecting Locks Options ...36 Viewing Locked or Blocked Programs 37 Other Information ...38 Troubleshooting ...38 Care and Maintenance...40 Specifications ...41 Programming your Remote...
Operation Manual
Page 8
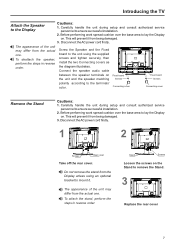
... diagram illustrates. The appearance of the unit may differ from being damaged. 3. Stand Screws Loosen the screws on Fixed board the unit and the speaker matching Screws Fixed board Screws polarity according to remove the Stand. 3 Replace the rear cover 7 Disconnect the AC power cord firstly. Connect the speaker audio cable between the speaker terminals on the Stand to the terminals' color. Before performing work spread cushion over the base area to lay the Display...
... diagram illustrates. The appearance of the unit may differ from being damaged. 3. Stand Screws Loosen the screws on Fixed board the unit and the speaker matching Screws Fixed board Screws polarity according to remove the Stand. 3 Replace the rear cover 7 Disconnect the AC power cord firstly. Connect the speaker audio cable between the speaker terminals on the Stand to the terminals' color. Before performing work spread cushion over the base area to lay the Display...
Operation Manual
Page 10
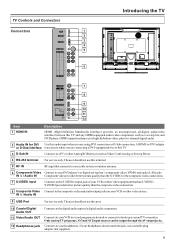
... match the jack, use a suitable plug adaptor (not supplied). 9 S VIDEO provides better picture quality than the S-VIDEO or the composite video connections. 7 S-VIDEO input Connects to the S-VIDEO output jack of a digital audio component. 11 Video/Audio OUT Connects to your DVD player's or digital set -top box and DVD player. If your VCR or other video equipment that connects to your cable system or outdoor antenna. 6 Component Video Connect to your VCR to record programs as a set -top box's component video (YPbPr) and audio (L/R) jacks. TV Controls and Connectors Connectors...
... match the jack, use a suitable plug adaptor (not supplied). 9 S VIDEO provides better picture quality than the S-VIDEO or the composite video connections. 7 S-VIDEO input Connects to the S-VIDEO output jack of a digital audio component. 11 Video/Audio OUT Connects to your DVD player's or digital set -top box and DVD player. If your VCR or other video equipment that connects to your cable system or outdoor antenna. 6 Component Video Connect to your VCR to record programs as a set -top box's component video (YPbPr) and audio (L/R) jacks. TV Controls and Connectors Connectors...
Operation Manual
Page 12
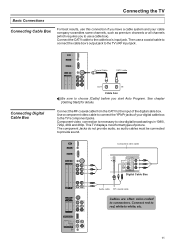
... connect the cable box's output jack to provide sound. See chapter [Getting Start] for details. This TV displays most format types of the digital cable box. The component Jacks do not provide audio, so audio cables must be connected to the TV's RF input jack. Connect the RF coaxial cable from the CATV to the input of picture. Coaxial Cable CATV cable Connecting Digital Cable Box OUT IN Cable box Be sure to choose [Cable] before you to use a cable box). Component video cable Digital Cable Box Audio cable RF coaxial cable Cables are often color-coded...
... connect the cable box's output jack to provide sound. See chapter [Getting Start] for details. This TV displays most format types of the digital cable box. The component Jacks do not provide audio, so audio cables must be connected to the TV's RF input jack. Connect the RF coaxial cable from the CATV to the input of picture. Coaxial Cable CATV cable Connecting Digital Cable Box OUT IN Cable box Be sure to choose [Cable] before you to use a cable box). Component video cable Digital Cable Box Audio cable RF coaxial cable Cables are often color-coded...
Operation Manual
Page 16
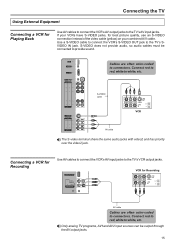
... analog TV programs, AV1and AV2 input sources can be connected to white, etc. VIDEO AV VIDEO VIDEO L L R R 2 1 Cables are often color-coded to connectors. Connecting the TV Using External Equipment Connecting a VCR for Playing Back Use AV cables to connect the VCR's AV output jacks to the TV's SVIDEO IN jack. If your VCRs have S-VIDEO jacks, for Recording S-VIDEO AV cable Cables are often color-coded to connectors. VCR for best picture quality, use an S-VIDEO connection instead of the video cable (yellow) on your combined A/V cable...
... analog TV programs, AV1and AV2 input sources can be connected to white, etc. VIDEO AV VIDEO VIDEO L L R R 2 1 Cables are often color-coded to connectors. Connecting the TV Using External Equipment Connecting a VCR for Playing Back Use AV cables to connect the VCR's AV output jacks to the TV's SVIDEO IN jack. If your VCRs have S-VIDEO jacks, for Recording S-VIDEO AV cable Cables are often color-coded to connectors. VCR for best picture quality, use an S-VIDEO connection instead of the video cable (yellow) on your combined A/V cable...
Operation Manual
Page 21
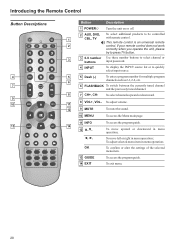
... work correctly when you operate the unit, please try to press TV button. 3 3 0-9 number Use these number buttons to select channel or buttons input password. 4 INPUT To display the INPUT source list or to be controlled 1 CBL, TV with remote control. To move left or right in menu operation; To move upward or downward in menu operation; This remote control is an universal remote 2 control. To confirm or alter the settings of the selected menu item. 13 GUIDE 14 EXIT To access the program guide. To adjust volume...
... work correctly when you operate the unit, please try to press TV button. 3 3 0-9 number Use these number buttons to select channel or buttons input password. 4 INPUT To display the INPUT source list or to be controlled 1 CBL, TV with remote control. To move left or right in menu operation; To move upward or downward in menu operation; This remote control is an universal remote 2 control. To confirm or alter the settings of the selected menu item. 13 GUIDE 14 EXIT To access the program guide. To adjust volume...
Operation Manual
Page 22
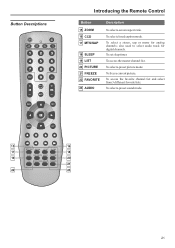
also used to select audio track for analog channels; To freeze current picture. To access the favorite channel list and select from 3 different favorite lists. To set sleep timer. To select a preset picture mode. To select closed caption mode. To select a preset sound mode. 15 16 MTS/SAP ZOOM CCD SLEEP 17 18 LIST FAVORITE AUDIO PICTURE 19 20 PIP P.POSITION SWAP FREEZE 21 22 23 21 Button Descriptions Introducing the Remote Control Button 15 ZOOM 16 CCD 17...
also used to select audio track for analog channels; To freeze current picture. To access the favorite channel list and select from 3 different favorite lists. To set sleep timer. To select a preset picture mode. To select closed caption mode. To select a preset sound mode. 15 16 MTS/SAP ZOOM CCD SLEEP 17 18 LIST FAVORITE AUDIO PICTURE 19 20 PIP P.POSITION SWAP FREEZE 21 22 23 21 Button Descriptions Introducing the Remote Control Button 15 ZOOM 16 CCD 17...
Operation Manual
Page 23
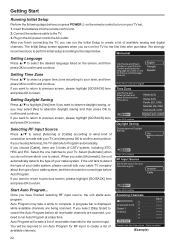
... Initial Setup to turn on your cable system, and then choose the correct type before Auto Program. Select [Automatic] when you press POWER on the remote control to create a list of your television signal. GO BACK Start Auto Program... If you want to what kind of Yes No connection is displayed while available channels are 3 kinds of your Time Zone. Press ▲/▼ to select [Antenna] or [Cable] according to use...
... Initial Setup to turn on your cable system, and then choose the correct type before Auto Program. Select [Automatic] when you press POWER on the remote control to create a list of your television signal. GO BACK Start Auto Program... If you want to what kind of Yes No connection is displayed while available channels are 3 kinds of your Time Zone. Press ▲/▼ to select [Antenna] or [Cable] according to use...
Operation Manual
Page 24
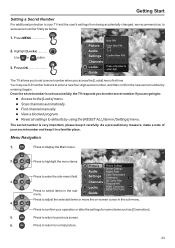
...-menu field. Use or button. 3. Once the secret number is very important, please keep it again. Press to highlight the menu items. Picture Picture Settings Screen Settings Audio Aspect Ratio Press to select items in a familiar place. Press to defaults by entering it in the submenu. Press MENU 2. The secret number is set a secret number when you are going to: = Access to the [Locks] menu. = Scan channels automatically. = Find channel manually. = View a blocked program. = Reset all settings...
...-menu field. Use or button. 3. Once the secret number is very important, please keep it again. Press to highlight the menu items. Picture Picture Settings Screen Settings Audio Aspect Ratio Press to select items in a familiar place. Press to defaults by entering it in the submenu. Press MENU 2. The secret number is set a secret number when you are going to: = Access to the [Locks] menu. = Scan channels automatically. = Find channel manually. = View a blocked program. = Reset all settings...
Operation Manual
Page 25
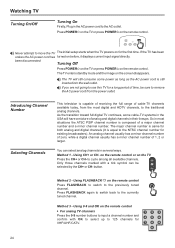
...). Using CH+ or CH- Press POWER on the TV or press POWER on before, it displays current input signal directly. If the TV has been unless the AC power cord has turned on the remote control. Introducing Channel Number Selecting Channels This television is equal to the traditional analog channels. button. been disconnected. The TV will have a mixture of analog and digital channels in serveral ways. As the transition toward full digital TV continues, some cable-TV systems...
...). Using CH+ or CH- Press POWER on the TV or press POWER on before, it displays current input signal directly. If the TV has been unless the AC power cord has turned on the remote control. Introducing Channel Number Selecting Channels This television is equal to the traditional analog channels. button. been disconnected. The TV will have a mixture of analog and digital channels in serveral ways. As the transition toward full digital TV continues, some cable-TV systems...
Operation Manual
Page 31
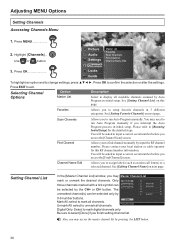
...- Adjusting MENU Options Setting Channels Accessing Channels Menu 1. Use or button. 3. You may need to a selected channel. The unmarked channel(s) can be selected only by input the RF channel number. See [Editing Channel Name] on next page. Done Press OK to finish Digital Only: Select to exit. Press OK Picture Audio Settings Master List Favorites Scan Channels Find Channel Channel Name Edit Channels Locks Guide To highlight an option and to change settings, press Press OK to [Running Initial Setup] for...
...- Adjusting MENU Options Setting Channels Accessing Channels Menu 1. Use or button. 3. You may need to a selected channel. The unmarked channel(s) can be selected only by input the RF channel number. See [Editing Channel Name] on next page. Done Press OK to finish Digital Only: Select to exit. Press OK Picture Audio Settings Master List Favorites Scan Channels Find Channel Channel Name Edit Channels Locks Guide To highlight an option and to change settings, press Press OK to [Running Initial Setup] for...
Operation Manual
Page 35
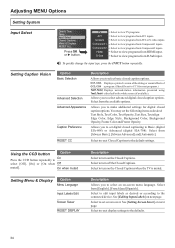
... quickly change the input type, press the INPUT button repeatedly. Select from D-Sub input. Select to reset display settings to view programs from AV1 inputs. Select to view programs from Component1 inputs. Select to the connected device. TV AV1 SV/AV2 Component1 Component2 HDMI D-Sub Select to view TV programs Select to the defaults. 34 Adjusting MENU Options Setting System Input Select Date & Time Timer Input Select Closed Captions Menu & Displays RESET ALL Press OK or ► button. CC1, CC2, Displays a printed version of the dialog or sound...
... quickly change the input type, press the INPUT button repeatedly. Select from D-Sub input. Select to reset display settings to view programs from AV1 inputs. Select to view programs from Component1 inputs. Select to the connected device. TV AV1 SV/AV2 Component1 Component2 HDMI D-Sub Select to view TV programs Select to the defaults. 34 Adjusting MENU Options Setting System Input Select Date & Time Timer Input Select Closed Captions Menu & Displays RESET ALL Press OK or ► button. CC1, CC2, Displays a printed version of the dialog or sound...
Operation Manual
Page 39
... one code for the equipment that you have selected a text option in the Setup setting and no sound Audio noise Possible Solutions ● Make sure the power cord is plugged in theAudio settings. ● Make sure the stereo mode is set to On in . ● Press POWER on the TV or on screen Good picture, no text is used near the TV. Remote Control Problem Remote control does not operate Remote control does not operate other...
... one code for the equipment that you have selected a text option in the Setup setting and no sound Audio noise Possible Solutions ● Make sure the power cord is plugged in theAudio settings. ● Make sure the stereo mode is set to On in . ● Press POWER on the TV or on screen Good picture, no text is used near the TV. Remote Control Problem Remote control does not operate Remote control does not operate other...
Operation Manual
Page 40
... hidden in the master channel list. TV cabinet creaks ● When the TV is unavailable in use the master password to set to repair a defective TV yourself. 39 Control buttons do not operate ● Disconnect the power cord and wait for a few seconds. You may be accessed ● If a setting option appears in gray, this indicates that the settings option is in current input mode. Please unlock them with the...
... hidden in the master channel list. TV cabinet creaks ● When the TV is unavailable in use the master password to set to repair a defective TV yourself. 39 Control buttons do not operate ● Disconnect the power cord and wait for a few seconds. You may be accessed ● If a setting option appears in gray, this indicates that the settings option is in current input mode. Please unlock them with the...
Operation Manual
Page 42
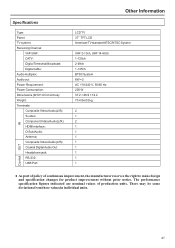
... prior notice. IN Specifications Type: Panel: TV system: Receiving Channel: VHF/UHF: CATV: Digital Terrestrial Broadcast: Digital cable: Audio multiplex: Audio out: Power Requirement: Power Consumption: Dimensions (W X H X D in individual units. 41 There may be some deviations from these values in inches): Weight: Terminals: Composite Video/Audio(L/R): S-video: Component Video/Audio(L/R): HDMI interface: D-Sub/Audio: Antenna: Composite Video/Audio(L/R): Coaxial Digital Audio Out: Headphone jack: RS-232: USB Port: Other Information LCD TV 37" TFT LCD American TV standard ATSC/NTSC System...
... prior notice. IN Specifications Type: Panel: TV system: Receiving Channel: VHF/UHF: CATV: Digital Terrestrial Broadcast: Digital cable: Audio multiplex: Audio out: Power Requirement: Power Consumption: Dimensions (W X H X D in individual units. 41 There may be some deviations from these values in inches): Weight: Terminals: Composite Video/Audio(L/R): S-video: Component Video/Audio(L/R): HDMI interface: D-Sub/Audio: Antenna: Composite Video/Audio(L/R): Coaxial Digital Audio Out: Headphone jack: RS-232: USB Port: Other Information LCD TV 37" TFT LCD American TV standard ATSC/NTSC System...
Operation Manual
Page 43
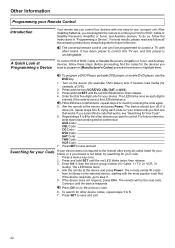
... red LED blinks twice; The universal remote control unit can program the remote to 4 and try searching for your brand, or if your VCR or DVD, Cable or Satellite Receivers, Amplifier or Tuner, and Auxiliary devices. Press CH- To control VCR or DVD, Cable or Satellite Receivers, Amplifier or Tuner, and Auxiliary devices, follow the instructions in [Manufacturer's Codes] and write them down each digit is not listed, try entering the code...
... red LED blinks twice; The universal remote control unit can program the remote to 4 and try searching for your brand, or if your VCR or DVD, Cable or Satellite Receivers, Amplifier or Tuner, and Auxiliary devices. Press CH- To control VCR or DVD, Cable or Satellite Receivers, Amplifier or Tuner, and Auxiliary devices, follow the instructions in [Manufacturer's Codes] and write them down each digit is not listed, try entering the code...


