Owners Manual
Page 1
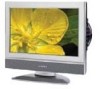
FPE1708DVS 17" HD FLAT PANEL LCD TV WITH BUILT-IN DVD PLAYER OWNER'S MANUAL FOR ASSISTANCE CALL CUSTOMER SERVICE AT 1-800-645-4994 OR VISIT US AT WWW. AUDIOVOX.COM 128-8327
FPE1708DVS 17" HD FLAT PANEL LCD TV WITH BUILT-IN DVD PLAYER OWNER'S MANUAL FOR ASSISTANCE CALL CUSTOMER SERVICE AT 1-800-645-4994 OR VISIT US AT WWW. AUDIOVOX.COM 128-8327
Owners Manual
Page 2
.... TECHNICIAN. These limits are designed to provide reasonable protection against harmful interference in the literature accompanying the appliance. Consult the dealer or an experienced radio/TV technician for Class II (Double Insulation) CAUTION INVISIBLE LASER RADIATION WHEN OPEN AND INTERLOCKS DEFEATED. FCC STATEMENTS The symbol for help. REPLACE ONLY WITH THE...
.... TECHNICIAN. These limits are designed to provide reasonable protection against harmful interference in the literature accompanying the appliance. Consult the dealer or an experienced radio/TV technician for Class II (Double Insulation) CAUTION INVISIBLE LASER RADIATION WHEN OPEN AND INTERLOCKS DEFEATED. FCC STATEMENTS The symbol for help. REPLACE ONLY WITH THE...
Owners Manual
Page 4
... SAFETY INSTRUCTIONS 2 MAINTENANCE 2 CONTENTS 3 QUICK INSTALLATION 4 DISC FORMATS 5 ACCESSORIES 6 GETTING STARTED 6 CONTROL REFERENCE GUIDE ........ 7 - 9 CONNECTIONS 10 - 17 Connecting a TV Antenna / Cable / Satellite 10 Connecting an A / V Device 10 Connecting Devices with a Composite (Yellow RCA-Type) Video Output .......... 11 Connecting Devices ...the wall 14 USING HEADPHONES 15 UNIT OPERATION 15 SOUND SYSTEM 15 TV SETUP 16 - 20 Picture menu 16 Audio menu 16 Time menu 17 Setup menu 17 - 18 Parental menu 18 - 19 TV menu 20 CD/DVD OPERATION 21 - 22 Playing a disc 21 ...
... SAFETY INSTRUCTIONS 2 MAINTENANCE 2 CONTENTS 3 QUICK INSTALLATION 4 DISC FORMATS 5 ACCESSORIES 6 GETTING STARTED 6 CONTROL REFERENCE GUIDE ........ 7 - 9 CONNECTIONS 10 - 17 Connecting a TV Antenna / Cable / Satellite 10 Connecting an A / V Device 10 Connecting Devices with a Composite (Yellow RCA-Type) Video Output .......... 11 Connecting Devices ...the wall 14 USING HEADPHONES 15 UNIT OPERATION 15 SOUND SYSTEM 15 TV SETUP 16 - 20 Picture menu 16 Audio menu 16 Time menu 17 Setup menu 17 - 18 Parental menu 18 - 19 TV menu 20 CD/DVD OPERATION 21 - 22 Playing a disc 21 ...
Owners Manual
Page 5
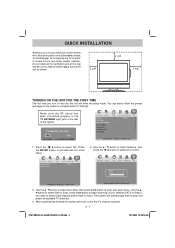
...jack on the rear of the system. 1. Make sure the RF aerial has been connected properly to complete basic TV settings. Use the / button to select Auto Scan, then press the button to water, or a heat source...on the unit, the unit will enter the setup mode. To avoid danger, do not expose the TV to enter auto scan menu. Do not obstruct the ventilation grid at the rear and be sure to... FIRST TIME The first time you need to select Cable System before Start to scan and preset all available TV channels. 4. Use the / button to select Start to Scan, press the button to begin scanning. (If you...
...jack on the rear of the system. 1. Make sure the RF aerial has been connected properly to complete basic TV settings. Use the / button to select Auto Scan, then press the button to water, or a heat source...on the unit, the unit will enter the setup mode. To avoid danger, do not expose the TV to enter auto scan menu. Do not obstruct the ventilation grid at the rear and be sure to... FIRST TIME The first time you need to select Cable System before Start to scan and preset all available TV channels. 4. Use the / button to select Start to Scan, press the button to begin scanning. (If you...
Owners Manual
Page 8
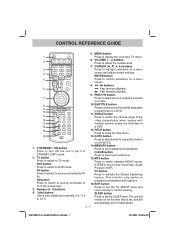
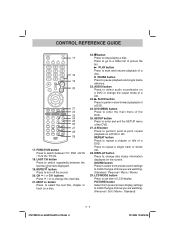
... to switch to show the Title menu. 13. TITLE button Press to TV mode. GOTO button Press to skip directly to a specific location on for the time...ON button Press to normal viewing. SUBTITLE button Press to display the on a disc. 10. EXIT button Press to exit the TV SETUP menu and return directly to turn ON the unit or put it in STANDBY (OFF) mode. 2. MENU button Press to ... certain settings. ANGLE button Press to select previous chapters or tracks on -screen TV menu. 6. CLEAR button Press to set predetermined playback. SLEEP button Press to clear input selections. 15.
... to switch to show the Title menu. 13. TITLE button Press to TV mode. GOTO button Press to skip directly to a specific location on for the time...ON button Press to normal viewing. SUBTITLE button Press to display the on a disc. 10. EXIT button Press to exit the TV SETUP menu and return directly to turn ON the unit or put it in STANDBY (OFF) mode. 2. MENU button Press to ... certain settings. ANGLE button Press to select previous chapters or tracks on -screen TV menu. 6. CLEAR button Press to set predetermined playback. SLEEP button Press to clear input selections. 15.
Owners Manual
Page 9
...to pause playback and single frame advance. 23. DISPLAY button Press to enter and exit the SETUP menu of the DVD. 26. CONTROL REFERENCE GUIDE 17. PICTURE button Select from preset sound settings to enter the main menu of the DVD. 27. DVD MENU button Press to match the type of... button Press to perform slow forward playback of LCD display. LAST CH button Press to match the type of a DVD. NEXT button Press to turn off the sound. 20. SOUND button Press to select from preset screen display settings to switch repeatedly between TV / DVD / AV IN / YUV IN / PC IN. ...
...to pause playback and single frame advance. 23. DISPLAY button Press to enter and exit the SETUP menu of the DVD. 26. CONTROL REFERENCE GUIDE 17. PICTURE button Select from preset sound settings to enter the main menu of the DVD. 27. DVD MENU button Press to match the type of... button Press to perform slow forward playback of LCD display. LAST CH button Press to match the type of a DVD. NEXT button Press to turn off the sound. 20. SOUND button Press to select from preset screen display settings to switch repeatedly between TV / DVD / AV IN / YUV IN / PC IN. ...
Owners Manual
Page 10
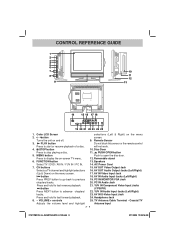
Color LCD Screen selections (Left & Right) on and off. 9. Turns the unit on the menu 2. MENU button...disc door. AV IN S-Video Input Jack 24. PUSH OPEN button Push to advance chapters/ tracks. AC Power Cord 7. TV Antenna Cable Terminal - PLAY button Do not block this sensor or the remote control Press to stop playing a disc. 5....IN Audio Input Jacks (Left/Right) 23. CONTROL REFERENCE GUIDE 14 15 16 17 18 19 20 21 22 23 24 25 1. Remote Sensor 3. Removable stand 6. FUNCTION button 13. Speakers Select TV / DVD / AV IN / YUV IN / PC IN. 14. AV ...
Color LCD Screen selections (Left & Right) on and off. 9. Turns the unit on the menu 2. MENU button...disc door. AV IN S-Video Input Jack 24. PUSH OPEN button Push to advance chapters/ tracks. AC Power Cord 7. TV Antenna Cable Terminal - PLAY button Do not block this sensor or the remote control Press to stop playing a disc. 5....IN Audio Input Jacks (Left/Right) 23. CONTROL REFERENCE GUIDE 14 15 16 17 18 19 20 21 22 23 24 25 1. Remote Sensor 3. Removable stand 6. FUNCTION button 13. Speakers Select TV / DVD / AV IN / YUV IN / PC IN. 14. AV ...
Owners Manual
Page 11
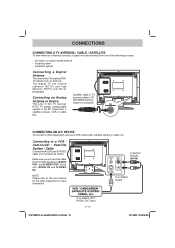
...VIDEO IN jack To S-VIDEO OUT / AUDIO OUT jacks E - 10 FPE1708DVS_UL_IB_MSTAR+MTK_E1-20.indd 10 3/11/2008 10:39:16 AM This digital TV can receive standard (SDTV) and high definition (HDTV) over the air broadcasts. Connecting to the user manual for the other equipment such as shown...A cable system - Make sure you connect the cable from an antenna. Satellite, cable or TV antenna cable to TV ANTENNA terminal (cable not included) CONNECTING AN A/V DEVICE To connect to this TV receives NTSC TV signals, analog cable signals or the RF output from one of the following sources: - CONNECTIONS...
...VIDEO IN jack To S-VIDEO OUT / AUDIO OUT jacks E - 10 FPE1708DVS_UL_IB_MSTAR+MTK_E1-20.indd 10 3/11/2008 10:39:16 AM This digital TV can receive standard (SDTV) and high definition (HDTV) over the air broadcasts. Connecting to the user manual for the other equipment such as shown...A cable system - Make sure you connect the cable from an antenna. Satellite, cable or TV antenna cable to TV ANTENNA terminal (cable not included) CONNECTING AN A/V DEVICE To connect to this TV receives NTSC TV signals, analog cable signals or the RF output from one of the following sources: - CONNECTIONS...
Owners Manual
Page 15
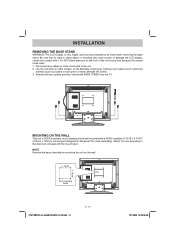
...on the front of foam) beneath the screen. 3. Disconnect any time because the screen could scratch or damage the LCD display, comes into contact with the mounting kit. Remove the four screws and then remove the BASE STAND from the... TV. FPE1708DVS_UL_IB_MSTAR+MTK_E1-20.indd 14 E - 14 3/11/2008 10:39:18 AM Lay the unit down on a flat ... or cords connected to place a soft cushioned material (such as a pillow or thick piece of the unit at -panel TVs (sold separately).
...on the front of foam) beneath the screen. 3. Disconnect any time because the screen could scratch or damage the LCD display, comes into contact with the mounting kit. Remove the four screws and then remove the BASE STAND from the... TV. FPE1708DVS_UL_IB_MSTAR+MTK_E1-20.indd 14 E - 14 3/11/2008 10:39:18 AM Lay the unit down on a flat ... or cords connected to place a soft cushioned material (such as a pillow or thick piece of the unit at -panel TVs (sold separately).
Owners Manual
Page 16
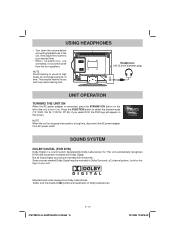
... your desired level. • When headphones are connected, no sound will come from the front speakers. Press the FUNCTION button to select the desired mode (TV / DVD / AV IN / YUV IN / PC IN). If you and may cause hearing loss. FPE1708DVS_UL_IB_MSTAR+MTK_E1-20.indd 15 E - 15 3/11/2008 10:39:18...
... your desired level. • When headphones are connected, no sound will come from the front speakers. Press the FUNCTION button to select the desired mode (TV / DVD / AV IN / YUV IN / PC IN). If you and may cause hearing loss. FPE1708DVS_UL_IB_MSTAR+MTK_E1-20.indd 15 E - 15 3/11/2008 10:39:18...
Owners Manual
Page 17
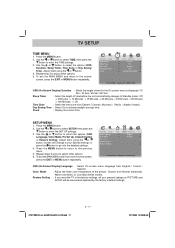
... return to select the options (Sound Mode, Bass, Treble, Balance, Audio Language or MTS). NOTE The SAP (Secondary Audio Programs) feature allows a TV station to your custom settings on bass, treble and balance. Adjust them using the or button (Screen will change to broadcast other information, which could... Audio Language : Select from preset sound settings (Standard, Music, Movie or Personal) to improve detail in darkness and the white become brighter. TV SETUP Note: Some setting items on the menu screen may not activate depending on what mode the unit is currently in...
... return to select the options (Sound Mode, Bass, Treble, Balance, Audio Language or MTS). NOTE The SAP (Secondary Audio Programs) feature allows a TV station to your custom settings on bass, treble and balance. Adjust them using the or button (Screen will change to broadcast other information, which could... Audio Language : Select from preset sound settings (Standard, Music, Movie or Personal) to improve detail in darkness and the white become brighter. TV SETUP Note: Some setting items on the menu screen may not activate depending on what mode the unit is currently in...
Owners Manual
Page 18
... of time for the On screen menu is displayed : 15 Sec / 30 Sec / 45 Sec / 60 Sec. FPE1708DVS_UL_IB_MSTAR+MTK_E1-20.indd 17 E - 17 3/11/2008 10:39:20 AM TV SETUP TIME MENU 1. Use the or button to activate daylight savings time. Repeat step 3 to adjust other options. 6. Day Saving Time :... the EXIT or MENU button repeatedly. Press the MENU button to return to enter the SET UP settings. 3. Restore Setting : If you reset the TV to the factory settings, all your desired setting); Use the or button to select SETUP, then press the button to the previous menu. 5. Repeat ...
... of time for the On screen menu is displayed : 15 Sec / 30 Sec / 45 Sec / 60 Sec. FPE1708DVS_UL_IB_MSTAR+MTK_E1-20.indd 17 E - 17 3/11/2008 10:39:20 AM TV SETUP TIME MENU 1. Use the or button to activate daylight savings time. Repeat step 3 to adjust other options. 6. Day Saving Time :... the EXIT or MENU button repeatedly. Press the MENU button to return to enter the SET UP settings. 3. Restore Setting : If you reset the TV to the factory settings, all your desired setting); Use the or button to select SETUP, then press the button to the previous menu. 5. Repeat ...
Owners Manual
Page 19
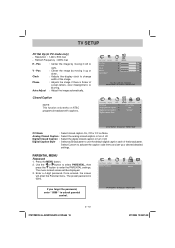
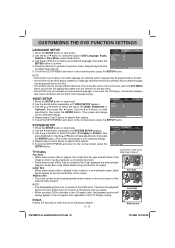
... : Select as Broadcaster to change width of the image. : Adjusts the image if there is 0000. The preset password is flicker of the broadcaster. TV SETUP PC Set Up (in PC mode only) - Pos : Center the image by moving it off . Use the or button to select PARENTAL, then press...
... : Select as Broadcaster to change width of the image. : Adjusts the image if there is 0000. The preset password is flicker of the broadcaster. TV SETUP PC Set Up (in PC mode only) - Pos : Center the image by moving it off . Use the or button to select PARENTAL, then press...
Owners Manual
Page 20
... or MENU button repeatedly. U.S. MPAA Ratings Canadian English Ratings N/A G PG PG-13 R NC-17 X : Not rated. : GENERAL AUDIENCES, Suitable for children under the age of 13. 16 ans+ : Not suitable for all ages. US : Set TV and MPAA ratings. TV-Y7 : Recommended for all ages. 8 ans+ : Not recommended for young children. 13 ans...
... or MENU button repeatedly. U.S. MPAA Ratings Canadian English Ratings N/A G PG PG-13 R NC-17 X : Not rated. : GENERAL AUDIENCES, Suitable for children under the age of 13. 16 ans+ : Not suitable for all ages. US : Set TV and MPAA ratings. TV-Y7 : Recommended for all ages. 8 ans+ : Not recommended for young children. 13 ans...
Owners Manual
Page 21
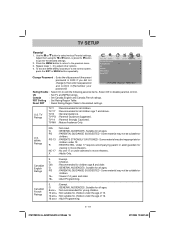
... select a channel. (Press the button to the next page. Press the button to adjust other options. 6. press again to return to enter the TV settings. 3. Press the ENTER button to shift between On / Off. (Select On to the normal screen, press the EXIT or MENU button repeatedly....E - 20 3/11/2008 10:39:21 AM To exit the MAIN MENU and return to skip the selected channel. TV SETUP TV MENU (For TV Mode Only) 1. Channel No. : Select a different TV channel. Press the MENU button. 2. The stations stored before are available. Channel Skip : Skip weak channels and the channels...
... select a channel. (Press the button to the next page. Press the button to adjust other options. 6. press again to return to enter the TV settings. 3. Press the ENTER button to shift between On / Off. (Select On to the normal screen, press the EXIT or MENU button repeatedly....E - 20 3/11/2008 10:39:21 AM To exit the MAIN MENU and return to skip the selected channel. TV SETUP TV MENU (For TV Mode Only) 1. Channel No. : Select a different TV channel. Press the MENU button. 2. The stations stored before are available. Channel Skip : Skip weak channels and the channels...
Owners Manual
Page 26
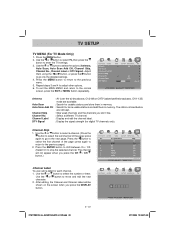
... the SETUP button. NOTE • Some DVDs may be programmed on a conventional screen, black Pan Scan bands appear at top and bottom of the TV Display setting. A prior language may be set to select your pre-selected language. If this is played in this mode on the disc. •...ratio regardless of screen). Use the or button to the factory default. Repeat steps 2 and 3 above to adjust other than the one you selected. TV Display Cut off when a wide-screen video image is played, this case, the DVD player automatically displays disc menus consistent with the disc's initial ...
... the SETUP button. NOTE • Some DVDs may be programmed on a conventional screen, black Pan Scan bands appear at top and bottom of the TV Display setting. A prior language may be set to select your pre-selected language. If this is played in this mode on the disc. •...ratio regardless of screen). Use the or button to the factory default. Repeat steps 2 and 3 above to adjust other than the one you selected. TV Display Cut off when a wide-screen video image is played, this case, the DVD player automatically displays disc menus consistent with the disc's initial ...

Owners Manual
Page 27
... the disc does not match the region number of picture. • Check the PICTURE MENU within the TV SETUP MENU. • Check to make sure the program you select DVD mode. • The system... to cool it to normal PLAY mode. • Fast-forward or fast-reverse is too hot. TV Bad Picture (snow, multiple images, distortion, blurry) • Check the location of the antenna and adjust... it again. CAUSE (AND REMEDY) • Check that TV mode is selected. • Try a new channel to check for possible station trouble. • Make sure the...
... the disc does not match the region number of picture. • Check the PICTURE MENU within the TV SETUP MENU. • Check to make sure the program you select DVD mode. • The system... to cool it to normal PLAY mode. • Fast-forward or fast-reverse is too hot. TV Bad Picture (snow, multiple images, distortion, blurry) • Check the location of the antenna and adjust... it again. CAUSE (AND REMEDY) • Check that TV mode is selected. • Try a new channel to check for possible station trouble. • Make sure the...


