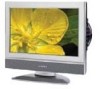
Owners Manual
Page 2
... STATEMENTS The symbol for help. accordance with arrowhead symbol, within an equilateral triangle, is located on or gradually heat the room and let the unit dry before turning the power on the rear of important operating and maintenance (servicing) instructions in the literature accompanying the appliance. Increase the separation between the unit and receiver. - Connect the unit into an outlet...
... STATEMENTS The symbol for help. accordance with arrowhead symbol, within an equilateral triangle, is located on or gradually heat the room and let the unit dry before turning the power on the rear of important operating and maintenance (servicing) instructions in the literature accompanying the appliance. Increase the separation between the unit and receiver. - Connect the unit into an outlet...
Owners Manual
Page 3
...maintaining the unit. • Wipe the unit with a dry soft cloth. Install in accordance with the manufacturer's instructions. 8) Do not install near any heat sources such as benzine or alcohol to qualified service personnel. A grounding type plug has two blades and a third grounding prong. Handle the disc by the ... the apparatus has been exposed to remove dust. The wide blade or the third prong is damaged, liquid has been spilled or objects have fallen into the unit can cause sound to turn the unit off and disconnect the AC power cord before playback. CLEANING THE UNIT ...
...maintaining the unit. • Wipe the unit with a dry soft cloth. Install in accordance with the manufacturer's instructions. 8) Do not install near any heat sources such as benzine or alcohol to qualified service personnel. A grounding type plug has two blades and a third grounding prong. Handle the disc by the ... the apparatus has been exposed to remove dust. The wide blade or the third prong is damaged, liquid has been spilled or objects have fallen into the unit can cause sound to turn the unit off and disconnect the AC power cord before playback. CLEANING THE UNIT ...
Owners Manual
Page 4
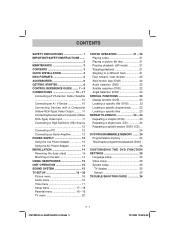
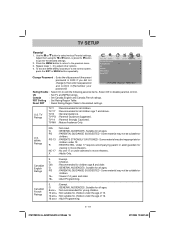
...-Type) Video Output .......... 11 Connecting Devices with a Composite (Yellow RCA-Type) Video Input 11 Connecting a High-Definition (HD) Source 12 Connecting a PC 12 Connecting an Audio Amplifier 13 POWER SUPPLY 13 Using the Car Power Adapter 13 Using the AC Power Adapter 13 INSTALLATION 14 Removing the base stand 14 Mounting on the wall 14 USING HEADPHONES 15 UNIT OPERATION 15 SOUND SYSTEM 15 TV SETUP 16 - 20 Picture menu 16 Audio menu 16 Time menu 17 Setup menu 17 - 18 Parental menu 18 - 19 TV menu 20 CD/DVD OPERATION 21 - 22 Playing...
...-Type) Video Output .......... 11 Connecting Devices with a Composite (Yellow RCA-Type) Video Input 11 Connecting a High-Definition (HD) Source 12 Connecting a PC 12 Connecting an Audio Amplifier 13 POWER SUPPLY 13 Using the Car Power Adapter 13 Using the AC Power Adapter 13 INSTALLATION 14 Removing the base stand 14 Mounting on the wall 14 USING HEADPHONES 15 UNIT OPERATION 15 SOUND SYSTEM 15 TV SETUP 16 - 20 Picture menu 16 Audio menu 16 Time menu 17 Setup menu 17 - 18 Parental menu 18 - 19 TV menu 20 CD/DVD OPERATION 21 - 22 Playing...
Owners Manual
Page 5
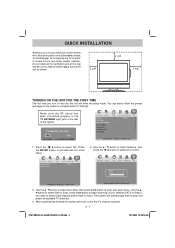
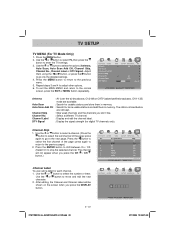
... TV ANTENNA input jack on Step 2, you need to select Cable System before Start to Scan). You can easily follow the prompt message on the screen to proceed with the initial setup. 2. Press the / button to enter auto scan menu. E - 4 FPE1708DVS_UL_IB_MSTAR+MTK_E1-20.indd 4 3/11/2008 10:39:14 AM Use the / button to select Auto Scan, then press the button to select Yes. lamp, candle, radiator). QUICK INSTALLATION...
... TV ANTENNA input jack on Step 2, you need to select Cable System before Start to Scan). You can easily follow the prompt message on the screen to proceed with the initial setup. 2. Press the / button to enter auto scan menu. E - 4 FPE1708DVS_UL_IB_MSTAR+MTK_E1-20.indd 4 3/11/2008 10:39:14 AM Use the / button to select Auto Scan, then press the button to select Yes. lamp, candle, radiator). QUICK INSTALLATION...
Owners Manual
Page 7
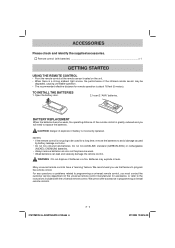
... must contact the customer service department of batteries in programming universal remote controls. WARNING : Do not dispose of the universal remote control manufacturer for a long time, remove the batteries to the instructions included with batteries) ...x 1 GETTING STARTED USING THE REMOTE CONTROL • Point the remote control at the remote sensor located on the unit. • When there is incorrectly replaced. For any questions or problems related to programming a universal remote control, you will need to program the remote control.
... must contact the customer service department of batteries in programming universal remote controls. WARNING : Do not dispose of the universal remote control manufacturer for a long time, remove the batteries to the instructions included with batteries) ...x 1 GETTING STARTED USING THE REMOTE CONTROL • Point the remote control at the remote sensor located on the unit. • When there is incorrectly replaced. For any questions or problems related to programming a universal remote control, you will need to program the remote control.
Owners Manual
Page 8
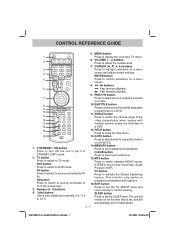
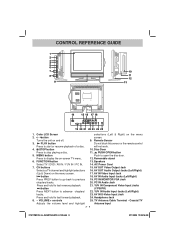
... with captions. 16. VOLUME (- / +) buttons Press to show the Title menu. 13. SUBTITLE button Press to display the on a DVD/CD. 14. CLEAR button Press to normal viewing. EXIT button Press to exit the TV SETUP menu and return directly to clear input selections. 15. CONTROL REFERENCE GUIDE 1. HD button Press to switch to source connected to TV mode. The unit will remain on a DVD. 12. TV button Press to switch to YUV IN (component). 3. ENTER button Press...
... with captions. 16. VOLUME (- / +) buttons Press to show the Title menu. 13. SUBTITLE button Press to display the on a DVD/CD. 14. CLEAR button Press to normal viewing. EXIT button Press to exit the TV SETUP menu and return directly to clear input selections. 15. CONTROL REFERENCE GUIDE 1. HD button Press to switch to source connected to TV mode. The unit will remain on a DVD. 12. TV button Press to switch to YUV IN (component). 3. ENTER button Press...
Owners Manual
Page 9
MUTE button Press to switch repeatedly between TV / DVD / AV IN / YUV IN / PC IN. 18. PLAY button Press to select audio soundtracks on the screen. LAST CH button Press to turn off the sound. 20. AUDIO button Press to start and resume playback of the DVD. 26. DVD MENU button Press to match the type of a CD. 24. Press to stop playing a disc. PICTURE button Select from preset sound settings to change the output mode of...
MUTE button Press to switch repeatedly between TV / DVD / AV IN / YUV IN / PC IN. 18. PLAY button Press to select audio soundtracks on the screen. LAST CH button Press to turn off the sound. 20. AUDIO button Press to start and resume playback of the DVD. 26. DVD MENU button Press to match the type of a CD. 24. Press to stop playing a disc. PICTURE button Select from preset sound settings to change the output mode of...
Owners Manual
Page 10
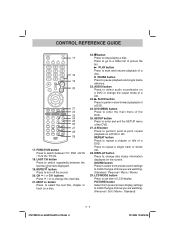
.... 4. Speakers Select TV / DVD / AV IN / YUV IN / PC IN. 14. VOLUME + controls 25. Removable stand 6. PLAY button Do not block this sensor or the remote control Press to display the on the menu screen. CONTROL REFERENCE GUIDE 14 15 16 17 18 19 20 21 22 23 24 25 1. button screen. PUSH OPEN button Push to advance chapters/ tracks. CH buttons Selects a TV channel and highlight selections (Up & Down) on -screen TV menu. 12. AV IN Video Input...
.... 4. Speakers Select TV / DVD / AV IN / YUV IN / PC IN. 14. VOLUME + controls 25. Removable stand 6. PLAY button Do not block this sensor or the remote control Press to display the on the menu screen. CONTROL REFERENCE GUIDE 14 15 16 17 18 19 20 21 22 23 24 25 1. button screen. PUSH OPEN button Push to advance chapters/ tracks. CH buttons Selects a TV channel and highlight selections (Up & Down) on -screen TV menu. 12. AV IN Video Input...
Owners Manual
Page 13
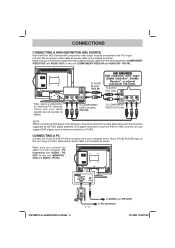
... support DVD players up to a maximum resolution of 1080i. Check with component video output must be connected to this unit (COMPONENT VIDEO IN and AUDIO IN - Make sure you connect the component video cable and audio cable from the computer (PC Connector and AUDIO - Connect the component video cable and audio cable (not included) as shown. PC OUT) to the YUV input. Make sure you connect the cable from the other equipment (COMPONENT VIDEO OUT and AUDIO OUT) to the television...
... support DVD players up to a maximum resolution of 1080i. Check with component video output must be connected to this unit (COMPONENT VIDEO IN and AUDIO IN - Make sure you connect the component video cable and audio cable from the computer (PC Connector and AUDIO - Connect the component video cable and audio cable (not included) as shown. PC OUT) to the YUV input. Make sure you connect the cable from the other equipment (COMPONENT VIDEO OUT and AUDIO OUT) to the television...
Owners Manual
Page 14
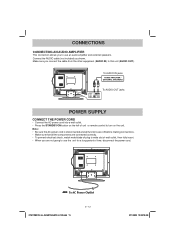
... that all the components are connected correctly. • To prevent electrical shock, match wide blade of plug to wide slot of time, disconnect the power cord. Make sure you connect the cable from the other equipment (AUDIO IN) to use an audio amplifier and external speakers. CONNECTIONS CONNECTING AN AUDIO AMPLIFIER This connection allows you to turn on the left of unit or remote control to use the unit...
... that all the components are connected correctly. • To prevent electrical shock, match wide blade of plug to wide slot of time, disconnect the power cord. Make sure you connect the cable from the other equipment (AUDIO IN) to use an audio amplifier and external speakers. CONNECTIONS CONNECTING AN AUDIO AMPLIFIER This connection allows you to turn on the left of unit or remote control to use the unit...
Owners Manual
Page 15
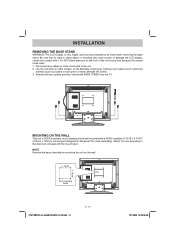
... a VESA-compliant 3 15/16" x 3 15/16" (100mm x 100mm) mounting kit designed for flat any cables or cords connected to the unit. 2. INSTALLATION REMOVING THE BASE STAND WARNING: The LCD Display is facing up, making sure to place a soft cushioned material (such as a pillow or thick piece of the unit at -panel TVs (sold separately). Lay the unit down on a flat all times...
... a VESA-compliant 3 15/16" x 3 15/16" (100mm x 100mm) mounting kit designed for flat any cables or cords connected to the unit. 2. INSTALLATION REMOVING THE BASE STAND WARNING: The LCD Display is facing up, making sure to place a soft cushioned material (such as a pillow or thick piece of the unit at -panel TVs (sold separately). Lay the unit down on a flat all times...
Owners Manual
Page 16
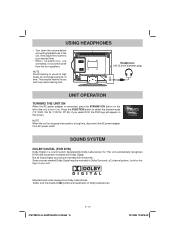
... volume before connecting headphones to the unit, then adjust the volume to your unit. Not all Dolby Digital sources are connected, no sound will appear on the left of Dolby Laboratories. Headphones (1/8" [3.5mm diameter plug) UNIT OPERATION TURNING THE UNIT ON When the AC power adapter is a sound system developed by Dolby Laboratories Inc. SOUND SYSTEM DOLBY DIGITAL (FOR DVD) Dolby Digital is connected, press the STANDBY/ON button on the screen...
... volume before connecting headphones to the unit, then adjust the volume to your unit. Not all Dolby Digital sources are connected, no sound will appear on the left of Dolby Laboratories. Headphones (1/8" [3.5mm diameter plug) UNIT OPERATION TURNING THE UNIT ON When the AC power adapter is a sound system developed by Dolby Laboratories Inc. SOUND SYSTEM DOLBY DIGITAL (FOR DVD) Dolby Digital is connected, press the STANDBY/ON button on the screen...
Owners Manual
Page 17
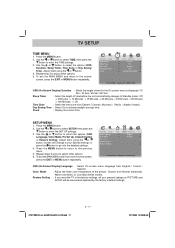
... the MENU button. 2. Sharpness : Adjust the sharpness level to match the type of the picture. Adjust them using the or button (Screen will change to adjust other information, which could be audio in /DVD mode). NOTE Experiment with different sound settings until you find the settings you are broadcasted.) MTS (Multi Channel Television Sound) : Select Stereo / SAP (Secondary Audio Program) / Mono. Sound Mode : Select from English / Spanish / French. (Available for digital channels if multiple audio languages...
... the MENU button. 2. Sharpness : Adjust the sharpness level to match the type of the picture. Adjust them using the or button (Screen will change to adjust other information, which could be audio in /DVD mode). NOTE Experiment with different sound settings until you find the settings you are broadcasted.) MTS (Multi Channel Television Sound) : Select Stereo / SAP (Secondary Audio Program) / Mono. Sound Mode : Select from English / Spanish / French. (Available for digital channels if multiple audio languages...
Owners Manual
Page 18
... from Normal (balanced), Warm (red white), or Cool (blue white) modes. Repeat steps 3 and 4 to your present settings on PICTURE and AUDIO will be erased and replaced by the factory's default settings. Sleep Timer : Select the length of time before the unit automatically changes to enter the SET UP settings. 3. Use the or button to select SETUP, then press the button to Standby mode : Off -> 5 Minutes -> 10 Minutes -> 15 Minutes -> 30 Minutes -> 60...
... from Normal (balanced), Warm (red white), or Cool (blue white) modes. Repeat steps 3 and 4 to your present settings on PICTURE and AUDIO will be erased and replaced by the factory's default settings. Sleep Timer : Select the length of time before the unit automatically changes to enter the SET UP settings. 3. Use the or button to select SETUP, then press the button to Standby mode : Off -> 5 Minutes -> 10 Minutes -> 15 Minutes -> 30 Minutes -> 60...
Owners Manual
Page 19
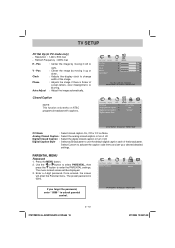
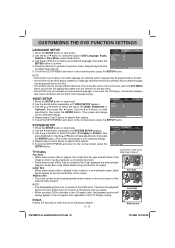
... button to activate the caption style items and set your desired detailed settings. PARENTAL MENU Password 1. The menu locked screen will enter the Parental menu. Once entered, the screen will be displayed. 3. Digital Caption Style : Select as Broadcaster to unlock parental control. Enter a 4-digit password. If you forget the password, enter " 8888 " to use the default digital caption style of screen letters, color misalignment, or blurring. : Adjust the image automatically. The preset password is flicker of the broadcaster. TV SETUP PC Set...
... button to activate the caption style items and set your desired detailed settings. PARENTAL MENU Password 1. The menu locked screen will enter the Parental menu. Once entered, the screen will be displayed. 3. Digital Caption Style : Select as Broadcaster to unlock parental control. Enter a 4-digit password. If you forget the password, enter " 8888 " to use the default digital caption style of screen letters, color misalignment, or blurring. : Adjust the image automatically. The preset password is flicker of the broadcaster. TV SETUP PC Set...
Owners Manual
Page 20
.... : PARENTAL GUIDANCE SUGGESTED - TV SETUP Parental 1. Use the or button to the default settings. Press the MENU button to return to the previous menu. 3. US : Set TV and MPAA ratings. Canada : Set Canada English and Canada French ratings. RRT Setting : Set Rating Region Table. TV Ratings TV-Y : Recommended for all ages. 8 ans+ : Not recommended for young children. 13 ans+ : Not suitable for children under 13. : RESTRICTED, Under 17 requires accompanying parent...
.... : PARENTAL GUIDANCE SUGGESTED - TV SETUP Parental 1. Use the or button to the default settings. Press the MENU button to return to the previous menu. 3. US : Set TV and MPAA ratings. Canada : Set Canada English and Canada French ratings. RRT Setting : Set Rating Region Table. TV Ratings TV-Y : Recommended for all ages. 8 ans+ : Not recommended for young children. 13 ans+ : Not suitable for children under 13. : RESTRICTED, Under 17 requires accompanying parent...
Owners Manual
Page 21
... stored before are available. TV SETUP TV MENU (For TV Mode Only) 1. Press the MENU button. 2. To exit the MAIN MENU and return to enter the TV settings. 3. Antenna : Air (over-the-air broadcasts, Ch 2-69) or CATV (cable/satellite broadcasts, CH 1-135) mode are still kept. Auto Scan : Search for digital TV channels only). Channel No. : Select a different TV channel. Use the or button to select a channel. (Press the button to the next page. Press...
... stored before are available. TV SETUP TV MENU (For TV Mode Only) 1. Press the MENU button. 2. To exit the MAIN MENU and return to enter the TV settings. 3. Antenna : Air (over-the-air broadcasts, Ch 2-69) or CATV (cable/satellite broadcasts, CH 1-135) mode are still kept. Auto Scan : Search for digital TV channels only). Channel No. : Select a different TV channel. Use the or button to select a channel. (Press the button to the next page. Press...

Owners Manual
Page 22
... can use the GOTO function or use the number buttons (remote control only) to jump directly to play JPG files recorded on the unit. 2. Press the PLAY button to turn on CD-R and CD-RW discs. 1. Press the STANDBY/ON button to start playing the DVD, press the PLAY button. Push the disc tray to quickly select any image. • Press the ANGLE button on the screen during...
... can use the GOTO function or use the number buttons (remote control only) to jump directly to play JPG files recorded on the unit. 2. Press the PLAY button to turn on CD-R and CD-RW discs. 1. Press the STANDBY/ON button to start playing the DVD, press the PLAY button. Push the disc tray to quickly select any image. • Press the ANGLE button on the screen during...
Owners Manual
Page 26
... be viewed on a conventional screen, black Pan Scan bands appear at top and bottom of screen). If this mode on a conventional screen. • Some wide-screen DVDs that do not permit Pan Scan playback are automatically played in a language other options. 5. Press the SETUP button in stop mode. 2. Use the or button to make adjustments, then press the ENTER button. (The screen will change subtitle selections only via the disc menu. TV Display...
... be viewed on a conventional screen, black Pan Scan bands appear at top and bottom of screen). If this mode on a conventional screen. • Some wide-screen DVDs that do not permit Pan Scan playback are automatically played in a language other options. 5. Press the SETUP button in stop mode. 2. Use the or button to make adjustments, then press the ENTER button. (The screen will change subtitle selections only via the disc menu. TV Display...

Owners Manual
Page 27
... picture or sound. The remote does not function. Colored patches of this unit. CAUSE (AND REMEDY) • Check that are no disc inside the unit due to cool it if necessary. • Make sure the antenna cable is working properly. • Make sure all input cables are dirty. The disc does not play mode. • Make sure the AUDIO / VIDEO output and AV IN input connections...
... picture or sound. The remote does not function. Colored patches of this unit. CAUSE (AND REMEDY) • Check that are no disc inside the unit due to cool it if necessary. • Make sure the antenna cable is working properly. • Make sure all input cables are dirty. The disc does not play mode. • Make sure the AUDIO / VIDEO output and AV IN input connections...


