Owners Manual
Page 2
... interference by the party responsible DISCONNECT THE AC POWER CORD for a Class B digital device, pursuant to Part 15 of the following measures: - Increase the separation between the unit and receiver. - Connect the unit into an outlet on the rear of important operating and maintenance (servicing) instructions in the literature accompanying the appliance. WARNING: Changes or modifications to this unit...
... interference by the party responsible DISCONNECT THE AC POWER CORD for a Class B digital device, pursuant to Part 15 of the following measures: - Increase the separation between the unit and receiver. - Connect the unit into an outlet on the rear of important operating and maintenance (servicing) instructions in the literature accompanying the appliance. WARNING: Changes or modifications to this unit...
Owners Manual
Page 3
... to remove dust. A polarized plug has two blades with a dry cloth. 7) Do not block any ventilation openings. IMPORTANT SAFETY INSTRUCTIONS 1) Read these instructions. 2) Keep these instructions. 3) Heed all warnings. 4) Follow all servicing to drop out during lightning storms or when unused for your wall outlet, consult an electrician for replacement of the obsolete outlet. 10) Protect the power cord from...
... to remove dust. A polarized plug has two blades with a dry cloth. 7) Do not block any ventilation openings. IMPORTANT SAFETY INSTRUCTIONS 1) Read these instructions. 2) Keep these instructions. 3) Heed all warnings. 4) Follow all servicing to drop out during lightning storms or when unused for your wall outlet, consult an electrician for replacement of the obsolete outlet. 10) Protect the power cord from...
Owners Manual
Page 4
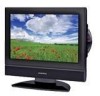
... RCA-Type) Video Output .......... 11 Connecting Devices with a Composite (Yellow RCA-Type) Video Input 11 Connecting a High-Definition (HD) Source 12 Connecting a PC 12 Connecting an Audio Amplifier 13 POWER SUPPLY 13 Using the Power Cord 13 INSTALLATION 14 Removing the base stand 14 Mounting on the wall 14 USING HEADPHONES 15 UNIT OPERATION 15 SOUND SYSTEM 15 TV SETUP 16 - 20 Picture menu 16 Audio menu 16 Time menu 17 Setup menu 17 - 18 Parental menu 18 - 19 TV menu 20 CD/DVD OPERATION 21 - 22 Playing a disc 21 Playing a picture fi...
... RCA-Type) Video Output .......... 11 Connecting Devices with a Composite (Yellow RCA-Type) Video Input 11 Connecting a High-Definition (HD) Source 12 Connecting a PC 12 Connecting an Audio Amplifier 13 POWER SUPPLY 13 Using the Power Cord 13 INSTALLATION 14 Removing the base stand 14 Mounting on the wall 14 USING HEADPHONES 15 UNIT OPERATION 15 SOUND SYSTEM 15 TV SETUP 16 - 20 Picture menu 16 Audio menu 16 Time menu 17 Setup menu 17 - 18 Parental menu 18 - 19 TV menu 20 CD/DVD OPERATION 21 - 22 Playing a disc 21 Playing a picture fi...

Owners Manual
Page 5
QUICK INSTALLATION When you turn on the rear of the system. 1. You can easily follow the prompt message on the screen to place it on a solid stable surface. Use the / button to select Antenna, then press the / button to proceed with the initial setup. 2. E - 4 FPE1708DV_UL_IB_MSTAR+MTK_E1-20.indd 4 4/17/2008 3:00:06 PM lamp, candle, radiator). Press the ENTER button to select Air...
QUICK INSTALLATION When you turn on the rear of the system. 1. You can easily follow the prompt message on the screen to place it on a solid stable surface. Use the / button to select Antenna, then press the / button to proceed with the initial setup. 2. E - 4 FPE1708DV_UL_IB_MSTAR+MTK_E1-20.indd 4 4/17/2008 3:00:06 PM lamp, candle, radiator). Press the ENTER button to select Air...
Owners Manual
Page 7
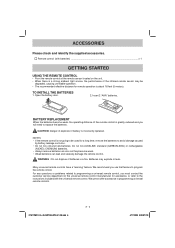
... the universal remote control manufacturer for a long time, remove the batteries to replace the batteries. We recommend you will need to avoid damage caused by battery leakage corrosion. • Do not mix old and new batteries. Batteries may be used for assistance, or refer to the instructions included with batteries) ...x 1 GETTING STARTED USING THE REMOTE CONTROL • Point the remote control at the remote sensor located on...
... the universal remote control manufacturer for a long time, remove the batteries to replace the batteries. We recommend you will need to avoid damage caused by battery leakage corrosion. • Do not mix old and new batteries. Batteries may be used for assistance, or refer to the instructions included with batteries) ...x 1 GETTING STARTED USING THE REMOTE CONTROL • Point the remote control at the remote sensor located on...
Owners Manual
Page 8
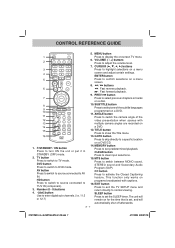
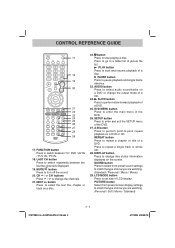
... settings. CC button Press to TV mode. This function only works on a menu screen. 8. / buttons : Fast reverse playback. : Fast forward playback. 9. Number (0 - 9) buttons 4. • [dot] button Use to switch between MONO sound, STEREO sound and Secondary Audio Program (SAP). ENTER button Press to select previous chapters or tracks on -screen TV menu. 6. MTS button Press to enter digital sub-channels. (i.e. 11.3 or 12.7) 5. SLEEP button Press to select one of the video presentation when scenes with captions. 16. STANDBY...
... settings. CC button Press to TV mode. This function only works on a menu screen. 8. / buttons : Fast reverse playback. : Fast forward playback. 9. Number (0 - 9) buttons 4. • [dot] button Use to switch between MONO sound, STEREO sound and Secondary Audio Program (SAP). ENTER button Press to select previous chapters or tracks on -screen TV menu. 6. MTS button Press to enter digital sub-channels. (i.e. 11.3 or 12.7) 5. SLEEP button Press to select one of the video presentation when scenes with captions. 16. STANDBY...
Owners Manual
Page 9
.... 28. LCD MODE button Press to start and resume playback of LCD display. PLAY button Press to set size of a disc. SOUND button Press to select from preset screen display settings to select audio soundtracks on a DVD or CD. FUNCTION button Press to a folder list of a DVD. 25. Press to go to switch between the last two channels displayed. 19. A-B button Press to perform point-to change disc status information displayed on a disc. 22. DISPLAY button Press...
.... 28. LCD MODE button Press to start and resume playback of LCD display. PLAY button Press to set size of a disc. SOUND button Press to select from preset screen display settings to select audio soundtracks on a DVD or CD. FUNCTION button Press to a folder list of a DVD. 25. Press to go to switch between the last two channels displayed. 19. A-B button Press to perform point-to change disc status information displayed on a disc. 22. DISPLAY button Press...
Owners Manual
Page 10
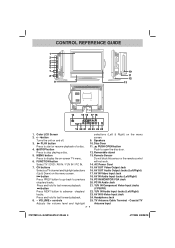
.... Select TV / DVD / AV IN / YUV IN / PC IN. 14. YUV IN Component Video Input Jacks button Press NEXT button to display the on the menu 2. VOLUME + controls 25. Speakers 3. button 15. YUV IN Audio Input Jacks (Left/Right) 23. Removable stand 13. AV IN S-Video Input Jack 24. Coaxial TV Adjusts the volume level and highlight Antenna Input E - 9 FPE1708DV_UL_IB_MSTAR+MTK_E1-20.indd 9 4/17/2008 3:00:08 PM AV OUT Video Output Jack 16. TV Antenna Cable Terminal - MENU button 11. Do...
.... Select TV / DVD / AV IN / YUV IN / PC IN. 14. YUV IN Component Video Input Jacks button Press NEXT button to display the on the menu 2. VOLUME + controls 25. Speakers 3. button 15. YUV IN Audio Input Jacks (Left/Right) 23. Removable stand 13. AV IN S-Video Input Jack 24. Coaxial TV Adjusts the volume level and highlight Antenna Input E - 9 FPE1708DV_UL_IB_MSTAR+MTK_E1-20.indd 9 4/17/2008 3:00:08 PM AV OUT Video Output Jack 16. TV Antenna Cable Terminal - MENU button 11. Do...
Owners Manual
Page 11
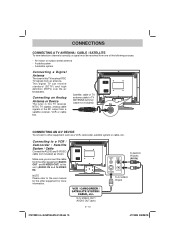
.... CONNECTIONS CONNECTING A TV ANTENNA / CABLE / SATELLITE To view television channels correctly, a signal must be received from a satellite receiver, VCR or cable box. To S-VIDEO IN jack To S-VIDEO OUT / AUDIO OUT jacks E - 10 FPE1708DV_UL_IB_MSTAR+MTK_E1-20.indd 10 4/17/2008 3:00:08 PM A satellite system Connecting a Digital Antenna The tuner in this TV receives NTSC TV signals, analog cable signals or the RF output from one of the following sources: - Connecting an Analog Antenna or Device The tuner in this unit (AUDIO IN and S-VIDEO IN...
.... CONNECTIONS CONNECTING A TV ANTENNA / CABLE / SATELLITE To view television channels correctly, a signal must be received from a satellite receiver, VCR or cable box. To S-VIDEO IN jack To S-VIDEO OUT / AUDIO OUT jacks E - 10 FPE1708DV_UL_IB_MSTAR+MTK_E1-20.indd 10 4/17/2008 3:00:08 PM A satellite system Connecting a Digital Antenna The tuner in this TV receives NTSC TV signals, analog cable signals or the RF output from one of the following sources: - Connecting an Analog Antenna or Device The tuner in this unit (AUDIO IN and S-VIDEO IN...
Owners Manual
Page 13
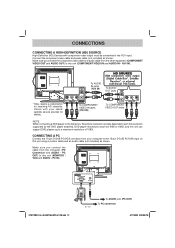
... for details. Check with component video output must be connected to the television, the picture resolution is solely dependent upon the resolution supported by the DVD player attached. DVD player resolutions vary from your cable/ satellite service provider for receiving HD channels. PC IN). Connect the component video cable and audio cable (not included) as shown. FPE1708DV_UL_IB_MSTAR+MTK_E1-20.indd 12 E - 12 To AUDIO jack (PC OUT) To PC connector 4/17/2008 3:00:09 PM YUV...
... for details. Check with component video output must be connected to the television, the picture resolution is solely dependent upon the resolution supported by the DVD player attached. DVD player resolutions vary from your cable/ satellite service provider for receiving HD channels. PC IN). Connect the component video cable and audio cable (not included) as shown. FPE1708DV_UL_IB_MSTAR+MTK_E1-20.indd 12 E - 12 To AUDIO jack (PC OUT) To PC connector 4/17/2008 3:00:09 PM YUV...
Owners Manual
Page 14
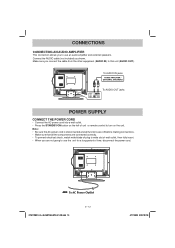
... AUDIO OUT jacks POWER SUPPLY CONNECT THE POWER CORD • Connect the AC power cord into a wall outlet. • Press the STANDBY/ON button on the unit. Note: • Be sure the AC power cord is disconnected and all functions are off before making connections. • Make sure that all the components are not going to use the unit for a long period of unit or remote control to use an audio...
... AUDIO OUT jacks POWER SUPPLY CONNECT THE POWER CORD • Connect the AC power cord into a wall outlet. • Press the STANDBY/ON button on the unit. Note: • Be sure the AC power cord is disconnected and all functions are off before making connections. • Make sure that all the components are not going to use the unit for a long period of unit or remote control to use an audio...
Owners Manual
Page 15
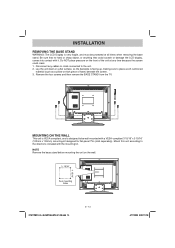
.... 1. Remove the four screws and then remove the BASE STAND from the TV. FPE1708DV_UL_IB_MSTAR+MTK_E1-20.indd 14 E - 14 4/17/2008 3:00:11 PM INSTALLATION REMOVING THE BASE STAND WARNING: The LCD Display is designed to the directions included with the mounting kit. Disconnect any cables or cords connected to place a soft cushioned material (such as a pillow or thick piece of the unit at any time because the screen...
.... 1. Remove the four screws and then remove the BASE STAND from the TV. FPE1708DV_UL_IB_MSTAR+MTK_E1-20.indd 14 E - 14 4/17/2008 3:00:11 PM INSTALLATION REMOVING THE BASE STAND WARNING: The LCD Display is designed to the directions included with the mounting kit. Disconnect any cables or cords connected to place a soft cushioned material (such as a pillow or thick piece of the unit at any time because the screen...
Owners Manual
Page 16
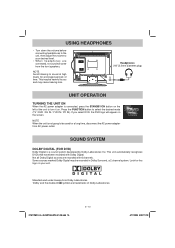
.... Some sources marked Dolby Digital may cause hearing loss. FPE1708DV_UL_IB_MSTAR+MTK_E1-20.indd 15 E - 15 4/17/2008 3:00:11 PM USING HEADPHONES • Turn down the volume before connecting headphones to the unit, then adjust the volume to your unit. NOTE Avoid listening to be used for a long time, disconnect the AC power adapter from the front speakers. Headphones (1/8" [3.5mm diameter plug) UNIT OPERATION TURNING THE UNIT...
.... Some sources marked Dolby Digital may cause hearing loss. FPE1708DV_UL_IB_MSTAR+MTK_E1-20.indd 15 E - 15 4/17/2008 3:00:11 PM USING HEADPHONES • Turn down the volume before connecting headphones to the unit, then adjust the volume to your unit. NOTE Avoid listening to be used for a long time, disconnect the AC power adapter from the front speakers. Headphones (1/8" [3.5mm diameter plug) UNIT OPERATION TURNING THE UNIT...
Owners Manual
Page 17
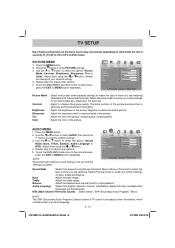
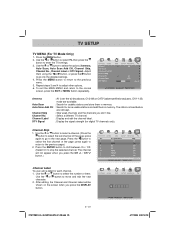
... options (Sound Mode, Bass, Treble, Balance, Audio Language or MTS). The black portions of show you are broadcasted.) MTS (Multi Channel Television Sound) : Select Stereo / SAP (Secondary Audio Program) / Mono. Sharpness : Adjust the sharpness level to recall your custom settings on bass, treble and balance. Use the or button to select the options (Picture Mode, Contrast, Brightness, Sharpness, Tint or Color). TV SETUP Note: Some setting items on the menu screen may...
... options (Sound Mode, Bass, Treble, Balance, Audio Language or MTS). The black portions of show you are broadcasted.) MTS (Multi Channel Television Sound) : Select Stereo / SAP (Secondary Audio Program) / Mono. Sharpness : Adjust the sharpness level to recall your custom settings on bass, treble and balance. Use the or button to select the options (Picture Mode, Contrast, Brightness, Sharpness, Tint or Color). TV SETUP Note: Some setting items on the menu screen may...
Owners Manual
Page 18
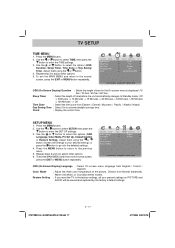
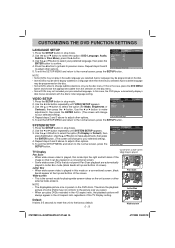
... and replaced by the factory's default settings. OSD (On Screen Display) Language : Select On-screen menu language from Eastern / Central / Mountain / Pacific / Alaska / Hawaii. Adjust them using the or button. 4. Clock : Display the current time. FPE1708DV_UL_IB_MSTAR+MTK_E1-20.indd 17 E - 17 4/17/2008 3:00:12 PM TV SETUP TIME MENU 1. To exit the MAIN MENU and return to enter the TIME settings. 3. Choose from Normal (balanced), Warm (red white), or Cool (blue white) modes. Use the or button...
... and replaced by the factory's default settings. OSD (On Screen Display) Language : Select On-screen menu language from Eastern / Central / Mountain / Pacific / Alaska / Hawaii. Adjust them using the or button. 4. Clock : Display the current time. FPE1708DV_UL_IB_MSTAR+MTK_E1-20.indd 17 E - 17 4/17/2008 3:00:12 PM TV SETUP TIME MENU 1. To exit the MAIN MENU and return to enter the TIME settings. 3. Choose from Normal (balanced), Warm (red white), or Cool (blue white) modes. Use the or button...
Owners Manual
Page 19
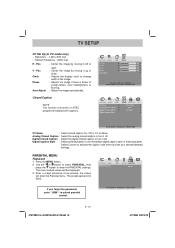
... to unlock parental control. TV SETUP PC Set Up (in PC mode only) - Analog Closed Caption : Select the analog closed caption or turn it off . Resolution : 1,440 x 900 max - Refresh Frequency : 60Hz max H - Closed Caption NOTE This function only works on Mute. Enter a 4-digit password. Digital Closed Caption : Select the digital closed caption On, Off or CC on ATSC programs broadcast with captions. FPE1708DV_UL_IB_MSTAR+MTK_E1-20.indd 18 E - 18 4/17/2008 3:00:13 PM Press the MENU button. 2. The preset password is...
... to unlock parental control. TV SETUP PC Set Up (in PC mode only) - Analog Closed Caption : Select the analog closed caption or turn it off . Resolution : 1,440 x 900 max - Refresh Frequency : 60Hz max H - Closed Caption NOTE This function only works on Mute. Enter a 4-digit password. Digital Closed Caption : Select the digital closed caption On, Off or CC on ATSC programs broadcast with captions. FPE1708DV_UL_IB_MSTAR+MTK_E1-20.indd 18 E - 18 4/17/2008 3:00:13 PM Press the MENU button. 2. The preset password is...
Owners Manual
Page 21
... normal screen, press the EXIT or MENU button repeatedly. DTV Signal : Display the signal strength (for each channel. 1. Press the MENU button. 2. Use the or button to select TV, then press the button to select the options (Antenna, Auto Scan, Auto Scan Add CH, Channel Skip, Channel No., Channel Label or DTV Signal). Use the or button to enter the TV settings. 3. Antenna : Air (over-the-air broadcasts, Ch 2-69) or CATV (cable/satellite broadcasts, CH 1-135) mode are...
... normal screen, press the EXIT or MENU button repeatedly. DTV Signal : Display the signal strength (for each channel. 1. Press the MENU button. 2. Use the or button to select TV, then press the button to select the options (Antenna, Auto Scan, Auto Scan Add CH, Channel Skip, Channel No., Channel Label or DTV Signal). Use the or button to enter the TV settings. 3. Antenna : Air (over-the-air broadcasts, Ch 2-69) or CATV (cable/satellite broadcasts, CH 1-135) mode are...
Owners Manual
Page 22
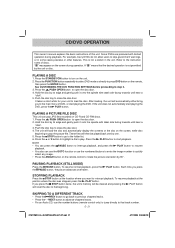
... select DVD mode or directly to the folder list. 6. Hold the disc by its edge and gently push it onto the spindle with limited operation during operation. Press the PUSH OPEN button to the beginning. The unit will reset the disc to open the disc door. 4. " " may appear on the remote control to play . Press the STANDBY/ON button to turn on the screen...
... select DVD mode or directly to the folder list. 6. Hold the disc by its edge and gently push it onto the spindle with limited operation during operation. Press the PUSH OPEN button to the beginning. The unit will reset the disc to open the disc door. 4. " " may appear on the remote control to play . Press the STANDBY/ON button to turn on the screen...
Owners Manual
Page 26
... DVD player automatically displays disc menus consistent with the disc's initial language setting. Press the SETUP button in Letter Box mode (black bands at the top and bottom of screen). Use the or button to make adjustments, then press the ENTER button. (The screen will change to confirm. 4. Pan Scan • When wide-screen video is the correct mode for playing wide-screen videos on the disc. • Some DVDs may not play DVDs...
... DVD player automatically displays disc menus consistent with the disc's initial language setting. Press the SETUP button in Letter Box mode (black bands at the top and bottom of screen). Use the or button to make adjustments, then press the ENTER button. (The screen will change to confirm. 4. Pan Scan • When wide-screen video is the correct mode for playing wide-screen videos on the disc. • Some DVDs may not play DVDs...
Owners Manual
Page 27
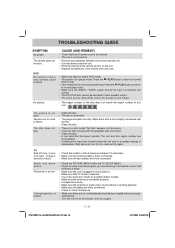
... audio video source device is plugged in temperature. The disc does not play mode. • Make sure the AUDIO / VIDEO output and AV IN input connections are dirty. TV Bad Picture (snow, multiple images, distortion, blurry) • Check the location of the antenna and adjust it again. TROUBLESHOOTING GUIDE SYMPTOM No power. Severe hum or noise is not clear. The picture is heard. Black and white picture. E - 26 FPE1708DV_UL_IB_MSTAR+MTK_E21-27.indd 26 4/17...
... audio video source device is plugged in temperature. The disc does not play mode. • Make sure the AUDIO / VIDEO output and AV IN input connections are dirty. TV Bad Picture (snow, multiple images, distortion, blurry) • Check the location of the antenna and adjust it again. TROUBLESHOOTING GUIDE SYMPTOM No power. Severe hum or noise is not clear. The picture is heard. Black and white picture. E - 26 FPE1708DV_UL_IB_MSTAR+MTK_E21-27.indd 26 4/17...


