
Owners Manual
Page 1
FPE1708 17" HD FLAT PANEL LCD TV OWNER'S MANUAL FOR ASSISTANCE CALL CUSTOMER SERVICE AT 1-800-645-4994 OR VISIT US AT WWW. AUDIOVOX.COM 128-8317
FPE1708 17" HD FLAT PANEL LCD TV OWNER'S MANUAL FOR ASSISTANCE CALL CUSTOMER SERVICE AT 1-800-645-4994 OR VISIT US AT WWW. AUDIOVOX.COM 128-8317
Owners Manual
Page 2
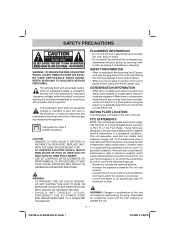
... the appliance. Let the unit stand for a long period of important operating and maintenance (servicing) instructions in a residential installation. If this unit not expressly approved by covering it and create a hazard. • When you are designed to the presence of time, disconnect the AC power cord. Reorient or relocate the receiving antenna. - The symbol for help. FCC STATEMENTS NOTE: This unit...
... the appliance. Let the unit stand for a long period of important operating and maintenance (servicing) instructions in a residential installation. If this unit not expressly approved by covering it and create a hazard. • When you are designed to the presence of time, disconnect the AC power cord. Reorient or relocate the receiving antenna. - The symbol for help. FCC STATEMENTS NOTE: This unit...
Owners Manual
Page 3
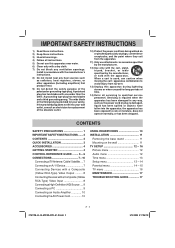
... by the manufacturer. 12) Use only with the cart, stand, tripod, bracket, or table specified by the manufacturer, or sold with a Composite (Yellow RCA-Type) Video Input 8 ConnectingaHigh-Definition(HD)Source .....9 Connecting a PC 9 Connecting an Audio Amplifier 10 Connecting the AC Power Cord 10 USING HEADPHONES 10 INSTALLATION 11 Removing the base stand 11 Mounting on or pinched particularly at plugs, convenience receptacles, and the...
... by the manufacturer. 12) Use only with the cart, stand, tripod, bracket, or table specified by the manufacturer, or sold with a Composite (Yellow RCA-Type) Video Input 8 ConnectingaHigh-Definition(HD)Source .....9 Connecting a PC 9 Connecting an Audio Amplifier 10 Connecting the AC Power Cord 10 USING HEADPHONES 10 INSTALLATION 11 Removing the base stand 11 Mounting on or pinched particularly at plugs, convenience receptacles, and the...
Owners Manual
Page 4
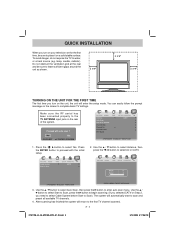
... a heat source (e.g. Press the / button to enter auto scan menu. QUICK INSTALLATION When you turn on the screen to complete basic TV settings. Use the / button to select Auto Scan, then press the button to select Yes. The system will return to proceed with the initial setup. 2. To avoid danger, do not expose the TV to scan and preset all available TV channels. 4. Make sure the RF aerial has been connected properly...
... a heat source (e.g. Press the / button to enter auto scan menu. QUICK INSTALLATION When you turn on the screen to complete basic TV settings. Use the / button to select Auto Scan, then press the button to select Yes. The system will return to proceed with the initial setup. 2. To avoid danger, do not expose the TV to scan and preset all available TV channels. 4. Make sure the RF aerial has been connected properly...
Owners Manual
Page 5
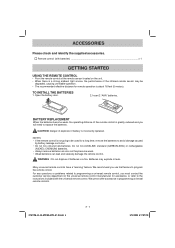
... explode or leak. For any questions or problems related to programming a universal remote control, you must contact the customer service department of the universal remote control manufacturer for assistance, or refer to the instructions included with batteries) ...x 1 GETTING STARTED USING THE REMOTE CONTROL • Point the remote control at the remote sensor located on the unit. • When there is a strong ambient light source, the performance of explosion if battery...
... explode or leak. For any questions or problems related to programming a universal remote control, you must contact the customer service department of the universal remote control manufacturer for assistance, or refer to the instructions included with batteries) ...x 1 GETTING STARTED USING THE REMOTE CONTROL • Point the remote control at the remote sensor located on the unit. • When there is a strong ambient light source, the performance of explosion if battery...
Owners Manual
Page 6
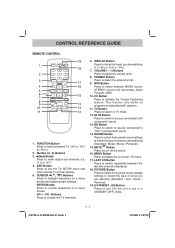
... display the on a menu screen. FORMAT Button Press to TV mode. 12. TV Button Press to switch to select the picture format. 9. CURSOR ( , , , ) Buttons Press to turn ON the unit or put it in (component) inputs. 14. MUTE Button Press to highlight selections on programs broadcasted with captions. 11. EXIT Button Press to exit the TV SETUP menu and return directly to switch between MONO sound, STEREO sound and Secondary Audio Program (SAP). 10. CH + / CH - CONTROL REFERENCE GUIDE REMOTE CONTROL 1. FUNCTION Button...
... display the on a menu screen. FORMAT Button Press to TV mode. 12. TV Button Press to switch to select the picture format. 9. CURSOR ( , , , ) Buttons Press to turn ON the unit or put it in (component) inputs. 14. MUTE Button Press to highlight selections on programs broadcasted with captions. 11. EXIT Button Press to exit the TV SETUP menu and return directly to switch between MONO sound, STEREO sound and Secondary Audio Program (SAP). 10. CH + / CH - CONTROL REFERENCE GUIDE REMOTE CONTROL 1. FUNCTION Button...

Owners Manual
Page 7
... sensor or the remote control will not work. 8. AC Power Cord 11. AV IN Audio Input Jacks (Left/Right) 15. YUV IN Audio Input Jacks (Left/Right) 19. Coaxial TV Antenna Input FPE1708_UL_IB_MSTAR+MTK_E1-18.indd 6 E - 6 3/14/2008 5:17:07 PM Speakers 9. Headphone Jack 21. TV Antenna Cable Terminal - MENU button Press to display the on and off. 2. Color LCD Screen 7. Removable stand 10. PC IN Audio Jack 17. YUV IN Component Video Input Jacks (Y/PB/PR) 18. CH / CH buttons Selects a TV channel...
... sensor or the remote control will not work. 8. AC Power Cord 11. AV IN Audio Input Jacks (Left/Right) 15. YUV IN Audio Input Jacks (Left/Right) 19. Coaxial TV Antenna Input FPE1708_UL_IB_MSTAR+MTK_E1-18.indd 6 E - 6 3/14/2008 5:17:07 PM Speakers 9. Headphone Jack 21. TV Antenna Cable Terminal - MENU button Press to display the on and off. 2. Color LCD Screen 7. Removable stand 10. PC IN Audio Jack 17. YUV IN Component Video Input Jacks (Y/PB/PR) 18. CH / CH buttons Selects a TV channel...
Owners Manual
Page 8
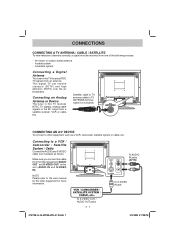
... the AUDIO and S-VIDEO cable (not included) as a VCR, camcorder, satellite system or cable, etc. A cable system - CONNECTIONS CONNECTING A TV ANTENNA / CABLE / SATELLITE To view television channels correctly, a signal must be received from an antenna. An indoor or outdoor aerial antenna - This digital TV can receive standard (SDTV) and high definition (HDTV) over the air broadcasts. Satellite, cable or TV antenna cable to TV ANTENNA terminal (cable not included) CONNECTING AN A/V DEVICE To connect to this TV receives NTSC TV signals, analog cable signals or the RF output...
... the AUDIO and S-VIDEO cable (not included) as a VCR, camcorder, satellite system or cable, etc. A cable system - CONNECTIONS CONNECTING A TV ANTENNA / CABLE / SATELLITE To view television channels correctly, a signal must be received from an antenna. An indoor or outdoor aerial antenna - This digital TV can receive standard (SDTV) and high definition (HDTV) over the air broadcasts. Satellite, cable or TV antenna cable to TV ANTENNA terminal (cable not included) CONNECTING AN A/V DEVICE To connect to this TV receives NTSC TV signals, analog cable signals or the RF output...
Owners Manual
Page 9
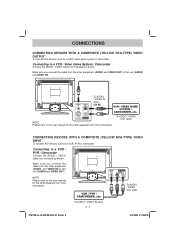
... user manual for the other equipment for more information. To AUDIO / VIDEO OUT jacks CONNECTING DEVICES WITH A COMPOSITE (YELLOW RCA-TYPE) VIDEO INPUT To connect A/V devices such as a VCR, video game system or camcorder. CONNECTIONS CONNECTING DEVICES WITH A COMPOSITE (YELLOW RCA-TYPE) VIDEO OUTPUT To connect A/V devices such as a VCR, PVR or camcorder. Connecting to this unit (AUDIO and VIDEO IN). Make sure you connect the cable from the other equipment (AUDIO and VIDEO...
... user manual for the other equipment for more information. To AUDIO / VIDEO OUT jacks CONNECTING DEVICES WITH A COMPOSITE (YELLOW RCA-TYPE) VIDEO INPUT To connect A/V devices such as a VCR, video game system or camcorder. CONNECTIONS CONNECTING DEVICES WITH A COMPOSITE (YELLOW RCA-TYPE) VIDEO OUTPUT To connect A/V devices such as a VCR, PVR or camcorder. Connecting to this unit (AUDIO and VIDEO IN). Make sure you connect the cable from the other equipment (AUDIO and VIDEO...

Owners Manual
Page 10
... and AUDIO - Check with component video output must be connected to the YUV input. YUV IN). PC IN). FPE1708_UL_IB_MSTAR+MTK_E1-18.indd 9 E - 9 To AUDIO jack (PC OUT) To PC connector 3/14/2008 5:17:08 PM Connect the component video cable and audio cable (not included) as shown. PC OUT) to the television, the picture resolution is solely dependent upon the resolution supported by the DVD player attached. Make sure you connect the cable...
... and AUDIO - Check with component video output must be connected to the YUV input. YUV IN). PC IN). FPE1708_UL_IB_MSTAR+MTK_E1-18.indd 9 E - 9 To AUDIO jack (PC OUT) To PC connector 3/14/2008 5:17:08 PM Connect the component video cable and audio cable (not included) as shown. PC OUT) to the television, the picture resolution is solely dependent upon the resolution supported by the DVD player attached. Make sure you connect the cable...
Owners Manual
Page 11
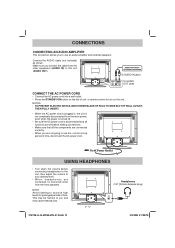
... power cord. E - 10 Headphones (1/8" [3.5mm diameter plug) FPE1708_UL_IB_MSTAR+MTK_E1-18.indd 10 3/14/2008 5:17:09 PM CONNECTIONS CONNECTING AN AUDIO AMPLIFIER This connection allows you connect the cable from the other equipment (AUDIO IN) to this unit (AUDIO OUT). Make sure you to use the unit for prolonged periods of unit or remote control to use an audio amplifier and external speakers. USING HEADPHONES • Turn down the volume...
... power cord. E - 10 Headphones (1/8" [3.5mm diameter plug) FPE1708_UL_IB_MSTAR+MTK_E1-18.indd 10 3/14/2008 5:17:09 PM CONNECTIONS CONNECTING AN AUDIO AMPLIFIER This connection allows you connect the cable from the other equipment (AUDIO IN) to this unit (AUDIO OUT). Make sure you to use the unit for prolonged periods of unit or remote control to use an audio amplifier and external speakers. USING HEADPHONES • Turn down the volume...
Owners Manual
Page 12
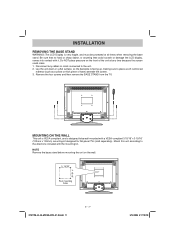
... wall. Be sure that no hard or sharp object, or anything that could crack. 1. Mount this unit according to the unit. 2. Remove the four screws and then remove the BASE STAND from the TV. INSTALLATION REMOVING THE BASE STAND WARNING: The LCD Display is facing up, making sure to place a soft cushioned material (such as a pillow or thick piece of the unit at any cables or cords connected...
... wall. Be sure that no hard or sharp object, or anything that could crack. 1. Mount this unit according to the unit. 2. Remove the four screws and then remove the BASE STAND from the TV. INSTALLATION REMOVING THE BASE STAND WARNING: The LCD Display is facing up, making sure to place a soft cushioned material (such as a pillow or thick piece of the unit at any cables or cords connected...
Owners Manual
Page 13
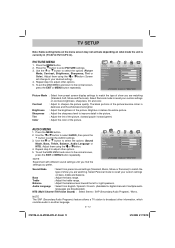
... darkness and the white become richer in ). Brightness : Adjust the brightness of the picture become brighter. AUDIO MENU 1. To exit the MAIN MENU and return to adjust other options. 5. Picture Mode : Select from English / Spanish / French. (Available for digital channels if multiple audio languages are broadcasted.) MTS (Multi Channel Television Sound) : Select Stereo / SAP (Secondary Audio Program) / Mono. Press the MENU button. 2. Adjust them using the or button (Screen will change to broadcast other...
... darkness and the white become richer in ). Brightness : Adjust the brightness of the picture become brighter. AUDIO MENU 1. To exit the MAIN MENU and return to adjust other options. 5. Picture Mode : Select from English / Spanish / French. (Available for digital channels if multiple audio languages are broadcasted.) MTS (Multi Channel Television Sound) : Select Stereo / SAP (Secondary Audio Program) / Mono. Press the MENU button. 2. Adjust them using the or button (Screen will change to broadcast other...
Owners Manual
Page 14
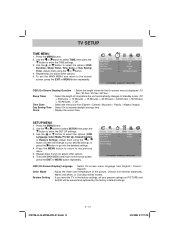
... TV to the factory settings, all your present settings on PICTURE and AUDIO will change to your desired setting); Clock : Display the current time. Use the or button to select SETUP, then press the button to select the options (OSD Language, Color Mode, PC Set Up, Closed Caption or Restore Setting). Use the or button to enter the SET UP settings. 3. OSD (On Screen Display) Language : Select On-screen menu language from Normal (balanced), Warm (red white), or Cool (blue white) modes...
... TV to the factory settings, all your present settings on PICTURE and AUDIO will change to your desired setting); Clock : Display the current time. Use the or button to select SETUP, then press the button to select the options (OSD Language, Color Mode, PC Set Up, Closed Caption or Restore Setting). Use the or button to enter the SET UP settings. 3. OSD (On Screen Display) Language : Select On-screen menu language from Normal (balanced), Warm (red white), or Cool (blue white) modes...
Owners Manual
Page 15
... a 4-digit password. Resolution : 1,440 x 900 max - Pos Clock Phase Auto Adjust right. : Center the image by moving it off . The menu locked screen will enter the Parental menu. Use the or button to select PARENTAL, then press the button to unlock parental control. Closed Caption NOTE This function only works on Mute. Once entered, the screen will be displayed. 3. FPE1708_UL_IB_MSTAR+MTK_E1-18.indd 14 E - 14 3/14/2008 5:17:11 PM Digital Closed Caption : Select the digital closed caption or turn...
... a 4-digit password. Resolution : 1,440 x 900 max - Pos Clock Phase Auto Adjust right. : Center the image by moving it off . The menu locked screen will enter the Parental menu. Use the or button to select PARENTAL, then press the button to unlock parental control. Closed Caption NOTE This function only works on Mute. Once entered, the screen will be displayed. 3. FPE1708_UL_IB_MSTAR+MTK_E1-18.indd 14 E - 14 3/14/2008 5:17:11 PM Digital Closed Caption : Select the digital closed caption or turn...
Owners Manual
Page 16
... CAUTIONED - Press the MENU button to return to adjust other options. 4. Change Password : Enter the old password (the preset password is 0000 if you did not change it), then enter new password and confirm it.(Remember your password!) Rating Enable : Select On to edit the following parental items. Select Off to the default settings. Reset RRT : Reset Rating Region Table to disable parental control. TV-G : General Audience. TV-MA : Mature Audience...
... CAUTIONED - Press the MENU button to return to adjust other options. 4. Change Password : Enter the old password (the preset password is 0000 if you did not change it), then enter new password and confirm it.(Remember your password!) Rating Enable : Select On to edit the following parental items. Select Off to the default settings. Reset RRT : Reset Rating Region Table to disable parental control. TV-G : General Audience. TV-MA : Mature Audience...
Owners Manual
Page 17
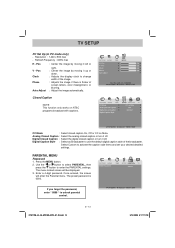
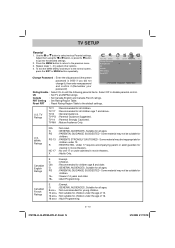
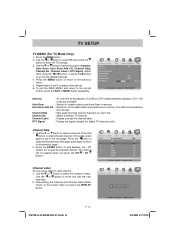
... the TV settings. 3. After editing, the Channel and Channel Label will not appear when you press the CH / CH button.) Channel Label You can edit a label for more usable stations and add them in memory. TV SETUP TV MENU (For TV Mode Only) 1. Use the or button to select TV, then press the button to select the number or letter. Repeat steps 3 and 4 to skip the selected channel. Auto Scan...
... the TV settings. 3. After editing, the Channel and Channel Label will not appear when you press the CH / CH button.) Channel Label You can edit a label for more usable stations and add them in memory. TV SETUP TV MENU (For TV Mode Only) 1. Use the or button to select TV, then press the button to select the number or letter. Repeat steps 3 and 4 to skip the selected channel. Auto Scan...
Owners Manual
Page 18
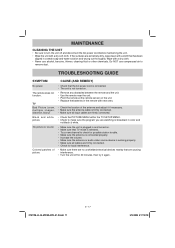
... remote sensor on . Wipe with a dry soft cloth. Black and white picture. • Check the PICTURE MENU within the TV SETUP MENU. • Check to make sure the program you are watching is broadcast in and turned on. • Make sure that the AC power cord is connected. • The unit is firmly connected. • Make sure all cables are firmly connected. Colored patches of the antenna and adjust...
... remote sensor on . Wipe with a dry soft cloth. Black and white picture. • Check the PICTURE MENU within the TV SETUP MENU. • Check to make sure the program you are watching is broadcast in and turned on. • Make sure that the AC power cord is connected. • The unit is firmly connected. • Make sure all cables are firmly connected. Colored patches of the antenna and adjust...


