User Manual
Page 2
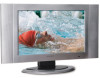
... mode 33 18 TV troubleshooting 35 Main on your purchase of this LCD TV. Keep this manual may differ from the actual model. Contents Index Important safety information 3 Operations 20 Important safety cautions 4 Picture adjustment 20 System setting 21 Identification of controls 6 Audio setting 26 Control buttons 6 Channel setting 28 Back 7 Selecting channel 30 Remote control 8 OSD setting 31 Installation Basic operations 10 Timer setting 32 Operations in an easily accessible location for future reference. Congratulations on -screen-display...
... mode 33 18 TV troubleshooting 35 Main on your purchase of this LCD TV. Keep this manual may differ from the actual model. Contents Index Important safety information 3 Operations 20 Important safety cautions 4 Picture adjustment 20 System setting 21 Identification of controls 6 Audio setting 26 Control buttons 6 Channel setting 28 Back 7 Selecting channel 30 Remote control 8 OSD setting 31 Installation Basic operations 10 Timer setting 32 Operations in an easily accessible location for future reference. Congratulations on -screen-display...
User Manual
Page 3
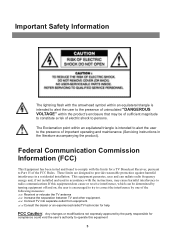
... the instructions, may be determined by the party responsible for a TV Broadcast Receiver, pursuant to Part 15 of electric shock to persons. Connect TV into separate outlet from equipment. ? ?Consult the dealer or an experienced radio/TV technician for help FCC Caution: Any changes or modifications not expressly approved by turning equipment off and on, the user is...
... the instructions, may be determined by the party responsible for a TV Broadcast Receiver, pursuant to Part 15 of electric shock to persons. Connect TV into separate outlet from equipment. ? ?Consult the dealer or an experienced radio/TV technician for help FCC Caution: Any changes or modifications not expressly approved by turning equipment off and on, the user is...
User Manual
Page 4
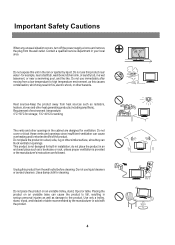
...occurs, turn off the power supply at once and remove the plug from the wall outlet before cleaning. Do not place the product on a bed, sofa, rug or other hazards. Use a damp...as radiators, heaters, stoves and other openings in installation; Use only a trolley, stand, tripod, and bracket or table recommended by liquid. Unplug this unit in your ...sources-Keep the product away from a low temperature to the product. This product is provided or the manufacturer's instructions are designed for ventilation. Do not expose this product from the wall outlet. Contact a qualified service...
...occurs, turn off the power supply at once and remove the plug from the wall outlet before cleaning. Do not place the product on a bed, sofa, rug or other hazards. Use a damp...as radiators, heaters, stoves and other openings in installation; Use only a trolley, stand, tripod, and bracket or table recommended by liquid. Unplug this unit in your ...sources-Keep the product away from a low temperature to the product. This product is provided or the manufacturer's instructions are designed for ventilation. Do not expose this product from the wall outlet. Contact a qualified service...
User Manual
Page 6
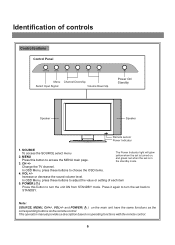
... STANDBY. Change the TV channel. In OSD Menu, press these buttons to adjust the value or setting of controls Control buttons Control Panel SOURCE MENU CH CH VOL VOL Menu Channel Down/Up Select Input Signal Volume Down/Up Power On/ Standby Speaker Speaker Remote sensor Power Indicator 1. Press it again to turn the set is in the standby mode. This operation manual provides a description based on operating functions with the remote control. 6 CH +/- POWER ( ) Press this button to choose the OSD items. 4. In OSD Menu, press these buttons to access...
... STANDBY. Change the TV channel. In OSD Menu, press these buttons to adjust the value or setting of controls Control buttons Control Panel SOURCE MENU CH CH VOL VOL Menu Channel Down/Up Select Input Signal Volume Down/Up Power On/ Standby Speaker Speaker Remote sensor Power Indicator 1. Press it again to turn the set is in the standby mode. This operation manual provides a description based on operating functions with the remote control. 6 CH +/- POWER ( ) Press this button to choose the OSD items. 4. In OSD Menu, press these buttons to access...

User Manual
Page 7
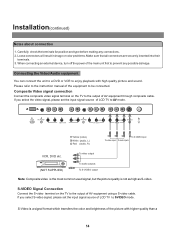
... PC. 2. AV inputs (Video, Audio L, R) Receive video/audio signals from external source such as VCR or DVD player. 6. VGA input / PC- Headphone 3.5mm jack 4. Audio in Connect to record programs. 5. HDTV input (Y, Pb, Pr, Audio L, R) Connect to the Y/Pb/Pr (or Y/Cb/Cr) and audio output jacks of controls (continued) Back 1 2 3 4 5 67 VGA PC-AUDIO Y Pb Pr R AUDIO L PHONE VIDEO L AUDIO R VIDEO L AUDIO R S-VIDEO RF HDT V IN AV OUT AV IN 1. S-Video input Receive a S-Video signal from external sources such as VCR or DVD player. 7.Coaxial cable & Antenna input 7
... PC. 2. AV inputs (Video, Audio L, R) Receive video/audio signals from external source such as VCR or DVD player. 6. VGA input / PC- Headphone 3.5mm jack 4. Audio in Connect to record programs. 5. HDTV input (Y, Pb, Pr, Audio L, R) Connect to the Y/Pb/Pr (or Y/Cb/Cr) and audio output jacks of controls (continued) Back 1 2 3 4 5 67 VGA PC-AUDIO Y Pb Pr R AUDIO L PHONE VIDEO L AUDIO R VIDEO L AUDIO R S-VIDEO RF HDT V IN AV OUT AV IN 1. S-Video input Receive a S-Video signal from external sources such as VCR or DVD player. 7.Coaxial cable & Antenna input 7
User Manual
Page 8
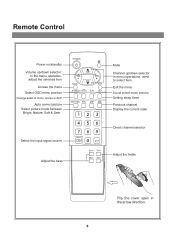
In the menu operation, adjust the selected item Access the menu Select OSD menu position Change audio to select item. In menu operations, used to mono, stereo or SAP Auto correct picture Select picture mode between Bright, Nature, Soft & User Select the input signal source Adjust the bass Mute Channel up /down selector. Exit the menu S.M Sound preset mode selector Setting sleep timer Previous channel Display the current state Direct channel selector Adjust the treble Flip the cover open in the arrow direction. 8 Remote Control Power on/standby Volume up /down selector;
In the menu operation, adjust the selected item Access the menu Select OSD menu position Change audio to select item. In menu operations, used to mono, stereo or SAP Auto correct picture Select picture mode between Bright, Nature, Soft & User Select the input signal source Adjust the bass Mute Channel up /down selector. Exit the menu S.M Sound preset mode selector Setting sleep timer Previous channel Display the current state Direct channel selector Adjust the treble Flip the cover open in the arrow direction. 8 Remote Control Power on/standby Volume up /down selector;
User Manual
Page 9
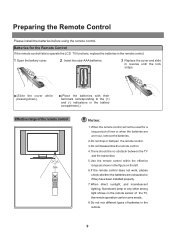
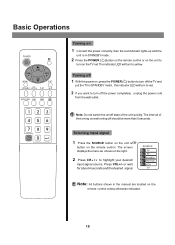
Preparing the Remote Control Please install the batteries before using the remote control. Batteries for the Remote Control If the remote control fails to operate the LCD TV functions, replace the batteries in the remote control. 1 Open the battery cover. 2 Insert two size-AAA batteries. 3 Replace the cover and slide in reverse until the lock snaps.
Preparing the Remote Control Please install the batteries before using the remote control. Batteries for the Remote Control If the remote control fails to operate the LCD TV functions, replace the batteries in the remote control. 1 Open the battery cover. 2 Insert two size-AAA batteries. 3 Replace the cover and slide in reverse until the lock snaps.
User Manual
Page 11
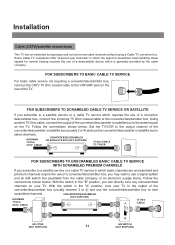
... CABLE TV SERVICE For basic cable service not requiring a converter/descrambler box, connect the CATV 75 ohm coaxial cable to the antenna jack on your TV to the output of a descrambler device which the signal is generally provided by the cable company. Set the TV/VCR to the output channel of the converter/descrambler or satellite box (usually 3 or 4) and use the converter/descrambler box to select channels...
... CABLE TV SERVICE For basic cable service not requiring a converter/descrambler box, connect the CATV 75 ohm coaxial cable to the antenna jack on your TV to the output of a descrambler device which the signal is generally provided by the cable company. Set the TV/VCR to the output channel of the converter/descrambler or satellite box (usually 3 or 4) and use the converter/descrambler box to select channels...
User Manual
Page 14
... composite cable. If you select the video signal, please set the input signal source of the main unit first to enjoy playback with higher quality than a 14 When connecting an external device, turn off the power of LCD TV to be connected. Please refer to the instruction manual of AV equipment using a S-video cable. If you select S-video signal, please set the input signal source of LCD TV to the output of the equipment to SVIDEO mode.
... composite cable. If you select the video signal, please set the input signal source of the main unit first to enjoy playback with higher quality than a 14 When connecting an external device, turn off the power of LCD TV to be connected. Please refer to the instruction manual of AV equipment using a S-video cable. If you select S-video signal, please set the input signal source of LCD TV to the output of the equipment to SVIDEO mode.
User Manual
Page 15
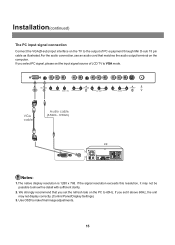
... be possible to make final image adjustments. 15 If you set the input signal source of PC equipment through Min D-sub 15 pin cable as illustrated.For the audio connection,use an audio cord that you set it may not display correctly. (Control Panel/Display Settings) 3. VGA PC-AUDIO Y Pb Pr R AUDIO L PHONE VIDEO L AUDIO R VIDEO L AUDIO R S-VIDEO RF HDT V IN AV OUT AV IN VGA cable Audio cable (3.5mm - 3.5mm) Notes: 1.The native display resolution is 1280 x 768.
... be possible to make final image adjustments. 15 If you set the input signal source of PC equipment through Min D-sub 15 pin cable as illustrated.For the audio connection,use an audio cord that you set it may not display correctly. (Control Panel/Display Settings) 3. VGA PC-AUDIO Y Pb Pr R AUDIO L PHONE VIDEO L AUDIO R VIDEO L AUDIO R S-VIDEO RF HDT V IN AV OUT AV IN VGA cable Audio cable (3.5mm - 3.5mm) Notes: 1.The native display resolution is 1280 x 768.
User Manual
Page 16
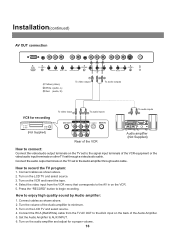
... the "RECORD" button to AUX INPUT. 6. Set the Audio Amplifier to begin recording. How to record the TV program: 1. Connect the audio output terminals on the TV set through audio cable. Turn on the LCD TV and select source. 3. Connect the RCA (Red/White) cable from the VCR menu that corresponds to the AV in on the LCD TV and select source. 4. Turn the volume of the VCR equipment or the video/audio input terminals on...
... the "RECORD" button to AUX INPUT. 6. Set the Audio Amplifier to begin recording. How to record the TV program: 1. Connect the audio output terminals on the TV set through audio cable. Turn on the LCD TV and select source. 3. Connect the RCA (Red/White) cable from the VCR menu that corresponds to the AV in on the LCD TV and select source. 4. Turn the volume of the VCR equipment or the video/audio input terminals on...
User Manual
Page 17
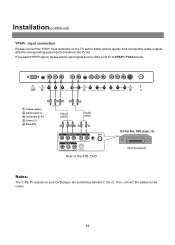
... mode. Installation(continued) YPbPr input connection Please connect the YPbPr input terminals on the TV set the input signal source of the STB, DVD Set-Top Box, DVD player, etc. (Not Supplied) Notes: The Y, Pb, Pr outputs on the TV set. VGA PC-AUDIO Y Pb Pr R AUDIO L PHONE VIDEO L AUDIO R VIDEO L AUDIO R S-VIDEO RF HDT V IN AV OUT AV IN G Y Yellow (video) W white (audio L) R red (audio R, Pr) G Green (Y) B Blue (Pb) BR R W Video cable Audio cable G B RR W HDTV OUT ANT Y Pb Pr AV OUT R AUDIO L AUDIO R AUDIO L VIDEO S-VIDEO Rear of the LCD TV...
... mode. Installation(continued) YPbPr input connection Please connect the YPbPr input terminals on the TV set the input signal source of the STB, DVD Set-Top Box, DVD player, etc. (Not Supplied) Notes: The Y, Pb, Pr outputs on the TV set. VGA PC-AUDIO Y Pb Pr R AUDIO L PHONE VIDEO L AUDIO R VIDEO L AUDIO R S-VIDEO RF HDT V IN AV OUT AV IN G Y Yellow (video) W white (audio L) R red (audio R, Pr) G Green (Y) B Blue (Pb) BR R W Video cable Audio cable G B RR W HDTV OUT ANT Y Pb Pr AV OUT R AUDIO L AUDIO R AUDIO L VIDEO S-VIDEO Rear of the LCD TV...
User Manual
Page 18
.... The screen displays the menu as shown on the TV set.The indicator LED will turn to red. or wait for about 4 seconds and the desired signal SOURCE TV AV SVIDEO YPbPr/YCbCr VGA TV Note: All buttons shown in the manual are located on , press the POWER ( ) button to turn off the TV and put the TV in STANDBY mode. 2 Press the POWER ( )button on the remote control or on...
.... The screen displays the menu as shown on the TV set.The indicator LED will turn to red. or wait for about 4 seconds and the desired signal SOURCE TV AV SVIDEO YPbPr/YCbCr VGA TV Note: All buttons shown in the manual are located on , press the POWER ( ) button to turn off the TV and put the TV in STANDBY mode. 2 Press the POWER ( )button on the remote control or on...
User Manual
Page 19
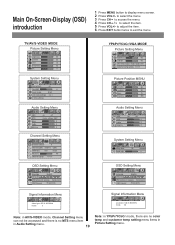
.../AV/S-VIDEO MODE Picture Setting Menu brightness 50 contrast 50 color 18 sharpness 32 tint 0 System Setting Menu blue screen on bass treble balance off 0 0 0 System Setting Menu sleep time Back light 20 minutes 6 OSD Setting Menu language English OSD position OSD background opaque translucent OSD timeout 30 seconds Signal Information Menu video type: 650 X 462/60Hz mode: 3 Signal Information Menu resolution: 640 X 480/60Hz mode: 40 Note: in AV/S-VIDEO mode, Channel Setting menu can not be accessed and there...
.../AV/S-VIDEO MODE Picture Setting Menu brightness 50 contrast 50 color 18 sharpness 32 tint 0 System Setting Menu blue screen on bass treble balance off 0 0 0 System Setting Menu sleep time Back light 20 minutes 6 OSD Setting Menu language English OSD position OSD background opaque translucent OSD timeout 30 seconds Signal Information Menu video type: 650 X 462/60Hz mode: 3 Signal Information Menu resolution: 640 X 480/60Hz mode: 40 Note: in AV/S-VIDEO mode, Channel Setting menu can not be accessed and there...
User Manual
Page 20
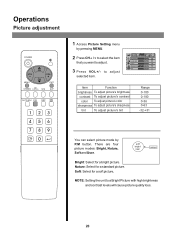
... for a bright picture. contrast 50 color 19 sharpness 32 tint 0 3 Press VOL+/- Item Function Range S.M brightness To adjust picture's brightness 0-100 contrast To adjust picture's contrast 0-100 color To adjust picture's color sharpness To adjust picture's sharpness 0-36 0-63 tint To adjust picture's tint -32-+31 You can select picture mode by pressing MENU. 2 Press CH5/6to select the item brightness 50 that you want to adjust. Operations Picture adjustment 1 Access Picture Setting menu by P.M button.
... for a bright picture. contrast 50 color 19 sharpness 32 tint 0 3 Press VOL+/- Item Function Range S.M brightness To adjust picture's brightness 0-100 contrast To adjust picture's contrast 0-100 color To adjust picture's color sharpness To adjust picture's sharpness 0-36 0-63 tint To adjust picture's tint -32-+31 You can select picture mode by pressing MENU. 2 Press CH5/6to select the item brightness 50 that you want to adjust. Operations Picture adjustment 1 Access Picture Setting menu by P.M button.
User Manual
Page 22
... ccd mode settings item. Parental Control with closed caption signals, and therefore the TV will not be broadcast with V-Chip 1 Access the System Setting menu. 2 Press CH5/6to select V-Chip settings item. change the password after you select disable, the function is activated. You can select the caption data channel (CC1, CC2, CC3, CC4), the text service channel(text1, text2, text3, text4) or turn off the Closed Caption(Off). Some TV programs...
... ccd mode settings item. Parental Control with closed caption signals, and therefore the TV will not be broadcast with V-Chip 1 Access the System Setting menu. 2 Press CH5/6to select V-Chip settings item. change the password after you select disable, the function is activated. You can select the caption data channel (CC1, CC2, CC3, CC4), the text service channel(text1, text2, text3, text4) or turn off the Closed Caption(Off). Some TV programs...
User Manual
Page 26
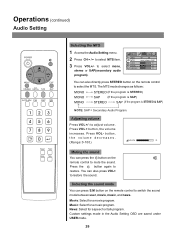
... Audio Program. Press the button again to select MTS item. 3 Press VOL+/- Movie: Select for a music program. Operations (continued) Audio Setting Selecting the MTS 1 Access the Audio Setting menu. 2 Press CH5/6 to restore. button, the volume decreases. Music: Select for a movie program. You can press S.M button on the remote control to restore the sound. Adjusting volume Press VOL+/- Press VOL- Selecting the sound mode You can also press VOL+ to switch the sound mode between user...
... Audio Program. Press the button again to select MTS item. 3 Press VOL+/- Movie: Select for a music program. Operations (continued) Audio Setting Selecting the MTS 1 Access the Audio Setting menu. 2 Press CH5/6 to restore. button, the volume decreases. Music: Select for a movie program. You can press S.M button on the remote control to restore the sound. Adjusting volume Press VOL+/- Press VOL- Selecting the sound mode You can also press VOL+ to switch the sound mode between user...
User Manual
Page 28
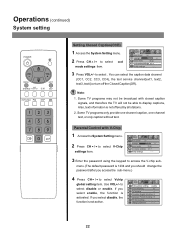
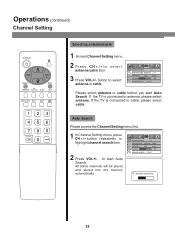
Operations (continued) Channel Setting Selecting antenna/cable 1 Access Channel Setting menu. 2 Press CH5/6to select antenna/cable item. 3 Press VOL+/- If the TV is connected to cable, please select cable. Auto Search Please access the Channel Setting menu first. 1 In Channel Setting menu, press CH5/6button repeatedly to select antenna or cable. If the TV is connected to start Auto Search. channel number 9 antenna/cable antenna cable add/erase add erase fine tune 48 channel search antenna searching 28 All active channels will be preset and...
Operations (continued) Channel Setting Selecting antenna/cable 1 Access Channel Setting menu. 2 Press CH5/6to select antenna/cable item. 3 Press VOL+/- If the TV is connected to cable, please select cable. Auto Search Please access the Channel Setting menu first. 1 In Channel Setting menu, press CH5/6button repeatedly to select antenna or cable. If the TV is connected to start Auto Search. channel number 9 antenna/cable antenna cable add/erase add erase fine tune 48 channel search antenna searching 28 All active channels will be preset and...
User Manual
Page 33
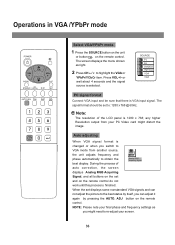
The screen displays the menu shown as you might distort the image. S.M PC signal format Connect VGA input and be set and on the set to re-adjust your screen. 33 Auto adjusting When VGA signal format is VGA input signal. During the process of the LCD panel is selected. or VGA wait about 4 seconds and the signal source is 1280 x 768; ADJ button on the remote control. any higher Resolution output from another source, the unit adjusts frequency...
The screen displays the menu shown as you might distort the image. S.M PC signal format Connect VGA input and be set and on the set to re-adjust your screen. 33 Auto adjusting When VGA signal format is VGA input signal. During the process of the LCD panel is selected. or VGA wait about 4 seconds and the signal source is 1280 x 768; ADJ button on the remote control. any higher Resolution output from another source, the unit adjusts frequency...
User Manual
Page 35
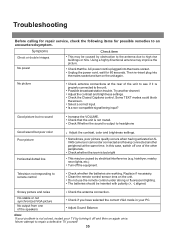
... TEXT modes could block the screen. ! Check the antenna connection. Check antenna connections at the same time. Is a non-compatible signal being input? Increase the VOLUME. ! Adjust the contrast, color and brightness settings. ! Sometimes, poor picture quality occurs when having activated an SVHS camera or camcorder connected and having connected another channel. ! Clean the remote control sensor lens on the unit again. Note: If your problem is not muted. ! No picture ! Check the Closed Captions control...
... TEXT modes could block the screen. ! Check the antenna connection. Check antenna connections at the same time. Is a non-compatible signal being input? Increase the VOLUME. ! Adjust the contrast, color and brightness settings. ! Sometimes, poor picture quality occurs when having activated an SVHS camera or camcorder connected and having connected another channel. ! Clean the remote control sensor lens on the unit again. Note: If your problem is not muted. ! No picture ! Check the Closed Captions control...


