
User Manual
Page 1
AUDIOVOX.COM PLV16159CS2 / AUDIOVOX / ENGLISH SIZE: 148 X 210 MM MATERIAL: 80G WOODFREE PAPER 100% 03-01-2008 128-8315 Printed in China 811-161S91W420 FPE1508 15" FLAT PANEL LCD TV FOR ASSISTANCE CALL CUSTOMER SERVICE AT 1-800-645-4994 OR VISIT US AT WWW.
AUDIOVOX.COM PLV16159CS2 / AUDIOVOX / ENGLISH SIZE: 148 X 210 MM MATERIAL: 80G WOODFREE PAPER 100% 03-01-2008 128-8315 Printed in China 811-161S91W420 FPE1508 15" FLAT PANEL LCD TV FOR ASSISTANCE CALL CUSTOMER SERVICE AT 1-800-645-4994 OR VISIT US AT WWW.
User Manual
Page 2
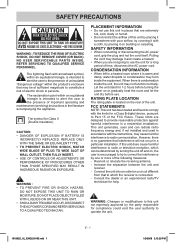
...: This unit has been tested and found to comply with a cloth, by one or more of the unit. Consult the dealer or an experienced radio/TV technician for a Class B digital device, pursuant to persons. NO USER SERVICEABLE PARTS INSIDE. The exclamation point within the product's enclosure that may damage it and...
...: This unit has been tested and found to comply with a cloth, by one or more of the unit. Consult the dealer or an experienced radio/TV technician for a Class B digital device, pursuant to persons. NO USER SERVICEABLE PARTS INSIDE. The exclamation point within the product's enclosure that may damage it and...
User Manual
Page 3
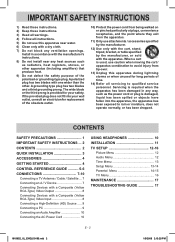
... prong. CONTENTS SAFETY PRECAUTIONS 1 IMPORTANT SAFETY INSTRUCTIONS ... 2 CONTENTS 2 QUICK INSTALLATION 3 ACCESSORIES 4 GETTING STARTED 4 CONTROL REFERENCE GUIDE 5-6 CONNECTIONS 7-10 Connecting a TV Antenna / Cable / Satellite ... 7 Connecting an A / V Device 7 Connecting Devices with a Composite (Yellow RCA-Type) Video Output 8 Connecting Devices with one... a PC 9 Connecting an Audio Amplifier 10 Connecting the AC Power Cord 10 USING HEADPHONES 10 INSTALLATION 11 TV SETUP 12-16 Picture Menu 12 Audio Menu 12 Time Menu 13 Setup Menu 13-14 Parental Menu 14-15...
... prong. CONTENTS SAFETY PRECAUTIONS 1 IMPORTANT SAFETY INSTRUCTIONS ... 2 CONTENTS 2 QUICK INSTALLATION 3 ACCESSORIES 4 GETTING STARTED 4 CONTROL REFERENCE GUIDE 5-6 CONNECTIONS 7-10 Connecting a TV Antenna / Cable / Satellite ... 7 Connecting an A / V Device 7 Connecting Devices with a Composite (Yellow RCA-Type) Video Output 8 Connecting Devices with one... a PC 9 Connecting an Audio Amplifier 10 Connecting the AC Power Cord 10 USING HEADPHONES 10 INSTALLATION 11 TV SETUP 12-16 Picture Menu 12 Audio Menu 12 Time Menu 13 Setup Menu 13-14 Parental Menu 14-15...
User Manual
Page 4
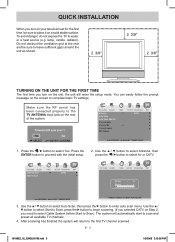
... message on the rear of the system. 1. Press the ENTER button to water, or a heat source (e.g. To avoid danger, do not expose the TV to proceed with the initial setup. 2. Use the / button to select Auto Scan, then press the button to scan and preset all available... stable surface. The system will automatically start to enter auto scan menu. Use the / button to select Antenna, then press the / button to the first TV channel scanned. After scanning has finished the system will return to select Air or CATV. 3. E - 3 16159S2_UL_ENGLISH IB.indd 3 1/9/2008 2:13:26 PM Do ...
... message on the rear of the system. 1. Press the ENTER button to water, or a heat source (e.g. To avoid danger, do not expose the TV to proceed with the initial setup. 2. Use the / button to select Auto Scan, then press the button to scan and preset all available... stable surface. The system will automatically start to enter auto scan menu. Use the / button to select Antenna, then press the / button to the first TV channel scanned. After scanning has finished the system will return to select Air or CATV. 3. E - 3 16159S2_UL_ENGLISH IB.indd 3 1/9/2008 2:13:26 PM Do ...
User Manual
Page 6
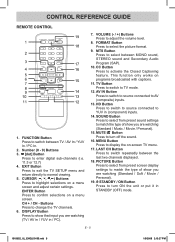
...MTS Button Press to turn ON the unit or put it in / PC). 7. HD Button Press to switch to source connected to change the TV channels. 6. MUTE Button Press to select between the last two channels displayed. 18. STANDBY / ON Button Press to show you are watching (Standard...15. CONTROL REFERENCE GUIDE REMOTE CONTROL 1. DISPLAY Button Press to turn off the sound. 16. FORMAT Button Press to highlight selections on -screen TV menu. 17. SOUND Button Press to select from preset screen display settings to switch repeatedly between MONO sound, STEREO sound and Secondary Audio Program ...
...MTS Button Press to turn ON the unit or put it in / PC). 7. HD Button Press to switch to source connected to change the TV channels. 6. MUTE Button Press to select between the last two channels displayed. 18. STANDBY / ON Button Press to show you are watching (Standard...15. CONTROL REFERENCE GUIDE REMOTE CONTROL 1. DISPLAY Button Press to turn off the sound. 16. FORMAT Button Press to highlight selections on -screen TV menu. 17. SOUND Button Press to select from preset screen display settings to switch repeatedly between MONO sound, STEREO sound and Secondary Audio Program ...
User Manual
Page 7
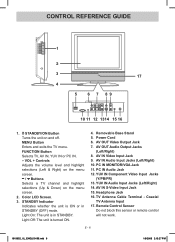
... 6 7 89 10 11 12 1314 15 16 1. VOL + Controls Adjusts the volume level and highlight selections (Left & Right) on the menu screen. / Buttons Selects a TV channel and highlight selections (Up & Down) on and off. AV IN Video Input Jack 9. Headphone Jack 16. AV OUT Video Output Jack 7. AV OUT Audio... (Left/Right) 10. STANDBY/ON Button Turns the unit on the menu screen. 2. Light Off: The unit is ON or in STANDBY. Coaxial TV Antenna Input 17. Color LCD Screen. 3. STANDBY Indicator Indicates whether the unit is turned ON. 4. Removable Base Stand 5. AV IN S-Video Input Jack...
... 6 7 89 10 11 12 1314 15 16 1. VOL + Controls Adjusts the volume level and highlight selections (Left & Right) on the menu screen. / Buttons Selects a TV channel and highlight selections (Up & Down) on and off. AV IN Video Input Jack 9. Headphone Jack 16. AV OUT Video Output Jack 7. AV OUT Audio... (Left/Right) 10. STANDBY/ON Button Turns the unit on the menu screen. 2. Light Off: The unit is ON or in STANDBY. Coaxial TV Antenna Input 17. Color LCD Screen. 3. STANDBY Indicator Indicates whether the unit is turned ON. 4. Removable Base Stand 5. AV IN S-Video Input Jack...
User Manual
Page 8
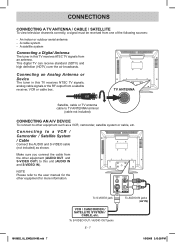
...view television channels correctly, a signal must be received from an antenna. Connecting an Analog Antenna or Device The tuner in this TV receives NTSC TV signals, analog cable signals or the RF output from the other equipment for more information. 16159S2_UL_ENGLISH IB.indd 7 To S-VIDEO ...jack VCR / CAMCORDER / SATELLITE SYSTEM / CABLE, etc. An indoor or outdoor aerial antenna - A cable system - TV ANTENNA Satellite, cable or TV antenna cable to TV ANTENNA terminal (cable not included) CONNECTING AN A/V DEVICE To connect to the user manual for the other equipment (AUDIO OUT...
...view television channels correctly, a signal must be received from an antenna. Connecting an Analog Antenna or Device The tuner in this TV receives NTSC TV signals, analog cable signals or the RF output from the other equipment for more information. 16159S2_UL_ENGLISH IB.indd 7 To S-VIDEO ...jack VCR / CAMCORDER / SATELLITE SYSTEM / CABLE, etc. An indoor or outdoor aerial antenna - A cable system - TV ANTENNA Satellite, cable or TV antenna cable to TV ANTENNA terminal (cable not included) CONNECTING AN A/V DEVICE To connect to the user manual for the other equipment (AUDIO OUT...
User Manual
Page 12
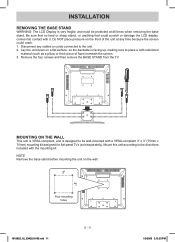
... surface, so the backside is facing up, making sure to the unit. 2. Remove the four screws and then remove the BASE STAND from the TV. Disconnect any time because the screen could scratch or damage the LCD display, comes into contact with it. NOTE Remove the base stand before mounting...unit is VESA-compliant, and is very fragile, and must be wall-mounted with a VESA-compliant 3" x 3" (75mm x 75mm) mounting kit designed for flat-panel TVs (sold separately). Do NOT place pressure on the wall. Be sure that no hard or sharp object, or anything that could crack. 1. Mount this unit...
... surface, so the backside is facing up, making sure to the unit. 2. Remove the four screws and then remove the BASE STAND from the TV. Disconnect any time because the screen could scratch or damage the LCD display, comes into contact with it. NOTE Remove the base stand before mounting...unit is VESA-compliant, and is very fragile, and must be wall-mounted with a VESA-compliant 3" x 3" (75mm x 75mm) mounting kit designed for flat-panel TVs (sold separately). Do NOT place pressure on the wall. Be sure that no hard or sharp object, or anything that could crack. 1. Mount this unit...
User Manual
Page 13
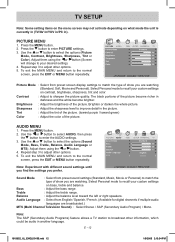
...button to sharpen the picture quality. Select Personal mode to improve detail in another language. Note: The SAP (Secondary Audio Programs) feature allows a TV station to adjust other options. 5. Repeat step 3 to broadcast other information, which could be audio in the picture. To exit the MAIN ... if multiple audio languages are watching. Repeat step 3 to enter PICTURE settings. 3. E - 12 16159S2_UL_ENGLISH IB.indd 12 1/9/2008 2:13:34 PM TV SETUP Note: Some setting items on the menu screen may not activate depending on what mode the unit is currently in...
...button to sharpen the picture quality. Select Personal mode to improve detail in another language. Note: The SAP (Secondary Audio Programs) feature allows a TV station to adjust other options. 5. Repeat step 3 to broadcast other information, which could be audio in the picture. To exit the MAIN ... if multiple audio languages are watching. Repeat step 3 to enter PICTURE settings. 3. E - 12 16159S2_UL_ENGLISH IB.indd 12 1/9/2008 2:13:34 PM TV SETUP Note: Some setting items on the menu screen may not activate depending on what mode the unit is currently in...
User Manual
Page 14
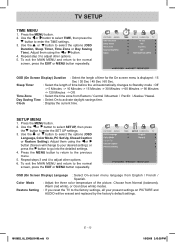
... mode : Off -> 5 Minutes -> 10 Minutes -> 15 Minutes -> 30 Minutes -> 60 Minutes -> 90 Minutes -> 120 Minutes -> Off. Restore Setting : If you reset the TV to the factory settings, all your present settings on PICTURE and Audio will change to adjust other options. 6. Adjust them using the or button. 4. OSD...the or button (Screen will be erased and replaced by the factory's default settings. 16159S2_UL_ENGLISH IB.indd 13 E - 13 1/9/2008 2:13:35 PM TV SETUP TIME MENU 1. Use the or button to select time, then press the button to go into the detailed settings. 4. To exit the MAIN ...
... mode : Off -> 5 Minutes -> 10 Minutes -> 15 Minutes -> 30 Minutes -> 60 Minutes -> 90 Minutes -> 120 Minutes -> Off. Restore Setting : If you reset the TV to the factory settings, all your present settings on PICTURE and Audio will change to adjust other options. 6. Adjust them using the or button. 4. OSD...the or button (Screen will be erased and replaced by the factory's default settings. 16159S2_UL_ENGLISH IB.indd 13 E - 13 1/9/2008 2:13:35 PM TV SETUP TIME MENU 1. Use the or button to select time, then press the button to go into the detailed settings. 4. To exit the MAIN ...
User Manual
Page 15
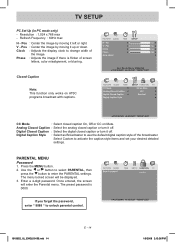
TV SETUP PC Set Up (in PC mode only) - Closed Caption Note: This function only works on Mute. Analog Closed Caption : Select the analog closed caption ...
TV SETUP PC Set Up (in PC mode only) - Closed Caption Note: This function only works on Mute. Analog Closed Caption : Select the analog closed caption ...
User Manual
Page 16
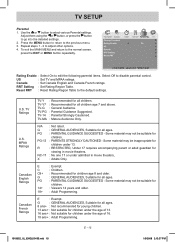
...Press the MENU button to return to select various Parental settings. RRT Setting : Set Rating Region Table. TV Ratings U.S. TV-Y7 : Recommended for children. : PARENTS STRONGLY CAUTIONED - TV-PG : Parental Guidance Suggested. Some material may not be suitable for all children age 7 and above... - Canada : Set Canada English and Canada French ratings. U.S. E - 15 16159S2_UL_ENGLISH IB.indd 15 1/9/2008 2:13:37 PM TV-G : General Audience. TV-MA : Mature Audience Only. Repeat steps 1 - 2 to the normal screen, press the EXIT or MENU button repeatedly. Reset RRT...
...Press the MENU button to return to select various Parental settings. RRT Setting : Set Rating Region Table. TV Ratings U.S. TV-Y7 : Recommended for children. : PARENTS STRONGLY CAUTIONED - TV-PG : Parental Guidance Suggested. Some material may not be suitable for all children age 7 and above... - Canada : Set Canada English and Canada French ratings. U.S. E - 15 16159S2_UL_ENGLISH IB.indd 15 1/9/2008 2:13:37 PM TV-G : General Audience. TV-MA : Mature Audience Only. Repeat steps 1 - 2 to the normal screen, press the EXIT or MENU button repeatedly. Reset RRT...
User Manual
Page 17
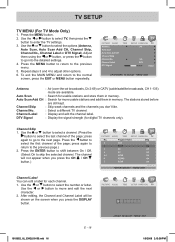
...button. 16159S2_UL_ENGLISH IB.indd 16 E - 16 1/9/2008 2:13:38 PM Channel Label : Display and edit the channel label. Use the or button to select TV, then press the button to select the options (Antenna, Auto Scan, Auto Scan Add CH, Channel Skip, Channel No., Channel Label or DTV Signal). ...Repeat steps 3 and 4 to the previous menu. 5. Channel No. : Select a different TV channel. Press the button to select the first channel of the page; Auto Scan Add CH : Search for each channel. 1. Use the or button to...
...button. 16159S2_UL_ENGLISH IB.indd 16 E - 16 1/9/2008 2:13:38 PM Channel Label : Display and edit the channel label. Use the or button to select TV, then press the button to select the options (Antenna, Auto Scan, Auto Scan Add CH, Channel Skip, Channel No., Channel Label or DTV Signal). ...Repeat steps 3 and 4 to the previous menu. 5. Channel No. : Select a different TV channel. Press the button to select the first channel of the page; Auto Scan Add CH : Search for each channel. 1. Use the or button to...
User Manual
Page 18
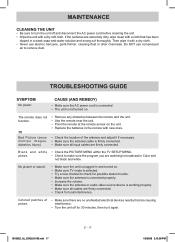
...; Check the location of picture. • Make sure there are firmly connected. Black and white picture. • Check the PICTURE MENU within the TV SETUP MENU. • Check to check for possible station trouble. • Make sure the antenna is connected properly. • Increase the volume. ...solution and wrung out thoroughly. Colored patches of the antenna and adjust it again. 16159S2_UL_ENGLISH IB.indd 17 E - 17 1/9/2008 2:13:38 PM TV Bad Picture (snow, multipe images, distortion, blurry) • Remove any obstacles between the remote and the unit. • Use the remote near...
...; Check the location of picture. • Make sure there are firmly connected. Black and white picture. • Check the PICTURE MENU within the TV SETUP MENU. • Check to check for possible station trouble. • Make sure the antenna is connected properly. • Increase the volume. ...solution and wrung out thoroughly. Colored patches of the antenna and adjust it again. 16159S2_UL_ENGLISH IB.indd 17 E - 17 1/9/2008 2:13:38 PM TV Bad Picture (snow, multipe images, distortion, blurry) • Remove any obstacles between the remote and the unit. • Use the remote near...


