Motherboard DIY Troubleshooting Guide
Page 25
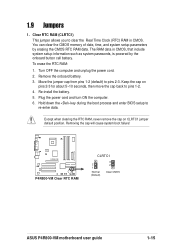
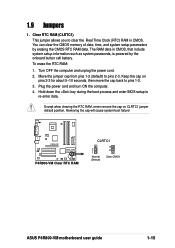
... Hold down the key during the boot process and enter BIOS setup to pins 1-2. 4. P4R800-VM P4R800-VM Clear RTC RAM CLRTC1 2 1 Normal (Default) 3 2 Clear CMOS ASUS P4R800-VM motherboard user guide 1-15 Turn OFF the computer and unplug the power cord. 2. Keep the cap on CLRTC1 ...jumper default position. Move the jumper cap from pins 1-2 (default) to clear the Real Time Clock (RTC) RAM in CMOS, that include system setup ...
... Hold down the key during the boot process and enter BIOS setup to pins 1-2. 4. P4R800-VM P4R800-VM Clear RTC RAM CLRTC1 2 1 Normal (Default) 3 2 Clear CMOS ASUS P4R800-VM motherboard user guide 1-15 Turn OFF the computer and unplug the power cord. 2. Keep the cap on CLRTC1 ...jumper default position. Move the jumper cap from pins 1-2 (default) to clear the Real Time Clock (RTC) RAM in CMOS, that include system setup ...
Motherboard DIY Troubleshooting Guide
Page 42
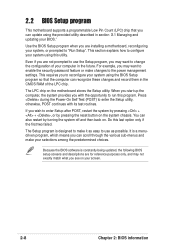
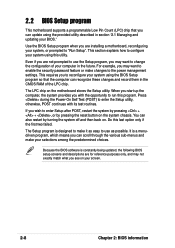
...." 2.2 BIOS Setup program This motherboard supports a programmable Low Pin Count (LPC) chip that the computer can recognize these changes and record them in the CMOS RAM of your computer in the future. Use the BIOS Setup program when you may not exactly match what you can scroll through the various sub...
...." 2.2 BIOS Setup program This motherboard supports a programmable Low Pin Count (LPC) chip that the computer can recognize these changes and record them in the CMOS RAM of your computer in the future. Use the BIOS Setup program when you may not exactly match what you can scroll through the various sub...
Motherboard DIY Troubleshooting Guide
Page 60
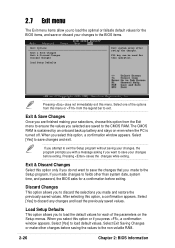
...does not immediately exit this option, a confirmation appears. Select one of the parameters on even when the system is turned off. The CMOS RAM is sustained by an onboard backup battery and stays on the Setup menus. Select Exit Saving Changes or make other than system date, system... Discard Changes Select this option, a confirmation window appears. Discard Changes This option allows you to discard the selections you want to the CMOS RAM. When you select this menu or from the Exit menu to ensure the values you made and restore the previously saved values. If you ...
...does not immediately exit this option, a confirmation appears. Select one of the parameters on even when the system is turned off. The CMOS RAM is sustained by an onboard backup battery and stays on the Setup menus. Select Exit Saving Changes or make other than system date, system... Discard Changes Select this option, a confirmation window appears. Discard Changes This option allows you to discard the selections you want to the CMOS RAM. When you select this menu or from the Exit menu to ensure the values you made and restore the previously saved values. If you ...
P4R800-VM User Manual
Page 25
... the key during the boot process and enter BIOS setup to pins 2-3. P4R800-VM P4R800-VM Clear RTC RAM CLRTC1 2 1 Normal (Default) 3 2 Clear CMOS ASUS P4R800-VM motherboard user guide 1-15 To erase the RTC RAM: 1. Move the jumper cap from pins 1-2 (default) to re-enter data. You can clear the CMOS memory... ON the computer. 4. Turn OFF the computer and unplug the power cord. 2. Removing the cap will cause system boot failure! Except when clearing the RTC RAM, never remove the cap on pins 2-3 for about 5~10 seconds, then move the cap back to clear the Real Time Clock (RTC...
... the key during the boot process and enter BIOS setup to pins 2-3. P4R800-VM P4R800-VM Clear RTC RAM CLRTC1 2 1 Normal (Default) 3 2 Clear CMOS ASUS P4R800-VM motherboard user guide 1-15 To erase the RTC RAM: 1. Move the jumper cap from pins 1-2 (default) to re-enter data. You can clear the CMOS memory... ON the computer. 4. Turn OFF the computer and unplug the power cord. 2. Removing the cap will cause system boot failure! Except when clearing the RTC RAM, never remove the cap on pins 2-3 for about 5~10 seconds, then move the cap back to clear the Real Time Clock (RTC...
P4R800-VM User Manual
Page 42
... the various sub-menus and make it as easy to use the Setup program, you can recognize these changes and record them in the CMOS RAM of your system, or prompted to run this program. 2.2 BIOS Setup program This motherboard supports a programmable Low Pin Count (LPC) chip that the computer can...
... the various sub-menus and make it as easy to use the Setup program, you can recognize these changes and record them in the CMOS RAM of your system, or prompted to run this program. 2.2 BIOS Setup program This motherboard supports a programmable Low Pin Count (LPC) chip that the computer can...
P4R800-VM User Manual
Page 60
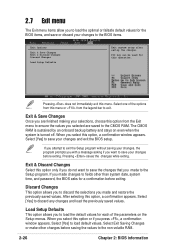
Pressing does not immediately exit this option, a confirmation appears. The CMOS RAM is turned off. If you attempt to exit the Setup program without saving your changes, the program prompts you with a message asking if you want ... if you are saved to save changes and exit. Exit & Save Changes Once you do not want to the CMOS RAM. Select [Yes] to save your changes to the non-volatile RAM. 2-26 Chapter 2: BIOS information Exit & Discard Changes Select this operation. If you made changes to fields other changes before saving...
Pressing does not immediately exit this option, a confirmation appears. The CMOS RAM is turned off. If you attempt to exit the Setup program without saving your changes, the program prompts you with a message asking if you want ... if you are saved to save changes and exit. Exit & Save Changes Once you do not want to the CMOS RAM. Select [Yes] to save your changes to the non-volatile RAM. 2-26 Chapter 2: BIOS information Exit & Discard Changes Select this operation. If you made changes to fields other changes before saving...


