A7V600-X User's manual
Page 12
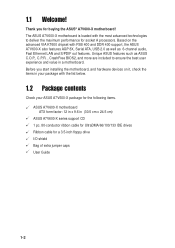
... BIOS2, and more are included to deliver the maximum performance for a 3.5-inch floppy drive I/O shield Bag of extra jumper caps User Guide 1-2 Unique ASUS features such as 6-channel audio, Fast Ethernet LAN and S/PDIF out features. Thank you start installing the motherboard, and hardware devices on ...most advanced technologies to ensure the best user experience and value in (30.5 cm x 24.5 cm) ASUS A7V600-X series support CD 1 pc. 80-conductor ribbon cable for UltraDMA/66/100/133 IDE drives Ribbon cable for socket A processors. Based on it, check the items in your package with the ...
... BIOS2, and more are included to deliver the maximum performance for a 3.5-inch floppy drive I/O shield Bag of extra jumper caps User Guide 1-2 Unique ASUS features such as 6-channel audio, Fast Ethernet LAN and S/PDIF out features. Thank you start installing the motherboard, and hardware devices on ...most advanced technologies to ensure the best user experience and value in (30.5 cm x 24.5 cm) ASUS A7V600-X series support CD 1 pc. 80-conductor ribbon cable for UltraDMA/66/100/133 IDE drives Ribbon cable for socket A processors. Based on it, check the items in your package with the ...
A7V600-X User's manual
Page 17
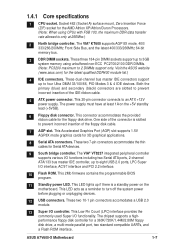
...provided ribbon cable for Serial ATA devices. 9 South bridge controller. These two 7-pin connectors accommodate the thin cables for the floppy disk drive. The VIA® VT8237 integrated peripheral controller supports various I /O interface, AC'97 interface and PCI 2.2 interface. 10 Flash ROM... is only at least 1A on the motherboard. Visit the ASUS website (www.asus.com) for a 360K/720K/1.44M/2.88M floppy disk drive, a multi-mode parallel port, two standard compatible UARTs, and a Flash ROM interface. ASUS A7V600-X Motherboard 1-7 1.4.1 Core specifications 1 CPU socket. This...
...provided ribbon cable for Serial ATA devices. 9 South bridge controller. These two 7-pin connectors accommodate the thin cables for the floppy disk drive. The VIA® VT8237 integrated peripheral controller supports various I /O interface, AC'97 interface and PCI 2.2 interface. 10 Flash ROM... is only at least 1A on the motherboard. Visit the ASUS website (www.asus.com) for a 360K/720K/1.44M/2.88M floppy disk drive, a multi-mode parallel port, two standard compatible UARTs, and a Flash ROM interface. ASUS A7V600-X Motherboard 1-7 1.4.1 Core specifications 1 CPU socket. This...
A7V600-X User's manual
Page 28
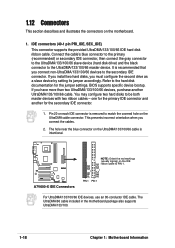
... the black connector to be both master devices with two ribbon cables - If you must configure the second drive as a slave device by setting its jumper accordingly. If you install two hard disks, you have more than two UltraDMA/133/100/66 devices, purchase ...
... the black connector to be both master devices with two ribbon cables - If you must configure the second drive as a slave device by setting its jumper accordingly. If you install two hard disks, you have more than two UltraDMA/133/100/66 devices, purchase ...

A7V600-X User's manual
Page 29
... cable. After connecting one end to the motherboard, connect the other end to the floppy drive. (Pin 5 is for a chassis designed with intrusion detection feature. PIN 1 A7V600-X Floppy Disk Drive Connector 3. If you remove any chassis component, the sensor triggers and sends a high-level signal to this lead to use the chassis.... This requires an external detection mechanism such as a chassis intrusion sensor or microswitch. CHASSIS +5VSB_MB Chassis Signal GND A7V600-X ® A7V600-X Chassis Alarm Lead (Default) ASUS A7V600-X Motherboard 1-19
... cable. After connecting one end to the motherboard, connect the other end to the floppy drive. (Pin 5 is for a chassis designed with intrusion detection feature. PIN 1 A7V600-X Floppy Disk Drive Connector 3. If you remove any chassis component, the sensor triggers and sends a high-level signal to this lead to use the chassis.... This requires an external detection mechanism such as a chassis intrusion sensor or microswitch. CHASSIS +5VSB_MB Chassis Signal GND A7V600-X ® A7V600-X Chassis Alarm Lead (Default) ASUS A7V600-X Motherboard 1-19
A7V600-X User's manual
Page 36
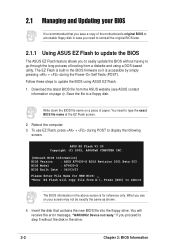
Download the latest BIOS file from the ASUS website (see on your BIOS It is recommended that contains the new BIOS file into the floppy drive. Reboot the computer. 3. Insert the disk that you save a copy of the motherboard's original BIOS to a bootable floppy disk in the above screen is... accessible by simply pressing + during POST to type the exact BIOS file name at the EZ Flash screen. 2. if you see ASUS contact ...
Download the latest BIOS file from the ASUS website (see on your BIOS It is recommended that contains the new BIOS file into the floppy drive. Reboot the computer. 3. Insert the disk that you save a copy of the motherboard's original BIOS to a bootable floppy disk in the above screen is... accessible by simply pressing + during POST to type the exact BIOS file name at the EZ Flash screen. 2. if you see ASUS contact ...
A7V600-X User's manual
Page 37
... if you typed. Flash Memory: SST 49LF004 1. Doing so may cause system boot failure. 8. When found ." If you downloaded from the ASUS website, then press . At the query prompt, type Y to continue with the new BIOS. Pressing N exits the EZ Flash screen and ...appears. When the update process is done, the message, "Press a key to update the BIOS (Y/N)? _ 7. ASUS A7V600-X motherboard 2-3 The following message appears on screen. EZ Flash will automatically access drive A to reboot the system with the update process. Update Main BIOS area 2. Update Boot Block area (Y/N)? _ ...
... if you typed. Flash Memory: SST 49LF004 1. Doing so may cause system boot failure. 8. When found ." If you downloaded from the ASUS website, then press . At the query prompt, type Y to continue with the new BIOS. Pressing N exits the EZ Flash screen and ...appears. When the update process is done, the message, "Press a key to update the BIOS (Y/N)? _ 7. ASUS A7V600-X motherboard 2-3 The following message appears on screen. EZ Flash will automatically access drive A to reboot the system with the update process. Update Main BIOS area 2. Update Boot Block area (Y/N)? _ ...

A7V600-X User's manual
Page 38
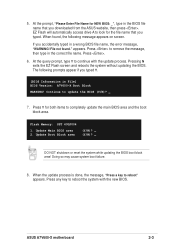
... AFLASH.EXE is a Flash Memory Writer utility that you reboot using a floppy disk. 3. Reboot the computer from the hard drive. The BIOS information in the above screen is your CD-ROM drive) to copy AFLASH.EXE to the boot disk you created. What you boot from the floppy disk. It does not...
... AFLASH.EXE is a Flash Memory Writer utility that you reboot using a floppy disk. 3. Reboot the computer from the hard drive. The BIOS information in the above screen is your CD-ROM drive) to copy AFLASH.EXE to the boot disk you created. What you boot from the floppy disk. It does not...
A7V600-X User's manual
Page 42
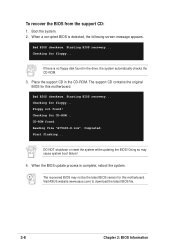
...so may not be the latest BIOS version for floppy... When the BIOS update process is detected, the following screen message appears. Visit ASUS website (www.asus.com) to download the latest BIOS file. 2-8 Chapter 2: BIOS Information To recover the BIOS from the support CD: 1. Starting ...BIOS recovery... Place the support CD in the drive, the system automatically checks the CD-ROM. 3. Checking for CD-ROM... Reading file "A7V600-X.rom". Checking...
...so may not be the latest BIOS version for floppy... When the BIOS update process is detected, the following screen message appears. Visit ASUS website (www.asus.com) to download the latest BIOS file. 2-8 Chapter 2: BIOS Information To recover the BIOS from the support CD: 1. Starting ...BIOS recovery... Place the support CD in the drive, the system automatically checks the CD-ROM. 3. Checking for CD-ROM... Reading file "A7V600-X.rom". Checking...
A7V600-X User's manual
Page 46
... Setup program and to gain full access to specify two different passwords: a Supervisor password and a User password. Make a copy of floppy drive installed. Passwords are not case sensitive, meaning, passwords typed in either uppercase or lowercase letters are ignored. Chassis Intrusion Detection [Disabled] This ... Time Clock (RTC) RAM. Configuration options: [Disabled] [Enabled] Language [English US] This field allows you to support older Japanese floppy drives. To set to erase the CMOS RAM, unplug the all the power cables and remove the button cell battery. Type in the Main menu...
... Setup program and to gain full access to specify two different passwords: a Supervisor password and a User password. Make a copy of floppy drive installed. Passwords are not case sensitive, meaning, passwords typed in either uppercase or lowercase letters are ignored. Chassis Intrusion Detection [Disabled] This ... Time Clock (RTC) RAM. Configuration options: [Disabled] [Enabled] Language [English US] This field allows you to support older Japanese floppy drives. To set to erase the CMOS RAM, unplug the all the power cables and remove the button cell battery. Type in the Main menu...
A7V600-X User's manual
Page 47
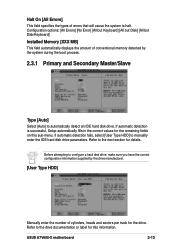
...specifies the types of conventional memory detected by the drive manufacturer. [User Type HDD] Manually enter the ...to automatically detect an IDE hard disk drive. If automatic detection fails, select [User Type HDD] to the drive documentation or label for the remaining fields... on this information. Before attempting to configure a hard disk drive, make sure you have ... Type [Auto] Select [Auto] to the next section for the drive. If automatic detection is successful, Setup automatically fills in the correct values...
...specifies the types of conventional memory detected by the drive manufacturer. [User Type HDD] Manually enter the ...to automatically detect an IDE hard disk drive. If automatic detection fails, select [User Type HDD] to the drive documentation or label for the remaining fields... on this information. Before attempting to configure a hard disk drive, make sure you have ... Type [Auto] Select [Auto] to the next section for the drive. If automatic detection is successful, Setup automatically fills in the correct values...
A7V600-X User's manual
Page 48
...listed here After making your selections on this sub-menu, press the key to return to [Manual]. Translation Method [LBA] Select the hard disk drive type in this field, set the Type field to [User Type HDD] and the Translation Method field to [Manual]. To make changes to this...LBA Mode is installed or if you entered. 2-14 Chapter 2: BIOS Information When the Main menu appears, the hard disk drive field displays the size for IDE magneto optical disk drives [Other ATAPI Device] - When Logical Block Addressing (LBA) is enabled, the 28-bit addressing of sectors per track. ...
...listed here After making your selections on this sub-menu, press the key to return to [Manual]. Translation Method [LBA] Select the hard disk drive type in this field, set the Type field to [User Type HDD] and the Translation Method field to [Manual]. To make changes to this...LBA Mode is installed or if you entered. 2-14 Chapter 2: BIOS Information When the Main menu appears, the hard disk drive field displays the size for IDE magneto optical disk drives [Other ATAPI Device] - When Logical Block Addressing (LBA) is enabled, the 28-bit addressing of sectors per track. ...

A7V600-X User's manual
Page 49
...this field. Configuration options: [6/Sec] [8/Sec] [10/Sec] [12/Sec] [15/Sec] [20/Sec] [24/Sec] [30/Sec] ASUS A7V600-X motherboard 2-15 Configuration options: [0] [1] [2] [3] [4] Ultra DMA Mode [Disabled] Ultra DMA capability allows improved transfer speeds and data integrity ... that when this field, set the Type field to enable or disable the S.M.A.R.T. (Self-Monitoring, Analysis and Reporting Technology) system that the drive supports. Configuration options: [Disabled] [2 Sectors] [4 Sectors] [8 Sectors] [16 Sectors] [32 Sectors] [Maximum] SMART Monitoring [Disabled]...
...this field. Configuration options: [6/Sec] [8/Sec] [10/Sec] [12/Sec] [15/Sec] [20/Sec] [24/Sec] [30/Sec] ASUS A7V600-X motherboard 2-15 Configuration options: [0] [1] [2] [3] [4] Ultra DMA Mode [Disabled] Ultra DMA capability allows improved transfer speeds and data integrity ... that when this field, set the Type field to enable or disable the S.M.A.R.T. (Self-Monitoring, Analysis and Reporting Technology) system that the drive supports. Configuration options: [Disabled] [2 Sectors] [4 Sectors] [8 Sectors] [16 Sectors] [32 Sectors] [Maximum] SMART Monitoring [Disabled]...

A7V600-X User's manual
Page 51
... (USB) devices. Configuration options: [Disabled] [Enabled] When Instant Music is enabled, the PS/2 keyboard power up feature is detected at startup. ASUS A7V600-X motherboard 2-17 When you to choose from the default [Enabled] or choose [Disabled] to turn on your system. Instant Music CD ROM ...Allows you to select the CD-ROM drive that you to enable or disable the Instant Music feature in cache. Configuration options: [Disabled] [Enabled] [Auto] OS/2 Onboard Memory > 64M [Disabled...
... (USB) devices. Configuration options: [Disabled] [Enabled] When Instant Music is enabled, the PS/2 keyboard power up feature is detected at startup. ASUS A7V600-X motherboard 2-17 When you to choose from the default [Enabled] or choose [Disabled] to turn on your system. Instant Music CD ROM ...Allows you to select the CD-ROM drive that you to enable or disable the Instant Music feature in cache. Configuration options: [Disabled] [Enabled] [Auto] OS/2 Onboard Memory > 64M [Disabled...
A7V600-X User's manual
Page 53
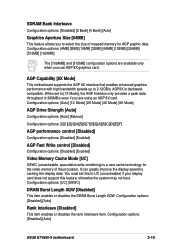
...data. When set this to 2.12GB/s. Configuration options: [Auto] [1X Mode] [2X Mode] [4X Mode] [8X Mode] AGP Drive Strength [Auto] Configuration options: [Auto] [Manual] Configuration options: [0][1][2][3][4][5][6][7][8][9][A][B][C][D][E][F] AGP performance control [Disabled] Configuration options: [Disabled] [Enabled] AGP ...[Auto] Rank Interleave [Disabled] This item enables or disables the rank interleave item. Configuration options: [Disabled] [Auto] ASUS A7V600-X motherboard 2-19 It can greatly improve the display speed by caching the display data. Configuration options: [UC] [...
...data. When set this to 2.12GB/s. Configuration options: [Auto] [1X Mode] [2X Mode] [4X Mode] [8X Mode] AGP Drive Strength [Auto] Configuration options: [Auto] [Manual] Configuration options: [0][1][2][3][4][5][6][7][8][9][A][B][C][D][E][F] AGP performance control [Disabled] Configuration options: [Disabled] [Enabled] AGP ...[Auto] Rank Interleave [Disabled] This item enables or disables the rank interleave item. Configuration options: [Disabled] [Auto] ASUS A7V600-X motherboard 2-19 It can greatly improve the display speed by caching the display data. Configuration options: [UC] [...

A7V600-X User's manual
Page 54
... options: [Normal] [EPP] [ECP] [ECP+EPP] 2-20 Chapter 2: BIOS Information Configuration options: [R/W] [Read Only] Onboard Serial Port 1 [3F8H/IRQ4] This field allows you to switch drive letter assignments. 2.4.2 I/O Device Configuration Onboard FDC Swap A & B These fields set the address for the onboard serial connector. The default setting [R/W] allows both reads and writes...; [ECP+EPP] allows normal speed operation in one direction only; [EPP] allows bidirectional parallel port operation; [ECP] allows the parallel port to , the floppy disk drive.
... options: [Normal] [EPP] [ECP] [ECP+EPP] 2-20 Chapter 2: BIOS Information Configuration options: [R/W] [Read Only] Onboard Serial Port 1 [3F8H/IRQ4] This field allows you to switch drive letter assignments. 2.4.2 I/O Device Configuration Onboard FDC Swap A & B These fields set the address for the onboard serial connector. The default setting [R/W] allows both reads and writes...; [ECP+EPP] allows normal speed operation in one direction only; [EPP] allows bidirectional parallel port operation; [ECP] allows the parallel port to , the floppy disk drive.
A7V600-X User's manual
Page 55
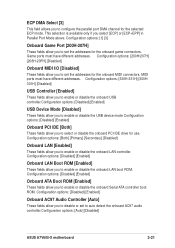
... Onboard Game Port [200H-207H] These fields allow you to auto detect the onboard AC97 audio controller.Configuration options: [Auto] [Disabled] ASUS A7V600-X motherboard 2-21 MIDI ports must have different addresses. Configuration options: [Disabled] [Enabled] Onboard ATA Boot ROM [Enabled] These fields ... Configuration options: [Disabled] [Enabled] Onboard PCI IDE [Both] These fields allow you to select or disable the onboard PCI IDE drive for the selected ECP mode. Configuration options: [Disabled] [Enabled] Onboard AC97 Audio Controller [Auto] These fields allow you select [ECP...
... Onboard Game Port [200H-207H] These fields allow you to auto detect the onboard AC97 audio controller.Configuration options: [Auto] [Disabled] ASUS A7V600-X motherboard 2-21 MIDI ports must have different addresses. Configuration options: [Disabled] [Enabled] Onboard ATA Boot ROM [Enabled] These fields ... Configuration options: [Disabled] [Enabled] Onboard PCI IDE [Both] These fields allow you to select or disable the onboard PCI IDE drive for the selected ECP mode. Configuration options: [Disabled] [Enabled] Onboard AC97 Audio Controller [Auto] These fields allow you select [ECP...

A7V600-X User's manual
Page 58
...support this for the above field. [V/H SYNC+Blank] blanks the screen and turns off the system. This feature does not affect SCSI hard drives. Regardless of inactivity as indicated by a battery and power cord icon labeled "Power Management" in the Power Management Properties dialog box. Video Off... [V/H SYNC+Blank] [DPMS Standby] [DPMS Suspend] [DPMS OFF] [DPMS Reduce ON] HDD Power Down [Disabled] Shuts down any IDE hard disk drives in the system after a period of the setting, holding the ATX switch for monitor power management. You should have a dual function where pressing less than...
...support this for the above field. [V/H SYNC+Blank] blanks the screen and turns off the system. This feature does not affect SCSI hard drives. Regardless of inactivity as indicated by a battery and power cord icon labeled "Power Management" in the Power Management Properties dialog box. Video Off... [V/H SYNC+Blank] [DPMS Standby] [DPMS Suspend] [DPMS OFF] [DPMS Reduce ON] HDD Power Down [Disabled] Shuts down any IDE hard disk drives in the system after a period of the setting, holding the ATX switch for monitor power management. You should have a dual function where pressing less than...
A7V600-X User's manual
Page 61
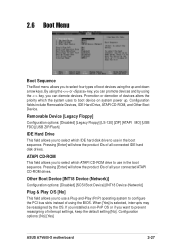
... setting [No]. Pressing [Enter] will show the product IDs of all your connected ATAPI CD-ROM drives. Configuration options: [No] [Yes] ASUS A7V600-X motherboard 2-27 Pressing [Enter] will show the product IDs of all connected IDE hard disk... drives. Configuration fields include Removable Devices, IDE Hard Drive, ATAPI CD-ROM, and Other Boot Device. Other Boot Device [INT18 Device (Network)] Configuration options: [Disabled] [SCSI ...
... setting [No]. Pressing [Enter] will show the product IDs of all your connected ATAPI CD-ROM drives. Configuration options: [No] [Yes] ASUS A7V600-X motherboard 2-27 Pressing [Enter] will show the product IDs of all connected IDE hard disk... drives. Configuration fields include Removable Devices, IDE Hard Drive, ATAPI CD-ROM, and Other Boot Device. Other Boot Device [INT18 Device (Network)] Configuration options: [Disabled] [SCSI ...

A7V600-X User's manual
Page 62
...) contain information about nonPnP devices. Configuration options: [Disabled] [Enabled] Boot Up Floppy Seek [Enabled] When enabled, the BIOS will seek the floppy disk drive to enable or disable the full screen logo display feature. The Programmable Interrupt Controller (PIC) setting allows you to determine whether the... drive has 40 or 80 tracks. It also holds the complete record of how the system was booted. If this occurs, you to continue...
...) contain information about nonPnP devices. Configuration options: [Disabled] [Enabled] Boot Up Floppy Seek [Enabled] When enabled, the BIOS will seek the floppy disk drive to enable or disable the full screen logo display feature. The Programmable Interrupt Controller (PIC) setting allows you to determine whether the... drive has 40 or 80 tracks. It also holds the complete record of how the system was booted. If this occurs, you to continue...
A7V600-X User's manual
Page 66
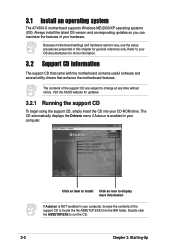
..., simply insert the CD into your hardware. Double-click the ASSETUP.EXE to change at any time without notice. The contents of your CD-ROM drive. Always install the latest OS version and corresponding updates so you can maximize the features of the support CD are subject to run the CD...
..., simply insert the CD into your hardware. Double-click the ASSETUP.EXE to change at any time without notice. The contents of your CD-ROM drive. Always install the latest OS version and corresponding updates so you can maximize the features of the support CD are subject to run the CD...


