User Manual
Page 19
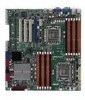
... Hot Swap. Furthermore, the supply voltage for DDR3. Serial ATA II technology The motherboard supports the Serial ATA II 3 Gb/s technology through the Serial ATA interface and Intel.... The system fan rotations per minute (RPM) is backward compatible with USB 1.1. ASUS Z8PE-D12 Series 1-5 This enhances system performance while still providing backward compatibility to a fast 480... 1.5V for the memory is monitored to meet the higher bandwidth requirements of server and workstation applications. The 3-channel DDR3 architecture boosts system performance, eliminating bottlenecks ...
... Hot Swap. Furthermore, the supply voltage for DDR3. Serial ATA II technology The motherboard supports the Serial ATA II 3 Gb/s technology through the Serial ATA interface and Intel.... The system fan rotations per minute (RPM) is backward compatible with USB 1.1. ASUS Z8PE-D12 Series 1-5 This enhances system performance while still providing backward compatibility to a fast 480... 1.5V for the memory is monitored to meet the higher bandwidth requirements of server and workstation applications. The 3-channel DDR3 architecture boosts system performance, eliminating bottlenecks ...
User Manual
Page 20
...-E x16 Link on both Server and Workstation. 100% Japan-made Conductive Polymer Capacitors This motherboard uses all high-quality conductive polymer capacitors (5000hrs) onboard for durability, improved lifespan, and enhanced thermal capacity. 1.4.2 Innovative ASUS features ASUS EPU With current trends leaning towards power efficiency, the Z8PE-D12X is equipped with the ASUS exclusive EPU technology to...
...-E x16 Link on both Server and Workstation. 100% Japan-made Conductive Polymer Capacitors This motherboard uses all high-quality conductive polymer capacitors (5000hrs) onboard for durability, improved lifespan, and enhanced thermal capacity. 1.4.2 Innovative ASUS features ASUS EPU With current trends leaning towards power efficiency, the Z8PE-D12X is equipped with the ASUS exclusive EPU technology to...
User Manual
Page 58
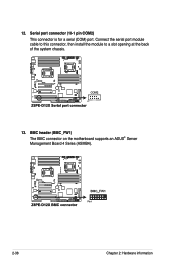
Connect the serial port module cable to this connector, then install the module to a slot opening at the back of the system chassis. 13. BMC header (BMC_FW1) The BMC connector on the motherboard supports an ASUS® Server Management Board 4 Series (ASMB4). 2-38 Chapter 2: Hardware information 12. Serial port connector (10-1 pin COM2) This connector is for a serial (COM) port.
Connect the serial port module cable to this connector, then install the module to a slot opening at the back of the system chassis. 13. BMC header (BMC_FW1) The BMC connector on the motherboard supports an ASUS® Server Management Board 4 Series (ASMB4). 2-38 Chapter 2: Hardware information 12. Serial port connector (10-1 pin COM2) This connector is for a serial (COM) port.
User Manual
Page 143
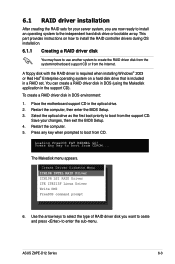
...create a RAID driver disk in the support CD). Select the optical drive as the first boot priority to enter the sub-menu. Save your server system, you want to ceate and press to boot from the Internet. Restart the computer. 5. This part provides instructions on a hard disk...create the RAID driver disk from the system/motherboard support CD or from the support CD. 6.1 RAID driver installation After creating the RAID sets for your changes, then exit the BIOS Setup. 4. Restart the computer, then enter the BIOS Setup. 3. ASUS Z8PE-D12 Series 6-3 The Makedisk menu appears. A ...
...create a RAID driver disk in the support CD). Select the optical drive as the first boot priority to enter the sub-menu. Save your server system, you want to ceate and press to boot from the Internet. Restart the computer. 5. This part provides instructions on a hard disk...create the RAID driver disk from the system/motherboard support CD or from the support CD. 6.1 RAID driver installation After creating the RAID sets for your changes, then exit the BIOS Setup. 4. Restart the computer, then enter the BIOS Setup. 3. ASUS Z8PE-D12 Series 6-3 The Makedisk menu appears. A ...
User Manual
Page 152
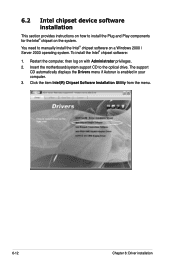
... Installation Utility from the menu. 6-12 Chapter 6: Driver installation To install the Intel® chipset software: 1. Insert the motherboard/system support CD to manually install the Intel® chipset software on a Windows 2000 / Server 2003 operating system. You need to the optical drive. The support CD automatically displays the Drivers menu if...
... Installation Utility from the menu. 6-12 Chapter 6: Driver installation To install the Intel® chipset software: 1. Insert the motherboard/system support CD to manually install the Intel® chipset software on a Windows 2000 / Server 2003 operating system. You need to the optical drive. The support CD automatically displays the Drivers menu if...

User Manual
Page 156
...controllers and displays window. Click the Intel® PRO/1000 EB Network Connection option. 6-16 Chapter 6: Driver installation Insert the motherboard/system support CD to locate the file AUTORUN.EXE from the \Drivers\Intel 82574L folder. The CD automatically displays the Drivers menu...AUTORUN.EXE and follow step 4 to install Intel® Gigabit LAN controller drivers. 6.3.1 Windows XP/Server 2003 To install the Intel® Gigabit LAN controller driver on a Windows® XP/ Server 2003 OS: 1. 6.3 LAN driver installation This section provides the instructions on how to run the ...
...controllers and displays window. Click the Intel® PRO/1000 EB Network Connection option. 6-16 Chapter 6: Driver installation Insert the motherboard/system support CD to locate the file AUTORUN.EXE from the \Drivers\Intel 82574L folder. The CD automatically displays the Drivers menu...AUTORUN.EXE and follow step 4 to install Intel® Gigabit LAN controller drivers. 6.3.1 Windows XP/Server 2003 To install the Intel® Gigabit LAN controller driver on a Windows® XP/ Server 2003 OS: 1. 6.3 LAN driver installation This section provides the instructions on how to run the ...
User Manual
Page 160
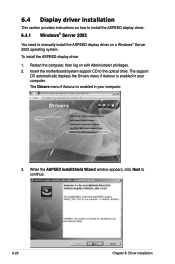
The support CD automatically displays the Drivers menu if Autorun is enabled in your computer. 3. Insert the motherboard/system support CD to continue. 6-20 Chapter 6: Driver installation The Drivers menu if Autorun is enabled in your computer. When... Next to the optical drive. 6.4 Display driver installation This section provides instructions on how to install the ASPEED display driver. 6.4.1 Windows® Server 2003 You need to manually install the ASPEED display driver on with Administrator privileges. 2. To install the ASPEED display driver 1. Restart the computer,...
The support CD automatically displays the Drivers menu if Autorun is enabled in your computer. 3. Insert the motherboard/system support CD to continue. 6-20 Chapter 6: Driver installation The Drivers menu if Autorun is enabled in your computer. When... Next to the optical drive. 6.4 Display driver installation This section provides instructions on how to install the ASPEED display driver. 6.4.1 Windows® Server 2003 You need to manually install the ASPEED display driver on with Administrator privileges. 2. To install the ASPEED display driver 1. Restart the computer,...


