User Manual
Page 8
...Seek professional assistance before using an adapter or extension cord. These devices could interrupt the grounding circuit. • Make sure that your power supply is broken, do not try to the correct voltage in your dealer immediately. • To avoid short circuits, keep paper clips,...on it by yourself. Operation safety • Before installing the motherboard and adding devices on a stable surface. • If you are connected. Contact a qualified service technician or your local power company. • If the power supply is set to fix it , carefully read all cables are ...
...Seek professional assistance before using an adapter or extension cord. These devices could interrupt the grounding circuit. • Make sure that your power supply is broken, do not try to the correct voltage in your dealer immediately. • To avoid short circuits, keep paper clips,...on it by yourself. Operation safety • Before installing the motherboard and adding devices on a stable surface. • If you are connected. Contact a qualified service technician or your local power company. • If the power supply is set to fix it , carefully read all cables are ...
User Manual
Page 19
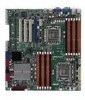
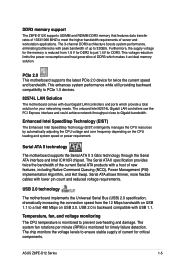
...motherboard comes with lower pin count and reduced voltage requirements. The Serial ATA II specification provides twice the bandwidth of the current Serial ATA products with USB 1.1. DDR3 memory support The Z8PE-D12X supports UDIMM and RDIMM DDR3 memory that features data transfer rates of 1333/1066 MHZ to Gigabit bandwidth. ASUS Z8PE-D12...bandwidth. This voltage reduction limits the power consumption and heat generation of current for your networking needs. The system fan rotations per minute (RPM) is monitored to ensure stable supply of DDR3 which provide a total solution...
...motherboard comes with lower pin count and reduced voltage requirements. The Serial ATA II specification provides twice the bandwidth of the current Serial ATA products with USB 1.1. DDR3 memory support The Z8PE-D12X supports UDIMM and RDIMM DDR3 memory that features data transfer rates of 1333/1066 MHZ to Gigabit bandwidth. ASUS Z8PE-D12...bandwidth. This voltage reduction limits the power consumption and heat generation of current for your networking needs. The system fan rotations per minute (RPM) is monitored to ensure stable supply of DDR3 which provide a total solution...
User Manual
Page 23
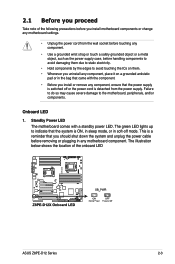
... the onboard LED ASUS Z8PE-D12 Series 2-3 The green LED lights up to indicate that you install or remove any motherboard component. Standby Power LED The motherboard comes with the component. • Before you should shut down the system and unplug the power cable before handling ...8226; Whenever you install motherboard components or change any motherboard settings. • Unplug the power cord from the wall socket before touching any component. • Use a grounded wrist strap or touch a safely grounded object or a metal object, such as the power supply case, before removing ...
... the onboard LED ASUS Z8PE-D12 Series 2-3 The green LED lights up to indicate that you install or remove any motherboard component. Standby Power LED The motherboard comes with the component. • Before you should shut down the system and unplug the power cable before handling ...8226; Whenever you install motherboard components or change any motherboard settings. • Unplug the power cord from the wall socket before touching any component. • Use a grounded wrist strap or touch a safely grounded object or a metal object, such as the power supply case, before removing ...
User Manual
Page 38
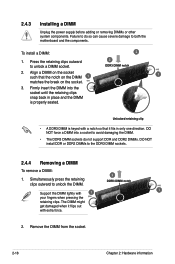
Press the retaining clips outward to both the motherboard and the components. DO NOT force a DIMM into the socket until the retaining clips snap back in only one direction. The DIMM might get damaged ... DIMM notch Support the DIMM lightly with extra force. 2. Unlocked retaining clip • A DDR3 DIMM is properly seated. To install a DIMM: 2 1. 2.4.3 Installing a DIMM Unplug the power supply before adding or removing DIMMs or other system components. Firmly insert the DIMM into a socket to avoid damaging the DIMM. • The DDR3 DIMM sockets...
Press the retaining clips outward to both the motherboard and the components. DO NOT force a DIMM into the socket until the retaining clips snap back in only one direction. The DIMM might get damaged ... DIMM notch Support the DIMM lightly with extra force. 2. Unlocked retaining clip • A DDR3 DIMM is properly seated. To install a DIMM: 2 1. 2.4.3 Installing a DIMM Unplug the power supply before adding or removing DIMMs or other system components. Firmly insert the DIMM into a socket to avoid damaging the DIMM. • The DDR3 DIMM sockets...
User Manual
Page 59
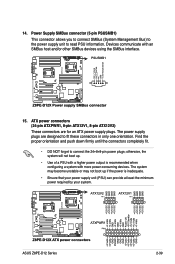
... SMBus host and/or other SMBus devices using the SMBus interface. 15. ASUS Z8PE-D12 Series 2-39 The power supply plugs are for an ATX power supply plugs. otherwise, the system will not boot up if the power is recommended when configuring a system with more power-consuming devices. Power Supply SMBus connector (5-pin PSUSMB1) This connector allows you to connect SMBus...
... SMBus host and/or other SMBus devices using the SMBus interface. 15. ASUS Z8PE-D12 Series 2-39 The power supply plugs are for an ATX power supply plugs. otherwise, the system will not boot up if the power is recommended when configuring a system with more power-consuming devices. Power Supply SMBus connector (5-pin PSUSMB1) This connector allows you to connect SMBus...
User Manual
Page 65
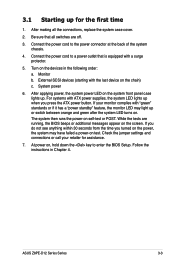
... the last device on self-test or POST. Monitor b. Check the jumper settings and connections or call your monitor complies with ATX power supplies, the system LED lights up . ASUS Z8PE-D12 Series Series 3-3 3.1 Starting up for assistance. 7. Connect the power cord to enter the BIOS Setup. For systems with "green" standards or if it has...
... the last device on self-test or POST. Monitor b. Check the jumper settings and connections or call your monitor complies with ATX power supplies, the system LED lights up . ASUS Z8PE-D12 Series Series 3-3 3.1 Starting up for assistance. 7. Connect the power cord to enter the BIOS Setup. For systems with "green" standards or if it has...


