

Vintage-PE2 User''s Manual for English Edition
Page 12
... system. 1-2 Chapter 1: System introduction External Internal 1 2 3 78 9 4 5 6 78 9 1 . This is for an IDE or Serial ATA hard disk drive. 3 . H a r d d i s k d r i v e b a y . R e s e t b u t t o n . O p t i c a l d r i v e b a y s ( d r i v e i n p h o t o n o t i n c l u d e d ) . 1.1 Welcome! The ASUS Vintage-PE2 is powered by the ASUS motherboard that supports Intel® Pentium® 4 processors in -one barebone system with a versatile home entertainment feature. The system comes in a stylish casing and is an...
... system. 1-2 Chapter 1: System introduction External Internal 1 2 3 78 9 4 5 6 78 9 1 . This is for an IDE or Serial ATA hard disk drive. 3 . H a r d d i s k d r i v e b a y . R e s e t b u t t o n . O p t i c a l d r i v e b a y s ( d r i v e i n p h o t o n o t i n c l u d e d ) . 1.1 Welcome! The ASUS Vintage-PE2 is powered by the ASUS motherboard that supports Intel® Pentium® 4 processors in -one barebone system with a versatile home entertainment feature. The system comes in a stylish casing and is an...
Vintage-PE2 User''s Manual for English Edition
Page 21
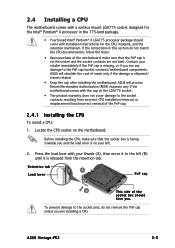
... the left . 2. Retention tab A Load lever PnP cap B This side of the socket box should come with installation instructions for the Intel® Pentium® 4 processor in this section do not remove the PnP cap unless you and the load lever is on your left .... Locate the CPU socket on the motherboard. Before installing the CPU, make sure that the socket box is facing towards you are not bent. ASUS Vintage-PE2 2-5 2.4 Installing a CPU The motherboard comes with a surface mount LGA775 socket designed for the CPU, heatsink, and the retention mechanism. Press the...
... the left . 2. Retention tab A Load lever PnP cap B This side of the socket box should come with installation instructions for the Intel® Pentium® 4 processor in this section do not remove the PnP cap unless you and the load lever is on your left .... Locate the CPU socket on the motherboard. Before installing the CPU, make sure that the socket box is facing towards you are not bent. ASUS Vintage-PE2 2-5 2.4 Installing a CPU The motherboard comes with a surface mount LGA775 socket designed for the CPU, heatsink, and the retention mechanism. Press the...

Vintage-PE2 User''s Manual for English Edition
Page 23
... to compile the code. ASUS Vintage-PE2 2-7 If you installed a CPU that supports Hyper-Threading Technology. 3. To use the Hyper-Threading compiler to Enabled. Under Linux, use the Hyper-Threading Technology on Hyper-Threading Technology, visit www.intel.com/info/hyperthreading. Close the... retention tab. Under the Advanced Menu, make sure that supports Hyper-Threading Technology. 2. B Notes on Intel® Hyper-Threading Technology • This motherboard supports Intel® Pentium® 4 CPUs in BIOS before installing a supported operating system. • For more ...
... to compile the code. ASUS Vintage-PE2 2-7 If you installed a CPU that supports Hyper-Threading Technology. 3. To use the Hyper-Threading compiler to Enabled. Under Linux, use the Hyper-Threading Technology on Hyper-Threading Technology, visit www.intel.com/info/hyperthreading. Close the... retention tab. Under the Advanced Menu, make sure that supports Hyper-Threading Technology. 2. B Notes on Intel® Hyper-Threading Technology • This motherboard supports Intel® Pentium® 4 CPUs in BIOS before installing a supported operating system. • For more ...
Vintage-PE2 User''s Manual for English Edition
Page 24
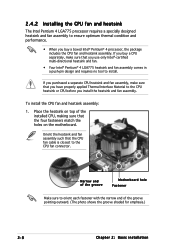
...Make sure to orient each fastener with the narrow end of the installed CPU, making sure that you use only Intel®-certified multi-directional heatsink and fan. • Your Intel® Pentium® 4 LGA775 heatsink and fan assembly comes in a push-pin design and requires no tool to...CPU heatsink and fan assembly, make sure that the four fasteners match the holes on the motherboard. 2.4.2 Installing the CPU fan and heatsink The Intel Pentium 4 LGA775 processor requires a specially designed heatsink and fan assembly to the CPU heatsink or CPU before you install the heatsink and fan assembly....
...Make sure to orient each fastener with the narrow end of the installed CPU, making sure that you use only Intel®-certified multi-directional heatsink and fan. • Your Intel® Pentium® 4 LGA775 heatsink and fan assembly comes in a push-pin design and requires no tool to...CPU heatsink and fan assembly, make sure that the four fasteners match the holes on the motherboard. 2.4.2 Installing the CPU fan and heatsink The Intel Pentium 4 LGA775 processor requires a specially designed heatsink and fan assembly to the CPU heatsink or CPU before you install the heatsink and fan assembly....
Vintage-PE2 User''s Manual for English Edition
Page 36
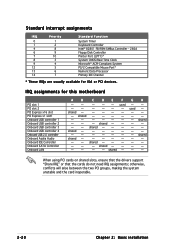
... assignments for ISA or PCI devices. shared - -- -- -- shared used - - - - shared - - - - Standard interrupt assignments IRQ Priority 0 1 1 2 4 8 6 9 7 10 8 3 9 4 12 5 13 6 14 7 Standard Function System Timer Keyboard Controller Intel® 82801 FB/FBM SMBus Controller - 266A Floppy Disk Controller Printer Port (LPT1)* System CMOS/Real Time Clock Microsoft® ACPI-Compliant System PS/2 Compatible...
... assignments for ISA or PCI devices. shared - -- -- -- shared used - - - - shared - - - - Standard interrupt assignments IRQ Priority 0 1 1 2 4 8 6 9 7 10 8 3 9 4 12 5 13 6 14 7 Standard Function System Timer Keyboard Controller Intel® 82801 FB/FBM SMBus Controller - 266A Floppy Disk Controller Printer Port (LPT1)* System CMOS/Real Time Clock Microsoft® ACPI-Compliant System PS/2 Compatible...

Vintage-PE2 User''s Manual for English Edition
Page 49
... silent or unattended preload modes. Refer to the online help or readme file that came with the utility for the Intel® chipset components on the motherboard. SoundMAX Audio Driver Executes the wizard to activate the devices. USB 2.0 Driver ...: interactive, silent, or unattended preload. Intel Chipset Inf Update Program This item installs the Intel® Chipset INF Update Program. QFE Update Installs the Quick Fix Engineering (QFE) driver updates. ASUS Vintage-PE2 3-3 Intel(R) Graphics Accelerator Driver Installs the Intel® Graphics Accelerator driver.
... silent or unattended preload modes. Refer to the online help or readme file that came with the utility for the Intel® chipset components on the motherboard. SoundMAX Audio Driver Executes the wizard to activate the devices. USB 2.0 Driver ...: interactive, silent, or unattended preload. Intel Chipset Inf Update Program This item installs the Intel® Chipset INF Update Program. QFE Update Installs the Quick Fix Engineering (QFE) driver updates. ASUS Vintage-PE2 3-3 Intel(R) Graphics Accelerator Driver Installs the Intel® Graphics Accelerator driver.

Vintage-PE2 User''s Manual for English Edition
Page 54
... CHA_FAN1 Top:Line In Center:Line Out Below:Mic In PCIEX16 RTL8100C AGP PCI1 ALC880 FP_AUDIO CD1 AUX1 PCI2 SB_PWR1 Intel® 915GL MCH PRI_IDE1 CR2032 3V Lithium Cell CMOS Power Intel ICH6 SATA4 SATA3 SATA2 SATA1 USBPW78 USB56 USBPW56 USB78 4Mb BIOS CLRTC1 BUZZ1 PANEL EATXPWR1 4-2 Chapter 4: Motherboard information 4.1 Introduction An...
... CHA_FAN1 Top:Line In Center:Line Out Below:Mic In PCIEX16 RTL8100C AGP PCI1 ALC880 FP_AUDIO CD1 AUX1 PCI2 SB_PWR1 Intel® 915GL MCH PRI_IDE1 CR2032 3V Lithium Cell CMOS Power Intel ICH6 SATA4 SATA3 SATA2 SATA1 USBPW78 USB56 USBPW56 USB78 4Mb BIOS CLRTC1 BUZZ1 PANEL EATXPWR1 4-2 Chapter 4: Motherboard information 4.1 Introduction An...

Vintage-PE2 User''s Manual for English Edition
Page 79
The P-ATA+S-ATA and P-ATA options are for detecting ATA/ATAPI devices. ASUS Vintage-PE2 5-17 The BIOS automatically detects the items in this setting, you may use native OS on the Parallel ATA ports o n l y i f you did not install ...of these options and encounter problems, revert to the default setting S A T A. In this menu. AMIBIOS Version : 0110 Build Date : 03/16/05 Processor Type : Genuine Intel(R) CPU 3.20GHz Speed : 3200 MHz Count : 1 System Memory Size : 248MB AMI BIOS Displays the auto-detected BIOS information. Configuration options: [S-ATA+P-ATA] [SATA mode] ...
The P-ATA+S-ATA and P-ATA options are for detecting ATA/ATAPI devices. ASUS Vintage-PE2 5-17 The BIOS automatically detects the items in this setting, you may use native OS on the Parallel ATA ports o n l y i f you did not install ...of these options and encounter problems, revert to the default setting S A T A. In this menu. AMIBIOS Version : 0110 Build Date : 03/16/05 Processor Type : Genuine Intel(R) CPU 3.20GHz Speed : 3200 MHz Count : 1 System Memory Size : 248MB AMI BIOS Displays the auto-detected BIOS information. Configuration options: [S-ATA+P-ATA] [SATA mode] ...

Vintage-PE2 User''s Manual for English Edition
Page 82
Configure Advanced CPU settings Manufacturer: Intel Brand String: Genuine Intel(R) CPU 3.20GHz Frequency : 3200 MHz FSB Speed : 800 MHz Cache L1 Cache L2 Cache L3 : 16 KB : 1024 KB : 0 KB Ratio Status: Locked Ratio Actual ...
Configure Advanced CPU settings Manufacturer: Intel Brand String: Genuine Intel(R) CPU 3.20GHz Frequency : 3200 MHz FSB Speed : 800 MHz Cache L1 Cache L2 Cache L3 : 16 KB : 1024 KB : 0 KB Ratio Status: Locked Ratio Actual ...

