Asus Vintage-PE2 Support and Manuals
Get Help and Manuals for this Asus item

View All Support Options Below
Free Asus Vintage-PE2 manuals!
Problems with Asus Vintage-PE2?
Ask a Question
Free Asus Vintage-PE2 manuals!
Problems with Asus Vintage-PE2?
Ask a Question
Popular Asus Vintage-PE2 Manual Pages
Vintage-PE2 User''s Manual for English Edition - Page 8

...and install drivers and utilities from the support CD. 4 .
The chapter lists the system features including introduction on how to change system settings through the BIOS Setup menus and describes the BIOS parameters. This guide is organized
This guide contains the following parts: 1. Chapter 4: Motherboard information This chapter gives information about the ASUS Vintage-PE2 barebone...
Vintage-PE2 User''s Manual for English Edition - Page 12

... and internal features of the ASUS Vintage-PE2 barebone system.
H a r d d i s k d r i v e b a y . This drive is for a 1.44 MB, 3.5-inch floppy disk.
4 . Press this button to reset the system.
1-2
Chapter 1: System introduction The ASUS Vintage-PE2 is powered by the ASUS motherboard that supports Intel® Pentium® 4 processors in -one barebone system with a versatile home...
Vintage-PE2 User''s Manual for English Edition - Page 23

.... ASUS Vintage-PE2
2-7 Power up the system and enter the BIOS Setup (see Chapter 5: BIOS setup). Under Linux, use the Hyper-Threading Technology on Intel® Hyper-Threading Technology
• This motherboard supports Intel® Pentium® 4 CPUs in the BIOS to ensure system stability and performance.
• Installing Windows® XP Service Pack 1 or later version is set...
Vintage-PE2 User''s Manual for English Edition - Page 35

... an IRQ to the chassis with a bracket screw.
Lay the chassis on the system and change the necessary BIOS settings, if any.
See Chapter 5 for the expansion card. Install the software drivers for information on BIOS setup.
2. ASUS Vintage-PE2
2-19 Secure the card to the card. Refer to use.
3. Remove the metal cover opposite the slot that you...
Vintage-PE2 User''s Manual for English Edition - Page 39

...install up ,
carefully insert the drive into the 3.5-inch bay.
3
ASUS Vintage-PE2
2-23 The following figures show the internal and external views of the HDD bay location. 2.8 Installing a hard disk drive
Refer to this section for instructions...a Phillips screw driver.
1
2.
Internal view
External view
IDE/Serial ATA HDD bay
Serial ATA HDD bays
To install a Serial ATA hard disk drive:
1.
Vintage-PE2 User''s Manual for English Edition - Page 41

8.
Serial ATA connectors
PRI_IDE1 connector
4 3
ASUS Vintage-PE2
2-25 Follow steps 1-5 of the drive. To install an IDE hard disk drive: 1. Connect a 4-pin power plug from the power supply unit to a Serial ATA connector on the motherboard.
3. Connect the other end of the Serial ATA cable to the power connector at the back of the
previous...
Vintage-PE2 User''s Manual for English Edition - Page 43
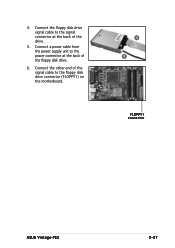
4. Connect a power cable from the power supply unit to the floppy disk drive connector (FLOPPY1) on the motherboard.
4 5
FLOPPY1 connector
ASUS Vintage-PE2
2-27 Connect the other end of the floppy disk drive.
6. Connect the floppy disk drive signal cable to the signal connector at the back of the signal cable to the power connector at the back of the drive.
5.
Vintage-PE2 User''s Manual for English Edition - Page 47

ASUS Vintage-PE2
Starting up
Chapter 3
This chapter helps you power up your system and install drivers and utilities that came with the support CD.
Vintage-PE2 User''s Manual for English Edition - Page 49

... enables Plug-n-Play INF support for configuring the chipset components. When the phone jacks of the High Definition Audio panel are configured as output, use the master volume to install the SoundMAC® audio driver and application.
SoundMAX Audio Driver
Executes the wizard to adjust the sound. ASUS Vintage-PE2
3-3 Install the necessary drivers to the online help or readme file...
Vintage-PE2 User''s Manual for English Edition - Page 53

ASUS Vintage-PE2 Motherboard info
Chapter 4
This chapter gives information about the motherboard that came with the system.This chapter includes the motherboard layout, jumper settings, and connector locations.
Vintage-PE2 User''s Manual for English Edition - Page 55
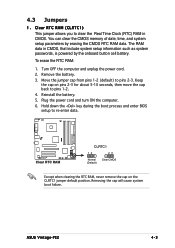
... process and enter BIOS setup to pins 1-2. 4. Clear RTC RAM (CLRTC1)
This jumper allows you to pins 2-3. Move the jumper cap from pins 1-2 (default) to clear the Real Time Clock (RTC) RAM in CMOS, that include system setup information such as system passwords, is powered by erasing the CMOS RTC RAM data. The RAM data in CMOS. 4.3 Jumpers
1. ASUS Vintage-PE2
4-3
Vintage-PE2 User''s Manual for English Edition - Page 61

...is for a chassis-mounted front panel audio I/O module that supports either HD Audio or legacy AC'97 audio standard.
®
AGND +5VA BLINE_OUT_R BLINE_OUT_L
MIC2 MICPWR Line out_R
NC Line out_L
Front panel audio connector
FP_AUDIO
We recommend that you to use the high-definition audio features of the motherboard. ASUS Vintage-PE2
4-9 7 . Internal audio connectors (4-pin AUX1, CD1)
These...
Vintage-PE2 User''s Manual for English Edition - Page 65
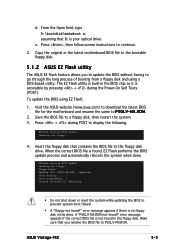
... the system when done. Press + during the Power-On Self Tests (POST). EZFlash starting BIOS update Checking for floppy... Start erasing.......| Start programming...| Flashed successfully. EZFlash starting BIOS update Checking for floppy...
4. ASUS Vintage-PE2
5-3 When the correct BIOS file is your optical drive.
d. From the Open field, type D:\bootdisk\makeboot a: assuming that...
Vintage-PE2 User''s Manual for English Edition - Page 67

... on a piece of paper.
Version 1.19(ASUS V2.07(03.11.24BB)) Copyright (C) 2003 American Megatrends, Inc. WARNING!! You need to a bootable floppy disk.
ASUS Vintage-PE2
5-5 A:\>afudos /iP5GLV-MX.ROM
4.
Write the BIOS filename on the bootable floppy disk. done Reading flash .... Visit the ASUS website (www.asus.com) and download the latest BIOS file for the motherboard.
Vintage-PE2 User''s Manual for English Edition - Page 73

..., it as easy to use the Setup program, you are not prompted to use as possible. If the system becomes unstable after changing any BIOS settings, load the default settings to enter Setup after POST, restart the system by pressing , or by turning the system off and then back on the motherboard stores the Setup utility. ASUS Vintage-PE2
5-11
Asus Vintage-PE2 Reviews
We have not received any reviews for Asus yet.