TUEG-VM User Manual
Page 2
...is defaced or missing. Copyright © 2001 ASUSTeK COMPUTER INC. For more information on manuals, BIOS, drivers, or recent product releases, contact ASUS at http://www.asus.com.tw or through any means, except for documentation kept by the digit before and after the ...manual revision number. Manual revisions are represented by the third digit in writing by ASUS; Product Name: ASUS TUEG-VM Manual Revision: 1.01 E859 Release Date: September 2001 2 ASUS TUEG-VM User's Manual IN NO EVENT SHALL ASUS, ITS DIRECTORS, OFFICERS, EMPLOYEES OR AGENTS BE LIABLE FOR ANY INDIRECT, SPECIAL,...
...is defaced or missing. Copyright © 2001 ASUSTeK COMPUTER INC. For more information on manuals, BIOS, drivers, or recent product releases, contact ASUS at http://www.asus.com.tw or through any means, except for documentation kept by the digit before and after the ...manual revision number. Manual revisions are represented by the third digit in writing by ASUS; Product Name: ASUS TUEG-VM Manual Revision: 1.01 E859 Release Date: September 2001 2 ASUS TUEG-VM User's Manual IN NO EVENT SHALL ASUS, ITS DIRECTORS, OFFICERS, EMPLOYEES OR AGENTS BE LIABLE FOR ANY INDIRECT, SPECIAL,...
TUEG-VM User Manual
Page 4
... 4.1.1 Upon First Use of the Computer System 45 4.1.2 Updating BIOS Procedures 47 4.2 BIOS Setup Program 49 4.2.1 BIOS Menu Bar 50 4.2.2 Legend Bar 50 4 ASUS TUEG-VM User's Manual FEATURES 8 2.1 The ASUS TUEG-VM 8 2.2 TUEG-VM Motherboard Components 12 3. INTRODUCTION 7 1.1 How This Manual Is Organized 7 1.2 Item Checklist 7 2. CONTENTS 1. HARDWARE SETUP 14 3.1 TUEG-VM Motherboard Layout 14 3.2 Layout Contents 15 3.3 Hardware Setup Procedure 17 3.4 Motherboard...
... 4.1.1 Upon First Use of the Computer System 45 4.1.2 Updating BIOS Procedures 47 4.2 BIOS Setup Program 49 4.2.1 BIOS Menu Bar 50 4.2.2 Legend Bar 50 4 ASUS TUEG-VM User's Manual FEATURES 8 2.1 The ASUS TUEG-VM 8 2.2 TUEG-VM Motherboard Components 12 3. INTRODUCTION 7 1.1 How This Manual Is Organized 7 1.2 Item Checklist 7 2. CONTENTS 1. HARDWARE SETUP 14 3.1 TUEG-VM Motherboard Layout 14 3.2 Layout Contents 15 3.3 Hardware Setup Procedure 17 3.4 Motherboard...
TUEG-VM User Manual
Page 7
... on setting up the BIOS Instructions on setting up the included software Reference material for (1) 5.25" and (2) 3.5" floppy disk drives (1) Serial COM2 connector with bracket (1) Bag of spare jumpers (1) Support drivers and utilities (1) User's Manual (1) ASUS 2-port USB connector set... with bracket Optional Items LCD controller module TVOUT controller module ASUS iPanel ASUS IrDA-compliant infrared module Smart Card Reader ASUS TUEG-VM User's Manual 7 SOFTWARE SETUP 6. APPENDIX Manual information...
... on setting up the BIOS Instructions on setting up the included software Reference material for (1) 5.25" and (2) 3.5" floppy disk drives (1) Serial COM2 connector with bracket (1) Bag of spare jumpers (1) Support drivers and utilities (1) User's Manual (1) ASUS 2-port USB connector set... with bracket Optional Items LCD controller module TVOUT controller module ASUS iPanel ASUS IrDA-compliant infrared module Smart Card Reader ASUS TUEG-VM User's Manual 7 SOFTWARE SETUP 6. APPENDIX Manual information...
TUEG-VM User Manual
Page 8
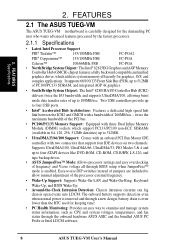
... data transfer rates of frequency and Vcore voltage all through the onboard hardware ASUS ASIC and the bundled ASUS PC Probe or Intel LDCM software. 8 ASUS TUEG-VM User's Manual FEATURES 2.1 The ASUS TUEG-VM The ASUS TUEG-VM motherboard is carefully designed for the demanding PC user who wants advanced features ...Provides an easy way to examine and manage system status information, such as CPU and system voltages, temperatures, and fan status through BIOS setup when JumperFree™ mode is even lower than the RTC used for graphics, O/S, and complex applications. Easy-to-use ...
... data transfer rates of frequency and Vcore voltage all through the onboard hardware ASUS ASIC and the bundled ASUS PC Probe or Intel LDCM software. 8 ASUS TUEG-VM User's Manual FEATURES 2.1 The ASUS TUEG-VM The ASUS TUEG-VM motherboard is carefully designed for the demanding PC user who wants advanced features ...Provides an easy way to examine and manage system status information, such as CPU and system voltages, temperatures, and fan status through BIOS setup when JumperFree™ mode is even lower than the RTC used for graphics, O/S, and complex applications. Easy-to-use ...

TUEG-VM User Manual
Page 9
...supports new security software for data protection and secured Internet transactions. • Enhanced ACPI & Anti-Boot Virus Protection: Programmable BIOS (Flash EEPROM), offering enhanced ACPI for Windows 98 compatibility, built-in firmware-based virus protection, and autodetection of financial, telephony... interfaces that support integrated audio and modem features that physically transports commands and information between SMBus devices. ASUS TUEG-VM User's Manual 9 Provides Vcore and CPU/ SDRAM frequency adjustments, boot block write protection, and HD/SCSI/MO/ ZIP/CD...
...supports new security software for data protection and secured Internet transactions. • Enhanced ACPI & Anti-Boot Virus Protection: Programmable BIOS (Flash EEPROM), offering enhanced ACPI for Windows 98 compatibility, built-in firmware-based virus protection, and autodetection of financial, telephony... interfaces that support integrated audio and modem features that physically transports commands and information between SMBus devices. ASUS TUEG-VM User's Manual 9 Provides Vcore and CPU/ SDRAM frequency adjustments, boot block write protection, and HD/SCSI/MO/ ZIP/CD...

TUEG-VM User Manual
Page 11
...; Voltage Monitoring and Alert: System voltage levels are PC'99 compliant. FEATURES Intelligence 2. FEATURES • PC'99 Compliant: Both the BIOS and hardware levels of the setting, pushing the power button for future processors, so monitoring is necessary to ensure proper system configuration and...or Sleep) button or as required by " (a.k.a. Through the way a particular LED illuminates, you can be defined as information providers. ASUS TUEG-VM User's Manual 11 Color-coded connectors and descriptive icons make identification easy as the Soft-Off button (see ATX Power / Soft-Off ...
...; Voltage Monitoring and Alert: System voltage levels are PC'99 compliant. FEATURES Intelligence 2. FEATURES • PC'99 Compliant: Both the BIOS and hardware levels of the setting, pushing the power button for future processors, so monitoring is necessary to ensure proper system configuration and...or Sleep) button or as required by " (a.k.a. Through the way a particular LED illuminates, you can be defined as information providers. ASUS TUEG-VM User's Manual 11 Color-coded connectors and descriptive icons make identification easy as the Soft-Off button (see ATX Power / Soft-Off ...
TUEG-VM User Manual
Page 18
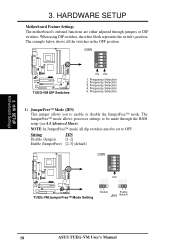
...JEN) This jumper allows you to OFF. HARDWARE SETUP Motherboard Feature Settings The motherboard's onboard functions are either adjusted through the BIOS setup (see 4.4 Advanced Menu). Frequency Selection 3. NOTE: In JumperFree™ mode, all the switches in the OFF position. ... DSW ON 12345 ® TUEG-VM TUEG-VM DIP Switches ON OFF 1. Setting JEN Disable (Jumper) [1-2] Enable (JumperFree) [2-3] (default) DSW ON 12345 ® TUEG-VM TUEG-VM JumperFree™ Mode Setting OFF 12 23 Disable Enable JEN (default) 18 ASUS TUEG-VM User's Manual The JumperFree™...
...JEN) This jumper allows you to OFF. HARDWARE SETUP Motherboard Feature Settings The motherboard's onboard functions are either adjusted through the BIOS setup (see 4.4 Advanced Menu). Frequency Selection 3. NOTE: In JumperFree™ mode, all the switches in the OFF position. ... DSW ON 12345 ® TUEG-VM TUEG-VM DIP Switches ON OFF 1. Setting JEN Disable (Jumper) [1-2] Enable (JumperFree) [2-3] (default) DSW ON 12345 ® TUEG-VM TUEG-VM JumperFree™ Mode Setting OFF 12 23 Disable Enable JEN (default) 18 ASUS TUEG-VM User's Manual The JumperFree™...
TUEG-VM User Manual
Page 22
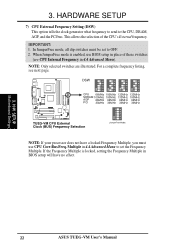
... next page. For a complete frequency listing, see CPU Internal Frequency in BIOS setup will have a locked Frequency Multiple, you must be set the Frequency Multiple. H/W SETUP Motherboard Settings 22 ASUS TUEG-VM User's Manual When JumperFree mode is locked, setting the Frequency Multiple in... 4.4 Advanced Menu). DSW ON 12345 ON 12345 ON 12345 ON 12345 ® TUEG-VM CPU 66MHz 100MHz 133MHz 133MHz SDRAM 100MHz 100MHz...
... next page. For a complete frequency listing, see CPU Internal Frequency in BIOS setup will have a locked Frequency Multiple, you must be set the Frequency Multiple. H/W SETUP Motherboard Settings 22 ASUS TUEG-VM User's Manual When JumperFree mode is locked, setting the Frequency Multiple in... 4.4 Advanced Menu). DSW ON 12345 ON 12345 ON 12345 ON 12345 ® TUEG-VM CPU 66MHz 100MHz 133MHz 133MHz SDRAM 100MHz 100MHz...
TUEG-VM User Manual
Page 24
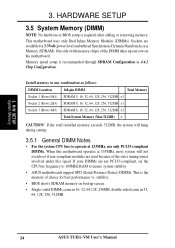
... of choice for 3.3Volt (power level) unbuffered Synchronous Dynamic Random Access Memory (SDRAM). Install memory in 32, 64, 128, 256, 512MB. 24 ASUS TUEG-VM User's Manual If the total installed memory exceeds 512MB, the system will hang during startup. 3.5.1 General DIMM Notes • For the system CPU bus...setup is recommended through SDRAM Configuration in 16, 32, 64,128, 256MB; 3. HARDWARE SETUP 3.5 System Memory (DIMM) NOTE: No hardware or BIOS setup is the memory of the DIMM takes up one row on bootup screen. • Single-sided DIMMs come in any combination as follows: ...
... of choice for 3.3Volt (power level) unbuffered Synchronous Dynamic Random Access Memory (SDRAM). Install memory in 32, 64, 128, 256, 512MB. 24 ASUS TUEG-VM User's Manual If the total installed memory exceeds 512MB, the system will hang during startup. 3.5.1 General DIMM Notes • For the system CPU bus...setup is recommended through SDRAM Configuration in 16, 32, 64,128, 256MB; 3. HARDWARE SETUP 3.5 System Memory (DIMM) NOTE: No hardware or BIOS setup is the memory of the DIMM takes up one row on bootup screen. • Single-sided DIMMs come in any combination as follows: ...
TUEG-VM User Manual
Page 27
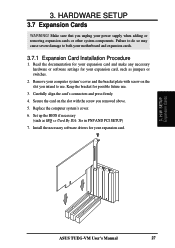
... PCI SETUP) 7. HARDWARE SETUP 3.7 Expansion Cards WARNING! Carefully align the card's connectors and press firmly. 4. H/W SETUP Expansion Cards ASUS TUEG-VM User's Manual 27 Install the necessary software drivers for your motherboard and expansion cards. 3.7.1 Expansion Card Installation Procedure 1. Keep the bracket for.... 3. Failure to do so may cause severe damage to use . 3. Replace the computer system's cover. 6. Set up the BIOS if necessary (such as jumpers or switches. 2. 3. Read the documentation for your expansion card and make any necessary hardware or software...
... PCI SETUP) 7. HARDWARE SETUP 3.7 Expansion Cards WARNING! Carefully align the card's connectors and press firmly. 4. H/W SETUP Expansion Cards ASUS TUEG-VM User's Manual 27 Install the necessary software drivers for your motherboard and expansion cards. 3.7.1 Expansion Card Installation Procedure 1. Keep the bracket for.... 3. Failure to do so may cause severe damage to use . 3. Replace the computer system's cover. 6. Set up the BIOS if necessary (such as jumpers or switches. 2. 3. Read the documentation for your expansion card and make any necessary hardware or software...

TUEG-VM User Manual
Page 34
...hard disk documentation for the primary IDE connector and another on a SCSI drive and select the boot disk through 4.4.1 Advanced CMOS Setup. BIOS now supports specific device bootup (see 4.4.1 Advanced CMOS Setup). (Pin 20 is recommended that non-UltraDMA/100 devices be both Masters with... floppy ribbon cable to the secondary IDE connector. one operating system on an IDE drive and another for 100MByte/sec transfer rates. 34 ASUS TUEG-VM User's Manual You may configure two hard disks to be connected to PIN 1. Connect the cable's blue connector to the motherboard's primary...
...hard disk documentation for the primary IDE connector and another on a SCSI drive and select the boot disk through 4.4.1 Advanced CMOS Setup. BIOS now supports specific device bootup (see 4.4.1 Advanced CMOS Setup). (Pin 20 is recommended that non-UltraDMA/100 devices be both Masters with... floppy ribbon cable to the secondary IDE connector. one operating system on an IDE drive and another for 100MByte/sec transfer rates. 34 ASUS TUEG-VM User's Manual You may configure two hard disks to be connected to PIN 1. Connect the cable's blue connector to the motherboard's primary...
TUEG-VM User Manual
Page 43
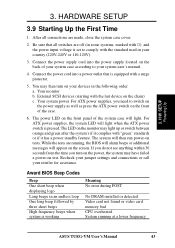
...made, close the system case cover. 2. Connect the power supply cord into a power outlet that all connections are running at a lower frequency ASUS TUEG-VM User's Manual 43 External SCSI devices (starting with "green" standards or if it complies with the last device on tests. Recheck your jumper settings... and connections or call your system user's manual. 4. Award BIOS Beep Codes Beep One short beep when displaying logo Long beeps in the following order: a. You may then turn on the power, the ...
...made, close the system case cover. 2. Connect the power supply cord into a power outlet that all connections are running at a lower frequency ASUS TUEG-VM User's Manual 43 External SCSI devices (starting with "green" standards or if it complies with the last device on tests. Recheck your jumper settings... and connections or call your system user's manual. 4. Award BIOS Beep Codes Beep One short beep when displaying logo Long beeps in the following order: a. You may then turn on the power, the ...
TUEG-VM User Manual
Page 44
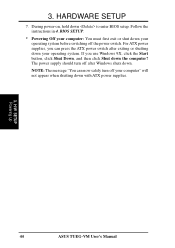
Follow the instructions in 4. NOTE: The message "You can press the ATX power switch after Windows shuts down to enter BIOS setup. HARDWARE SETUP 7. BIOS SETUP. * Powering Off your computer: You must first exit or shut down your computer" will not appear when shutting down the computer? For ATX power ... turn off your operating system before switching off after exiting or shutting down your operating system. During power-on, hold down . H/W SETUP Powering Up 44 ASUS TUEG-VM User's Manual
Follow the instructions in 4. NOTE: The message "You can press the ATX power switch after Windows shuts down to enter BIOS setup. HARDWARE SETUP 7. BIOS SETUP. * Powering Off your computer: You must first exit or shut down your computer" will not appear when shutting down the computer? For ATX power ... turn off your operating system before switching off after exiting or shutting down your operating system. During power-on, hold down . H/W SETUP Powering Up 44 ASUS TUEG-VM User's Manual
TUEG-VM User Manual
Page 45
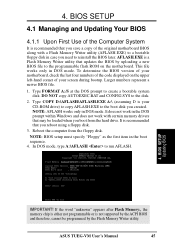
This file works only in DOS mode. Larger numbers represent a newer BIOS file. 1. NOTE: AFLASH works only in DOS mode. AFLASH.EXE is a Flash Memory Writer utility that you created. ASUS TUEG-VM User's Manual 45 4. Reboot the computer from the hard drive. It is recommended that may... be programmed by the Flash Memory Writer utility. NOTE: BIOS setup must specify "Floppy" as the first item in case...
This file works only in DOS mode. Larger numbers represent a newer BIOS file. 1. NOTE: AFLASH works only in DOS mode. AFLASH.EXE is a Flash Memory Writer utility that you created. ASUS TUEG-VM User's Manual 45 4. Reboot the computer from the hard drive. It is recommended that may... be programmed by the Flash Memory Writer utility. NOTE: BIOS setup must specify "Floppy" as the first item in case...
TUEG-VM User Manual
Page 46
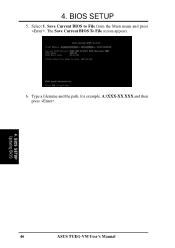
BIOS SETUP Updating BIOS 46 ASUS TUEG-VM User's Manual Save Current BIOS to File from the Main menu and press . Type a filename and the path, for example, A:\XXX-XX.XXX and then press . 4. 4. The Save Current BIOS To File screen appears. 6. BIOS SETUP 5. Select 1.
BIOS SETUP Updating BIOS 46 ASUS TUEG-VM User's Manual Save Current BIOS to File from the Main menu and press . Type a filename and the path, for example, A:\XXX-XX.XXX and then press . 4. 4. The Save Current BIOS To File screen appears. 6. BIOS SETUP 5. Select 1.
TUEG-VM User Manual
Page 47
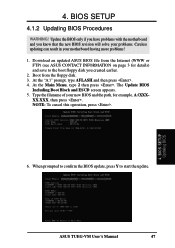
... 2. Boot from the Internet (WWW or FTP) (see ASUS CONTACT INFORMATION on page 3 for example, A:\XXX- NOTE: To cancel this operation, press . 6. Download an updated ASUS BIOS file from the floppy disk. 3. The Update BIOS Including Boot Block and ESCD screen appears. 5. When prompted to...new BIOS and the path, for details) and save to start the update. 4. XX.XXX, then press . At the Main Menu, type 2 then press . Type the filename of your motherboard having more problems! 1. At the "A:\" prompt, type AFLASH and then press . 4. 4. BIOS SETUP Updating BIOS ASUS TUEG-VM ...
... 2. Boot from the Internet (WWW or FTP) (see ASUS CONTACT INFORMATION on page 3 for example, A:\XXX- NOTE: To cancel this operation, press . 6. Download an updated ASUS BIOS file from the floppy disk. 3. The Update BIOS Including Boot Block and ESCD screen appears. 5. When prompted to...new BIOS and the path, for details) and save to start the update. 4. XX.XXX, then press . At the Main Menu, type 2 then press . Type the filename of your motherboard having more problems! 1. At the "A:\" prompt, type AFLASH and then press . 4. 4. BIOS SETUP Updating BIOS ASUS TUEG-VM ...
TUEG-VM User Manual
Page 48
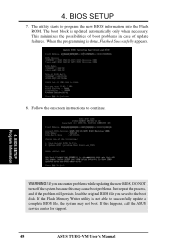
... necessary. The boot block is not able to continue. If you encounter problems while updating the new BIOS, DO NOT turn off the system because this happens, call the ASUS service center for support. 48 ASUS TUEG-VM User's Manual The utility starts to the boot disk. P WARNING! If this may not boot. This minimizes...
... necessary. The boot block is not able to continue. If you encounter problems while updating the new BIOS, DO NOT turn off the system because this happens, call the ASUS service center for support. 48 ASUS TUEG-VM User's Manual The utility starts to the boot disk. P WARNING! If this may not boot. This minimizes...
TUEG-VM User Manual
Page 49
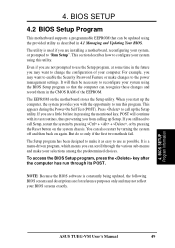
...POST will then be updated using this program. The Setup program has been designed to make your BIOS screens exactly. 4. BIOS SETUP Program Information ASUS TUEG-VM User's Manual 49 BIOS SETUP 4.2 BIOS Setup Program This motherboard supports a programmable EEPROM that the computer can also restart by pressing the... section describes how to change the configuration of the EEPROM. To access the BIOS Setup program, press the key after the computer has run this utility. NOTE: Because the BIOS software is a menu-driven program, which means you may not reflect your selections...
...POST will then be updated using this program. The Setup program has been designed to make your BIOS screens exactly. 4. BIOS SETUP Program Information ASUS TUEG-VM User's Manual 49 BIOS SETUP 4.2 BIOS Setup Program This motherboard supports a programmable EEPROM that the computer can also restart by pressing the... section describes how to change the configuration of the EEPROM. To access the BIOS Setup program, press the key after the computer has run this utility. NOTE: Because the BIOS software is a menu-driven program, which means you may not reflect your selections...
TUEG-VM User Manual
Page 50
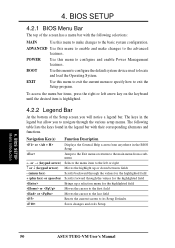
...menu to make changes to the main menu from anywhere in the legend bar allow you will notice a legend bar. BIOS SETUP Menu Introduction 50 ASUS TUEG-VM User's Manual EXIT Use this menu to configure the default system device used to its Setup Defaults Saves changes and exits... Setup 4. 4. BIOS SETUP 4.2.1 BIOS Menu Bar The top of the Setup screen you to navigate through the values for the highlighted ...
...menu to make changes to the main menu from anywhere in the legend bar allow you will notice a legend bar. BIOS SETUP Menu Introduction 50 ASUS TUEG-VM User's Manual EXIT Use this menu to configure the default system device used to its Setup Defaults Saves changes and exits... Setup 4. 4. BIOS SETUP 4.2.1 BIOS Menu Bar The top of the Setup screen you to navigate through the values for the highlighted ...
TUEG-VM User Manual
Page 51
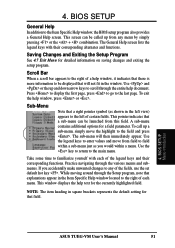
...that explanations appear in the window. Use the legend keys to enter values and move the highlight to the Item Specific Help window, the BIOS setup program also provides a General Help screen. Saving Changes and Exiting the Setup Program See 4.7 Exit Menu for a field parameter. A...information on saving changes and exiting the setup program. Take some time to any menu by simply pressing or the + combination. BIOS SETUP Menu Introduction ASUS TUEG-VM User's Manual 51 The General Help screen lists the legend keys with each menu. Practice navigating through the Setup program, note...
...that explanations appear in the window. Use the legend keys to enter values and move the highlight to the Item Specific Help window, the BIOS setup program also provides a General Help screen. Saving Changes and Exiting the Setup Program See 4.7 Exit Menu for a field parameter. A...information on saving changes and exiting the setup program. Take some time to any menu by simply pressing or the + combination. BIOS SETUP Menu Introduction ASUS TUEG-VM User's Manual 51 The General Help screen lists the legend keys with each menu. Practice navigating through the Setup program, note...


