T2-P User Manual
Page 3
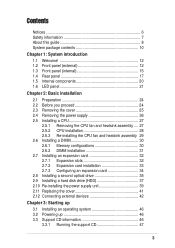
... a CPU 27 2.5.1 Removing the CPU fan and heatsink assembly .... 27 2.5.2 CPU installation 28 2.5.3 Re-installing the CPU fan and heatsink assembly 29 2.6 Installing a DIMM 30 2.6.1 Memory configurations 30 2.6.2 DIMM installation 31 2.7 Installing an expansion card 32 2.7.1 Expansion slots 32 2.7.2 Expansion card installation 33 2.7.3 Configuring an expansion card 34 2.8 Installing a second optical...
... a CPU 27 2.5.1 Removing the CPU fan and heatsink assembly .... 27 2.5.2 CPU installation 28 2.5.3 Re-installing the CPU fan and heatsink assembly 29 2.6 Installing a DIMM 30 2.6.1 Memory configurations 30 2.6.2 DIMM installation 31 2.7 Installing an expansion card 32 2.7.1 Expansion slots 32 2.7.2 Expansion card installation 33 2.7.3 Configuring an expansion card 34 2.8 Installing a second optical...
T2-P User Manual
Page 12
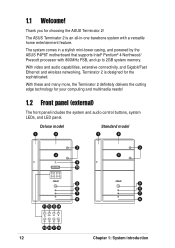
... and audio capabilities, extensive connectivity, and Gigabit/Fast Ethernet and wireless networking, Terminator 2 is an all-in a stylish mini-tower casing, and powered by the ASUS P4P8T motherboard that supports Intel® Pentium® 4 Northwood/ Prescott processor with a versatile home entertainment feature. Deluxe model 1 2 Standard model 1 2 3 4 9 10 MODE 5 6 7 8 11... 3 4 5 6 7 8 15 16 17 18 12 Chapter 1: System introduction The system comes in -one barebone system with 800MHz FSB, and up to 2GB system memory. 1.1 Welcome! Thank you for choosing the ASUS Terminator 2!
... and audio capabilities, extensive connectivity, and Gigabit/Fast Ethernet and wireless networking, Terminator 2 is an all-in a stylish mini-tower casing, and powered by the ASUS P4P8T motherboard that supports Intel® Pentium® 4 Northwood/ Prescott processor with a versatile home entertainment feature. Deluxe model 1 2 Standard model 1 2 3 4 9 10 MODE 5 6 7 8 11... 3 4 5 6 7 8 15 16 17 18 12 Chapter 1: System introduction The system comes in -one barebone system with 800MHz FSB, and up to 2GB system memory. 1.1 Welcome! Thank you for choosing the ASUS Terminator 2!

T2-P User Manual
Page 15
... SmartMedia® storage card. • You can not close the storage card reader door if a storage card is for a Memory Stick®/Memory Stick Pro™ storage card. 23. Open the front panel doors by pressing the mark. Deluxe model (with it.... Memory Stick®/Memory Stick Pro™ card slot. 1.3 Front panel (internal) The optical drive(s), storage card reader slots, and several I/O ...19 20 21 22 23 24 MODE 25 26 27 28 29 30 25 26 27 30 19. ASUS Terminator 2 barebone system 15
... SmartMedia® storage card. • You can not close the storage card reader door if a storage card is for a Memory Stick®/Memory Stick Pro™ storage card. 23. Open the front panel doors by pressing the mark. Deluxe model (with it.... Memory Stick®/Memory Stick Pro™ card slot. 1.3 Front panel (internal) The optical drive(s), storage card reader slots, and several I/O ...19 20 21 22 23 24 MODE 25 26 27 28 29 30 25 26 27 30 19. ASUS Terminator 2 barebone system 15
T2-P User Manual
Page 24
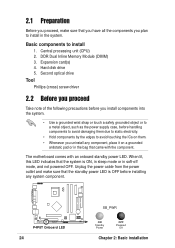
...-off mode, and not powered OFF. P4P8T ® P4P8T Onboard LED 24 SB_PWR ON Standby Power OFF Powered Off Chapter 2: Basic installation DDR Dual Inline Memory Module (DIMM) 3. Expansion card(s) 4. Basic components to install 1.
...-off mode, and not powered OFF. P4P8T ® P4P8T Onboard LED 24 SB_PWR ON Standby Power OFF Powered Off Chapter 2: Basic installation DDR Dual Inline Memory Module (DIMM) 3. Expansion card(s) 4. Basic components to install 1.
T2-P User Manual
Page 30
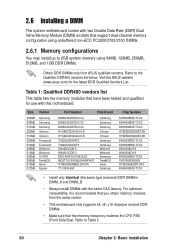
... Side Bus). Refer to Table 2. 30 Chapter 2: Basic installation For optimum compatibility, it is recommended that you obtain memory modules from ASUS qualified vendors. Size 256MB 256MB 512MB 256MB 512MB 256MB 512MB 256MB 512MB 256MB 256MB 512MB 512MB Vendor Samsung Samsung Samsung Infineon...install DIMMs with two Double Data Rate (DDR) Dual Inline Memory Module (DIMM) sockets that support dual-channel memory configuration using unbuffered non-ECC PC3200/2700/2100 DIMMs. 2.6.1 Memory configurations You may install up to 2GB system memory using 64MB, 128MB, 256MB, 512MB, and 1GB DDR ...
... Side Bus). Refer to Table 2. 30 Chapter 2: Basic installation For optimum compatibility, it is recommended that you obtain memory modules from ASUS qualified vendors. Size 256MB 256MB 512MB 256MB 512MB 256MB 512MB 256MB 512MB 256MB 256MB 512MB 512MB Vendor Samsung Samsung Samsung Infineon...install DIMMs with two Double Data Rate (DDR) Dual Inline Memory Module (DIMM) sockets that support dual-channel memory configuration using unbuffered non-ECC PC3200/2700/2100 DIMMs. 2.6.1 Memory configurations You may install up to 2GB system memory using 64MB, 128MB, 256MB, 512MB, and 1GB DDR ...

T2-P User Manual
Page 31
... DIMM installation To install a DDR DIMM. 1. Retaining clips 3 2 2 4 4 1 A DDR DIMM is properly seated. ASUS Terminator 2 barebone system 31 Table 2: Memory frequency/CPU FSB synchronization The system motherboard supports different memory frequencies depending on the motherboard. 2. Locate the two DIMM sockets on the CPU FSB (Front Side Bus) and...the type of DDR DIMM. CPU FSB 800 MHz 533 MHz 400 MHz DDR DIMM Type PC3200/PC2700*/PC2100 PC2700/PC2100 PC2100 Memory Frequency 400/333*/266 MHz 333/266 MHz 266 MHz *When using 800MHz CPU FSB, PC2700 DDR DIMMs may run only at...
... DIMM installation To install a DDR DIMM. 1. Retaining clips 3 2 2 4 4 1 A DDR DIMM is properly seated. ASUS Terminator 2 barebone system 31 Table 2: Memory frequency/CPU FSB synchronization The system motherboard supports different memory frequencies depending on the motherboard. 2. Locate the two DIMM sockets on the CPU FSB (Front Side Bus) and...the type of DDR DIMM. CPU FSB 800 MHz 533 MHz 400 MHz DDR DIMM Type PC3200/PC2700*/PC2100 PC2700/PC2100 PC2100 Memory Frequency 400/333*/266 MHz 333/266 MHz 266 MHz *When using 800MHz CPU FSB, PC2700 DDR DIMMs may run only at...
T2-P User Manual
Page 77
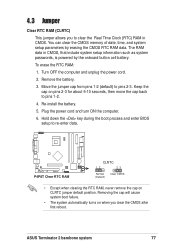
...battery. 3. 4.3 Jumper Clear RTC RAM (CLRTC) This jumper allows you clear the CMOS after first reboot. Plug the power cord and turn ON the computer. 6. ASUS Terminator 2 barebone system 77 Move the jumper cap from pins 1-2 (default) to re-enter data. Re-install the battery. 5. To erase the RTC RAM: ... the CMOS RTC RAM data. Hold down the key during the boot process and enter BIOS setup to pins 2-3. You can clear the CMOS memory of date, time, and system setup parameters by the onboard button cell battery. The RAM data in CMOS. Removing the cap will cause system...
...battery. 3. 4.3 Jumper Clear RTC RAM (CLRTC) This jumper allows you clear the CMOS after first reboot. Plug the power cord and turn ON the computer. 6. ASUS Terminator 2 barebone system 77 Move the jumper cap from pins 1-2 (default) to re-enter data. Re-install the battery. 5. To erase the RTC RAM: ... the CMOS RTC RAM data. Hold down the key during the boot process and enter BIOS setup to pins 2-3. You can clear the CMOS memory of date, time, and system setup parameters by the onboard button cell battery. The RAM data in CMOS. Removing the cap will cause system...
T2-P User Manual
Page 103
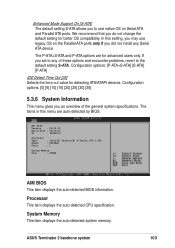
...] [20] [25] [30] [35] 5.3.6 System Information This menu gives you do not change the default setting for better OS compatibility. ASUS Terminator 2 barebone system 103 In this menu are for detecting ATA/ATAPI devices. If you did not install any of the general system specifications. ... Build Date : 09/03/03 ID : P4P8T113 Processor Type Speed Count : Intel(R) Pentium(R) 4 Family CPU 2.40G : 2600MHz : 1 System Memory Size : 256MB AMI BIOS This item displays the auto-detected BIOS information. The P-ATA+S-ATA and P-ATA options are auto-detected by BIOS. Enhanced...
...] [20] [25] [30] [35] 5.3.6 System Information This menu gives you do not change the default setting for better OS compatibility. ASUS Terminator 2 barebone system 103 In this menu are for detecting ATA/ATAPI devices. If you did not install any of the general system specifications. ... Build Date : 09/03/03 ID : P4P8T113 Processor Type Speed Count : Intel(R) Pentium(R) 4 Family CPU 2.40G : 2600MHz : 1 System Memory Size : 256MB AMI BIOS This item displays the auto-detected BIOS information. The P-ATA+S-ATA and P-ATA options are auto-detected by BIOS. Enhanced...
T2-P User Manual
Page 105
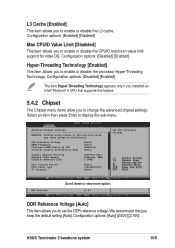
...Voltage DRAM Frequency Configure DRAM Timing by SPD Internal Graphic Acceleration Mode [Auto] [Auto] [Enabled] [Auto] Graphic Adapter Priority Onboard Video Memory Graphics Aperture Size [AGP/Int-VGA] [Enabled, 8MB] [ 64MB] Boot Display Device Flat Panel type TV Standard [Auto] [640x480LVDS]... [Auto] Set DDR reference voltage. Configuration options: [Auto] [2.60V] [2.70V] ASUS Terminator 2 barebone system 105 MPS Revision Scroll down to view more option. [1.4] DDR Reference Voltage [Auto] This item allows you to enable...
...Voltage DRAM Frequency Configure DRAM Timing by SPD Internal Graphic Acceleration Mode [Auto] [Auto] [Enabled] [Auto] Graphic Adapter Priority Onboard Video Memory Graphics Aperture Size [AGP/Int-VGA] [Enabled, 8MB] [ 64MB] Boot Display Device Flat Panel type TV Standard [Auto] [640x480LVDS]... [Auto] Set DDR reference voltage. Configuration options: [Auto] [2.60V] [2.70V] ASUS Terminator 2 barebone system 105 MPS Revision Scroll down to view more option. [1.4] DDR Reference Voltage [Auto] This item allows you to enable...

T2-P User Manual
Page 107
...4MB] [8MB] [16MB] [32MB] [64MB] [128MB] [128MB] Boot Display Device [Auto] This parameter allows you to select the mapped memory for AGP graphic data. Configuration options: [Enabled, 1MB] [Enabled, 4MB] [Enabled, 8MB] [Enabled, 16MB] [Enabled, 32MB] Graphics ...TV Standard [Auto] This parameter allows you to select the flat panel display resolution when you to set the size of the onboard video memory. Configuration options: [Auto] [NTSC_M] [PAL_B] [SECAM_L] [NTSC_M_J] [PAL_G] [SECAM_L1] [NTSC_433] [PAL_D] [SECAM_B] [NTSC_N] [PAL_H] [PAL_I] [PAL_M] ...
...4MB] [8MB] [16MB] [32MB] [64MB] [128MB] [128MB] Boot Display Device [Auto] This parameter allows you to select the mapped memory for AGP graphic data. Configuration options: [Enabled, 1MB] [Enabled, 4MB] [Enabled, 8MB] [Enabled, 16MB] [Enabled, 32MB] Graphics ...TV Standard [Auto] This parameter allows you to select the flat panel display resolution when you to set the size of the onboard video memory. Configuration options: [Auto] [NTSC_M] [PAL_B] [SECAM_L] [NTSC_M_J] [PAL_G] [SECAM_L1] [NTSC_433] [PAL_D] [SECAM_B] [NTSC_N] [PAL_H] [PAL_I] [PAL_M] ...
T2-P User Manual
Page 110
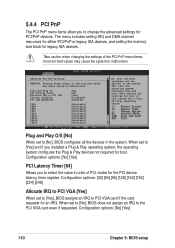
... the value in the system. The menu includes setting IRQ and DMA channel resources for either PCI/PnP or legacy ISA devices, and setting the memory size block for boot if your system has a Plug and Play operating system. Configuration options: [No] [Yes] PCI Latency Timer [64] Allows you to [Yes...
... the value in the system. The menu includes setting IRQ and DMA channel resources for either PCI/PnP or legacy ISA devices, and setting the memory size block for boot if your system has a Plug and Play operating system. Configuration options: [No] [Yes] PCI Latency Timer [64] Allows you to [Yes...

