Pundit-PE2 User''s Manual for English Edition
Page 3
... 2.4 Installing a hard disk drive (HDD 2-4 2.5 Installing a CPU 2-6 2.5.1 Removing the CPU fan and heatsink assembly ....... 2-6 2.5.2 CPU installation 2-7 2.5.3 Reinstalling the CPU fan and heatsink assembly ..... 2-8 2.6 Installing a DIMM 2-9 2.7 Replacing the top cover 2-10 2.8 Connecting the power cable 2-11 2.9 Connecting external devices 2-12 To the front panel 2-12 To the rear panel 2-12 Chapter 3: Getting started 3.1 Installing an operating system 3-2 3.2 Support CD information 3-2 3.2.1 Running the support CD 3-2 3.2.2 Drivers menu 3-3 3.2.3 Utilities menu 3-4 3.2.4 ASUS...
... 2.4 Installing a hard disk drive (HDD 2-4 2.5 Installing a CPU 2-6 2.5.1 Removing the CPU fan and heatsink assembly ....... 2-6 2.5.2 CPU installation 2-7 2.5.3 Reinstalling the CPU fan and heatsink assembly ..... 2-8 2.6 Installing a DIMM 2-9 2.7 Replacing the top cover 2-10 2.8 Connecting the power cable 2-11 2.9 Connecting external devices 2-12 To the front panel 2-12 To the rear panel 2-12 Chapter 3: Getting started 3.1 Installing an operating system 3-2 3.2 Support CD information 3-2 3.2.1 Running the support CD 3-2 3.2.2 Drivers menu 3-3 3.2.3 Utilities menu 3-4 3.2.4 ASUS...
Pundit-PE2 User''s Manual for English Edition
Page 5
... that to radio communications. The use of shielded cables for connection of the monitor to the graphics card is encouraged to try to correct the interference by the party responsible for a Class B digital device, pursuant to operate this unit not expressly approved by one or more of Communications. W A R N I N G ! This equipment has been tested and found to comply with FCC...
... that to radio communications. The use of shielded cables for connection of the monitor to the graphics card is encouraged to try to correct the interference by the party responsible for a Class B digital device, pursuant to operate this unit not expressly approved by one or more of Communications. W A R N I N G ! This equipment has been tested and found to comply with FCC...
Pundit-PE2 User''s Manual for English Edition
Page 7
... about the ASUS Pundit-PE2 barebone system. This guide is organized This guide contains the following parts: 1. The chapter lists the system features including introduction on how to change system settings through the BIOS Setup menus and describes the BIOS parameters. This chapter includes the motherboard layout, jumper settings, and connector locations. 5. vii How this guide Audience This guide provides general information and installation instructions about the motherboard that comes with hardware knowledge of...
... about the ASUS Pundit-PE2 barebone system. This guide is organized This guide contains the following parts: 1. The chapter lists the system features including introduction on how to change system settings through the BIOS Setup menus and describes the BIOS parameters. This chapter includes the motherboard layout, jumper settings, and connector locations. 5. vii How this guide Audience This guide provides general information and installation instructions about the motherboard that comes with hardware knowledge of...

Pundit-PE2 User''s Manual for English Edition
Page 9
ASUS Pundit-PE2 barebone system with • ASUS motherboard • CPU fan and heatsink assembly • IDE cable 2. Support CD 5. Optional items • Slim optical disk drive (DVD-ROM/Combo/DVD±RW) ix Cables • DC IN power cable and plug 4. User guide 6. System package contents Check your Pundit-PE2 system package for the following items. If any of the items is damaged or missing, contact your retailer immediately. 1 . Accessories • AC adapter and power plug • Screws 3.
ASUS Pundit-PE2 barebone system with • ASUS motherboard • CPU fan and heatsink assembly • IDE cable 2. Support CD 5. Optional items • Slim optical disk drive (DVD-ROM/Combo/DVD±RW) ix Cables • DC IN power cable and plug 4. User guide 6. System package contents Check your Pundit-PE2 system package for the following items. If any of the items is damaged or missing, contact your retailer immediately. 1 . Accessories • AC adapter and power plug • Screws 3.
Pundit-PE2 User''s Manual for English Edition
Page 12
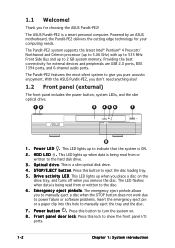
... front panel includes the power button, system LEDs, and the slim optical drive. 12 3 45 6 7 8 1 . Press this lock to eject the disc loading tray. 5 . E m e r g e n c y e j e c t p i n h o l e. Press this button to show the front panel I/O ports. 1-2 Chapter 1: System introduction Providing the best connectivity for your computing needs. This LED lights up when data is a slim optical disk drive. 4 . P o w e r b u t t o n . Powered by an ASUS motherboard, the Pundit-PE2 delivers the cutting edge technology for external devices and peripherals are USB 2.0 ports...
... front panel includes the power button, system LEDs, and the slim optical drive. 12 3 45 6 7 8 1 . Press this lock to eject the disc loading tray. 5 . E m e r g e n c y e j e c t p i n h o l e. Press this button to show the front panel I/O ports. 1-2 Chapter 1: System introduction Providing the best connectivity for your computing needs. This LED lights up when data is a slim optical disk drive. 4 . P o w e r b u t t o n . Powered by an ASUS motherboard, the Pundit-PE2 delivers the cutting edge technology for external devices and peripherals are USB 2.0 ports...
Pundit-PE2 User''s Manual for English Edition
Page 14
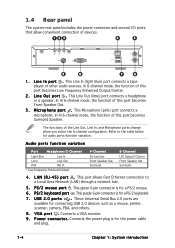
...Rear panel The system rear panel includes the power connector and several I n p o r t . This green 6-pin connector is for audio ports function variation. U S B 2 . 0 p o r t s . L i n e O u t p o r t . This purple 6-pin connector is for the power cable and plug. 1-4 Chapter 1: System introduction These Universal Serial Bus 2.0 ports are available for a PS/2 keyboard. 7 . L i n e I /O ports that allow convenient connection of this port becomes Front Speaker Out. 3 . M i c r o p h o n e p o r t . V G A p o r t . Connects the power plug is for connecting USB...
...Rear panel The system rear panel includes the power connector and several I n p o r t . This green 6-pin connector is for audio ports function variation. U S B 2 . 0 p o r t s . L i n e O u t p o r t . This purple 6-pin connector is for the power cable and plug. 1-4 Chapter 1: System introduction These Universal Serial Bus 2.0 ports are available for a PS/2 keyboard. 7 . L i n e I /O ports that allow convenient connection of this port becomes Front Speaker Out. 3 . M i c r o p h o n e p o r t . V G A p o r t . Connects the power plug is for connecting USB...
Pundit-PE2 User''s Manual for English Edition
Page 18
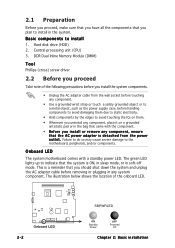
... mode. Hard disk drive (HDD) 2. This is detached from the wall socket before touching any component. • Use a grounded wrist strap or touch a safely grounded object or to a metal object, such as the power supply case, before removing or plugging in any component, place it on a grounded antistatic pad or in the bag that came with a standby power LED. The green LED lights up to install...
... mode. Hard disk drive (HDD) 2. This is detached from the wall socket before touching any component. • Use a grounded wrist strap or touch a safely grounded object or to a metal object, such as the power supply case, before removing or plugging in any component, place it on a grounded antistatic pad or in the bag that came with a standby power LED. The green LED lights up to install...
Pundit-PE2 User''s Manual for English Edition
Page 20
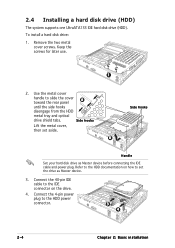
... cable and power plug. Connect the 40-pin IDE cable to slide the cover A toward the rear panel until the side hooks disengage from the HDD metal tray and optical drive shield tabs. Keep the screws for later use. 1 2. 2.4 Installing a hard disk drive (HDD) The system supports one UltraATA133 IDE hard disk drive (HDD). Use the metal cover handle to the IDE connector on how to the HDD power connector. 3 4 2-4 Chapter 2: Basic installation B Side hooks Handle Set your hard disk drive as Master device. 3. Connect the 4-pin power plug...
... cable and power plug. Connect the 40-pin IDE cable to slide the cover A toward the rear panel until the side hooks disengage from the HDD metal tray and optical drive shield tabs. Keep the screws for later use. 1 2. 2.4 Installing a hard disk drive (HDD) The system supports one UltraATA133 IDE hard disk drive (HDD). Use the metal cover handle to the IDE connector on how to the HDD power connector. 3 4 2-4 Chapter 2: Basic installation B Side hooks Handle Set your hard disk drive as Master device. 3. Connect the 4-pin power plug...
Pundit-PE2 User''s Manual for English Edition
Page 31
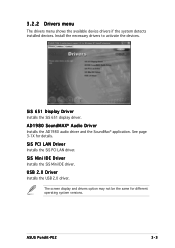
... for different operating system versions. 3.2.2 Drivers menu The drivers menu shows the available device drivers if the system detects installed devices. AD1980 SoundMAX® Audio Driver Installs the AD1980 audio driver and the SoundMax® application. SiS PCI LAN Driver Installs the SiS PCI LAN driver. USB 2.0 Driver Installs the USB 2.0 driver. The screen display and drivers option may not be the same for details. SiS 651 Display Driver Installs the SiS 651 display driver. ASUS Pundit-PE2 3-3 SiS Mini IDE Driver Installs the SiS Mini IDE driver. Install the necessary...
... for different operating system versions. 3.2.2 Drivers menu The drivers menu shows the available device drivers if the system detects installed devices. AD1980 SoundMAX® Audio Driver Installs the AD1980 audio driver and the SoundMax® application. SiS PCI LAN Driver Installs the SiS PCI LAN driver. USB 2.0 Driver Installs the USB 2.0 driver. The screen display and drivers option may not be the same for details. SiS 651 Display Driver Installs the SiS 651 display driver. ASUS Pundit-PE2 3-3 SiS Mini IDE Driver Installs the SiS Mini IDE driver. Install the necessary...
Pundit-PE2 User''s Manual for English Edition
Page 34
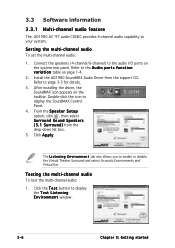
... the T e s t L i s t e n i n g E n v i r o n m e n t window. 3-6 Chapter 3: Getting started Testing the multi-channel audio To test the multi-channel audio: 1. Click the T e s t button to the audio I/O ports on the taskbar. 3.3 Software information 3.3.1 Multi-channel audio feature The AD1980 AC '97 audio CODEC provides 6-channel audio capability to your system. From the S p e a k e r S e t u p option, click , then select Surround Sound Speakers ( 5 . 1 S u r r o u n d ) from the support CD. After installing the driver, the SoundMAX icon appears on the system rear panel.
... the T e s t L i s t e n i n g E n v i r o n m e n t window. 3-6 Chapter 3: Getting started Testing the multi-channel audio To test the multi-channel audio: 1. Click the T e s t button to the audio I/O ports on the taskbar. 3.3 Software information 3.3.1 Multi-channel audio feature The AD1980 AC '97 audio CODEC provides 6-channel audio capability to your system. From the S p e a k e r S e t u p option, click , then select Surround Sound Speakers ( 5 . 1 S u r r o u n d ) from the support CD. After installing the driver, the SoundMAX icon appears on the system rear panel.
Pundit-PE2 User''s Manual for English Edition
Page 43
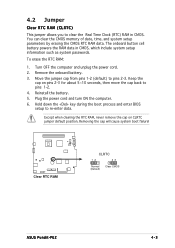
4.2 Jumper Clear RTC RAM (CLRTC) This jumper allows you to pins 2-3. Remove the onboard battery. 3. Removing the cap will cause system boot failure! The onboard button cell battery powers the RAM data in CMOS. Move the jumper cap from pins 1-2 (default) to clear the Real Time Clock (RTC) RAM in CMOS, which include system setup information such as system passwords. Clear RTC RAM CLRTC 12 23 Normal (Default) Clear CMOS ASUS Pundit-PE2 4-3 Plug the power cord and turn ON the computer. 6. To erase the...
4.2 Jumper Clear RTC RAM (CLRTC) This jumper allows you to pins 2-3. Remove the onboard battery. 3. Removing the cap will cause system boot failure! The onboard button cell battery powers the RAM data in CMOS. Move the jumper cap from pins 1-2 (default) to clear the Real Time Clock (RTC) RAM in CMOS, which include system setup information such as system passwords. Clear RTC RAM CLRTC 12 23 Normal (Default) Clear CMOS ASUS Pundit-PE2 4-3 Plug the power cord and turn ON the computer. 6. To erase the...
Pundit-PE2 User''s Manual for English Edition
Page 44
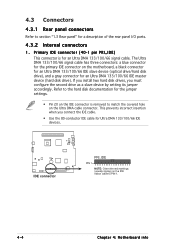
... IDE connector on the IDE ribbon cable to PIN 1. 4-4 Chapter 4: Motherboard info 4.3 Connectors 4.3.1 Rear panel connectors Refer to section "1.3 Rear panel" for Ultra DMA 133/100/66 IDE devices. If you install two hard disk drives, you connect the IDE cable. • Use the 80-conductor IDE cable for a description of the rear panel I/O ports. 4.3.2 Internal connectors 1 . Primary IDE connector (40-1 pin PRI_IDE) This connector is for the jumper settings. • Pin 20 on the IDE connector is removed to the hard disk documentation...
... IDE connector on the IDE ribbon cable to PIN 1. 4-4 Chapter 4: Motherboard info 4.3 Connectors 4.3.1 Rear panel connectors Refer to section "1.3 Rear panel" for Ultra DMA 133/100/66 IDE devices. If you install two hard disk drives, you connect the IDE cable. • Use the 80-conductor IDE cable for a description of the rear panel I/O ports. 4.3.2 Internal connectors 1 . Primary IDE connector (40-1 pin PRI_IDE) This connector is for the jumper settings. • Pin 20 on the IDE connector is removed to the hard disk documentation...
Pundit-PE2 User''s Manual for English Edition
Page 50
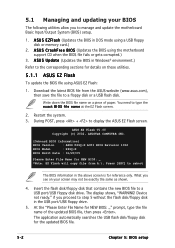
... disk or a USB flash disk. A S U S U p d a t e (Updates the BIOS in the above screen is for the updated BIOS file. 5-2 Chapter 5: BIOS setup Download the latest BIOS file from A:\, Press [ESC] to reboot The BIOS information in Windows® environment.) Refer to step 5 without the flash disk/floppy disk in DOS mode using the motherboard support CD when the BIOS file fails or gets corrupted.) 3. Device not ready." What you proceed to the corresponding sections for NEW BIOS: _" prompt, type...
... disk or a USB flash disk. A S U S U p d a t e (Updates the BIOS in the above screen is for the updated BIOS file. 5-2 Chapter 5: BIOS setup Download the latest BIOS file from A:\, Press [ESC] to reboot The BIOS information in Windows® environment.) Refer to step 5 without the flash disk/floppy disk in DOS mode using the motherboard support CD when the BIOS file fails or gets corrupted.) 3. Device not ready." What you proceed to the corresponding sections for NEW BIOS: _" prompt, type...
Pundit-PE2 User''s Manual for English Edition
Page 53
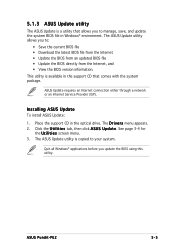
Installing ASUS Update To install ASUS Update: 1. 5.1.3 ASUS Update utility The ASUS Update is a utility that comes with the system package. The ASUS Update utility is available in the support CD that allows you to manage, save, and update the system BIOS file in the optical drive. The ASUS Update utility allows you update the BIOS using this utility. Place the support CD in Windows® environment. See page 3-4 for the U t i l i t i e s screen menu. 3. ASUS Pundit-PE2 5-5 ASUS Update requires an Internet connection either through a network or an Internet Service ...
Installing ASUS Update To install ASUS Update: 1. 5.1.3 ASUS Update utility The ASUS Update is a utility that comes with the system package. The ASUS Update utility is available in the support CD that allows you to manage, save, and update the system BIOS file in the optical drive. The ASUS Update utility allows you update the BIOS using this utility. Place the support CD in Windows® environment. See page 3-4 for the U t i l i t i e s screen menu. 3. ASUS Pundit-PE2 5-5 ASUS Update requires an Internet connection either through a network or an Internet Service ...
Pundit-PE2 User''s Manual for English Edition
Page 56
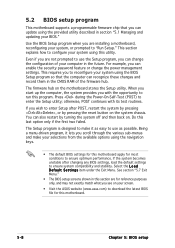
... the reset button on the system chassis. For example, you are installing a motherboard, reconfiguring your system using the navigation keys. • The default BIOS settings for most conditions to ensure optimum performance. When you start up the computer, the system provides you can change the power management settings. otherwise, POST continues with the opportunity to "Run Setup." Select the L o a d D e f a u l t S e t t i n g s item under the Exit Menu. 5.2 BIOS setup program This motherboard supports a programmable firmware...
... the reset button on the system chassis. For example, you are installing a motherboard, reconfiguring your system using the navigation keys. • The default BIOS settings for most conditions to ensure optimum performance. When you start up the computer, the system provides you can change the power management settings. otherwise, POST continues with the opportunity to "Run Setup." Select the L o a d D e f a u l t S e t t i n g s item under the Exit Menu. 5.2 BIOS setup program This motherboard supports a programmable firmware...
Pundit-PE2 User''s Manual for English Edition
Page 58
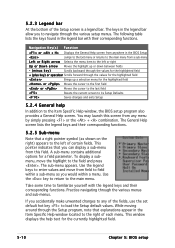
... you can display a sub-menu from this screen from field to field within a menu. The sub-menu appears. You may launch this field. Use the legend keys to load the Setup default values. To display a submenu, move from any of each menu. The following table lists the keys found in the Item Specific Help window located to the right of the fields, use the set default hot key to enter values...
... you can display a sub-menu from this screen from field to field within a menu. The sub-menu appears. You may launch this field. Use the legend keys to load the Setup default values. To display a submenu, move from any of each menu. The following table lists the keys found in the Item Specific Help window located to the right of the fields, use the set default hot key to enter values...
Pundit-PE2 User''s Manual for English Edition
Page 61
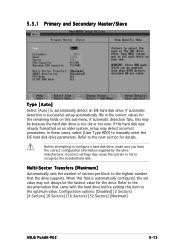
In these cases, select [User Type HDD] to the next section for the drive. Incorrect settings may not always be because the hard disk drive is too old or too new. Configuration options: [Disabled] [2 Sectors] [4 Sectors] [8 Sectors] [16 Sectors] [32 Sectors] [Maximum] ASUS Pundit-PE2 5-13 If automatic detection is automatically configured, the set value may cause the system to fail to recognize the installed hard disk. When this item to the...
In these cases, select [User Type HDD] to the next section for the drive. Incorrect settings may not always be because the hard disk drive is too old or too new. Configuration options: [Disabled] [2 Sectors] [4 Sectors] [8 Sectors] [16 Sectors] [32 Sectors] [Maximum] ASUS Pundit-PE2 5-13 If automatic detection is automatically configured, the set value may cause the system to fail to recognize the installed hard disk. When this item to the...
Pundit-PE2 User''s Manual for English Edition
Page 62
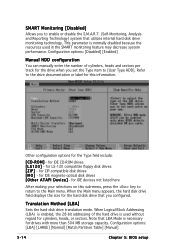
... Partition Table] [Manual] 5-14 Chapter 5: BIOS setup for IDE devices not listed here After making your selections on this sub-menu, press the key to return to the drive documentation or label for the drive when you configured. Translation Method [LBA] Sets the hard disk drive translation mode. R O M ] - for IDE magneto-optical disk drives [ O t h e r A T A P I P ] - Note that utilizes internal hard disk drive monitoring technology. Configuration options: [Disabled] [Enabled] Manual HDD configuration You can manually enter the number of the hard drive is necessary for drives...
... Partition Table] [Manual] 5-14 Chapter 5: BIOS setup for IDE devices not listed here After making your selections on this sub-menu, press the key to return to the drive documentation or label for the drive when you configured. Translation Method [LBA] Sets the hard disk drive translation mode. R O M ] - for IDE magneto-optical disk drives [ O t h e r A T A P I P ] - Note that utilizes internal hard disk drive monitoring technology. Configuration options: [Disabled] [Enabled] Manual HDD configuration You can manually enter the number of the hard drive is necessary for drives...
Pundit-PE2 User''s Manual for English Edition
Page 74
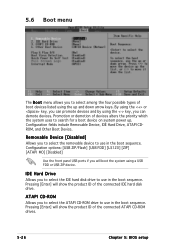
... four possible types of the connected ATAPI CD-ROM drives. 5-26 Chapter 5: BIOS setup Pressing [Enter] will show the product ID of the connected IDE hard disk drive. 5.6 Boot menu The B o o t menu allows you to search for a boot device on system power up and down arrow keys. By using a USB FDD or USB ZIP device. Configuration fields include Removable Device, IDE Hard Drive, ATAPI CDROM, and Other Boot Device. Configuration options: [USB ZIP/Flash] [USB FDD] [LS120] [ZIP] [ATAPI MO] [Disabled] Use the front panel USB ports if you...
... four possible types of the connected ATAPI CD-ROM drives. 5-26 Chapter 5: BIOS setup Pressing [Enter] will show the product ID of the connected IDE hard disk drive. 5.6 Boot menu The B o o t menu allows you to search for a boot device on system power up and down arrow keys. By using a USB FDD or USB ZIP device. Configuration fields include Removable Device, IDE Hard Drive, ATAPI CDROM, and Other Boot Device. Configuration options: [USB ZIP/Flash] [USB FDD] [LS120] [ZIP] [ATAPI MO] [Disabled] Use the front panel USB ports if you...
Pundit-PE2 User''s Manual for English Edition
Page 75
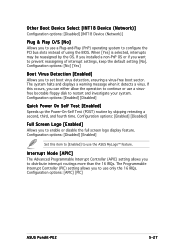
... Boot Device Select [INT18 Device (Network)] Configuration options: [Disabled] [INT18 Device (Network)] Plug & Play O/S [No] Allows you to use a Plug-and-Play (PnP) operating system to prevent reassigning of using the BIOS. When [Yes] is selected, interrupts may be reassigned by skipping retesting a second, third, and fourth time. If you installed a non-PnP OS or if you to use the ASUS MyLogo™ feature. Configuration options: [APIC] [PIC] ASUS Pundit-PE2 5-27 Configuration options: [Disabled] [Enabled] Set this...
... Boot Device Select [INT18 Device (Network)] Configuration options: [Disabled] [INT18 Device (Network)] Plug & Play O/S [No] Allows you to use a Plug-and-Play (PnP) operating system to prevent reassigning of using the BIOS. When [Yes] is selected, interrupts may be reassigned by skipping retesting a second, third, and fourth time. If you installed a non-PnP OS or if you to use the ASUS MyLogo™ feature. Configuration options: [APIC] [PIC] ASUS Pundit-PE2 5-27 Configuration options: [Disabled] [Enabled] Set this...


