Asus P2-PH1 Support and Manuals
Get Help and Manuals for this Asus item

Popular Asus P2-PH1 Manual Pages
Instruction Manual - Page 1

English
P-Series
ASUS PC (Desktop Barebone)
Installation manual
Download the latest manual from the ASUS website: www.asus.com
Instruction Manual - Page 2

... slots/ports and their locations may vary, depending on the model of your area.
2
Installation manual
Power button ( ) 6. Power connector
2. Use this switch to select the appropriate system input voltage according to the system User Guide. English
Front/Rear panel features
P1 Front (Close) P2 Front (Close) Front (Open)
1 2
2
8
3 3
4 4
1
5
5
6
6
11 9 7
13 10
Rear 12
14...
Instruction Manual - Page 3
... it, and set it aside.
1
R
Installation manual
2 CPU fan
NOTE: *Refer to the system User Guide for later use...ASUS motherboard* 6. Remove the cover screws on the rear panel. English
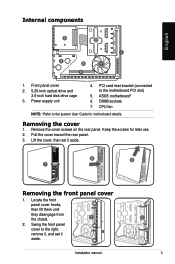
Internal components
3
2
1
4
5
7
6
1. Front panel cover 2. 5.25-inch optical drive and
3.5-inch hard disk drive cage 3. Pull the cover toward the rear panel. 3.
Lift the cover, then set...
Instruction Manual - Page 4

... then set aside.
1
1
1
Removing the CPU fan and heatsink assembly
Removing an Intel® CPU fan and heatsink assembly
1. Locking levers
2
Metal clip
5
4
3
Retention module
Hook
Installation manual Disconnect ..., then remove the fan and heatsink assembly. Lift the storage drive assembly, then
set it aside.
3 2
Removing an AMD CPU fan and heatsink assembly
1. Remove two...
Instruction Manual - Page 5

...a 135º angle.
2A 2B
Load lever
4.
Installation manual
Press the load lever with your thumb and forefinger to a 100... monitoring error can occur if you reinstall a fan and heatsink assembly, do not forget to remove (4B).
5. Install the... Intel® / AMD CPU fan and heatsink assembly, follow the instructions on the motherboard. Locate the CPU socket on page 4 in the...
Instruction Manual - Page 6

... the metal cover opposite
remove.
the slot that the notch on the DIMM matches the
break on the motherboard PCI slot.
Installation manual Unlock a DIMM socket by pressing the retaining clips outward. 3. Installing an expansion card
1. Lift the PCI riser card assembly to avoid damaging the DIMM. Secure the card with a notch so...
Instruction Manual - Page 7
...SATA/IDE hard disk drives.
3. SATA
IDE
1B 1A
3
R
2B 2A
2B
2A
R
4
Installation manual
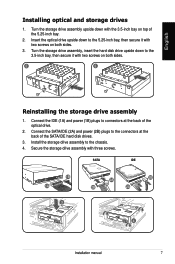
Turn the storage drive assembly upside down to the chassis. 4. Install the storage drive assembly to the 3.5-inch bay, then secure it with the 3.5-inch bay on both ...disk drive upside down with two screws on top of the 5.25-inch bay.
2. English
Installing optical and storage drives
1.
Instruction Manual - Page 8

...Insert the foot stand hooks into
2. NOTE: For P2 model, if your optical drive tray fails to eject when you removed earlier. Sticker
Installation manual
Make sure the cover tabs fit the chasis rails...chassis, then swing
1
the front panel cover to the direction of the front panel cover. Installing the foot stand
1. Insert the front panel
cover tabs to the pictures in the section "...
Asus P2-PH1 Reviews
We have not received any reviews for Asus yet.