
P8Z77-V User's Manual
Page 115
...Drivers menu if Autorun is NOT enabled in your hardware. • Motherboard settings and hardware options vary. Click each menu tab and select the items you can install to change at www.asus.com for updates. 4.2.1 Running the support DVD Place the support DVD... The support DVD that comes with the motherboard package contains the drivers, software applications, and utilities that you want to your computer. Double-click the ASSETUP.EXE to display the ASUS contact information. ASUS P8Z77-V PRO 4-1 Refer to install. Visit the ASUS website at any time without notice. Click...
...Drivers menu if Autorun is NOT enabled in your hardware. • Motherboard settings and hardware options vary. Click each menu tab and select the items you can install to change at www.asus.com for updates. 4.2.1 Running the support DVD Place the support DVD... The support DVD that comes with the motherboard package contains the drivers, software applications, and utilities that you want to your computer. Double-click the ASSETUP.EXE to display the ASUS contact information. ASUS P8Z77-V PRO 4-1 Refer to install. Visit the ASUS website at any time without notice. Click...
P8Z77-V User's Manual
Page 117
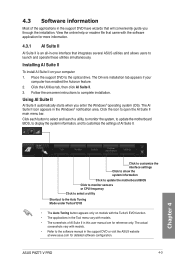
... enabled the Autorun feature. 2. Chapter 4 Click to customize the interface settings Click to show the system information Click to update the motherboard BIOS Click to monitor sensors or CPU frequency Click to select a utility Shortcut to customize the settings of the applications in the support... to the optical drive. Follow the onscreen instructions to open the AI Suite II main menu bar. Click the icon to complete installation. ASUS P8Z77-V PRO 4-3 Click the Utilities tab, then click AI Suite II. 3. Place the support DVD to launch and operate these utilities simultaneously. The...
... enabled the Autorun feature. 2. Chapter 4 Click to customize the interface settings Click to show the system information Click to update the motherboard BIOS Click to monitor sensors or CPU frequency Click to select a utility Shortcut to customize the settings of the applications in the support... to the optical drive. Follow the onscreen instructions to open the AI Suite II main menu bar. Click the icon to complete installation. ASUS P8Z77-V PRO 4-3 Click the Utilities tab, then click AI Suite II. 3. Place the support DVD to launch and operate these utilities simultaneously. The...
P8Z77-V User's Manual
Page 119
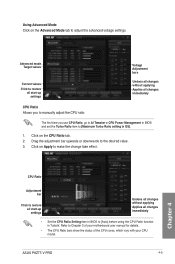
... Ratio function in OS]. 1. Click on Apply to the desired value. 3. ASUS P8Z77-V PRO 4-5 Chapter 4 Click on the CPU Ratio tab. 2. Refer to adjust the advanced voltage settings. Using Advanced Mode Click on the Advanced Mode tab to Chapter 3 of your motherboard user manual for details. • The CPU Ratio bars show the status...
... Ratio function in OS]. 1. Click on Apply to the desired value. 3. ASUS P8Z77-V PRO 4-5 Chapter 4 Click on the CPU Ratio tab. 2. Refer to adjust the advanced voltage settings. Using Advanced Mode Click on the Advanced Mode tab to Chapter 3 of your motherboard user manual for details. • The CPU Ratio bars show the status...
P8Z77-V User's Manual
Page 127
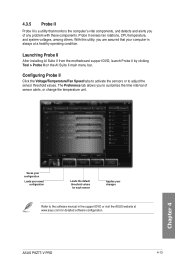
...computer's vital components, and detects and alerts you to adjust the sensor threshold values. Launching Probe II After installing AI Suite II from the motherboard support DVD, launch Probe II by clicking Tool > Probe II on the AI Suite II main menu bar. The Preference tab allows you .../Fan Speed tabs to activate the sensors or to customize the time interval of any problem with these components. ASUS P8Z77-V PRO 4-13 4.3.5 Probe II Probe II is always at www.asus.com for each sensor Applies your computer is a utility that your changes Refer to the software manual in the...
...computer's vital components, and detects and alerts you to adjust the sensor threshold values. Launching Probe II After installing AI Suite II from the motherboard support DVD, launch Probe II by clicking Tool > Probe II on the AI Suite II main menu bar. The Preference tab allows you .../Fan Speed tabs to activate the sensors or to customize the time interval of any problem with these components. ASUS P8Z77-V PRO 4-13 4.3.5 Probe II Probe II is always at www.asus.com for each sensor Applies your computer is a utility that your changes Refer to the software manual in the...
P8Z77-V User's Manual
Page 129
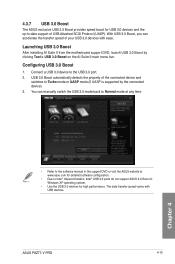
... by clicking Tool > USB 3.0 Boost on the AI Suite II main menu bar. ASUS P8Z77-V PRO 4-15 With USB 3.0 Boost, you can manually switch the USB 3.0 mode back to Normal mode at www.asus.com for detailed software configuration. • Due to Intel® chipset limitation, Intel... varies with ease. 4.3.7 USB 3.0 Boost The ASUS exclusive USB 3.0 Boost provides speed boost for high performance. You can accelerate the transfer speed of USB Attached SCSI Protocol (UASP). Launching USB 3.0 Boost After installing AI Suite II from the motherboard support DVD, launch USB 3.0 Boost by the...
... by clicking Tool > USB 3.0 Boost on the AI Suite II main menu bar. ASUS P8Z77-V PRO 4-15 With USB 3.0 Boost, you can manually switch the USB 3.0 mode back to Normal mode at www.asus.com for detailed software configuration. • Due to Intel® chipset limitation, Intel... varies with ease. 4.3.7 USB 3.0 Boost The ASUS exclusive USB 3.0 Boost provides speed boost for high performance. You can accelerate the transfer speed of USB Attached SCSI Protocol (UASP). Launching USB 3.0 Boost After installing AI Suite II from the motherboard support DVD, launch USB 3.0 Boost by the...
P8Z77-V User's Manual
Page 131
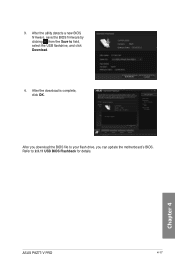
Refer to your flash drive, you download the BIOS file to 2.3.11 USB BIOS Flashback for details. Chapter 4 ASUS P8Z77-V PRO 4-17 3. After you can update the motherboard's BIOS. After the download is complete, click OK. After the utility detects a new BIOS firmware, save the BIOS firmware by clicking from the Save to field, select the USB flashdrive, and click Download. 4.
Refer to your flash drive, you download the BIOS file to 2.3.11 USB BIOS Flashback for details. Chapter 4 ASUS P8Z77-V PRO 4-17 3. After you can update the motherboard's BIOS. After the download is complete, click OK. After the utility detects a new BIOS firmware, save the BIOS firmware by clicking from the Save to field, select the USB flashdrive, and click Download. 4.

P8Z77-V User's Manual
Page 133
Launching ASUS Update After installing AI Suite II from the very beginning! Change the BIOS boot logo of my motherboard 1. 4.3.10 MyLogo2 This MyLogo utility lets you would like to do update your boot logo. Then click Next and follow the given instructions. Then click... on screen during the Power‑On‑Self-Tests (POST). Personalize your computer from the motherboard support DVD, launch MyLogo by clicking Update> MyLogo on the AI Suite II main menu bar. Chapter 4 ASUS P8Z77-V PRO 4-19 The boot logo is the image that appears on Next. Using MyLogo Select the way...
Launching ASUS Update After installing AI Suite II from the very beginning! Change the BIOS boot logo of my motherboard 1. 4.3.10 MyLogo2 This MyLogo utility lets you would like to do update your boot logo. Then click Next and follow the given instructions. Then click... on screen during the Power‑On‑Self-Tests (POST). Personalize your computer from the motherboard support DVD, launch MyLogo by clicking Update> MyLogo on the AI Suite II main menu bar. Chapter 4 ASUS P8Z77-V PRO 4-19 The boot logo is the image that appears on Next. Using MyLogo Select the way...
P8Z77-V User's Manual
Page 135
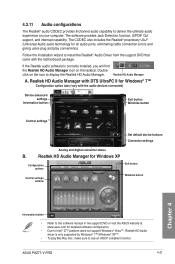
ASUS P8Z77-V PRO 4-21 Realtek HD Audio Manager A. The software provides Jack-Detection function, S/PDIF.... Realtek HD Audio Manager with DTS UltraPC II for Windows® 7™ Configuration option tabs (vary with the motherboard package. 4.3.11 Audio configurations The Realtek® audio CODEC provides 8-channel audio capability to install the Realtek® ... 4 Information button • Refer to the software manual in the support DVD or visit the ASUS website at www.asus.com for all audio ports, eliminating cable connection errors and giving users plug and play Blu-Ray...
ASUS P8Z77-V PRO 4-21 Realtek HD Audio Manager A. The software provides Jack-Detection function, S/PDIF.... Realtek HD Audio Manager with DTS UltraPC II for Windows® 7™ Configuration option tabs (vary with the motherboard package. 4.3.11 Audio configurations The Realtek® audio CODEC provides 8-channel audio capability to install the Realtek® ... 4 Information button • Refer to the software manual in the support DVD or visit the ASUS website at www.asus.com for all audio ports, eliminating cable connection errors and giving users plug and play Blu-Ray...
P8Z77-V User's Manual
Page 137
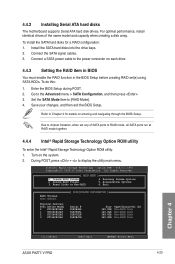
...Non-RAID Disk Non-RAID Disk Non-RAID Disk Non-RAID Disk Chapter 4 [↑↓]-Select [ESC]-Exit [ENTER]-Select Menu ASUS P8Z77-V PRO 4-23 Turn on each drive. 4.4.3 Setting the RAID item in BIOS You must enable the RAID function in the BIOS Setup before...> SATA Configuration, and then press . 3. Connect the SATA signal cables. 3. Refer to display the utility main menu. 4.4.2 Installing Serial ATA hard disks The motherboard supports Serial ATA hard disk drives. To do this: 1. During POST, press + to Chapter 3 for a RAID configuration: 1. All Rights Reserved. [ MAIN...
...Non-RAID Disk Non-RAID Disk Non-RAID Disk Non-RAID Disk Chapter 4 [↑↓]-Select [ESC]-Exit [ENTER]-Select Menu ASUS P8Z77-V PRO 4-23 Turn on each drive. 4.4.3 Setting the RAID item in BIOS You must enable the RAID function in the BIOS Setup before...> SATA Configuration, and then press . 3. Connect the SATA signal cables. 3. Refer to display the utility main menu. 4.4.2 Installing Serial ATA hard disks The motherboard supports Serial ATA hard disk drives. To do this: 1. During POST, press + to Chapter 3 for a RAID configuration: 1. All Rights Reserved. [ MAIN...
P8Z77-V User's Manual
Page 153
... around this OS limitation, refer to complete the process. Boot your computer. 2. Set the optical drive as the destination disk. 6. Chapter 4 ASUS P8Z77-V PRO 4-39 You have to use a USB floppy disk drive when creating a SATA RAID driver disk. • Windows® XP may not recognize...complete the process. 4.5.2 Creating a RAID driver disk in Windows® To create a RAID driver disk in a RAID set. • The motherboard does not provide a floppy drive connector. Follow the succeeding screen instructions to Windows® XP limitation. Press during POST to create a RAID driver...
... around this OS limitation, refer to complete the process. Boot your computer. 2. Set the optical drive as the destination disk. 6. Chapter 4 ASUS P8Z77-V PRO 4-39 You have to use a USB floppy disk drive when creating a SATA RAID driver disk. • Windows® XP may not recognize...complete the process. 4.5.2 Creating a RAID driver disk in Windows® To create a RAID driver disk in a RAID set. • The motherboard does not provide a floppy drive connector. Follow the succeeding screen instructions to Windows® XP limitation. Press during POST to create a RAID driver...


