

User Manual
Page 69
...the available options using a keyboard or a USB mouse. The BIOS setup program is designed to make it back on to restart the system. Chapter 3 ASUS P8P67 Deluxe 3-1 In normal circumstances, the default BIOS settings apply to most conditions to use the mouse to control the BIOS setup program...failed. • The BIOS setup screens shown in the motherboard CMOS. Chapter 3 Chapter 3: 3.1 Knowing BIOS BIOS setup The new ASUS EFI BIOS is an Extensible Firmware Interface that complies with uEFI architecture, offering a user-friendly interface that goes beyond traditional keyboard-only BIOS...
...the available options using a keyboard or a USB mouse. The BIOS setup program is designed to make it back on to restart the system. Chapter 3 ASUS P8P67 Deluxe 3-1 In normal circumstances, the default BIOS settings apply to most conditions to use the mouse to control the BIOS setup program...failed. • The BIOS setup screens shown in the motherboard CMOS. Chapter 3 Chapter 3: 3.1 Knowing BIOS BIOS setup The new ASUS EFI BIOS is an Extensible Firmware Interface that complies with uEFI architecture, offering a user-friendly interface that goes beyond traditional keyboard-only BIOS...
User Manual
Page 97
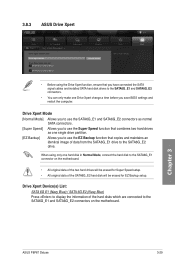
...] Allows you to use the SATA6G_E1 and SATA6G_E2 connectors as one single drive partition. [EZ Backup] Allows you save BIOS settings and restart the computer. When using the Drive Xpert function, ensure that you have connected the SATA signal cables and installed SATA hard disk drives ... (Navy Blue) Press to display the information of the SATA6G_E2 hard disk will be erased for EZ Backup setup. Chapter 3 ASUS P8P67 Deluxe 3-29 Advanced Mode Main Back Ai Tweaker Tool\ ASUS Drive Xpert > Drive Xpert Setup Utility Drive Xpert Mode Drive Xpert Device(s) List : > SATA 6G E1 (Navy Blue) ...
...] Allows you to use the SATA6G_E1 and SATA6G_E2 connectors as one single drive partition. [EZ Backup] Allows you save BIOS settings and restart the computer. When using the Drive Xpert function, ensure that you have connected the SATA signal cables and installed SATA hard disk drives ... (Navy Blue) Press to display the information of the SATA6G_E2 hard disk will be erased for EZ Backup setup. Chapter 3 ASUS P8P67 Deluxe 3-29 Advanced Mode Main Back Ai Tweaker Tool\ ASUS Drive Xpert > Drive Xpert Setup Utility Drive Xpert Mode Drive Xpert Device(s) List : > SATA 6G E1 (Navy Blue) ...
User Manual
Page 106
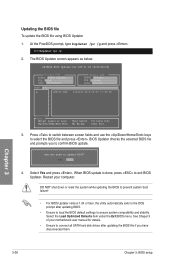
... Defaults item under the Exit BIOS menu. D:\>bupdater /pc /g 2. The BIOS Updater screen appears as below. Yes No 4. Restart your motherboard user manual for DOS V1.18 [2010/04/29] Current ROM BOARD: P8P67 DELUXE VER: 0204 DATE: 08/05/2010 Update ROM BOARD: Unknown VER: Unknown DATE: Unknown PATH: A:\ A: P8P67D.ROM 4194304...
... Defaults item under the Exit BIOS menu. D:\>bupdater /pc /g 2. The BIOS Updater screen appears as below. Yes No 4. Restart your motherboard user manual for DOS V1.18 [2010/04/29] Current ROM BOARD: P8P67 DELUXE VER: 0204 DATE: 08/05/2010 Update ROM BOARD: Unknown VER: Unknown DATE: Unknown PATH: A:\ A: P8P67D.ROM 4194304...
User Manual
Page 113
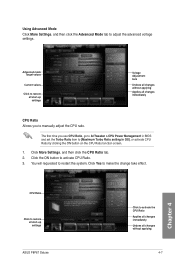
... to manually adjust the CPU ratio. Click More Settings, and then click the CPU Ratio tab. 2. CPU Ratio Click to restore all start -up settings ASUS P8P67 Deluxe Click to activate the CPU Ratio Applies all changes immediately Undoes all changes immediately CPU Ratio Allows you use CPU Ratio, go to AI Tweaker... by clicking the ON button on the CPU Ratio function screen. 1. Using Advanced Mode Click More Settings, and then click the Advanced Mode tab to restart the system.
... to manually adjust the CPU ratio. Click More Settings, and then click the CPU Ratio tab. 2. CPU Ratio Click to restore all start -up settings ASUS P8P67 Deluxe Click to activate the CPU Ratio Applies all changes immediately Undoes all changes immediately CPU Ratio Allows you use CPU Ratio, go to AI Tweaker... by clicking the ON button on the CPU Ratio function screen. 1. Using Advanced Mode Click More Settings, and then click the Advanced Mode tab to restart the system.

User Manual
Page 115
... Click OK to cancel the Overclocking process. 5. An animation appears indicating the overclocking process. ASUS P8P67 Deluxe 4-9 Chapter 4 TurboV automatically overclocks the CPU and memory and restarts the system. Click Stop if you did not click Stop in the previous step, TurboV ...To keep the result, click Stop. 4. Click OK to start auto-overclocking. 3. TurboV automatically adjusts and saves BIOS settings and restarts the system. After re-entering Windows, a message appears indicating auto tuning success. After re-entering Windows, a message appears indicating ...
... Click OK to cancel the Overclocking process. 5. An animation appears indicating the overclocking process. ASUS P8P67 Deluxe 4-9 Chapter 4 TurboV automatically overclocks the CPU and memory and restarts the system. Click Stop if you did not click Stop in the previous step, TurboV ...To keep the result, click Stop. 4. Click OK to start auto-overclocking. 3. TurboV automatically adjusts and saves BIOS settings and restarts the system. After re-entering Windows, a message appears indicating auto tuning success. After re-entering Windows, a message appears indicating ...


