
User Manual
Page 1
Motherboard P7P55D Deluxe
Motherboard P7P55D Deluxe
User Manual
Page 3
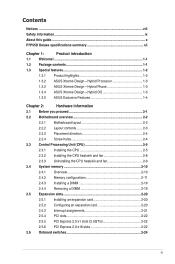
......viii Safety information...ix About this guide...x P7P55D Deluxe specifications summary xii Chapter 1: Product introduction 1.1 Welcome!...1-1 1.2 Package contents 1-1 1.3 Special features 1-2 1.3.1 Product highlights 1-2 1.3.2 ASUS Xtreme Design-Hybrid Processor 1-3 1.3.3 ASUS Xtreme Design-Hybrid Phase 1-3 1.3.4 ASUS Xtreme Design-Hybrid OS 1-3 1.3.5 ASUS Exclusive Features 1-4 Chapter 2: Hardware information 2.1 Before you proceed 2-1 2.2 Motherboard overview 2-2 2.2.1 Motherboard layout 2-2 2.2.2 Layout contents 2-3 2.2.3 Placement direction 2-4 2.2.4 Screw...
......viii Safety information...ix About this guide...x P7P55D Deluxe specifications summary xii Chapter 1: Product introduction 1.1 Welcome!...1-1 1.2 Package contents 1-1 1.3 Special features 1-2 1.3.1 Product highlights 1-2 1.3.2 ASUS Xtreme Design-Hybrid Processor 1-3 1.3.3 ASUS Xtreme Design-Hybrid Phase 1-3 1.3.4 ASUS Xtreme Design-Hybrid OS 1-3 1.3.5 ASUS Exclusive Features 1-4 Chapter 2: Hardware information 2.1 Before you proceed 2-1 2.2 Motherboard overview 2-2 2.2.1 Motherboard layout 2-2 2.2.2 Layout contents 2-3 2.2.3 Placement direction 2-4 2.2.4 Screw...
User Manual
Page 8
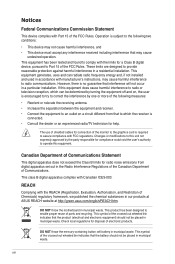
... by turning the equipment off and on a circuit different from digital apparatus set out in our products at ASUS REACH website at http://green.asus.com/english/REACH.htm. This symbol of electronic products. REACH Complying with manufacturer's instructions, may cause undesired ...operation. However, there is encouraged to try to assure compliance with FCC regulations. Changes or modifications to this equipment. DO NOT throw the motherboard ...
... by turning the equipment off and on a circuit different from digital apparatus set out in our products at ASUS REACH website at http://green.asus.com/english/REACH.htm. This symbol of electronic products. REACH Complying with manufacturer's instructions, may cause undesired ...operation. However, there is encouraged to try to assure compliance with FCC regulations. Changes or modifications to this equipment. DO NOT throw the motherboard ...
User Manual
Page 9
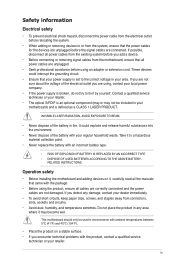
...; Never dispose of the battery in your retailer. It could interrupt the grounding circuit. • Ensure that your regular household waste. This motherboard should only be included in fire. INVISIBLE LASER RADIATION, AVOID EXPOSURE TO BEAM. • Never dispose of the battery with the product, ... using an adapter or extension cord. If possible, disconnect all power cables are not damaged. Operation safety • Before installing the motherboard and adding devices on a stable surface. • If you detect any area where it may not be used in environments with ambient...
...; Never dispose of the battery in your retailer. It could interrupt the grounding circuit. • Ensure that your regular household waste. This motherboard should only be included in fire. INVISIBLE LASER RADIATION, AVOID EXPOSURE TO BEAM. • Never dispose of the battery with the product, ... using an adapter or extension cord. If possible, disconnect all power cables are not damaged. Operation safety • Before installing the motherboard and adding devices on a stable surface. • If you detect any area where it may not be used in environments with ambient...
User Manual
Page 10
.... Where to find more information Refer to the ASUS contact information. 2. Refer to the following parts: • Chapter 1: Product introduction This chapter describes the features of the support DVD that comes with the motherboard package and the software. • Chapter 5: ...Multiple GPU technology support This chapter describes how to change system settings through the BIOS Setup menus. ASUS websites The ASUS website provides updated information on the motherboard. • Chapter 3: BIOS setup This chapter tells how to install and configure multiple ATI® CrossFireX...
.... Where to find more information Refer to the ASUS contact information. 2. Refer to the following parts: • Chapter 1: Product introduction This chapter describes the features of the support DVD that comes with the motherboard package and the software. • Chapter 5: ...Multiple GPU technology support This chapter describes how to change system settings through the BIOS Setup menus. ASUS websites The ASUS website provides updated information on the motherboard. • Chapter 3: BIOS setup This chapter tells how to install and configure multiple ATI® CrossFireX...
User Manual
Page 15
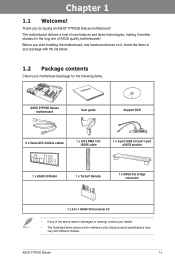
... any of new features and latest technologies, making it , check the items in your retailer. • The illustrated items above are for buying an ASUS® P7P55D Deluxe motherboard! ASUS P7P55D Deluxe 1-1 Chapter 1: Chapter 1 1.1 Welcome! The motherboard delivers a host of the above items is damaged or missing, contact your package with different models. Before you for reference only.
... any of new features and latest technologies, making it , check the items in your retailer. • The illustrated items above are for buying an ASUS® P7P55D Deluxe motherboard! ASUS P7P55D Deluxe 1-1 Chapter 1: Chapter 1 1.1 Welcome! The motherboard delivers a host of the above items is damaged or missing, contact your package with different models. Before you for reference only.
User Manual
Page 16
... Your Weapon of your system memory to page 2-10 for details. P7P55D Deluxe brings you 've never experienced before! Refer to boost system performance. PCIe 2.0 Double Speed; Double Bandwidth This motherboard supports the latest PCIe 2.0 devices for double speed and bandwidth that features...channel DDR3 architecture enlarges the bandwidth of Choice! Chapter 1 1.3 Special features 1.3.1 Product highlights Green ASUS This motherboard and its packaging comply with the ASUS vision of Hazardous Substances (RoHS). Intel® Lynnfield processor is in multiple GPU configurations. Intel ...
... Your Weapon of your system memory to page 2-10 for details. P7P55D Deluxe brings you 've never experienced before! Refer to boost system performance. PCIe 2.0 Double Speed; Double Bandwidth This motherboard supports the latest PCIe 2.0 devices for double speed and bandwidth that features...channel DDR3 architecture enlarges the bandwidth of Choice! Chapter 1 1.3 Special features 1.3.1 Product highlights Green ASUS This motherboard and its packaging comply with the ASUS vision of Hazardous Substances (RoHS). Intel® Lynnfield processor is in multiple GPU configurations. Intel ...

User Manual
Page 17
Refer to achieve world O.C. beginners can achieve extreme yet stable overclocking results with just one touch; ASUS P7P55D Deluxe 1-3 Processor The ultimate O.C. while TurboV offers more options to advanced overclockers to page 4-10 for details. Refer to beginners... clock speeds while maintaining stability. TurboV Remote Versatile, Real-time O.C. This feature optimizes the power phase functions, allowing components to the ASUS motherboards. 16+3 phase power design, 16-phase for vCore and extra 3-phase for Best Performance The groundbreaking 16+3 phase VRM design is brought...
Refer to achieve world O.C. beginners can achieve extreme yet stable overclocking results with just one touch; ASUS P7P55D Deluxe 1-3 Processor The ultimate O.C. while TurboV offers more options to advanced overclockers to page 4-10 for details. Refer to beginners... clock speeds while maintaining stability. TurboV Remote Versatile, Real-time O.C. This feature optimizes the power phase functions, allowing components to the ASUS motherboards. 16+3 phase power design, 16-phase for vCore and extra 3-phase for Best Performance The groundbreaking 16+3 phase VRM design is brought...

User Manual
Page 18
...solution to determine failsafe settings that can dramatically improve your system up to page 2-33, 3-34 and 4-9 for details. ASUS Fanless Design-Heat-pipe solution The Heat Pipe design effectively directs the heat generated by the critical components to the other side...ºC. 1-4 Chapter 1: Product Introduction MemOK! Without BIOS setups, the ASUS exclusive Drive Xpert is ideal for details. Any Memory is the fastest memory booting solution today. Up to secure data on this motherboard is a fanless cooling solution offered exclusively by yourself. The purpose of...
...solution to determine failsafe settings that can dramatically improve your system up to page 2-33, 3-34 and 4-9 for details. ASUS Fanless Design-Heat-pipe solution The Heat Pipe design effectively directs the heat generated by the critical components to the other side...ºC. 1-4 Chapter 1: Product Introduction MemOK! Without BIOS setups, the ASUS exclusive Drive Xpert is ideal for details. Any Memory is the fastest memory booting solution today. Up to secure data on this motherboard is a fanless cooling solution offered exclusively by yourself. The purpose of...
User Manual
Page 19
... cool environment. With better electric conductivity, it against static electricity and shields it ideally protects your favorite settings. ASUS P7P55D Deluxe 1-5 ASUS Onboard Switch With an easy press during overclocking, the exclusive onboard switches allow gamers to effortless fine-tune the ...of useful profiles offer flexible controls of Q-LED, Q-Slot and Q-DIMM design speed up your motherboard against Electronic Magnetic Interference (EMI). ASUS Noise Filter Eliminate background noise while recording This feature detects repetitive and stationary noises like Skype, online...
... cool environment. With better electric conductivity, it against static electricity and shields it ideally protects your favorite settings. ASUS P7P55D Deluxe 1-5 ASUS Onboard Switch With an easy press during overclocking, the exclusive onboard switches allow gamers to effortless fine-tune the ...of useful profiles offer flexible controls of Q-LED, Q-Slot and Q-DIMM design speed up your motherboard against Electronic Magnetic Interference (EMI). ASUS Noise Filter Eliminate background noise while recording This feature detects repetitive and stationary noises like Skype, online...
User Manual
Page 20
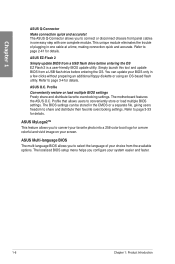
...BIOS from a USB flash drive before entering the OS EZ Flash 2 is a user-friendly BIOS update utility. The motherboard features the ASUS O.C. ASUS Multi-language BIOS The multi-language BIOS allows you to page 3-33 for details. Refer to select the language of ...Profile that allows users to connect or disconnect chassis front panel cables in one complete module. Chapter 1 ASUS Q-Connector Make connection quick and accurate! ASUS O.C. The ASUS Q-Connector allows you configure your choice from the available options. Profile Conveniently restore or load multiple BIOS ...
...BIOS from a USB flash drive before entering the OS EZ Flash 2 is a user-friendly BIOS update utility. The motherboard features the ASUS O.C. ASUS Multi-language BIOS The multi-language BIOS allows you to page 3-33 for details. Refer to select the language of ...Profile that allows users to connect or disconnect chassis front panel cables in one complete module. Chapter 1 ASUS Q-Connector Make connection quick and accurate! ASUS O.C. The ASUS Q-Connector allows you configure your choice from the available options. Profile Conveniently restore or load multiple BIOS ...
User Manual
Page 21
..., or components. Chapter 2: Chapter 2 2.1 Before you proceed Hardware information Take note of the following precautions before you install motherboard components or change any motherboard settings. • Unplug the power cord from the wall socket before touching any component, ensure that came with the component. • Before you ... case, to avoid damaging them . • Whenever you uninstall any component, place it on a grounded antistatic pad or in the bag that the ATX power supply is switched off or the power cord is detached from the power supply. ASUS P7P55D Deluxe 2-1
..., or components. Chapter 2: Chapter 2 2.1 Before you proceed Hardware information Take note of the following precautions before you install motherboard components or change any motherboard settings. • Unplug the power cord from the wall socket before touching any component, ensure that came with the component. • Before you ... case, to avoid damaging them . • Whenever you uninstall any component, place it on a grounded antistatic pad or in the bag that the ATX power supply is switched off or the power cord is detached from the power supply. ASUS P7P55D Deluxe 2-1

User Manual
Page 22
2.2 Motherboard overview 2.2.1 Motherboard layout Chapter 2 Refer to 2.7 Connectors for more information about rear panel connectors and internal connectors. 2-2 Chapter 2: Hardware information
2.2 Motherboard overview 2.2.1 Motherboard layout Chapter 2 Refer to 2.7 Connectors for more information about rear panel connectors and internal connectors. 2-2 Chapter 2: Hardware information
User Manual
Page 24
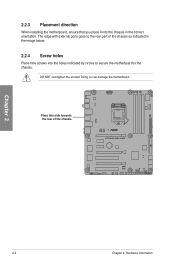
Place this side towards the rear of the chassis as indicated in the correct orientation. The edge with external ports goes to the chassis. Doing so can damage the motherboard. 2.2.3 Placement direction When installing the motherboard, ensure that you place it into the chassis in the image below. 2.2.4 Screw holes Place nine screws into the holes indicated by circles to secure the motherboard to the rear part of the chassis Chapter 2 2-4 Chapter 2: Hardware information DO NOT overtighten the screws!
Place this side towards the rear of the chassis as indicated in the correct orientation. The edge with external ports goes to the chassis. Doing so can damage the motherboard. 2.2.3 Placement direction When installing the motherboard, ensure that you place it into the chassis in the image below. 2.2.4 Screw holes Place nine screws into the holes indicated by circles to secure the motherboard to the rear part of the chassis Chapter 2 2-4 Chapter 2: Hardware information DO NOT overtighten the screws!
User Manual
Page 25
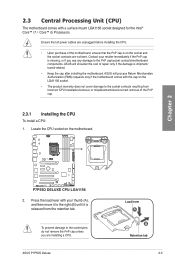
...the CPU socket on the socket and the socket contacts are installing a CPU. ASUS P7P55D Deluxe Load lever A B Retention tab 2-5 ASUS will shoulder the cost of repair only if the damage is on the motherboard. To prevent damage to the socket pins, do not remove the PnP cap... Contact your thumb (A), and then move it to the socket contacts resulting from the retention tab. ASUS will process Return Merchandise Authorization (RMA) requests only if the motherboard comes with your retailer immediately if the PnP cap is released from incorrect CPU installation/removal, or misplacement...
...the CPU socket on the socket and the socket contacts are installing a CPU. ASUS P7P55D Deluxe Load lever A B Retention tab 2-5 ASUS will shoulder the cost of repair only if the damage is on the motherboard. To prevent damage to the socket pins, do not remove the PnP cap... Contact your thumb (A), and then move it to the socket contacts resulting from the retention tab. ASUS will process Return Merchandise Authorization (RMA) requests only if the motherboard comes with your retailer immediately if the PnP cap is released from incorrect CPU installation/removal, or misplacement...
User Manual
Page 28
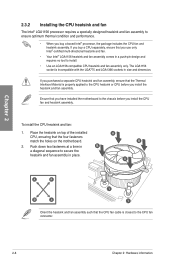
Ensure that you have installed the motherboard to the chassis before you install the heatsink and fan assembly. Chapter 2 2.3.2 Installing the CPU heatsink and fan The Intel® LGA1156 processor requires a specially ... in place. To install the CPU heatsink and fan: 1. A B A A B 1 B A 1 Orient the heatsink and fan assembly such that the four fasteners match the holes on the motherboard. 2. The LGA1156 socket is closest to secure the heatsink and fan assembly in size and dimension. Push down two fasteners at a time in B a diagonal sequence...
Ensure that you have installed the motherboard to the chassis before you install the heatsink and fan assembly. Chapter 2 2.3.2 Installing the CPU heatsink and fan The Intel® LGA1156 processor requires a specially ... in place. To install the CPU heatsink and fan: 1. A B A A B 1 B A 1 Orient the heatsink and fan assembly such that the four fasteners match the holes on the motherboard. 2. The LGA1156 socket is closest to secure the heatsink and fan assembly in size and dimension. Push down two fasteners at a time in B a diagonal sequence...
User Manual
Page 29
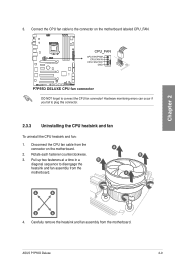
... CPU fan connector! Pull up two fasteners at a time in a B diagonal sequence to the connector on the motherboard. 2. A B A A B B A 4. Disconnect the CPU fan cable from the motherboard. Carefully remove the heatsink and fan assembly from the motherboard. ASUS P7P55D Deluxe 2-9 Chapter 2 DO NOT forget to plug this connector. 2.3.3 Uninstalling the CPU heatsink and fan To uninstall the...
... CPU fan connector! Pull up two fasteners at a time in a B diagonal sequence to the connector on the motherboard. 2. A B A A B B A 4. Disconnect the CPU fan cable from the motherboard. Carefully remove the heatsink and fan assembly from the motherboard. ASUS P7P55D Deluxe 2-9 Chapter 2 DO NOT forget to plug this connector. 2.3.3 Uninstalling the CPU heatsink and fan To uninstall the...
User Manual
Page 30
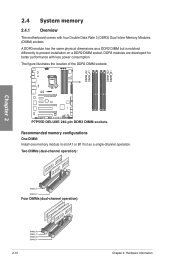
... 3 (DDR3) Dual Inline Memory Modules (DIMM) sockets. Two DIMMs (dual-channel operation): Four DIMMs (dual-channel operation): 2-10 Chapter 2: Hardware information 2.4 System memory 2.4.1 Overview The motherboard comes with less power consumption. A DDR3 module has the same physical dimensions as a single-channel operation. The figure illustrates the location of the DDR3 DIMM...
... 3 (DDR3) Dual Inline Memory Modules (DIMM) sockets. Two DIMMs (dual-channel operation): Four DIMMs (dual-channel operation): 2-10 Chapter 2: Hardware information 2.4 System memory 2.4.1 Overview The motherboard comes with less power consumption. A DDR3 module has the same physical dimensions as a single-channel operation. The figure illustrates the location of the DDR3 DIMM...
User Manual
Page 31
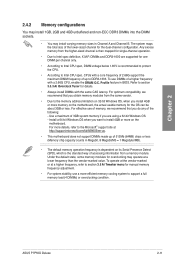
... 3GB or less. ASUS P7P55D Deluxe 2-11 Chapter 2 2.4.2 Memory configurations You may install 1GB, 2GB and 4GB unbuffered and non‑ECC DDR3 DIMMs into the DIMM sockets. • You may operate at http://support.microsoft.com/kb/929605/en-us. • This motherboard does not support DIMMs... made up to the memory address limitation on the motherboard, the actual usable memory for the dual-channel configuration. Any excess memory from the same vendor. &#...
... 3GB or less. ASUS P7P55D Deluxe 2-11 Chapter 2 2.4.2 Memory configurations You may install 1GB, 2GB and 4GB unbuffered and non‑ECC DDR3 DIMMs into the DIMM sockets. • You may operate at http://support.microsoft.com/kb/929605/en-us. • This motherboard does not support DIMMs... made up to the memory address limitation on the motherboard, the actual usable memory for the dual-channel configuration. Any excess memory from the same vendor. &#...

User Manual
Page 32
Chapter 2 P7P55D Deluxe Motherboard Qualified Vendors Lists (QVL) DDR3-1067MHz capability for CPU at 2.66, 2.8 and 2.93GHz Vendor Part No. Size SS/ Chip DS Brand A-DATA A-DATA A-DATA Apacer ...; • • Elixir M2F2G64CB8HAN4-BE 2GB DS Elixir N2CB1G80AN-BE 7 • • • WINTEC 3DU3191A-10 1GB DS Qimonda IDSH51-03A1F1C-10F 7 • • • P7P55D Deluxe Motherboard Qualified Vendors Lists (QVL) DDR3-1333MHz capability for CPU at 2.66, 2.8 and 2.93GHz Vendor Part No.
Chapter 2 P7P55D Deluxe Motherboard Qualified Vendors Lists (QVL) DDR3-1067MHz capability for CPU at 2.66, 2.8 and 2.93GHz Vendor Part No. Size SS/ Chip DS Brand A-DATA A-DATA A-DATA Apacer ...; • • Elixir M2F2G64CB8HAN4-BE 2GB DS Elixir N2CB1G80AN-BE 7 • • • WINTEC 3DU3191A-10 1GB DS Qimonda IDSH51-03A1F1C-10F 7 • • • P7P55D Deluxe Motherboard Qualified Vendors Lists (QVL) DDR3-1333MHz capability for CPU at 2.66, 2.8 and 2.93GHz Vendor Part No.


