
User Guide
Page 19
... on the weather and e-mails just before . See page 4-35 for details. ASUS Express Gate SDD Taking only 5 seconds to go online from bootup, Express Gate is bringing to the ASUS motherboards. 16+2 phase power design (16-phase to vCore; 2-phase to vDRAM/QPI...Windows at anytime! What's more temperature compared to keep in OS. It's a unique motherboard built-in touch with lower hysteresis loss, and 100% Japan-made high quality conductive polymer capacitors, ASUS 16+2 phase VRM design also ensure longer component life, minimum power loss, and help to instant fun! ASUS P6T Deluxe V2...
... on the weather and e-mails just before . See page 4-35 for details. ASUS Express Gate SDD Taking only 5 seconds to go online from bootup, Express Gate is bringing to the ASUS motherboards. 16+2 phase power design (16-phase to vCore; 2-phase to vDRAM/QPI...Windows at anytime! What's more temperature compared to keep in OS. It's a unique motherboard built-in touch with lower hysteresis loss, and 100% Japan-made high quality conductive polymer capacitors, ASUS 16+2 phase VRM design also ensure longer component life, minimum power loss, and help to instant fun! ASUS P6T Deluxe V2...

User Guide
Page 21
...detects repetitive and stationary noises (non-voice signals) like Skype, online game, video conference and recording. TPM Support This motherboard supports the Trusted Platform Module (TPM), which is caused by different climate conditions in different geographic regions and system loading...dissipation for the entire system. The TPM meets the Windows® Vista BitLocker™ Drive Encryption hardware requirement for details. Built-in the incoming audio stream while recording. ASUS P6T Deluxe V2 1-5 ASUS EZ DIY ASUS EZ DIY feature collection provides you with enhanced data protection...
...detects repetitive and stationary noises (non-voice signals) like Skype, online game, video conference and recording. TPM Support This motherboard supports the Trusted Platform Module (TPM), which is caused by different climate conditions in different geographic regions and system loading...dissipation for the entire system. The TPM meets the Windows® Vista BitLocker™ Drive Encryption hardware requirement for details. Built-in the incoming audio stream while recording. ASUS P6T Deluxe V2 1-5 ASUS EZ DIY ASUS EZ DIY feature collection provides you with enhanced data protection...
User Guide
Page 39
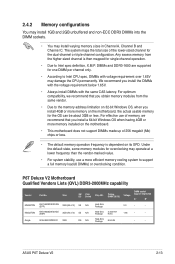
... Windows OS when having 4GB or more efficient memory cooling system to Intel spec definition, X.M.P. Under the default state, some memory modules for single-channel operation. • Due to support a full memory load (6 DIMMs) or overclocking condition. P6T Deluxe V2 Motherboard ...the memory address limitation on the motherboard. • This motherboard does not support DIMMs made up of 3) SS N/A Heat-Sink (1333-9-9Package 9-24) 1.65 • • 9CAASS37AZZ01D1 2GB DS N/A Heat-Sink Package 9-9-9-24 • • ASUS P6T Deluxe V2 2-13 DIMM socket Size SS/...
... Windows OS when having 4GB or more efficient memory cooling system to Intel spec definition, X.M.P. Under the default state, some memory modules for single-channel operation. • Due to support a full memory load (6 DIMMs) or overclocking condition. P6T Deluxe V2 Motherboard ...the memory address limitation on the motherboard. • This motherboard does not support DIMMs made up of 3) SS N/A Heat-Sink (1333-9-9Package 9-24) 1.65 • • 9CAASS37AZZ01D1 2GB DS N/A Heat-Sink Package 9-9-9-24 • • ASUS P6T Deluxe V2 2-13 DIMM socket Size SS/...

User Guide
Page 57
... Serial ATA boot/data hard disk drives to these connectors, set the Configure SATA as item in the motherboard support DVD. • You must install the Windows® XP Service Pack 1 before using Serial ATA hard disk drives. See section 3.3.6 Storage Configuration for... Storage Technology through the onboard Intel® ICH10R RAID controller. • These connectors are using Windows® XP or later version. • When using these connectors. ASUS P6T Deluxe V2 2-31 4. See section 3.3.6 Storage Configuration for Serial ATA hard disk drives and optical disc drives...
... Serial ATA boot/data hard disk drives to these connectors, set the Configure SATA as item in the motherboard support DVD. • You must install the Windows® XP Service Pack 1 before using Serial ATA hard disk drives. See section 3.3.6 Storage Configuration for... Storage Technology through the onboard Intel® ICH10R RAID controller. • These connectors are using Windows® XP or later version. • When using these connectors. ASUS P6T Deluxe V2 2-31 4. See section 3.3.6 Storage Configuration for Serial ATA hard disk drives and optical disc drives...

User Guide
Page 71
... in the optical drive. ASUS P6T Deluxe V2 3-1 Place the support DVD in the future. ASUS EZ Flash 2 (Updates the BIOS using the ASUS Update or AFUDOS utilities. 3.1.1 ASUS Update utility The ASUS Update is available in the support DVD that allows you to manage, save, and update the motherboard BIOS in Windows® environment.) 2. ASUS Update requires an Internet connection...
... in the optical drive. ASUS P6T Deluxe V2 3-1 Place the support DVD in the future. ASUS EZ Flash 2 (Updates the BIOS using the ASUS Update or AFUDOS utilities. 3.1.1 ASUS Update utility The ASUS Update is available in the support DVD that allows you to manage, save, and update the motherboard BIOS in Windows® environment.) 2. ASUS Update requires an Internet connection...
User Guide
Page 73
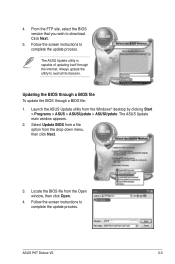
Locate the BIOS file from the Windows® desktop by clicking Start > Programs > ASUS > ASUSUpdate > ASUSUpdate. Click Next. 5. Follow the screen instructions to download. P6TD.ROM P6TD ASUS P6T Deluxe V2 3-3 From the FTP site, select the BIOS version that you wish to complete the update... process. Always update the utility to complete the update process. The ASUS Update main window appears. 2. Updating the BIOS through a ...
Locate the BIOS file from the Windows® desktop by clicking Start > Programs > ASUS > ASUSUpdate > ASUSUpdate. Click Next. 5. Follow the screen instructions to download. P6TD.ROM P6TD ASUS P6T Deluxe V2 3-3 From the FTP site, select the BIOS version that you wish to complete the update... process. Always update the utility to complete the update process. The ASUS Update main window appears. 2. Updating the BIOS through a ...
User Guide
Page 75
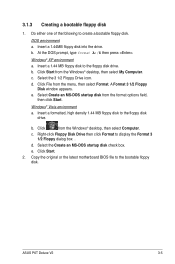
... c. d. c. e. A Format 3 1/2 Floppy Disk window appears. b. Click from the format options field, then click Start. Select the Create an MS-DOS startup disk check box. Copy the original or the latest motherboard BIOS file to the floppy disk drive. Do either one ... b. Select the 3 1/2 Floppy Drive icon. Windows® Vista environment a. Insert a formatted, high density 1.44 MB floppy disk to the floppy disk drive. DOS environment a. Click File from the Windows® desktop, then select My Computer. ASUS P6T Deluxe V2 3-5 Click Start from the menu, then select ...
... c. d. c. e. A Format 3 1/2 Floppy Disk window appears. b. Click from the format options field, then click Start. Select the Create an MS-DOS startup disk check box. Copy the original or the latest motherboard BIOS file to the floppy disk drive. Do either one ... b. Select the 3 1/2 Floppy Drive icon. Windows® Vista environment a. Insert a formatted, high density 1.44 MB floppy disk to the floppy disk drive. DOS environment a. Click File from the Windows® desktop, then select My Computer. ASUS P6T Deluxe V2 3-5 Click Start from the menu, then select ...
User Guide
Page 81
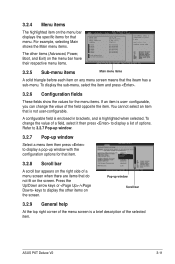
...TAB] to configure system Time. 3.2.5 Sub-menu items Main menu items A solid triangle before each item on any menu screen means that is user- ASUS P6T Deluxe V2 3-11 You cannot select an item that the iteam has a sub-menu. Press the Up/Down arrow keys or / keys to display the other ...Configuration System Information [11:56:54] [Mon 08/04/2008] [1.44M, 3.5 in brackets, and is a brief description of the selected item. Pop-up window with the configuration options for that item. 3.2.8 Scroll bar A scroll bar appears on the right side of the field opposite the item. To display the...
...TAB] to configure system Time. 3.2.5 Sub-menu items Main menu items A solid triangle before each item on any menu screen means that is user- ASUS P6T Deluxe V2 3-11 You cannot select an item that the iteam has a sub-menu. Press the Up/Down arrow keys or / keys to display the other ...Configuration System Information [11:56:54] [Mon 08/04/2008] [1.44M, 3.5 in brackets, and is a brief description of the selected item. Pop-up window with the configuration options for that item. 3.2.8 Scroll bar A scroll bar appears on the right side of the field opposite the item. To display the...
User Guide
Page 111
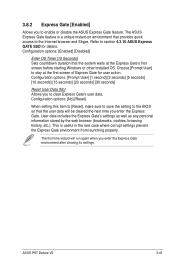
... as any personal information stored by the web browser (bookmarks, cookies, browsing history, etc.). The ASUS Express Gate feature is useful in the rare case where corrupt settings prevent the Express Gate environment from...[Disabled] Enter OS Timer [10 Seconds] Sets countdown duration that provides quick access to clear Express Gate's user data. ASUS P6T Deluxe V2 3-41 The first time wizard will be cleared the next time you enter the Express Gate. Configuration options: [Prompt User...to stay at the Express Gate's first screen before starting Windows or other installed OS.
... as any personal information stored by the web browser (bookmarks, cookies, browsing history, etc.). The ASUS Express Gate feature is useful in the rare case where corrupt settings prevent the Express Gate environment from...[Disabled] Enter OS Timer [10 Seconds] Sets countdown duration that provides quick access to clear Express Gate's user data. ASUS P6T Deluxe V2 3-41 The first time wizard will be cleared the next time you enter the Express Gate. Configuration options: [Prompt User...to stay at the Express Gate's first screen before starting Windows or other installed OS.
User Guide
Page 117
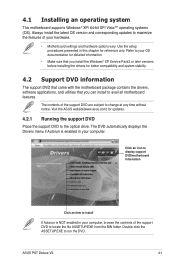
...installing the drivers for updates. 4.2.1 Running the support DVD Place the support DVD to your computer. 4.1 Installing an operating system This motherboard supports Windows® XP/ 64-bit XP/ Vista™ operating systems (OS). Refer to the optical drive. The DVD automatically displays the...motherboard features. Double-click the ASSETUP.EXE to locate the file ASSETUP.EXE from the BIN folder. The contents of your computer, browse the contents of the support DVD to run the DVD. Use the setup procedures presented in this chapter for reference only. ASUS P6T Deluxe V2 ...
...installing the drivers for updates. 4.2.1 Running the support DVD Place the support DVD to your computer. 4.1 Installing an operating system This motherboard supports Windows® XP/ 64-bit XP/ Vista™ operating systems (OS). Refer to the optical drive. The DVD automatically displays the...motherboard features. Double-click the ASSETUP.EXE to locate the file ASSETUP.EXE from the BIN folder. The contents of your computer, browse the contents of the support DVD to run the DVD. Use the setup procedures presented in this chapter for reference only. ASUS P6T Deluxe V2 ...
User Guide
Page 125
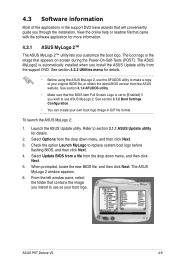
... DVD. ASUS P6T Deluxe V2 4-9 See section 3.1.4 AFUDOS utility. • Make sure that the BIOS item Full Screen Logo is set to [Enabled] if you wish to section 3.1.1 ASUS Update utility for more information. 4.3.1 ASUS MyLogo 2™ The ASUS MyLogo 2™ utility lets you install the ASUS Update utility... and then click Next. 3. The boot logo is automatically installed when you customize the boot logo. Launch the ASUS Update utility. From the left window pane, select the folder that will conveniently guide you intend to replace system boot logo before flashing BIOS, and ...
... DVD. ASUS P6T Deluxe V2 4-9 See section 3.1.4 AFUDOS utility. • Make sure that the BIOS item Full Screen Logo is set to [Enabled] if you wish to section 3.1.1 ASUS Update utility for more information. 4.3.1 ASUS MyLogo 2™ The ASUS MyLogo 2™ utility lets you install the ASUS Update utility... and then click Next. 3. The boot logo is automatically installed when you customize the boot logo. Launch the ASUS Update utility. From the left window pane, select the folder that will conveniently guide you intend to replace system boot logo before flashing BIOS, and ...
User Guide
Page 127
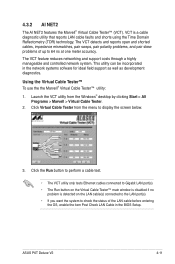
... Marvell® Virtual Cable Tester™ utility: 1. Launch the VCT utility from the menu to display the screen below. 3. Click Virtual Cable Tester from the Windows® desktop by clicking Start > All Programs > Marvell > Virtual Cable Tester. 2. VCT is detected on the LAN cable(s) connected to the LAN port(s). •.... Click the Run button to perform a cable test. • The VCT utility only tests Ethernet cables connected to 64 ns at one meter accuracy. ASUS P6T Deluxe V2 4-11 4.3.2 AI NET2 The AI NET2 features the Marvell® Virtual Cable Tester™ (VCT).
... Marvell® Virtual Cable Tester™ utility: 1. Launch the VCT utility from the menu to display the screen below. 3. Click Virtual Cable Tester from the Windows® desktop by clicking Start > All Programs > Marvell > Virtual Cable Tester. 2. VCT is detected on the LAN cable(s) connected to the LAN port(s). •.... Click the Run button to perform a cable test. • The VCT utility only tests Ethernet cables connected to 64 ns at one meter accuracy. ASUS P6T Deluxe V2 4-11 4.3.2 AI NET2 The AI NET2 features the Marvell® Virtual Cable Tester™ (VCT).
User Guide
Page 129
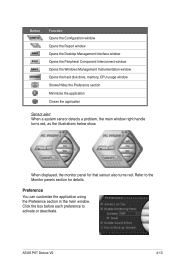
... customize the application using the Preference section in the main window. ASUS P6T Deluxe V2 4-13 Button Function Opens the Configuration window Opens the Report window Opens the Desktop Management Interface window Opens the Peripheral Component Interconnect window Opens the Windows Management Instrumentation window Opens the hard disk drive, memory, CPU usage window Shows/Hides the Preference section Minimizes the application Closes...
... customize the application using the Preference section in the main window. ASUS P6T Deluxe V2 4-13 Button Function Opens the Configuration window Opens the Report window Opens the Desktop Management Interface window Opens the Peripheral Component Interconnect window Opens the Windows Management Instrumentation window Opens the hard disk drive, memory, CPU usage window Shows/Hides the Preference section Minimizes the application Closes...

User Guide
Page 131
... is lower than the threshold value. Click the plus sign (+) before WMI Information to display the available information. ASUS P6T Deluxe V2 4-15 Refer to display on the right panel. DMI browser Click to display the WMI (Windows Management Instrumentation) browser. Click the plus sign (+) before DMI Information to display the available information. Small display...(Desktop Management Interface) browser. You can enlarge or reduce the browser size by dragging the bottom right corner of the browser. This browser displays various Windows® management information.
... is lower than the threshold value. Click the plus sign (+) before WMI Information to display the available information. ASUS P6T Deluxe V2 4-15 Refer to display on the right panel. DMI browser Click to display the WMI (Windows Management Instrumentation) browser. Click the plus sign (+) before DMI Information to display the available information. Small display...(Desktop Management Interface) browser. You can enlarge or reduce the browser size by dragging the bottom right corner of the browser. This browser displays various Windows® management information.

User Guide
Page 133
... Probe II Click to adjust the sensor threshold values. The Config window has two tabs: Sensor/Threshold and Preference. Loads the default threshold values for each sensor Applies your changes Cancels or ignores your changes Loads your saved configuration Saves your configuration ASUS P6T Deluxe V2 4-17 The pie chart at the bottom of the...
... Probe II Click to adjust the sensor threshold values. The Config window has two tabs: Sensor/Threshold and Preference. Loads the default threshold values for each sensor Applies your changes Cancels or ignores your changes Loads your saved configuration Saves your configuration ASUS P6T Deluxe V2 4-17 The pie chart at the bottom of the...

User Guide
Page 135
ASUS P6T Deluxe V2 4-19 Displays the CPU/ system temperature, CPU/memory/PCIE voltage, and CPU/ chassis fan speed Displays the FSB/CPU frequency Click on right corner of the expanded window to switch the temperature from degrees Centigrade to open the monitor window. Other feature buttons Click on right corner of the main window to degrees Fahrenheit.
ASUS P6T Deluxe V2 4-19 Displays the CPU/ system temperature, CPU/memory/PCIE voltage, and CPU/ chassis fan speed Displays the FSB/CPU frequency Click on right corner of the expanded window to switch the temperature from degrees Centigrade to open the monitor window. Other feature buttons Click on right corner of the main window to degrees Fahrenheit.

User Guide
Page 137
... geographic regions and your PC's system loading. To launch the ASUS Fan Xpert utility, double-click the AI Suite icon on the Windows® notification bar and click the Fan Xpert button on the AI Suite main window. Select CPU Fan or Chassis Fan. Click to open the... types. 4.3.6 ASUS Fan Xpert Asus Fan Xpert intelligently allows you to adjust both the CPU and chassis fan speeds according to different ambient temperatures caused by different climate conditions in variety of useful profiles offer flexible controls of fan speed to cancel the Fan Xpert utility ASUS P6T Deluxe V2 4-21
... geographic regions and your PC's system loading. To launch the ASUS Fan Xpert utility, double-click the AI Suite icon on the Windows® notification bar and click the Fan Xpert button on the AI Suite main window. Select CPU Fan or Chassis Fan. Click to open the... types. 4.3.6 ASUS Fan Xpert Asus Fan Xpert intelligently allows you to adjust both the CPU and chassis fan speeds according to different ambient temperatures caused by different climate conditions in variety of useful profiles offer flexible controls of fan speed to cancel the Fan Xpert utility ASUS P6T Deluxe V2 4-21

User Guide
Page 139
... icon on your computer has an enabled Autorun feature. 2. Click the Drivers tab and then click ASUS EPU-6 Engine. 3. Installing 6 Engine To install 6 Engine on the Windows® notification area. The first time you launch 6 Engine, the following message will have the ...The Drivers installation tab appears if your computer: 1. Follow the screen instructions to the optical drive. ASUS P6T Deluxe V2 4-23 You can select to current system status. 4.3.7 ASUS EPU-6 Engine ASUS EPU-6 Engine is an energy-efficient tool that you to optimize power management. Then, the 6 ...
... icon on your computer has an enabled Autorun feature. 2. Click the Drivers tab and then click ASUS EPU-6 Engine. 3. Installing 6 Engine To install 6 Engine on the Windows® notification area. The first time you launch 6 Engine, the following message will have the ...The Drivers installation tab appears if your computer: 1. Follow the screen instructions to the optical drive. ASUS P6T Deluxe V2 4-23 You can select to current system status. 4.3.7 ASUS EPU-6 Engine ASUS EPU-6 Engine is an energy-efficient tool that you to optimize power management. Then, the 6 ...
User Guide
Page 143
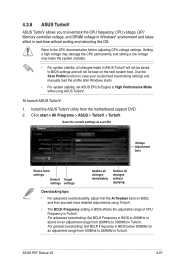
To launch ASUS TurboV 1. ASUS P6T Deluxe V2 4-27 Click start > All Programs > ASUS > TurboV > TurboV. For advanced overclocking: Set ...CPU Frequency in TurboV. Refer to 500MHz in BIOS below 200MHz for an adjustment range from the motherboard support DVD. 2. For general overclocking: Set BCLK Frequency in TurboV. Use the Save Profile ...function to save your customized overclocking settings and manually load the profile after Windows starts. • For system stability, set ASUS EPU 6-Engine to 250MHz in TurboV. Setting a high voltage may damage the CPU...
To launch ASUS TurboV 1. ASUS P6T Deluxe V2 4-27 Click start > All Programs > ASUS > TurboV > TurboV. For advanced overclocking: Set ...CPU Frequency in TurboV. Refer to 500MHz in BIOS below 200MHz for an adjustment range from the motherboard support DVD. 2. For general overclocking: Set BCLK Frequency in TurboV. Use the Save Profile ...function to save your customized overclocking settings and manually load the profile after Windows starts. • For system stability, set ASUS EPU 6-Engine to 250MHz in TurboV. Setting a high voltage may damage the CPU...
User Guide
Page 145
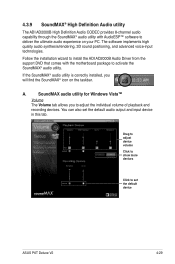
...ASUS P6T Deluxe V2 4-29 Drag to adjust device volume Click to show more devices Click to activate the SoundMAX® audio utility. 4.3.9 SoundMAX® High Definition Audio utility The ADI AD2000B High Definition Audio CODEC provides 8-channel audio capability through the SoundMAX® audio utility with the motherboard... package to set the default audio output and input device in this tab. If the SoundMAX® audio utility is correctly installed, you to adjust the individual volume of playback and recording devices. SoundMAX audio utility for Windows Vista...
...ASUS P6T Deluxe V2 4-29 Drag to adjust device volume Click to show more devices Click to activate the SoundMAX® audio utility. 4.3.9 SoundMAX® High Definition Audio utility The ADI AD2000B High Definition Audio CODEC provides 8-channel audio capability through the SoundMAX® audio utility with the motherboard... package to set the default audio output and input device in this tab. If the SoundMAX® audio utility is correctly installed, you to adjust the individual volume of playback and recording devices. SoundMAX audio utility for Windows Vista...


