
User Guide
Page 67
...switches are running, the BIOS beeps (see anything within 30 seconds from the time you press the ATX power button. Monitor b. System power 6. At power on self tests or POST. Follow the instructions in the following order: a. The system then runs the power-on , hold ... case cover. 2. External SCSI devices (starting with a surge protector. 5. After applying power, the system power LED on the chain) c. ASUS P6T Deluxe V2 2-41 2.10 Starting up for assistance. If your retailer for the first time 1. Check the jumper settings and connections or call your monitor complies...
...switches are running, the BIOS beeps (see anything within 30 seconds from the time you press the ATX power button. Monitor b. System power 6. At power on self tests or POST. Follow the instructions in the following order: a. The system then runs the power-on , hold ... case cover. 2. External SCSI devices (starting with a surge protector. 5. After applying power, the system power LED on the chain) c. ASUS P6T Deluxe V2 2-41 2.10 Starting up for assistance. If your retailer for the first time 1. Check the jumper settings and connections or call your monitor complies...

User Guide
Page 74
...boot failure! 3-4 Chapter 3: BIOS setup Save the BIOS file to download the latest BIOS file for the motherboard. 2. ASUSTek EZ Flash 2 BIOS ROM Utility V3.30 FLASH TYPE: MXIC 25L1605A Current ROM BOARD: P6T Deluxe V2 VER: 0309 DATE: 09/15/2008 Update ROM BOARD: Unknown VER: Unknown DATE: Unknown PATH: A:\...ASUS EZ Flash 2 feature allows you to update the BIOS without having to go through the long process of booting from a floppy disk and using EZ Flash 2 1. Then press . 4. Go to the Tools menu to select EZ Flash2 and press to enable it is accessible by pressing + during POST...
...boot failure! 3-4 Chapter 3: BIOS setup Save the BIOS file to download the latest BIOS file for the motherboard. 2. ASUSTek EZ Flash 2 BIOS ROM Utility V3.30 FLASH TYPE: MXIC 25L1605A Current ROM BOARD: P6T Deluxe V2 VER: 0309 DATE: 09/15/2008 Update ROM BOARD: Unknown VER: Unknown DATE: Unknown PATH: A:\...ASUS EZ Flash 2 feature allows you to update the BIOS without having to go through the long process of booting from a floppy disk and using EZ Flash 2 1. Then press . 4. Go to the Tools menu to select EZ Flash2 and press to enable it is accessible by pressing + during POST...
User Guide
Page 79
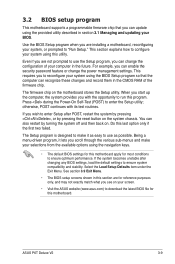
...otherwise, POST continues with the opportunity to run this motherboard apply for this last option only if the first two failed. Do this motherboard. Even if you are not prompted to download the latest BIOS file for most conditions to ensure optimum performance. ASUS P6T Deluxe V2 3-9 Use... the BIOS Setup program when you are installing a motherboard, reconfiguring your system, or prompted to configure your screen. • Visit the ASUS website (www.asus.com) to use as easy to enter Setup ...
...otherwise, POST continues with the opportunity to run this motherboard apply for this last option only if the first two failed. Do this motherboard. Even if you are not prompted to download the latest BIOS file for most conditions to ensure optimum performance. ASUS P6T Deluxe V2 3-9 Use... the BIOS Setup program when you are installing a motherboard, reconfiguring your system, or prompted to configure your screen. • Visit the ASUS website (www.asus.com) to use as easy to enter Setup ...

User Guide
Page 107
...] [Enabled] Set this item allows the BIOS to enable or disable the full screen logo display feature. Configuration options: [Disabled] [Enabled] ASUS P6T Deluxe V2 3-37 Change Option F1 General Help F10 Save and Exit ESC Exit v02.61 (C)Copyright 1985-2008, American Megatrends, Inc. AddOn ROM Display ...] Bootup Num-Lock [On] Wait for 'F1' if Error [Enabled] Hit 'DEL' Message Display [Enabled] Allows BIOS to run Setup" during POST. Select Screen Select Item +- Configuration options: [Force BIOS] [Keep Current] Bootup Num-Lock [On] Allows you to skip some power on state for...
...] [Enabled] Set this item allows the BIOS to enable or disable the full screen logo display feature. Configuration options: [Disabled] [Enabled] ASUS P6T Deluxe V2 3-37 Change Option F1 General Help F10 Save and Exit ESC Exit v02.61 (C)Copyright 1985-2008, American Megatrends, Inc. AddOn ROM Display ...] Bootup Num-Lock [On] Wait for 'F1' if Error [Enabled] Hit 'DEL' Message Display [Enabled] Allows BIOS to run Setup" during POST. Select Screen Select Item +- Configuration options: [Force BIOS] [Keep Current] Bootup Num-Lock [On] Allows you to skip some power on state for...

User Guide
Page 113
Configuration options: [Disabled] [Enabled] ASUS P6T Deluxe V2 3-43 Check Marvell LAN Cable [Disabled] Enables or disables checking of the Marvell LAN cable during POST. [Disabled] v02.61 (C)Copyright 1985-2008, American Megatrends, Inc. 3.8.4 Ai Net 2 AI NET 2 Pair Status Length Check Marvell LAN cable BIOS SETUP UTILITY Tools Check Marvell LAN cable during the Power-On Self‑Test (POST).
Configuration options: [Disabled] [Enabled] ASUS P6T Deluxe V2 3-43 Check Marvell LAN Cable [Disabled] Enables or disables checking of the Marvell LAN cable during POST. [Disabled] v02.61 (C)Copyright 1985-2008, American Megatrends, Inc. 3.8.4 Ai Net 2 AI NET 2 Pair Status Length Check Marvell LAN cable BIOS SETUP UTILITY Tools Check Marvell LAN cable during the Power-On Self‑Test (POST).
User Guide
Page 125
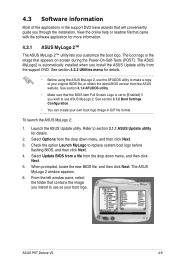
... See section 3.1.4 AFUDOS utility. • Make sure that appears on screen during the Power‑On‑Self-Tests (POST). Launch the ASUS Update utility. When prompted, locate the new BIOS file, and then click Next. Select Update BIOS from a file from ... See section 3.7.2 Boot Settings Configuration. • You can create your boot logo. ASUS P6T Deluxe V2 4-9 To launch the ASUS MyLogo 2: 1. Select Options from the support DVD. Check the option Launch MyLogo to section 3.1.1 ASUS Update utility for details. 2. From the left window pane, select the folder that...
... See section 3.1.4 AFUDOS utility. • Make sure that appears on screen during the Power‑On‑Self-Tests (POST). Launch the ASUS Update utility. When prompted, locate the new BIOS file, and then click Next. Select Update BIOS from a file from ... See section 3.7.2 Boot Settings Configuration. • You can create your boot logo. ASUS P6T Deluxe V2 4-9 To launch the ASUS MyLogo 2: 1. Select Options from the support DVD. Check the option Launch MyLogo to section 3.1.1 ASUS Update utility for details. 2. From the left window pane, select the folder that...
User Guide
Page 127
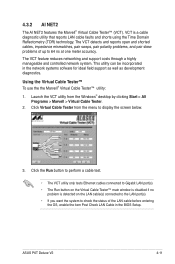
...utility can be incorporated in the BIOS Setup. Using the Virtual Cable Tester™ To use the the Marvell® Virtual Cable Tester™ utility: 1. ASUS P6T Deluxe V2 4-11 VCT is detected on the Virtual Cable Tester™ main window is disabled if no problem is a cable diagnostic utility that reports LAN cable... shorted cables, impedance mismatches, pair swaps, pair polarity problems, and pair skew problems of the LAN cable before entering the OS, enable the item Post Check LAN Cable in the network systems sofware for ideal field support as well as development diagnostics.
...utility can be incorporated in the BIOS Setup. Using the Virtual Cable Tester™ To use the the Marvell® Virtual Cable Tester™ utility: 1. ASUS P6T Deluxe V2 4-11 VCT is detected on the Virtual Cable Tester™ main window is disabled if no problem is a cable diagnostic utility that reports LAN cable... shorted cables, impedance mismatches, pair swaps, pair polarity problems, and pair skew problems of the LAN cable before entering the OS, enable the item Post Check LAN Cable in the network systems sofware for ideal field support as well as development diagnostics.
User Guide
Page 161
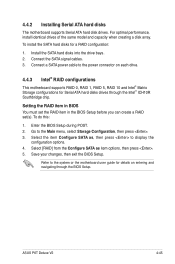
... a disk array. Enter the BIOS Setup during POST. 2. Connect the SATA signal cables. 3. To do this: 1. ASUS P6T Deluxe V2 4-45 Select the item Configure SATA as item options, then press . 5. Refer to the Main menu, select Storage Configuration, then press . 3. 4.4.2 Installing Serial ATA hard disks The motherboard supports Serial ATA hard disk drives. To install...
... a disk array. Enter the BIOS Setup during POST. 2. Connect the SATA signal cables. 3. To do this: 1. ASUS P6T Deluxe V2 4-45 Select the item Configure SATA as item options, then press . 5. Refer to the Main menu, select Storage Configuration, then press . 3. 4.4.2 Installing Serial ATA hard disks The motherboard supports Serial ATA hard disk drives. To install...

User Guide
Page 169
... key when the system prompts "Press any key to enter the BIOS setup utility. 3. Place the motherboard support DVD into the optical drive. 5. Insert a floppy disk into the floppy drive then press . 9. ASUS P6T Deluxe V2 4-53 Press during POST to boot from the optical drive." 7. 4.5 Creating a RAID driver disk A floppy disk with a floppy disk drive...
... key when the system prompts "Press any key to enter the BIOS setup utility. 3. Place the motherboard support DVD into the optical drive. 5. Insert a floppy disk into the floppy drive then press . 9. ASUS P6T Deluxe V2 4-53 Press during POST to boot from the optical drive." 7. 4.5 Creating a RAID driver disk A floppy disk with a floppy disk drive...


