User Guide
Page 2
... the owners' benefit, without the express written permission of ASUSTeK COMPUTER INC. ("ASUS"). ii E4398 First Edition December 2008 Copyright © 2008 ASUSTeK COMPUTER INC. SPECIFICATIONS AND INFORMATION CONTAINED IN THIS MANUAL ARE FURNISHED FOR INFORMATIONAL USE ONLY, AND ARE SUBJECT TO CHANGE AT ANY TIME... OF USE OR DATA, INTERRUPTION OF BUSINESS AND THE LIKE), EVEN IF ASUS HAS BEEN ADVISED OF THE POSSIBILITY OF SUCH DAMAGES ARISING FROM ANY DEFECT OR ERROR IN THIS MANUAL OR PRODUCT. ASUS PROVIDES THIS MANUAL "AS IS" WITHOUT WARRANTY OF ANY KIND, EITHER EXPRESS OR IMPLIED, ...
... the owners' benefit, without the express written permission of ASUSTeK COMPUTER INC. ("ASUS"). ii E4398 First Edition December 2008 Copyright © 2008 ASUSTeK COMPUTER INC. SPECIFICATIONS AND INFORMATION CONTAINED IN THIS MANUAL ARE FURNISHED FOR INFORMATIONAL USE ONLY, AND ARE SUBJECT TO CHANGE AT ANY TIME... OF USE OR DATA, INTERRUPTION OF BUSINESS AND THE LIKE), EVEN IF ASUS HAS BEEN ADVISED OF THE POSSIBILITY OF SUCH DAMAGES ARISING FROM ANY DEFECT OR ERROR IN THIS MANUAL OR PRODUCT. ASUS PROVIDES THIS MANUAL "AS IS" WITHOUT WARRANTY OF ANY KIND, EITHER EXPRESS OR IMPLIED, ...
User Guide
Page 6
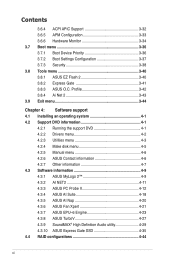
...Boot Device Priority 3-36 3.7.2 Boot Settings Configuration 3-37 3.7.3 Security 3-38 3.8 Tools menu 3-40 3.8.1 ASUS EZ Flash 2 3-40 3.8.2 Express Gate 3-41 3.8.3 ASUS O.C. Profile 3-42 3.8.4 Ai Net 2 3-43 3.9 Exit menu 3-44 Chapter 4: Software support 4.1... menu 4-5 4.2.5 Manual menu 4-6 4.2.6 ASUS Contact information 4-6 4.2.7 Other information 4-7 4.3 Software information 4-9 4.3.1 ASUS MyLogo 2 4-9 4.3.2 AI NET2 4-11 4.3.3 ASUS PC Probe II 4-12 4.3.4 ASUS AI Suite 4-18 4.3.5 ASUS AI Nap 4-20 4.3.6 ASUS Fan Xpert 4-21 4.3.7 ASUS EPU-6 Engine 4-23 4.3.8 ASUS TurboV 4-27 ...
...Boot Device Priority 3-36 3.7.2 Boot Settings Configuration 3-37 3.7.3 Security 3-38 3.8 Tools menu 3-40 3.8.1 ASUS EZ Flash 2 3-40 3.8.2 Express Gate 3-41 3.8.3 ASUS O.C. Profile 3-42 3.8.4 Ai Net 2 3-43 3.9 Exit menu 3-44 Chapter 4: Software support 4.1... menu 4-5 4.2.5 Manual menu 4-6 4.2.6 ASUS Contact information 4-6 4.2.7 Other information 4-7 4.3 Software information 4-9 4.3.1 ASUS MyLogo 2 4-9 4.3.2 AI NET2 4-11 4.3.3 ASUS PC Probe II 4-12 4.3.4 ASUS AI Suite 4-18 4.3.5 ASUS AI Nap 4-20 4.3.6 ASUS Fan Xpert 4-21 4.3.7 ASUS EPU-6 Engine 4-23 4.3.8 ASUS TurboV 4-27 ...
User Guide
Page 9
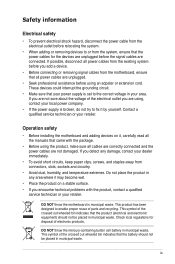
... adding devices on a stable surface. • If you are using an adpater or extension cord. DO NOT throw the motherboard in municipal waste. Contact a qualified service technician or your retailer. If you add a device. • Before connecting or removing signal ...before relocating the system. • When adding or removing devices to the correct voltage in your area. If possible, disconnect all the manuals that the product (electrical and electronic equipment) should not be placed in municipal waste. This symbol of electronic products. These devices could interrupt...
... adding devices on a stable surface. • If you are using an adpater or extension cord. DO NOT throw the motherboard in municipal waste. Contact a qualified service technician or your retailer. If you add a device. • Before connecting or removing signal ...before relocating the system. • When adding or removing devices to the correct voltage in your area. If possible, disconnect all the manuals that the product (electrical and electronic equipment) should not be placed in municipal waste. This symbol of electronic products. These devices could interrupt...

User Guide
Page 11
... Italics Command Indicates a menu or an item to complete a task. If you perform certain tasks properly, take note of the following symbols used throughout this manual. DANGER/WARNING: Information to prevent injury to yourself when trying to select. Example: At the DOS prompt, type the command line: afudos /iP6TD.ROM xi...
... Italics Command Indicates a menu or an item to complete a task. If you perform certain tasks properly, take note of the following symbols used throughout this manual. DANGER/WARNING: Information to prevent injury to yourself when trying to select. Example: At the DOS prompt, type the command line: afudos /iP6TD.ROM xi...
User Guide
Page 12
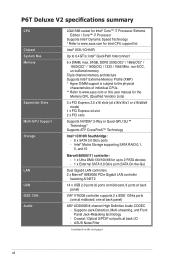
...channel High Definition Audio CODEC - Coaxial / Optical S/PDIF out ports at back I/O - Supports Jack-Detection, Multi-streaming, and Front Panel Jack-Retasking technology - P6T Deluxe V2 specifications summary CPU Chipset System Bus Memory Expansion Slots Multi-GPU Support Storage LAN USB IEEE 1394 Audio LGA1366 socket for Intel® Core... Intel® Extreme Memory Profile (XMP) * Hyper DIMM support is subject to the physical characteristics of individual CPUs. ** Refer to www.asus.com or this user manual for Intel CPU support list Intel® X58 / ICH10R Up to 6.4GT/s;
...channel High Definition Audio CODEC - Coaxial / Optical S/PDIF out ports at back I/O - Supports Jack-Detection, Multi-streaming, and Front Panel Jack-Retasking technology - P6T Deluxe V2 specifications summary CPU Chipset System Bus Memory Expansion Slots Multi-GPU Support Storage LAN USB IEEE 1394 Audio LGA1366 socket for Intel® Core... Intel® Extreme Memory Profile (XMP) * Hyper DIMM support is subject to the physical characteristics of individual CPUs. ** Refer to www.asus.com or this user manual for Intel CPU support list Intel® X58 / ICH10R Up to 6.4GT/s;
User Guide
Page 49
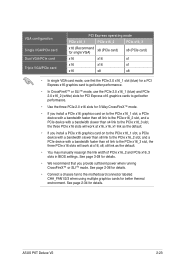
..., the three PCIe x16 slots will work at x16, x8, x8 link as the default. • You may manually reassign the link width of PCIe x16_2 and PCIe x16_3 slots in BIOS settings. ASUS P6T Deluxe V2 2-23 See page 2-34 for better thermal environment. See page 2-36 for details. • Connect a chassis fan... slot, a PCIe device with a bandwidth faster than x8 link to the PCIe x16_2 slot, and a PCIe device with a bandwidth slower than x4 link to the motherboard connector labeled CHA_FAN1/2/3 when using multiple graphics cards for details.
..., the three PCIe x16 slots will work at x16, x8, x8 link as the default. • You may manually reassign the link width of PCIe x16_2 and PCIe x16_3 slots in BIOS settings. ASUS P6T Deluxe V2 2-23 See page 2-34 for better thermal environment. See page 2-36 for details. • Connect a chassis fan... slot, a PCIe device with a bandwidth faster than x8 link to the PCIe x16_2 slot, and a PCIe device with a bandwidth slower than x4 link to the motherboard connector labeled CHA_FAN1/2/3 when using multiple graphics cards for details.

User Guide
Page 57
...ATA hard disk drives, you intend to create a Serial ATA RAID set the Configure SATA as item in the motherboard support DVD. • You must install the Windows® XP Service Pack 1 before using hot-plug and...hard disk drives. If you can connect Serial ATA boot/data hard disk drives to these connectors, set to [RAID]. ASUS P6T Deluxe V2 2-31 In Standard IDE mode, you are for the Serial ATA signal cables for details. The Serial ATA RAID ... as in the BIOS to section 4.4.3 Intel RAID configurations or the manual bundled in the BIOS to Standard IDE mode by default.
...ATA hard disk drives, you intend to create a Serial ATA RAID set the Configure SATA as item in the motherboard support DVD. • You must install the Windows® XP Service Pack 1 before using hot-plug and...hard disk drives. If you can connect Serial ATA boot/data hard disk drives to these connectors, set to [RAID]. ASUS P6T Deluxe V2 2-31 In Standard IDE mode, you are for the Serial ATA signal cables for details. The Serial ATA RAID ... as in the BIOS to section 4.4.3 Intel RAID configurations or the manual bundled in the BIOS to Standard IDE mode by default.
User Guide
Page 87
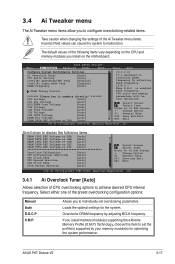
...motherboard. Change Option F1 General Help F10 Save and Exit ESC Exit v02.61 (C)Copyright 1985-2008, American Megatrends, Inc. Overclocks DRAM frequency by adjusting BCLK frequency. [X.M.P.] When X.M.P. The default values of CPU overclocking options to achieve desired CPU internal frequency. ASUS P6T Deluxe... you to configure overclocking-related items. Take caution when changing the settings of the preset overclocking configuration options: Manual Auto D.O.C.P X.M.P. Select Screen Select Item Enter Go to Sub Screen +- Change Option F1 General Help F10 Save...
...motherboard. Change Option F1 General Help F10 Save and Exit ESC Exit v02.61 (C)Copyright 1985-2008, American Megatrends, Inc. Overclocks DRAM frequency by adjusting BCLK frequency. [X.M.P.] When X.M.P. The default values of CPU overclocking options to achieve desired CPU internal frequency. ASUS P6T Deluxe... you to configure overclocking-related items. Take caution when changing the settings of the preset overclocking configuration options: Manual Auto D.O.C.P X.M.P. Select Screen Select Item Enter Go to Sub Screen +- Change Option F1 General Help F10 Save...

User Guide
Page 88
... applies different settings to adjust the value. Configuration options: [Disabled] [Enabled] The following sub-item vary depending on the motherboard. DRAM O.C. Configuration options: [DDR3-1339MHz] [DDR3-1603MHz] eXtreme Memory Profile [High Performance] This item appears only when you... item appears only when you set the Ai Overclock Tuner item to [Disabled], the CPU runs at its default speed. When set to [Manual], [D.O.C.P.] or [X.M.P.]. BCLK Frequency [XXX] Allows you to adjust the value. mode supported by the operating system. Configuration options: [Disabled] ...
... applies different settings to adjust the value. Configuration options: [Disabled] [Enabled] The following sub-item vary depending on the motherboard. DRAM O.C. Configuration options: [DDR3-1339MHz] [DDR3-1603MHz] eXtreme Memory Profile [High Performance] This item appears only when you... item appears only when you set the Ai Overclock Tuner item to [Disabled], the CPU runs at its default speed. When set to [Manual], [D.O.C.P.] or [X.M.P.]. BCLK Frequency [XXX] Allows you to adjust the value. mode supported by the operating system. Configuration options: [Disabled] ...
User Guide
Page 122
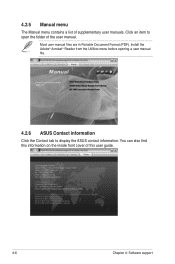
Install the Adobe® Acrobat® Reader from the Utilities menu before opening a user manual file. 4.2.6 ASUS Contact information Click the Contact tab to open the folder of the user manual. 4.2.5 Manual menu The Manual menu contains a list of this information on the inside front cover of supplementary user manuals. Click an item to display the ASUS contact information. You can also find this user guide. 4-6 Chapter 4: Software support Most user manual files are in Portable Document Format (PDF).
Install the Adobe® Acrobat® Reader from the Utilities menu before opening a user manual file. 4.2.6 ASUS Contact information Click the Contact tab to open the folder of the user manual. 4.2.5 Manual menu The Manual menu contains a list of this information on the inside front cover of supplementary user manuals. Click an item to display the ASUS contact information. You can also find this user guide. 4-6 Chapter 4: Software support Most user manual files are in Portable Document Format (PDF).
User Guide
Page 143
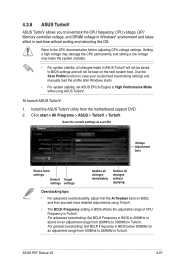
... motherboard support DVD. 2. Use the Save Profile function to save your customized overclocking settings and manually load the profile after Windows starts. • For system stability, set ASUS EPU 6-Engine to High Performance Mode while using TurboV. • The BCLK Frequency setting in BIOS affects the adjustable range of CPU Frequency in TurboV. ASUS P6T Deluxe...
... motherboard support DVD. 2. Use the Save Profile function to save your customized overclocking settings and manually load the profile after Windows starts. • For system stability, set ASUS EPU 6-Engine to High Performance Mode while using TurboV. • The BCLK Frequency setting in BIOS affects the adjustable range of CPU Frequency in TurboV. ASUS P6T Deluxe...

User Guide
Page 144
... processors support the CPU Ratio function. • Set the CPU Ratio Setting BIOS item to [Auto] before using the CPU Ratio function in BIOS for manual CPU ratio adjustment. See page 3-27 for CPU/chip voltage, DRAM Reference voltage, and CPU ratio.
... processors support the CPU Ratio function. • Set the CPU Ratio Setting BIOS item to [Auto] before using the CPU Ratio function in BIOS for manual CPU ratio adjustment. See page 3-27 for CPU/chip voltage, DRAM Reference voltage, and CPU ratio.

User Guide
Page 150
... Microphone tab allows you have to manually enable the directional Array and Speaker Phone function. Detects repetitive and stationary noises like computer fans, air conditioners, and other side. • The directional Array and Speaker Phone are purchased separately and function only when working with the ASUS Array Mic. • If you are...
... Microphone tab allows you have to manually enable the directional Array and Speaker Phone function. Detects repetitive and stationary noises like computer fans, air conditioners, and other side. • The directional Array and Speaker Phone are purchased separately and function only when working with the ASUS Array Mic. • If you are...
User Guide
Page 156
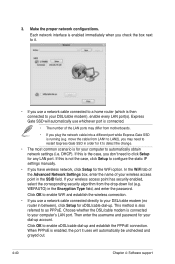
...to a home router (which is for any LAN port. This method is not the case, click Setup to configure the static IP settings manually. • If you don't need to automatically obtain network settings (i.e. Express Gate SSD will automatically be unchecked and grayed out. 4-40 ... most common scenario is then connected to click Setup for your wireless access point has security enabled, select the corresponding security algorithm from motherboards. • If you may differ from the drop-down list (e.g. Choose whether the DSL/cable modem is enabled immediately when you ...
...to a home router (which is for any LAN port. This method is not the case, click Setup to configure the static IP settings manually. • If you don't need to automatically obtain network settings (i.e. Express Gate SSD will automatically be unchecked and grayed out. 4-40 ... most common scenario is then connected to click Setup for your wireless access point has security enabled, select the corresponding security algorithm from motherboards. • If you may differ from the drop-down list (e.g. Choose whether the DSL/cable modem is enabled immediately when you ...
User Guide
Page 174
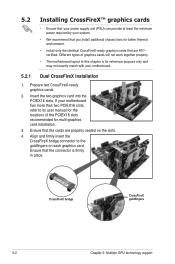
... 4. Ensure that the connector is for reference purpose only and may not exactly match with your motherboard. 5.2.1 Dual CrossFireX installation 1. Different types of graphics cards will not work together properly. • The motherboard layout of the PCIEX16 slots recommended for multi-graphics card installation. 3. CrossFireX bridge CrossFireX goldfingers 5-2... cards that the cards are ATI®certified. Align and firmly insert the CrossFireX bridge connector to its user manual for the locations of this chapter is firmly in place. Prepare two CrossFireX-ready graphics cards. 2.
... 4. Ensure that the connector is for reference purpose only and may not exactly match with your motherboard. 5.2.1 Dual CrossFireX installation 1. Different types of graphics cards will not work together properly. • The motherboard layout of the PCIEX16 slots recommended for multi-graphics card installation. 3. CrossFireX bridge CrossFireX goldfingers 5-2... cards that the cards are ATI®certified. Align and firmly insert the CrossFireX bridge connector to its user manual for the locations of this chapter is firmly in place. Prepare two CrossFireX-ready graphics cards. 2.
User Guide
Page 175
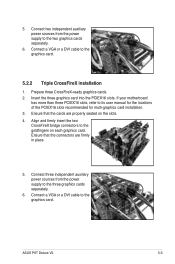
... graphics card. Align and firmly insert the two CrossFireX bridge connectors to its user manual for the locations of the PCIEX16 slots recommended for multi-graphics card installation. 3. ASUS P6T Deluxe V2 5-3 Prepare three CrossFireX-ready graphics cards. 2. If your motherboard has more than three PCIEX16 slots, refer to the goldfingers on the slots. 4. Insert...
... graphics card. Align and firmly insert the two CrossFireX bridge connectors to its user manual for the locations of the PCIEX16 slots recommended for multi-graphics card installation. 3. ASUS P6T Deluxe V2 5-3 Prepare three CrossFireX-ready graphics cards. 2. If your motherboard has more than three PCIEX16 slots, refer to the goldfingers on the slots. 4. Insert...


