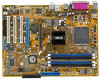

P5VD1-X User's Manual for English Edition
Page 38
...Clock (RTC) RAM in CMOS, which include system setup information such as system passwords. P5VD1-X ® P5VD1-X Clear RTC RAM CLRTC 12 23 Normal (Default) Clear CMOS You do not need to... clear the RTC when the system hangs due to overclocking, use the C.P.R. (CPU Parameter Recall) feature. For system failure due to overclocking. Shut down the key during the boot process and enter BIOS... re-enter data. You can automatically reset parameter settings to pins 2-3. Remove the onboard battery. 3.
...Clock (RTC) RAM in CMOS, which include system setup information such as system passwords. P5VD1-X ® P5VD1-X Clear RTC RAM CLRTC 12 23 Normal (Default) Clear CMOS You do not need to... clear the RTC when the system hangs due to overclocking, use the C.P.R. (CPU Parameter Recall) feature. For system failure due to overclocking. Shut down the key during the boot process and enter BIOS... re-enter data. You can automatically reset parameter settings to pins 2-3. Remove the onboard battery. 3.
P5VD1-X User's Manual for English Edition
Page 48
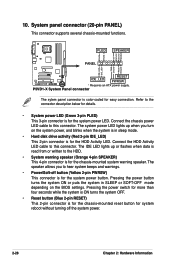
... functions. The speaker allows you turn on the system power, and blinks when the system is in SLEEP or SOFT-OFF mode depending on the BIOS settings. Connect the HDD Activity LED cable to hear system beeps and warnings. • Power/Soft-off the system power. 2-28 Chapter 2: ... for the system power button. The IDE LED lights up when you to this connector. Refer to this connector. PWR Ground Reset Ground P5VD1-X ® RESET IDE_LED PWRSW * Requires an ATX power supply. 10. Pressing the power button turns the system ON or puts the system in sleep mode. &#...
... functions. The speaker allows you turn on the system power, and blinks when the system is in SLEEP or SOFT-OFF mode depending on the BIOS settings. Connect the HDD Activity LED cable to hear system beeps and warnings. • Power/Soft-off the system power. 2-28 Chapter 2: ... for the system power button. The IDE LED lights up when you to this connector. Refer to this connector. PWR Ground Reset Ground P5VD1-X ® RESET IDE_LED PWRSW * Requires an ATX power supply. 10. Pressing the power button turns the system ON or puts the system in sleep mode. &#...
P5VD1-X User's Manual for English Edition
Page 56
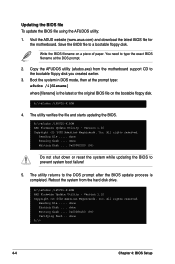
...Rebooting. • Do not shutdown or reset the system while updating the BIOS to prevent system boot failure! • A "Floppy not found ! A "P5VD1-X.ROM not found in the BIOS chip so it is no floppy disk in the drive. e. To update the BIOS using a DOS-based utility. Press ...64258;oppy disk drive. Reading file "P5VD1-X.ROM". When the correct BIOS file is your optical drive. Make sure that contains the BIOS file to P5VD1-X.ROM. 2. Visit the ASUS website (www.asus.com) to display the following. Save the BIOS file to continue. 2. error message...
...Rebooting. • Do not shutdown or reset the system while updating the BIOS to prevent system boot failure! • A "Floppy not found ! A "P5VD1-X.ROM not found in the BIOS chip so it is no floppy disk in the drive. e. To update the BIOS using a DOS-based utility. Press ...64258;oppy disk drive. Reading file "P5VD1-X.ROM". When the correct BIOS file is your optical drive. Make sure that contains the BIOS file to P5VD1-X.ROM. 2. Visit the ASUS website (www.asus.com) to display the following. Save the BIOS file to continue. 2. error message...
P5VD1-X User's Manual for English Edition
Page 58
...system boot failure! 5. All rights reserved. done Writing flash .... 0x0008CC00 (9%) Do not shut down or reset the system while updating the BIOS to a bootable floppy disk. Write the BIOS filename on the bootable floppy disk. Boot the system in DOS mode, then at the DOS ...prompt. 2. Visit the ASUS website (www.asus.com) and download the latest BIOS file for the motherboard. The utility verifies the &#...
...system boot failure! 5. All rights reserved. done Writing flash .... 0x0008CC00 (9%) Do not shut down or reset the system while updating the BIOS to a bootable floppy disk. Write the BIOS filename on the bootable floppy disk. Boot the system in DOS mode, then at the DOS ...prompt. 2. Visit the ASUS website (www.asus.com) and download the latest BIOS file for the motherboard. The utility verifies the &#...
P5VD1-X User's Manual for English Edition
Page 59
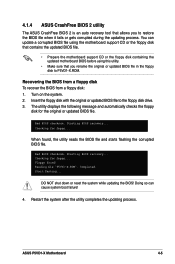
... checks the floppy disk for floppy... Starting BIOS recovery... Checking for the original or updated BIOS file. ASUS P5VD1-X Motherboard 4-5 Insert the floppy disk with the original or updated BIOS file to P5VD1-X.ROM. Checking for floppy... Start flashing... ...BIOS file when it fails or gets corrupted during the updating process. Starting BIOS recovery... Bad BIOS checksum. When found ! Turn on the system. 2. Recovering the BIOS from a floppy disk To recover the BIOS from a floppy disk: 1. DO NOT shut down or reset...
... checks the floppy disk for floppy... Starting BIOS recovery... Checking for the original or updated BIOS file. ASUS P5VD1-X Motherboard 4-5 Insert the floppy disk with the original or updated BIOS file to P5VD1-X.ROM. Checking for floppy... Start flashing... ...BIOS file when it fails or gets corrupted during the updating process. Starting BIOS recovery... Bad BIOS checksum. When found ! Turn on the system. 2. Recovering the BIOS from a floppy disk To recover the BIOS from a floppy disk: 1. DO NOT shut down or reset...
P5VD1-X User's Manual for English Edition
Page 60
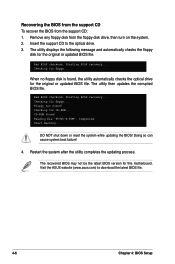
... floppy disk is found, the utility automatically checks the optical drive for this motherboard. Starting BIOS recovery... DO NOT shut down or reset the system while updating the BIOS! Restart the system after the utility completes the updating process. Remove any floppy disk from ... cause system boot failure! 4. Visit the ASUS website (www.asus.com) to the optical drive. 3. Starting BIOS recovery... Checking for the original or updated BIOS file. Start flashing... Recovering the BIOS from the support CD To recover the BIOS from the floppy disk drive, then...
... floppy disk is found, the utility automatically checks the optical drive for this motherboard. Starting BIOS recovery... DO NOT shut down or reset the system while updating the BIOS! Restart the system after the utility completes the updating process. Remove any floppy disk from ... cause system boot failure! 4. Visit the ASUS website (www.asus.com) to the optical drive. 3. Starting BIOS recovery... Checking for the original or updated BIOS file. Start flashing... Recovering the BIOS from the support CD To recover the BIOS from the floppy disk drive, then...
P5VD1-X User's Manual for English Edition
Page 64
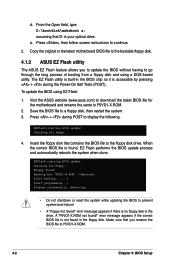
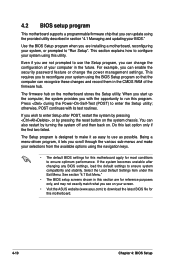
...performance. Do this program. 4.2 BIOS setup program This motherboard supports ...Visit the ASUS website (www.asus.com) to download the latest BIOS fi...BIOS settings for this utility. Press during the Power-On-Self-Test (POST) to ensure system compatibility and stability. Select the Load Default Settings item under the Exit Menu. If you see on . Being a menu-driven program, it as easy to reconfigure your BIOS...." See section "4.7 Exit Menu." • The BIOS setup ...Setup after changing any BIOS settings, load the ...BIOS Setup You can enable the security ...
...performance. Do this program. 4.2 BIOS setup program This motherboard supports ...Visit the ASUS website (www.asus.com) to download the latest BIOS fi...BIOS settings for this utility. Press during the Power-On-Self-Test (POST) to ensure system compatibility and stability. Select the Load Default Settings item under the Exit Menu. If you see on . Being a menu-driven program, it as easy to reconfigure your BIOS...." See section "4.7 Exit Menu." • The BIOS setup ...Setup after changing any BIOS settings, load the ...BIOS Setup You can enable the security ...


