P5VD1-X User's Manual for English Edition
Page 5
... Chipset 4-19 4.4.5 Onboard Devices Configuration 4-23 4.4.6 PCI PnP 4-24 4.5 Power menu 4-25 4.5.1 Suspend Mode 4-25 4.5.2 ACPI 2.0 Support 4-25 4.5.3 ACPI APIC Support 4-25 4.5.4 APM Configuration 4-26 4.5.5 Hardware Monitor 4-27 4.6 Boot menu 4-29 4.6.1 Boot Device Priority 4-29 4.6.2 Boot Settings Configuration 4-30 4.6.3 Security 4-31 4.7 Exit menu 4-33x Chapter 5: Software support 5.1 Installing an operating system 5-1 5.2 Support CD information 5-1 5.2.1 Running the support CD 5-1 5.2.2 Drivers menu 5-2 5.2.3 Utilities menu 5-3 5.2.4 Manuals menu...
... Chipset 4-19 4.4.5 Onboard Devices Configuration 4-23 4.4.6 PCI PnP 4-24 4.5 Power menu 4-25 4.5.1 Suspend Mode 4-25 4.5.2 ACPI 2.0 Support 4-25 4.5.3 ACPI APIC Support 4-25 4.5.4 APM Configuration 4-26 4.5.5 Hardware Monitor 4-27 4.6 Boot menu 4-29 4.6.1 Boot Device Priority 4-29 4.6.2 Boot Settings Configuration 4-30 4.6.3 Security 4-31 4.7 Exit menu 4-33x Chapter 5: Software support 5.1 Installing an operating system 5-1 5.2 Support CD information 5-1 5.2.1 Running the support CD 5-1 5.2.2 Drivers menu 5-2 5.2.3 Utilities menu 5-3 5.2.4 Manuals menu...
P5VD1-X User's Manual for English Edition
Page 17
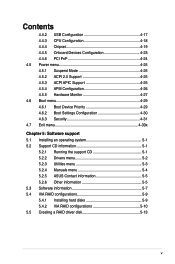
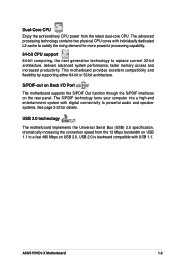
... on USB 2.0. ASUS P5VD1-X Motherboard 1-3 Dual-Core CPU Enjoy the extraordinary CPU power from the 12 Mbps bandwidth on USB 1.1 to powerful audio and speaker systems. See page 2-22 for more powerful processing capability. 64-bit CPU support 64-bit computing, the next generation technology to replace current 32-bit architecture, delivers advanced system performance, faster memory access and increased productivity. USB 2.0 technology The motherboard implements the Universal Serial Bus (USB) 2.0 specification, dramatically increasing the connection speed from the latest dual-core CPU...
... on USB 2.0. ASUS P5VD1-X Motherboard 1-3 Dual-Core CPU Enjoy the extraordinary CPU power from the 12 Mbps bandwidth on USB 1.1 to powerful audio and speaker systems. See page 2-22 for more powerful processing capability. 64-bit CPU support 64-bit computing, the next generation technology to replace current 32-bit architecture, delivers advanced system performance, faster memory access and increased productivity. USB 2.0 technology The motherboard implements the Universal Serial Bus (USB) 2.0 specification, dramatically increasing the connection speed from the latest dual-core CPU...

P5VD1-X User's Manual for English Edition
Page 33
... use . Refer to unplug the power cord before adding or removing expansion cards. ASUS P5VD1-X Motherboard 2-13 Before installing the expansion card, read the documentation that came with it by adjusting the software settings. 1. Keep the screw for the card. 2. Install the software drivers for information on the slot. 5. Make sure to the tables on the system and change the necessary BIOS settings, if any. Secure the card to the chassis...
... use . Refer to unplug the power cord before adding or removing expansion cards. ASUS P5VD1-X Motherboard 2-13 Before installing the expansion card, read the documentation that came with it by adjusting the software settings. 1. Keep the screw for the card. 2. Install the software drivers for information on the slot. 5. Make sure to the tables on the system and change the necessary BIOS settings, if any. Secure the card to the chassis...
P5VD1-X User's Manual for English Edition
Page 48
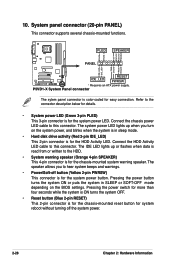
PWR Ground Reset Ground P5VD1-X ® RESET IDE_LED PWRSW * Requires an ATX power supply. Connect the chassis power LED cable to this connector. Connect the HDD Activity LED cable to the connector description below for details. • System power LED (Green 3-pin PLED) This 3-pin connector is for the HDD Activity LED. Pressing the power switch for more than four seconds while the system is ON turns the system OFF. • Reset button (Blue 2-pin RESET) This 2-pin connector is for the chassis-mounted reset button for...
PWR Ground Reset Ground P5VD1-X ® RESET IDE_LED PWRSW * Requires an ATX power supply. Connect the chassis power LED cable to this connector. Connect the HDD Activity LED cable to the connector description below for details. • System power LED (Green 3-pin PLED) This 3-pin connector is for the HDD Activity LED. Pressing the power switch for more than four seconds while the system is ON turns the system OFF. • Reset button (Blue 2-pin RESET) This 2-pin connector is for the chassis-mounted reset button for...

P5VD1-X User's Manual for English Edition
Page 55
... disk from the format options field, then click Start. Click Start, then select Run. b. ASUS P5VD1-X Motherboard 4-1 A Format 3 1/2 Floppy Disk window appears. b. Save a copy of boot disks for details on these utilities. Insert a 1.44 MB floppy disk to the optical drive. c. Windows® 2000 environment To create a set of the original motherboard BIOS file to a bootable floppy disk in the future. ASUS CrashFree BIOS 2 (Updates the BIOS using a floppy disk during POST...
... disk from the format options field, then click Start. Click Start, then select Run. b. ASUS P5VD1-X Motherboard 4-1 A Format 3 1/2 Floppy Disk window appears. b. Save a copy of boot disks for details on these utilities. Insert a 1.44 MB floppy disk to the optical drive. c. Windows® 2000 environment To create a set of the original motherboard BIOS file to a bootable floppy disk in the future. ASUS CrashFree BIOS 2 (Updates the BIOS using a floppy disk during POST...
P5VD1-X User's Manual for English Edition
Page 56
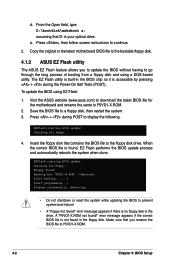
... latest motherboard BIOS file to the bootable floppy disk. 4.1.2 ASUS EZ Flash utility The ASUS EZ Flash feature allows you rename the BIOS file to P5VD1-X.ROM. 4-2 Chapter 4: BIOS Setup The EZ Flash utility is built-in the BIOS chip so it is accessible by pressing + during POST to download the latest BIOS file for floppy... 4. Visit the ASUS website (www.asus.com) to display the following. EZFlash starting BIOS update Checking...
... latest motherboard BIOS file to the bootable floppy disk. 4.1.2 ASUS EZ Flash utility The ASUS EZ Flash feature allows you rename the BIOS file to P5VD1-X.ROM. 4-2 Chapter 4: BIOS Setup The EZ Flash utility is built-in the BIOS chip so it is accessible by pressing + during POST to download the latest BIOS file for floppy... 4. Visit the ASUS website (www.asus.com) to display the following. EZFlash starting BIOS update Checking...
P5VD1-X User's Manual for English Edition
Page 61
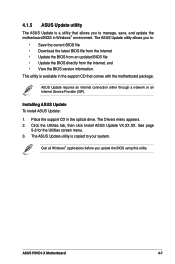
The ASUS Update utility allows you update the BIOS using this utility. See page 5-3 for the Utilities screen menu. 3. ASUS P5VD1-X Motherboard 4-7 ASUS Update requires an Internet connection either through a network or an Internet Service Provider (ISP). Click the Utilities tab, then click Install ASUS Update VX.XX.XX. Installing ASUS Update To install ASUS Update: 1. The Drivers menu appears. 2. This utility is available in the optical drive. Quit all Windows® applications before you to: • Save the current BIOS file • Download the...
The ASUS Update utility allows you update the BIOS using this utility. See page 5-3 for the Utilities screen menu. 3. ASUS P5VD1-X Motherboard 4-7 ASUS Update requires an Internet connection either through a network or an Internet Service Provider (ISP). Click the Utilities tab, then click Install ASUS Update VX.XX.XX. Installing ASUS Update To install ASUS Update: 1. The Drivers menu appears. 2. This utility is available in the optical drive. Quit all Windows® applications before you to: • Save the current BIOS file • Download the...
P5VD1-X User's Manual for English Edition
Page 66
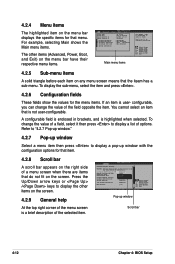
...;guration options for that menu. Refer to "4.2.7 Pop-up window." 4.2.7 Pop-up window Select a menu item then press to select a field. Advanced Chipset settings WARNING: Setting wrong values in ] [Disabled] :[ST340014A] :[Not Detected] :[ASUS DVD-E616P2] :[Not Detected] Use [ENTER], [TAB] or [SHIFT-TAB] to display a pop-up window Scroll bar 4-12 Chapter 4: BIOS Setup Press the Up/Down arrow keys or / keys to display the other items (Advanced, Power, Boot, and...
...;guration options for that menu. Refer to "4.2.7 Pop-up window." 4.2.7 Pop-up window Select a menu item then press to select a field. Advanced Chipset settings WARNING: Setting wrong values in ] [Disabled] :[ST340014A] :[Not Detected] :[ASUS DVD-E616P2] :[Not Detected] Use [ENTER], [TAB] or [SHIFT-TAB] to display a pop-up window Scroll bar 4-12 Chapter 4: BIOS Setup Press the Up/Down arrow keys or / keys to display the other items (Advanced, Power, Boot, and...
P5VD1-X User's Manual for English Edition
Page 68
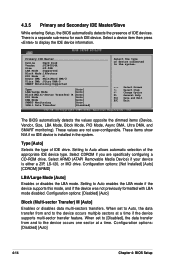
... the device occurs one sector at a time if the device supports multi-sector transfer feature. Configuration options: [Not Installed] [Auto] [CDROM] [ARMD] LBA/Large Mode [Auto] Enables or disables the LBA mode. These values are specifically configuring a CD-ROM drive. 4.3.5 Primary and Secondary IDE Master/Slave While entering Setup, the BIOS automatically detects the presence of IDE drive. Setting to display the IDE device information. Configuration options: [Disabled] [Auto] 4-14 Chapter 4: BIOS Setup
... the device occurs one sector at a time if the device supports multi-sector transfer feature. Configuration options: [Not Installed] [Auto] [CDROM] [ARMD] LBA/Large Mode [Auto] Enables or disables the LBA mode. These values are specifically configuring a CD-ROM drive. 4.3.5 Primary and Secondary IDE Master/Slave While entering Setup, the BIOS automatically detects the presence of IDE drive. Setting to display the IDE device information. Configuration options: [Disabled] [Auto] 4-14 Chapter 4: BIOS Setup
P5VD1-X User's Manual for English Edition
Page 69
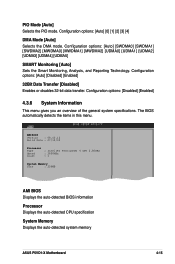
... the PIO mode. Configuration options: [Auto] [SWDMA0] [SWDMA1] [SWDMA2] [MWDMA0] [MWDMA1] [MWDMA2] [UDMA0] [UDMA1] [UDMA2] [UDMA3] [UDMA4] [UDMA5] SMART Monitoring [Auto] Sets the Smart Monitoring, Analysis, and Reporting Technology. AMIBIOS Version : 08.00.12 Build Date : 07/15/05 Processor Type Speed Count : Intel(R) Pentium(R) 4 CPU 2.80GHz : 2800MHz : 1 System Memory Size : 256MB AMI BIOS Displays the auto-detected BIOS information Processor Displays the auto-detected CPU specification System Memory Displays the auto-detected system memory ASUS P5VD1-X Motherboard 4-15...
... the PIO mode. Configuration options: [Auto] [SWDMA0] [SWDMA1] [SWDMA2] [MWDMA0] [MWDMA1] [MWDMA2] [UDMA0] [UDMA1] [UDMA2] [UDMA3] [UDMA4] [UDMA5] SMART Monitoring [Auto] Sets the Smart Monitoring, Analysis, and Reporting Technology. AMIBIOS Version : 08.00.12 Build Date : 07/15/05 Processor Type Speed Count : Intel(R) Pentium(R) 4 CPU 2.80GHz : 2800MHz : 1 System Memory Size : 256MB AMI BIOS Displays the auto-detected BIOS information Processor Displays the auto-detected CPU specification System Memory Displays the auto-detected system memory ASUS P5VD1-X Motherboard 4-15...
P5VD1-X User's Manual for English Edition
Page 70
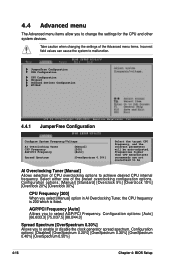
...the relevant parameters will be AI Overclocking Tuner [Manual] Allows selection of CPU overclocking options to achieve desired CPU internal frequency. Configuration options: [Manual] [Standard] [Overclock 5%] [Overclock 10%] [Overclock 20%] [Overclock 30%] CPU Frequency [200] When you to select AGP/PCI Frequency. Configuration options: [Disabled] [OverSpectrum 0.20%] [OverSpectrum 0.30%] [OverSpectrum 0.40%] [OverSpectrum 0.50%] 4-16 Chapter 4: BIOS Setup JumperFree Configuration USB Configuration CPU Configuration Chipset Onboard Devices Configuration PCIPnP...
...the relevant parameters will be AI Overclocking Tuner [Manual] Allows selection of CPU overclocking options to achieve desired CPU internal frequency. Configuration options: [Manual] [Standard] [Overclock 5%] [Overclock 10%] [Overclock 20%] [Overclock 30%] CPU Frequency [200] When you to select AGP/PCI Frequency. Configuration options: [Disabled] [OverSpectrum 0.20%] [OverSpectrum 0.30%] [OverSpectrum 0.40%] [OverSpectrum 0.50%] 4-16 Chapter 4: BIOS Setup JumperFree Configuration USB Configuration CPU Configuration Chipset Onboard Devices Configuration PCIPnP...
P5VD1-X User's Manual for English Edition
Page 71
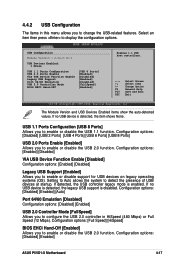
...: [Disabled] [Enabled] USB 2.0 Controller Mode [FullSpeed] Allows you to enable or disable the USB 1.1 function. Select an item then press to detect the presence of USB devices at startup. Configuration options: [Enabled] [Disabled] VIA USB Device Function Enable [Disabled] Configuration options: [Enabled] [Disabled] Legacy USB Support [Enabled] Allows you to change the USB-related features. 4.4.2 USB Configuration The items in HiSpeed (480 Mbps) or Full Speed (12 Mbps). Configuration options: [Disabled] [Enabled] ASUS P5VD1-X Motherboard 4-17 If no USB device is...
...: [Disabled] [Enabled] USB 2.0 Controller Mode [FullSpeed] Allows you to enable or disable the USB 1.1 function. Select an item then press to detect the presence of USB devices at startup. Configuration options: [Enabled] [Disabled] VIA USB Device Function Enable [Disabled] Configuration options: [Enabled] [Disabled] Legacy USB Support [Enabled] Allows you to change the USB-related features. 4.4.2 USB Configuration The items in HiSpeed (480 Mbps) or Full Speed (12 Mbps). Configuration options: [Disabled] [Enabled] ASUS P5VD1-X Motherboard 4-17 If no USB device is...
P5VD1-X User's Manual for English Edition
Page 72
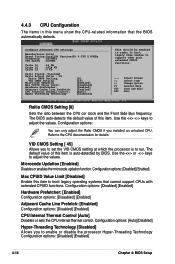
... Control [Auto] Disables or sets the CPU internal thermal control. Refer to enable or disable the processor Hyper-Threading Technology Configuration options: [Disabled] [Enabled] 4-18 Chapter 4: BIOS Setup Configuration options: [Disabled] [Enabled] Max CPUID Value Limit [Disabled] Enable this item is to set the VID CMOS setting at which the processor is auto-detected by BIOS. The default value of this menu show the CPU-related information that cannot support CPUs with extended CPUID functions. ←→ Select Screen...
... Control [Auto] Disables or sets the CPU internal thermal control. Refer to enable or disable the processor Hyper-Threading Technology Configuration options: [Disabled] [Enabled] 4-18 Chapter 4: BIOS Setup Configuration options: [Disabled] [Enabled] Max CPUID Value Limit [Disabled] Enable this item is to set the VID CMOS setting at which the processor is auto-detected by BIOS. The default value of this menu show the CPU-related information that cannot support CPUs with extended CPUID functions. ←→ Select Screen...
P5VD1-X User's Manual for English Edition
Page 77
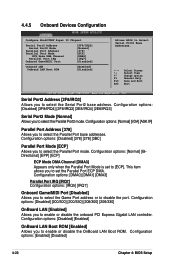
... Mode DMA Channel [DMA3] Appears only when the Parallel Port Mode is set the Parallel Port ECP DMA. Configuration options: [Enabled] [Disabled] 4-23 Chapter 4: BIOS Setup Configuration options: [Disabled] [Enabled] OnBoard LAN Boot ROM [Enabled] Allows you to set to [ECP]. Change Option F1 General Help F10 Save and Exit ESC Exit v02.58 (C)Copyright 1985-2004, American Megatrends, Inc. This item allows you to enable or disable the onboard PCI Express Gigabit LAN controller. Configuration options: [Disabled...
... Mode DMA Channel [DMA3] Appears only when the Parallel Port Mode is set the Parallel Port ECP DMA. Configuration options: [Enabled] [Disabled] 4-23 Chapter 4: BIOS Setup Configuration options: [Disabled] [Enabled] OnBoard LAN Boot ROM [Enabled] Allows you to set to [ECP]. Change Option F1 General Help F10 Save and Exit ESC Exit v02.58 (C)Copyright 1985-2004, American Megatrends, Inc. This item allows you to enable or disable the onboard PCI Express Gigabit LAN controller. Configuration options: [Disabled...
P5VD1-X User's Manual for English Edition
Page 79
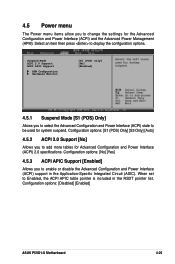
... Advanced Power Management (APM). 4.5 Power menu The Power menu items allow you to change the settings for system suspend. Select an item then press to enable or disable the Advanced Configuration and Power Interface (ACPI) support in the RSDT pointer list. Configuration options: [S1 (POS) Only] [S3 Only] [Auto] 4.5.2 ACPI 2.0 Support [No] Allows you to display the configuration options. Configuration options: [Disabled] [Enabled] ASUS P5VD1-X Motherboard 4-25...
... Advanced Power Management (APM). 4.5 Power menu The Power menu items allow you to change the settings for system suspend. Select an item then press to enable or disable the Advanced Configuration and Power Interface (ACPI) support in the RSDT pointer list. Configuration options: [S1 (POS) Only] [S3 Only] [Auto] 4.5.2 ACPI 2.0 Support [No] Allows you to display the configuration options. Configuration options: [Disabled] [Enabled] ASUS P5VD1-X Motherboard 4-25...
P5VD1-X User's Manual for English Edition
Page 85
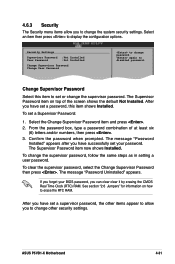
... password when prompted. ASUS P5VD1-X Motherboard 4-31 The message "Password Installed" appears after you have successfully set your BIOS password, you can clear clear it by erasing the CMOS Real Time Clock (RTC) RAM. 4.6.3 Security The Security menu items allow you to change the supervisor passEwSCordEx. After you forget your password. To set a supervisor password, the other items appear to allow you to disabled password. The message "Password Uninstalled" appears. See section "2.6 Jumpers...
... password when prompted. ASUS P5VD1-X Motherboard 4-31 The message "Password Installed" appears after you have successfully set your BIOS password, you can clear clear it by erasing the CMOS Real Time Clock (RTC) RAM. 4.6.3 Security The Security menu items allow you to change the supervisor passEwSCordEx. After you forget your password. To set a supervisor password, the other items appear to allow you to disabled password. The message "Password Uninstalled" appears. See section "2.6 Jumpers...
P5VD1-X User's Manual for English Edition
Page 91
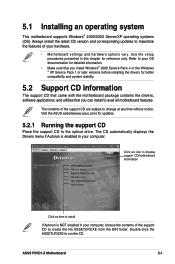
... icon to display support CD/motherboard information Click an item to avail all motherboard features. Double-click the ASSETUP.EXE to the optical drive. ASUS P5VD1-X Motherboard 5-1 Always install the latest OS version and corresponding updates to maximize the features of your computer, browse the contents of the support CD are subject to locate the file ASSETUP.EXE from the BIN folder. Use the setup procedures...
... icon to display support CD/motherboard information Click an item to avail all motherboard features. Double-click the ASSETUP.EXE to the optical drive. ASUS P5VD1-X Motherboard 5-1 Always install the latest OS version and corresponding updates to maximize the features of your computer, browse the contents of the support CD are subject to locate the file ASSETUP.EXE from the BIN folder. Use the setup procedures...
P5VD1-X User's Manual for English Edition
Page 92
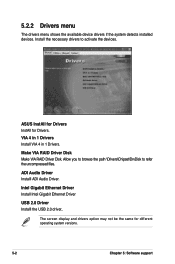
ASUS InstAll for Drivers InstAll for different operating system versions. 5-2 Chapter 5: Software support VIA 4 in 1 Drivers Install VIA 4 in 1 Drivers. Allow you to browse the path \Drivers\Chipset\DrvDisk to activate the devices. Make VIA RAID Driver Disk Make VIA RAID Driver Disk. ADI Audio Driver Installl ADI Audio Driver. The screen display and drivers option may not be the same for Drivers. Install the necessary drivers to refer the uncompressed files. Intel Gigabit Ethernet Driver Install Intel Gigabit Ethernet Driver USB 2.0 Driver Installl the...
ASUS InstAll for Drivers InstAll for different operating system versions. 5-2 Chapter 5: Software support VIA 4 in 1 Drivers Install VIA 4 in 1 Drivers. Allow you to browse the path \Drivers\Chipset\DrvDisk to activate the devices. Make VIA RAID Driver Disk Make VIA RAID Driver Disk. ADI Audio Driver Installl ADI Audio Driver. The screen display and drivers option may not be the same for Drivers. Install the necessary drivers to refer the uncompressed files. Intel Gigabit Ethernet Driver Install Intel Gigabit Ethernet Driver USB 2.0 Driver Installl the...
P5VD1-X User's Manual for English Edition
Page 94
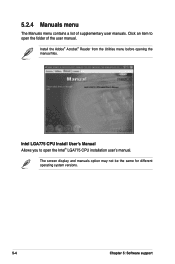
Click an item to open the folder of supplementary user manuals. Intel LGA775 CPU Install Userʼs Manual Allows you to open the Intel® LGA775 CPU installation userʼs manual. The screen display and manuals option may not be the same for different operating system versions. 5-4 Chapter 5: Software support Install the Adobe® Acrobat® Reader from the Utilities menu before opening the manual files. 5.2.4 Manuals menu The Manuals menu contains a list of the user manual.
Click an item to open the folder of supplementary user manuals. Intel LGA775 CPU Install Userʼs Manual Allows you to open the Intel® LGA775 CPU installation userʼs manual. The screen display and manuals option may not be the same for different operating system versions. 5-4 Chapter 5: Software support Install the Adobe® Acrobat® Reader from the Utilities menu before opening the manual files. 5.2.4 Manuals menu The Manuals menu contains a list of the user manual.
P5VD1-X User's Manual for English Edition
Page 103
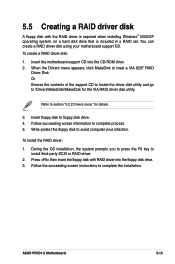
... a hard disk drive that is required when installing Windows® 2000/XP operating system. Press then insert the floppy disk with the RAID driver is included in a RAID set. Follow the succeeding screen instructions to complete process. 5. Follow succeeding screen information to complete the installation. Refer to section "5.2.2 Drivers menu" for the VIA RAID driver disk utility. You can create a RAID driver disk using your motherboard support CD. 5.5 Creating a RAID driver disk A floppy disk with RAID driver into the CD-ROM drive. 2.
... a hard disk drive that is required when installing Windows® 2000/XP operating system. Press then insert the floppy disk with the RAID driver is included in a RAID set. Follow the succeeding screen instructions to complete process. 5. Follow succeeding screen information to complete the installation. Refer to section "5.2.2 Drivers menu" for the VIA RAID driver disk utility. You can create a RAID driver disk using your motherboard support CD. 5.5 Creating a RAID driver disk A floppy disk with RAID driver into the CD-ROM drive. 2.


