P5VD1-X User's Manual for English Edition
Page 5
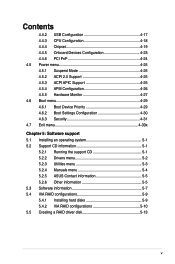
... Configuration 4-30 4.6.3 Security 4-31 4.7 Exit menu 4-33x Chapter 5: Software support 5.1 Installing an operating system 5-1 5.2 Support CD information 5-1 5.2.1 Running the support CD 5-1 5.2.2 Drivers menu 5-2 5.2.3 Utilities menu 5-3 5.2.4 Manuals menu 5-4 5.2.5 ASUS Contact information 5-5 5.2.6 Other information 5-5 5.3 Software information 5-7 5.4 VIA RAID configurations 5-9 5.4.1 Installing hard disks 5-9 5.4.2 VIA RAID configurations 5-10 5.5 Creating a RAID...
... Configuration 4-30 4.6.3 Security 4-31 4.7 Exit menu 4-33x Chapter 5: Software support 5.1 Installing an operating system 5-1 5.2 Support CD information 5-1 5.2.1 Running the support CD 5-1 5.2.2 Drivers menu 5-2 5.2.3 Utilities menu 5-3 5.2.4 Manuals menu 5-4 5.2.5 ASUS Contact information 5-5 5.2.6 Other information 5-5 5.3 Software information 5-7 5.4 VIA RAID configurations 5-9 5.4.1 Installing hard disks 5-9 5.4.2 VIA RAID configurations 5-10 5.5 Creating a RAID...
P5VD1-X User's Manual for English Edition
Page 11
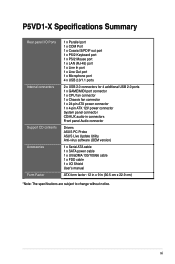
xi P5VD1-X Specifications Summary Rear panel I/O Ports Internal connectors Support CD contents Accessories Form Factor 1 x Parallel port 1 x COM Port 1 x Coaxial S/PDIF out port 1 x PS/2 Keyboard ... fan connector 1 x 24-pin ATX power connector 1 x 4-pin ATX 12V power connector System panel connector CD/AUX audio-in connectors Front panel Audio connector Drivers ASUS PC Probe ASUS Live Update Utility Anti-virus software (OEM version) 1 x Serial ATA cable 1 x SATA power cable 1 x UltraDMA 133/100/66 cable 1 x FDD cable 1 x I/O Shield Userʼ...
xi P5VD1-X Specifications Summary Rear panel I/O Ports Internal connectors Support CD contents Accessories Form Factor 1 x Parallel port 1 x COM Port 1 x Coaxial S/PDIF out port 1 x PS/2 Keyboard ... fan connector 1 x 24-pin ATX power connector 1 x 4-pin ATX 12V power connector System panel connector CD/AUX audio-in connectors Front panel Audio connector Drivers ASUS PC Probe ASUS Live Update Utility Anti-virus software (OEM version) 1 x Serial ATA cable 1 x SATA power cable 1 x UltraDMA 133/100/66 cable 1 x FDD cable 1 x I/O Shield Userʼ...

P5VD1-X User's Manual for English Edition
Page 33
...completely seated on the system and change the necessary BIOS settings, if any. Refer to unplug the power cord before adding or removing expansion cards. ASUS P5VD1-X Motherboard 2-13 Failure to do so may need to the card. See Chapter 4 for the card. 2. Make sure to the tables on BIOS...came with the screw you intend to the chassis with it by adjusting the software settings. 1. Turn on the slot. 5. Install the software drivers for later use . Keep the screw for the expansion card. Remove the bracket opposite the slot that they support. Assign an IRQ to ...
...completely seated on the system and change the necessary BIOS settings, if any. Refer to unplug the power cord before adding or removing expansion cards. ASUS P5VD1-X Motherboard 2-13 Failure to do so may need to the card. See Chapter 4 for the card. 2. Make sure to the tables on BIOS...came with the screw you intend to the chassis with it by adjusting the software settings. 1. Turn on the slot. 5. Install the software drivers for later use . Keep the screw for the expansion card. Remove the bracket opposite the slot that they support. Assign an IRQ to ...

P5VD1-X User's Manual for English Edition
Page 34
... 4 - - - shared - - - - used PCI E x 16 slot (max. 4X mode) - - - Onboard USB 2.0 controller - - - shared - - shared - - - shared - - - - shared - - - When using PCI cards on shared slots, ensure that the drivers support "Share IRQ " or that the cards do not need IRQ assignments. PCI slot 3 - - D E F G H - - - - - - - - - - - - - - - - - - - Onboard USB controller 3 - - - Onboard ACʼ97 audio - - - shared - - - - - - Onboard USB...
... 4 - - - shared - - - - used PCI E x 16 slot (max. 4X mode) - - - Onboard USB 2.0 controller - - - shared - - shared - - - shared - - - - shared - - - When using PCI cards on shared slots, ensure that the drivers support "Share IRQ " or that the cards do not need IRQ assignments. PCI slot 3 - - D E F G H - - - - - - - - - - - - - - - - - - - Onboard USB controller 3 - - - Onboard ACʼ97 audio - - - shared - - - - - - Onboard USB...
P5VD1-X User's Manual for English Edition
Page 61
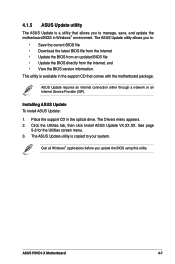
.... ASUS P5VD1-X Motherboard 4-7 4.1.5 ASUS Update utility The ASUS Update is a utility that comes with the motherboard package. ASUS Update requires an Internet connection either through a network or an Internet Service Provider (ISP). The ASUS Update utility allows you update the BIOS using this utility. Quit all Windows® applications before you to your system. The Drivers menu...
.... ASUS P5VD1-X Motherboard 4-7 4.1.5 ASUS Update utility The ASUS Update is a utility that comes with the motherboard package. ASUS Update requires an Internet connection either through a network or an Internet Service Provider (ISP). The ASUS Update utility allows you update the BIOS using this utility. Quit all Windows® applications before you to your system. The Drivers menu...

P5VD1-X User's Manual for English Edition
Page 90
Chapter summary 5.1 Installing an operating system 5-1 5.2 Support CD information 5-1 5.3 Software information 5-7 5.4 VIA RAID configurations 5-14 5.5 Creating a RAID driver disk 5-18 ASUS P5VD1-X Motherboard
Chapter summary 5.1 Installing an operating system 5-1 5.2 Support CD information 5-1 5.3 Software information 5-7 5.4 VIA RAID configurations 5-14 5.5 Creating a RAID driver disk 5-18 ASUS P5VD1-X Motherboard
P5VD1-X User's Manual for English Edition
Page 91
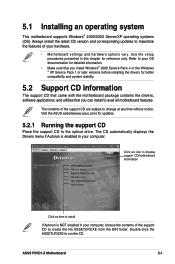
...subject to run the CD. The CD automatically displays the Drivers menu if Autorun is NOT enabled in your computer, browse the contents of your hardware. • Motherboard settings and hardware options vary. ASUS P5VD1-X Motherboard 5-1 Always install the latest OS version and ...corresponding updates to the optical drive. Visit the ASUS website(www.asus.com) for reference only. Refer to your computer. Click an icon to...
...subject to run the CD. The CD automatically displays the Drivers menu if Autorun is NOT enabled in your computer, browse the contents of your hardware. • Motherboard settings and hardware options vary. ASUS P5VD1-X Motherboard 5-1 Always install the latest OS version and ...corresponding updates to the optical drive. Visit the ASUS website(www.asus.com) for reference only. Refer to your computer. Click an icon to...
P5VD1-X User's Manual for English Edition
Page 92
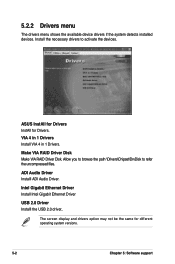
... you to browse the path \Drivers\Chipset\DrvDisk to activate the devices. VIA 4 in 1 Drivers Install VIA 4 in 1 Drivers. Make VIA RAID Driver Disk Make VIA RAID Driver Disk. 5.2.2 Drivers menu The drivers menu shows the available device drivers if the system detects installed devices. ADI Audio Driver Installl ADI Audio Driver. ASUS InstAll for Drivers InstAll for different operating system versions...
... you to browse the path \Drivers\Chipset\DrvDisk to activate the devices. VIA 4 in 1 Drivers Install VIA 4 in 1 Drivers. Make VIA RAID Driver Disk Make VIA RAID Driver Disk. 5.2.2 Drivers menu The drivers menu shows the available device drivers if the system detects installed devices. ADI Audio Driver Installl ADI Audio Driver. ASUS InstAll for Drivers InstAll for different operating system versions...
P5VD1-X User's Manual for English Edition
Page 93
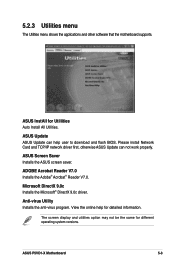
... not be the same for Utiliities Auto Install All Utilities. ASUS P5VD1-X Motherboard 5-3 ASUS Update ASUS Update can not work properly. ASUS InstAll for different operating system versions. ASUS Screen Saver Installs the ASUS screen saver. Please install Network Card and TCP/IP network driver first, otherwise ASUS Update can help for detailed information. Anti-virus Utility Installs...
... not be the same for Utiliities Auto Install All Utilities. ASUS P5VD1-X Motherboard 5-3 ASUS Update ASUS Update can not work properly. ASUS InstAll for different operating system versions. ASUS Screen Saver Installs the ASUS screen saver. Please install Network Card and TCP/IP network driver first, otherwise ASUS Update can help for detailed information. Anti-virus Utility Installs...
P5VD1-X User's Manual for English Edition
Page 99
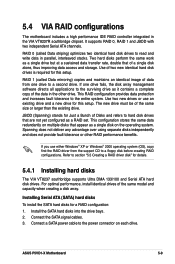
... two new drives or use either Windows® XP or Windows® 2000 operating system (OS), copy first the RAID driver from one drive fails, the disk array management software directs all applications to hard disk drives that are not yet configured ...this setup. Connect the SATA signal cables. 3. If one drive to section "5.5 Creating a RAID driver disk" for this setup. Install the SATA hard disks into the drive bays. 2. ASUS P5VD1-X Motherboard 5-9 This RAID configuration provides data protection and increases fault tolerance to the power ...
... two new drives or use either Windows® XP or Windows® 2000 operating system (OS), copy first the RAID driver from one drive fails, the disk array management software directs all applications to hard disk drives that are not yet configured ...this setup. Connect the SATA signal cables. 3. If one drive to section "5.5 Creating a RAID driver disk" for this setup. Install the SATA hard disks into the drive bays. 2. ASUS P5VD1-X Motherboard 5-9 This RAID configuration provides data protection and increases fault tolerance to the power ...
P5VD1-X User's Manual for English Edition
Page 103
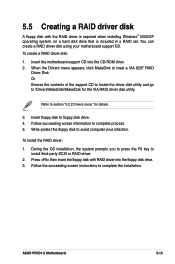
... drive that is required when installing Windows® 2000/XP operating system. Follow the succeeding screen instructions to floppy disk drive. 4. ASUS P5VD1-X Motherboard 5-13 Insert the motherboard support CD into the floppy disk drive. 3. Insert floppy disk to complete the installation. Write...-protect the floppy disk to install third-party SCSI or RAID driver. 2. During the OS installation, the system prompts you to press the F6 key to avoid computer virus infection. Follow succeeding screen ...
... drive that is required when installing Windows® 2000/XP operating system. Follow the succeeding screen instructions to floppy disk drive. 4. ASUS P5VD1-X Motherboard 5-13 Insert the motherboard support CD into the floppy disk drive. 3. Insert floppy disk to complete the installation. Write...-protect the floppy disk to install third-party SCSI or RAID driver. 2. During the OS installation, the system prompts you to press the F6 key to avoid computer virus infection. Follow succeeding screen ...


