P5VD2-VM English Edition User''s Manual
Page 36
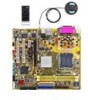
... the system so the BIOS can clear the CMOS memory of date, time, and system setup parameters by erasing the CMOS RTC RAM data. Except when clearing the RTC RAM, never remove the cap on pins 2-3 for about 5~10 seconds, then move the cap back to default values. 1-24 Chapter... 1: Product introduction Re-install the battery. 5. To erase the RTC RAM: 1. 1.9 Jumpers 1. Remove the onboard battery. 3. Removing the cap will cause system boot failure! ® Clear RTC RAM CLRTC 12 23 Normal (Default) CLEAR You do not need to clear the RTC when the system...
... the system so the BIOS can clear the CMOS memory of date, time, and system setup parameters by erasing the CMOS RTC RAM data. Except when clearing the RTC RAM, never remove the cap on pins 2-3 for about 5~10 seconds, then move the cap back to default values. 1-24 Chapter... 1: Product introduction Re-install the battery. 5. To erase the RTC RAM: 1. 1.9 Jumpers 1. Remove the onboard battery. 3. Removing the cap will cause system boot failure! ® Clear RTC RAM CLRTC 12 23 Normal (Default) CLEAR You do not need to clear the RTC when the system...
P5VD2-VM English Edition User''s Manual
Page 61
...Setup utility. This section explains how to configure your screen. • Visit the ASUS website (www.asus.com) to enter Setup after changing any BIOS settings, load the default settings to ...enter the Setup utility; Select the Load Default Settings item under the Exit Menu. 2.2 BIOS setup program This motherboard supports a programmable firmware chip that the computer can recognize these changes and record them in the CMOS RAM...not prompted to "Run Setup". ASUS P5VD2-VM/P5V-VM SE DH 2-11
...Setup utility. This section explains how to configure your screen. • Visit the ASUS website (www.asus.com) to enter Setup after changing any BIOS settings, load the default settings to ...enter the Setup utility; Select the Load Default Settings item under the Exit Menu. 2.2 BIOS setup program This motherboard supports a programmable firmware chip that the computer can recognize these changes and record them in the CMOS RAM...not prompted to "Run Setup". ASUS P5VD2-VM/P5V-VM SE DH 2-11

P5VD2-VM English Edition User''s Manual
Page 70
... Enter: Select SubMenu F10: Save 2.4.1 CPU Configuration Advanced Phoenix-Award BIOS CMOS Setup Utility CPU Configuration CPU Type Genuine Intel(R) CPU CPU Speed 2.80GHz Cache RAM 1024K x2 Current FSB Frequency Delay Prior to Thermal 200MHz [4 Min] Limit CPUID MaxVal Enhance C1(C1E) Execute Disable Bit CPU L1 & L2 Cache Virtualization...
... Enter: Select SubMenu F10: Save 2.4.1 CPU Configuration Advanced Phoenix-Award BIOS CMOS Setup Utility CPU Configuration CPU Type Genuine Intel(R) CPU CPU Speed 2.80GHz Cache RAM 1024K x2 Current FSB Frequency Delay Prior to Thermal 200MHz [4 Min] Limit CPUID MaxVal Enhance C1(C1E) Execute Disable Bit CPU L1 & L2 Cache Virtualization...

P5VD2-VM English Edition User''s Manual
Page 85
... set the delay before keystrokes begin to select the power-on an OS/2 operating system with an installed RAM of greater than 64 KB. Enable this item to use the ASUS MyLogo™ feature. Configuration options: [All Errors] [No Errors] [All, But Keyboard] [All, But Diskette] [All, But Disk/Key] ASUS P5VD2-VM/P5V-VM SE DH 2-35
... set the delay before keystrokes begin to select the power-on an OS/2 operating system with an installed RAM of greater than 64 KB. Enable this item to use the ASUS MyLogo™ feature. Configuration options: [All Errors] [No Errors] [All, But Keyboard] [All, But Diskette] [All, But Disk/Key] ASUS P5VD2-VM/P5V-VM SE DH 2-35

P5VD2-VM English Edition User''s Manual
Page 86
...information is changed to Set. Select an item then press . 2. When prompted, confirm the password by erasing the CMOS Real Time Clock (RTC) RAM. The User password is changed to Clear. If you to set passwords: To set a password: 1. numeric characters, then press . 3. To ... User Password Password Check Clear Clear [Setup] Select Menu Item Specific Help Supervisor Password User Password These fields allow you need to erase the CMOS RAM, refer to section "1.9 Jumpers" for instructions. 2-36 Chapter 2: BIOS setup Type in a password using a combination of a maximum of eight...
...information is changed to Set. Select an item then press . 2. When prompted, confirm the password by erasing the CMOS Real Time Clock (RTC) RAM. The User password is changed to Clear. If you to set passwords: To set a password: 1. numeric characters, then press . 3. To ... User Password Password Check Clear Clear [Setup] Select Menu Item Specific Help Supervisor Password User Password These fields allow you need to erase the CMOS RAM, refer to section "1.9 Jumpers" for instructions. 2-36 Chapter 2: BIOS setup Type in a password using a combination of a maximum of eight...
P5VD2-VM English Edition User''s Manual
Page 89
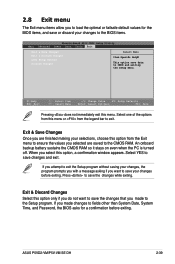
... Press to the Setup program. When you select this option only if you do not want to save the changes that you want to exit. ASUS P5VD2-VM/P5V-VM SE DH 2-39 Exit & Discard Changes Select this option, a confirmation window appears. F1:Help ESC: Exit and Exit ↑↓ : Select Item ... & Save Changes Exit & Discard Changes Load Setup Default Discard Changes Select Menu Item Specific Help This option save data to the CMOS RAM. Exit & Save Changes Once you selected are finished making your changes before exiting. Select one of the options from this menu or ...
... Press to the Setup program. When you select this option only if you do not want to save the changes that you want to exit. ASUS P5VD2-VM/P5V-VM SE DH 2-39 Exit & Discard Changes Select this option, a confirmation window appears. F1:Help ESC: Exit and Exit ↑↓ : Select Item ... & Save Changes Exit & Discard Changes Load Setup Default Discard Changes Select Menu Item Specific Help This option save data to the CMOS RAM. Exit & Save Changes Once you selected are finished making your changes before exiting. Select one of the options from this menu or ...

P5VD2-VM English Edition User''s Manual
Page 90
... changes before saving the values to discard any changes and load the previously saved values. 2-40 Chapter 2: BIOS setup Select YES to the non-volatile RAM. Load Setup Defaults This option allows you made and restore the previously saved values. After selecting this option or if you press , a confirmation window appears...
... changes before saving the values to discard any changes and load the previously saved values. 2-40 Chapter 2: BIOS setup Select YES to the non-volatile RAM. Load Setup Defaults This option allows you made and restore the previously saved values. After selecting this option or if you press , a confirmation window appears...


