
Motherboard Installation Guide
Page 4
...setup 4.1 Managing and updating your BIOS 4-1 4.1.1 Creating a bootable floppy disk 4-1 4.1.2 AFUDOS utility 4-2 4.1.3 ASUS EZ Flash utility 4-5 4.1.4 ASUS CrashFree BIOS 2 utility 4-6 4.1.5 ASUS Update utility 4-8 4.2 BIOS setup program 4-11 4.2.1 BIOS menu screen 4-12 4.2.2 Menu bar 4-12 4.2.3 ...Navigation keys 4-12 4.2.4 Menu items 4-13 4.2.5 Sub-menu items 4-13 4.2.6 Configuration fields 4-13 4.2.7 Pop-up window 4-13 ...
...setup 4.1 Managing and updating your BIOS 4-1 4.1.1 Creating a bootable floppy disk 4-1 4.1.2 AFUDOS utility 4-2 4.1.3 ASUS EZ Flash utility 4-5 4.1.4 ASUS CrashFree BIOS 2 utility 4-6 4.1.5 ASUS Update utility 4-8 4.2 BIOS setup program 4-11 4.2.1 BIOS menu screen 4-12 4.2.2 Menu bar 4-12 4.2.3 ...Navigation keys 4-12 4.2.4 Menu items 4-13 4.2.5 Sub-menu items 4-13 4.2.6 Configuration fields 4-13 4.2.7 Pop-up window 4-13 ...

Motherboard Installation Guide
Page 31
... load plate window to the socket pins, do not remove the PnP cap unless you . Retention tab A Load lever PnP cap B This side of the socket box should fit into the CPU notch. Lift the load plate with your thumb and forefinger to a 135º angle. 4. Gold triangle mark ASUS P5RD1-V Deluxe A 2-7 Load plate...
... load plate window to the socket pins, do not remove the PnP cap unless you . Retention tab A Load lever PnP cap B This side of the socket box should fit into the CPU notch. Lift the load plate with your thumb and forefinger to a 135º angle. 4. Gold triangle mark ASUS P5RD1-V Deluxe A 2-7 Load plate...
Motherboard Installation Guide
Page 52
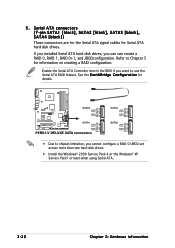
... hard disk drives. • Install the Windows® 2000 Service Pack 4 or the Windows® XP Service Pack1 or later when using Serial ATA. 2-28 Chapter 2: Hardware information P5RD1-V ® SATA3 GND RSATA_TXP3 RSATA_TXN3 GND RSATA_RXP3 RSATA_RXN3 GND SATA1 GND RSATA_TXP1 RSATA_TXN1 GND RSATA_RXP1 RSATA_RXN1 GND P5RD1-V DELUXE SATA connectors SATA4 GND RSATA_TXP4 RSATA_TXN4 GND...
... hard disk drives. • Install the Windows® 2000 Service Pack 4 or the Windows® XP Service Pack1 or later when using Serial ATA. 2-28 Chapter 2: Hardware information P5RD1-V ® SATA3 GND RSATA_TXP3 RSATA_TXN3 GND RSATA_RXP3 RSATA_RXN3 GND SATA1 GND RSATA_TXP1 RSATA_TXN1 GND RSATA_RXP1 RSATA_RXN1 GND P5RD1-V DELUXE SATA connectors SATA4 GND RSATA_TXP4 RSATA_TXN4 GND...
Motherboard Installation Guide
Page 64
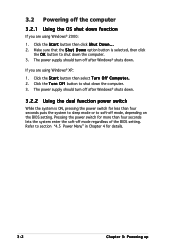
...r n O f f C o m p u t e r . 2. Refer to shut down the computer. 3. The power supply should turn off after Windows® shuts down. 3.2.2 Using the dual function power switch While the system is selected, then click the O K button to soft-off mode regardless of the ...button then click S h u t D o w n . . . 2. 3.2 Powering off the computer 3.2.1 Using the OS shut down function If you are using Windows® XP: 1. If you are using Windows® 2000: 1. Make sure that the S h u t D o w n option button is ON, pressing the power switch for more than four seconds puts the...
...r n O f f C o m p u t e r . 2. Refer to shut down the computer. 3. The power supply should turn off after Windows® shuts down. 3.2.2 Using the dual function power switch While the system is selected, then click the O K button to soft-off mode regardless of the ...button then click S h u t D o w n . . . 2. 3.2 Powering off the computer 3.2.1 Using the OS shut down function If you are using Windows® XP: 1. If you are using Windows® 2000: 1. Make sure that the S h u t D o w n option button is ON, pressing the power switch for more than four seconds puts the...
Motherboard Installation Guide
Page 67
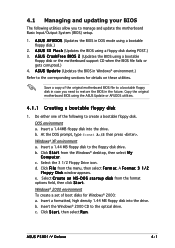
...U S E Z F l a s h (Updates the BIOS using the ASUS Update or AFUDOS utilities. 4.1.1 Creating a bootable floppy disk 1. Insert a 1.44MB floppy disk into the drive. b. Insert the Windows® 2000 CD to the floppy disk drive. Do either one of the ...Windows® 2000 environment To create a set of boot disks for details on these utilities. Copy the original motherboard BIOS using a floppy disk during POST.) 3. Click F i l e from the menu, then select F o r m a t. A S U S C r a s h F r e e B I O S 2 (Updates the BIOS using a bootable floppy disk.) 2. ASUS P5RD1-V Deluxe...
...U S E Z F l a s h (Updates the BIOS using the ASUS Update or AFUDOS utilities. 4.1.1 Creating a bootable floppy disk 1. Insert a 1.44MB floppy disk into the drive. b. Insert the Windows® 2000 CD to the floppy disk drive. Do either one of the ...Windows® 2000 environment To create a set of boot disks for details on these utilities. Copy the original motherboard BIOS using a floppy disk during POST.) 3. Click F i l e from the menu, then select F o r m a t. A S U S C r a s h F r e e B I O S 2 (Updates the BIOS using a bootable floppy disk.) 2. ASUS P5RD1-V Deluxe...
Motherboard Installation Guide
Page 74
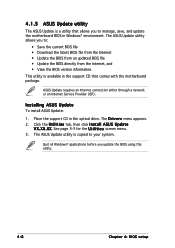
..., save, and update the motherboard BIOS in Windows® environment. This utility is available in the optical drive. See page 5-3 for the U t i l i t i e s screen menu. 3. X X . Installing ASUS Update To install ASUS Update: 1. ASUS Update requires an Internet connection either through a network or an Internet Service Provider (ISP). The ASUS Update utility allows you update the BIOS...
..., save, and update the motherboard BIOS in Windows® environment. This utility is available in the optical drive. See page 5-3 for the U t i l i t i e s screen menu. 3. X X . Installing ASUS Update To install ASUS Update: 1. ASUS Update requires an Internet connection either through a network or an Internet Service Provider (ISP). The ASUS Update utility allows you update the BIOS...
Motherboard Installation Guide
Page 75
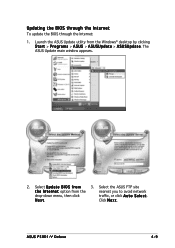
Select the ASUS FTP site t h e I O S f r o m 3. Click N e x t. Updating the BIOS through the Internet To update the BIOS through the Internet: 1. Select U p d a t e B I n t e r n e t option from the Windows® desktop by clicking S t a r t > P r o g r a m s > A S U S > A S U S U p d a t e > A S U S U p d a t e. Launch the ASUS Update utility from the nearest you to avoid network drop-down menu, then click traffic, or click A u t o S e l e c t. The ASUS Update main window appears. 2. N e x t. ASUS P5RD1-V Deluxe 4-9
Select the ASUS FTP site t h e I O S f r o m 3. Click N e x t. Updating the BIOS through the Internet To update the BIOS through the Internet: 1. Select U p d a t e B I n t e r n e t option from the Windows® desktop by clicking S t a r t > P r o g r a m s > A S U S > A S U S U p d a t e > A S U S U p d a t e. Launch the ASUS Update utility from the nearest you to avoid network drop-down menu, then click traffic, or click A u t o S e l e c t. The ASUS Update main window appears. 2. N e x t. ASUS P5RD1-V Deluxe 4-9
Motherboard Installation Guide
Page 76
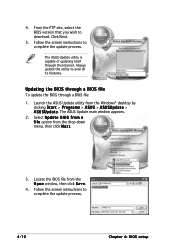
...5. Updating the BIOS through a BIOS file To update the BIOS through the Internet. The ASUS Update main window appears. 2. The ASUS Update utility is capable of updating itself through a BIOS file: 1. Launch the ASUS Update utility from the drop-down menu, then click N e x t. 3. Always update ... screen instructions to complete the update process. 4-10 Chapter 4: BIOS setup Select U p d a t e B I O S f r o m a f i l e option from the Windows® desktop by clicking S t a r t > P r o g r a m s > A S U S > A S U S U p d a t e > A S U S U p d a t e. Locate the BIOS file from the...
...5. Updating the BIOS through a BIOS file To update the BIOS through the Internet. The ASUS Update main window appears. 2. The ASUS Update utility is capable of updating itself through a BIOS file: 1. Launch the ASUS Update utility from the drop-down menu, then click N e x t. 3. Always update ... screen instructions to complete the update process. 4-10 Chapter 4: BIOS setup Select U p d a t e B I O S f r o m a f i l e option from the Windows® desktop by clicking S t a r t > P r o g r a m s > A S U S > A S U S U p d a t e > A S U S U p d a t e. Locate the BIOS file from the...

Motherboard Installation Guide
Page 79
...4.2.5 Sub-menu items A solid triangle before each item on the screen. Refer to "4.2.7 Pop-up window." 4.2.7 Pop-up window Select a menu item then press to display a pop-up window At the top right corner of the menu screen is user-configurable, you can change the value of...PCI VGA Palette Snooping PCI IDE BusMaster [No] [64] [Yes] [Disabled] [Enabled] 4.2.9 General help Pop-up window with the configuration options for that menu. Scroll bar ASUS P5RD1-V Deluxe 4-13 4.2.4 Menu items The highlighted item on the menu bar displays the specific items for that item. 4.2.8 Scroll ...
...4.2.5 Sub-menu items A solid triangle before each item on the screen. Refer to "4.2.7 Pop-up window." 4.2.7 Pop-up window Select a menu item then press to display a pop-up window At the top right corner of the menu screen is user-configurable, you can change the value of...PCI VGA Palette Snooping PCI IDE BusMaster [No] [64] [Yes] [Disabled] [Enabled] 4.2.9 General help Pop-up window with the configuration options for that menu. Scroll bar ASUS P5RD1-V Deluxe 4-13 4.2.4 Menu items The highlighted item on the menu bar displays the specific items for that item. 4.2.8 Scroll ...

Motherboard Installation Guide
Page 107
When you press , a confirmation window appears. After selecting this option from the Exit menu to ensure the values you selected are finished ... while exiting. Load Setup Defaults This option allows you to load the default values for a confirmation before exiting. Exit & Discard Changes Select this option, a confirmation window appears. Select Y e s to discard any changes and load the previously saved values. Select E x i t & S a v e C h a n g e s or make ...asking if you made to the Setup program. If you attempt to save changes and exit. ASUS P5RD1-V Deluxe 4-41
When you press , a confirmation window appears. After selecting this option from the Exit menu to ensure the values you selected are finished ... while exiting. Load Setup Defaults This option allows you to load the default values for a confirmation before exiting. Exit & Discard Changes Select this option, a confirmation window appears. Select Y e s to discard any changes and load the previously saved values. Select E x i t & S a v e C h a n g e s or make ...asking if you made to the Setup program. If you attempt to save changes and exit. ASUS P5RD1-V Deluxe 4-41
Motherboard Installation Guide
Page 111
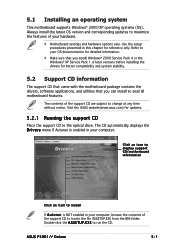
...s menu if Autorun is enabled in your OS documentation for detailed information. • Make sure that you install Windows® 2000 Service Pack 4 or the Windows® XP Service Pack 1 or later versions before installing the drivers for better compatibility and system stability. 5.2 ...the A S S E T U P . ASUS P5RD1-V Deluxe 5-1 Always install the latest OS version and corresponding updates to maximize the features of the support CD to change at any time without notice. 5.1 Installing an operating system This motherboard supports Windows® 2000/XP operating systems (OS). The ...
...s menu if Autorun is enabled in your OS documentation for detailed information. • Make sure that you install Windows® 2000 Service Pack 4 or the Windows® XP Service Pack 1 or later versions before installing the drivers for better compatibility and system stability. 5.2 ...the A S S E T U P . ASUS P5RD1-V Deluxe 5-1 Always install the latest OS version and corresponding updates to maximize the features of the support CD to change at any time without notice. 5.1 Installing an operating system This motherboard supports Windows® 2000/XP operating systems (OS). The ...
Motherboard Installation Guide
Page 113
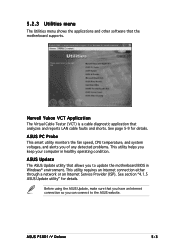
... detected problems. This utility helps you can connect to update the motherboard BIOS in healthy operating condition. ASUS P5RD1-V Deluxe 5-3 ASUS Update The ASUS Update utility that you have an Internet connection so you keep your computer in Windows® environment. This utility requires an Internet connection either through a network or an Internet Service Provider (ISP...
... detected problems. This utility helps you can connect to update the motherboard BIOS in healthy operating condition. ASUS P5RD1-V Deluxe 5-3 ASUS Update The ASUS Update utility that you have an Internet connection so you keep your computer in Windows® environment. This utility requires an Internet connection either through a network or an Internet Service Provider (ISP...
Motherboard Installation Guide
Page 114
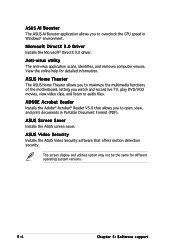
...; Reader V5.0 that offers motion detection security. ASUS Screen Saver Installs the ASUS screen saver. ASUS Video Security Installs the ASUS Video Security software that allows you to open, view, and print documents in Windows® environment. ASUS Home Theater The ASUS Home Theater allows you to maximize the multimedia functions...be the same for detailed information. Anti-virus utility The anti-virus application scans, identifies, and removes computer viruses. ASUS AI Booster The ASUS AI Booster application allows you to overclock the CPU speed in Portable Document Format (PDF).
...; Reader V5.0 that offers motion detection security. ASUS Screen Saver Installs the ASUS screen saver. ASUS Video Security Installs the ASUS Video Security software that allows you to open, view, and print documents in Windows® environment. ASUS Home Theater The ASUS Home Theater allows you to maximize the multimedia functions...be the same for detailed information. Anti-virus utility The anti-virus application scans, identifies, and removes computer viruses. ASUS AI Booster The ASUS AI Booster application allows you to overclock the CPU speed in Portable Document Format (PDF).

Motherboard Installation Guide
Page 117
... file formats. From the left window pane, select the folder that appears on screen during the Power-On-Self-Tests (POST). See section "5.2.3 Utilities menu" for more information. 5.3.1 ASUS MyLogo2™ The ASUS MyLogo2™ utility lets you install the A S U S U p d a t e utility from the drop down menu, then click N e x t. 3. ASUS P5RD1-V Deluxe 5-7 See section "4.6.2 Boot Settings Configuration...
... file formats. From the left window pane, select the folder that appears on screen during the Power-On-Self-Tests (POST). See section "5.2.3 Utilities menu" for more information. 5.3.1 ASUS MyLogo2™ The ASUS MyLogo2™ utility lets you install the A S U S U p d a t e utility from the drop down menu, then click N e x t. 3. ASUS P5RD1-V Deluxe 5-7 See section "4.6.2 Boot Settings Configuration...
Motherboard Installation Guide
Page 118
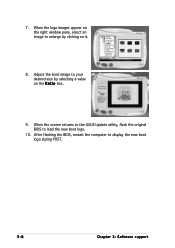
When the screen returns to the ASUS Update utility, flash the original BIOS to display the new boot logo during POST. 5-8 Chapter 5: Software support After flashing the BIOS, restart the computer to load the new boot logo. 10. Adjust the boot image to enlarge by selecting a value on it. 8. When the logo images appear on the right window pane, select an image to your desired size by clicking on the R a t i o box. 9. 7.
When the screen returns to the ASUS Update utility, flash the original BIOS to display the new boot logo during POST. 5-8 Chapter 5: Software support After flashing the BIOS, restart the computer to load the new boot logo. 10. Adjust the boot image to enlarge by selecting a value on it. 8. When the logo images appear on the right window pane, select an image to your desired size by clicking on the R a t i o box. 9. 7.

Motherboard Installation Guide
Page 119
... the the Marvell® Virtual Cable Tester™ utility: 1. ASUS P5RD1-V Deluxe 5-9 5.3.2 AI NET2 The AI NET2 features the Marvell® Virtual Cable Tester™ (VCT). Click the R u n button to perform a cable test. • The VCT only runs on systems with Windows® XP or Windows® 2000 operating systems. • The VCT utility only...
... the the Marvell® Virtual Cable Tester™ utility: 1. ASUS P5RD1-V Deluxe 5-9 5.3.2 AI NET2 The AI NET2 features the Marvell® Virtual Cable Tester™ (VCT). Click the R u n button to perform a cable test. • The VCT only runs on systems with Windows® XP or Windows® 2000 operating systems. • The VCT utility only...
Motherboard Installation Guide
Page 121
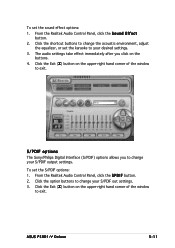
... on the buttons. 4. S/PDIF options The Sony/Philips Digital Interface (S/PDIF) options allows you click on the upper-right hand corner of the window to exit. The audio settings take effect immediately after you to change your S/PDIF out settings. 3. From the Realtek Audio Control Panel, click ...the upper-right hand corner of the window to exit. Click the option buttons to change the acoustic environment, adjust the equalizer, or set the sound effect options: 1. Click the shortcut buttons to change your S/PDIF output settings. ASUS P5RD1-V Deluxe 5-11 To set the karaoke to ...
... on the buttons. 4. S/PDIF options The Sony/Philips Digital Interface (S/PDIF) options allows you click on the upper-right hand corner of the window to exit. The audio settings take effect immediately after you to change your S/PDIF out settings. 3. From the Realtek Audio Control Panel, click ...the upper-right hand corner of the window to exit. Click the option buttons to change the acoustic environment, adjust the equalizer, or set the sound effect options: 1. Click the shortcut buttons to change your S/PDIF output settings. ASUS P5RD1-V Deluxe 5-11 To set the karaoke to ...
Motherboard Installation Guide
Page 122
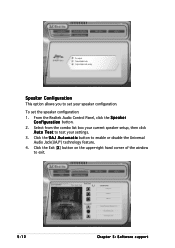
Select from the combo list box your current speaker setup, then click A u t o T e s t to test your speaker configuration. Click the U A J A u t o m a t i c button to exit. 5-12 Chapter 5: Software support Speaker Configuration This option allows you to set the speaker configuration: 1. To set your settings. 3. Click the Exit (X ) button on the upper-right hand corner of the window to enable or disable the Universal Audio Jack(UAJ®) technology feature. 4. From the Realtek Audio Control Panel, click the S p e a k e r C o n f i g u r a t i o n button. 2.
Select from the combo list box your current speaker setup, then click A u t o T e s t to test your speaker configuration. Click the U A J A u t o m a t i c button to exit. 5-12 Chapter 5: Software support Speaker Configuration This option allows you to set the speaker configuration: 1. To set your settings. 3. Click the Exit (X ) button on the upper-right hand corner of the window to enable or disable the Universal Audio Jack(UAJ®) technology feature. 4. From the Realtek Audio Control Panel, click the S p e a k e r C o n f i g u r a t i o n button. 2.
Motherboard Installation Guide
Page 124
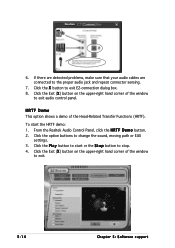
... sound, moving path or EAX settings. 3. To start or the S t o p button to stop. 4. Click the Exit (X ) button on the upper-right hand corner of the window to the proper audio jack and repeat connector sensing. 7. HRTF Demo This option shows a demo of the...
... sound, moving path or EAX settings. 3. To start or the S t o p button to stop. 4. Click the Exit (X ) button on the upper-right hand corner of the window to the proper audio jack and repeat connector sensing. 7. HRTF Demo This option shows a demo of the...
Motherboard Installation Guide
Page 125
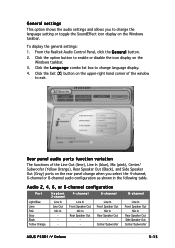
... Speaker Out Mic In Rear Speaker Out Center/Subwoofer 8-channel Line In Front Speaker Out Mic In Rear Speaker Out Side Speaker Out Center/Subwoofer ASUS P5RD1-V Deluxe 5-15 From the Realtek Audio Control Panel, click the G e n e r a l button. 2. General settings This option shows the audio ...channel or 8-channel audio configuration as shown in the following table. Click the option button to change language display. 4. Click the Exit (X ) button on the Windows taskbar. 3. Click the L a n g u a g e combo list box to enable or disable the icon display on the upper-right hand corner ...
... Speaker Out Mic In Rear Speaker Out Center/Subwoofer 8-channel Line In Front Speaker Out Mic In Rear Speaker Out Side Speaker Out Center/Subwoofer ASUS P5RD1-V Deluxe 5-15 From the Realtek Audio Control Panel, click the G e n e r a l button. 2. General settings This option shows the audio ...channel or 8-channel audio configuration as shown in the following table. Click the option button to change language display. 4. Click the Exit (X ) button on the Windows taskbar. 3. Click the L a n g u a g e combo list box to enable or disable the icon display on the upper-right hand corner ...


