
User Manual
Page 4
....2 Support DVD information 1-29 Chapter 2: BIOS information 2.1 Managing and updating your BIOS 2-1 2.1.1 ASUS Update utility 2-1 2.1.2 ASUS EZ Flash 2 utility 2-2 2.1.3 ASUS CrashFree BIOS 3 utility 2-3 2.2 BIOS setup program 2-4 2.2.1 BIOS menu screen 2-5 2.2.2 Menu bar 2-5 2.2.3 Navigation keys 2-6 2.2.4 Menu items 2-6 2.2.5 Submenu items 2-6 2.2.6 Configuration fields 2-6 2.2.7 Pop-up window 2-6 2.2.8 Scroll bar 2-6 2.2.9 General help 2-6 2.3 Main menu 2-7 2.3.1 System Time 2-7 2.3.2 System Date 2-7 2.3.3 Primary IDE...
....2 Support DVD information 1-29 Chapter 2: BIOS information 2.1 Managing and updating your BIOS 2-1 2.1.1 ASUS Update utility 2-1 2.1.2 ASUS EZ Flash 2 utility 2-2 2.1.3 ASUS CrashFree BIOS 3 utility 2-3 2.2 BIOS setup program 2-4 2.2.1 BIOS menu screen 2-5 2.2.2 Menu bar 2-5 2.2.3 Navigation keys 2-6 2.2.4 Menu items 2-6 2.2.5 Submenu items 2-6 2.2.6 Configuration fields 2-6 2.2.7 Pop-up window 2-6 2.2.8 Scroll bar 2-6 2.2.9 General help 2-6 2.3 Main menu 2-7 2.3.1 System Time 2-7 2.3.2 System Date 2-7 2.3.3 Primary IDE...

User Manual
Page 9
...174; Graphics Media Accelerator (Intel® GMA X4500) integrated Supports D-Sub with max. P5QPL-AM specifications summary CPU Chipset Front Side Bus Memory Graphics Expansion Slots Storage LAN Audio USB ASUS Overclocking Features LGA775 socket for Intel® Core™2 Quad / Core™2 Extreme ...® dual-core / Celeron® processors Supports Intel® 45nm multi-core CPU Refer to www.asus.com for the Memory QVL (Qualified Vendors Lists). ** When you are using a Windows® 32-bit operating system. We recommend a maximum of 2048 x 1536 x 32 Bpp Horizontal: 115KHz...
...174; Graphics Media Accelerator (Intel® GMA X4500) integrated Supports D-Sub with max. P5QPL-AM specifications summary CPU Chipset Front Side Bus Memory Graphics Expansion Slots Storage LAN Audio USB ASUS Overclocking Features LGA775 socket for Intel® Core™2 Quad / Core™2 Extreme ...® dual-core / Celeron® processors Supports Intel® 45nm multi-core CPU Refer to www.asus.com for the Memory QVL (Qualified Vendors Lists). ** When you are using a Windows® 32-bit operating system. We recommend a maximum of 2048 x 1536 x 32 Bpp Horizontal: 115KHz...

User Manual
Page 12
...management function to provide efficient power management for advanced operating systems. Serial ATA 3Gb/s technology This motherboard supports hard drives based on your screen. Innovative ASUS features ASUS MyLogo2™ This feature allows you to restore a corrupted BIOS file using an OS-based ...(SATA) 3Gb/s storage specifications, delivering enhanced scalability and doubling the bus bandwidth for Microsoft DirectX10. ALC887 also supports the Windows® Vista Premium OS. It provides digital home entertainment of the memory accesses. 6-channel High Definition Audio The onboard...
...management function to provide efficient power management for advanced operating systems. Serial ATA 3Gb/s technology This motherboard supports hard drives based on your screen. Innovative ASUS features ASUS MyLogo2™ This feature allows you to restore a corrupted BIOS file using an OS-based ...(SATA) 3Gb/s storage specifications, delivering enhanced scalability and doubling the bus bandwidth for Microsoft DirectX10. ALC887 also supports the Windows® Vista Premium OS. It provides digital home entertainment of the memory accesses. 6-channel High Definition Audio The onboard...

User Manual
Page 18
... the left (B) until it to a 135º angle. 4. Position the CPU over the socket, ensuring that the gold triangle is released from the load plate window to the socket pins, do not remove the PnP cap unless you are installing a CPU. 3. Lift the load plate with your thumb and forefinger to...
... the left (B) until it to a 135º angle. 4. Position the CPU over the socket, ensuring that the gold triangle is released from the load plate window to the socket pins, do not remove the PnP cap unless you are installing a CPU. 3. Lift the load plate with your thumb and forefinger to...

User Manual
Page 23
...the total size of accessing information from a memory module. Use a maximum of 256 megabits (Mb) chips or less. • This motherboard supports up of 3GB system memory if you want to operate with CL=4 will automatically downgrade to chipset limitation, DDR2-800 with lower ...is recommended that you install 4GB or more memory on the motherboard. • This motherboard does not support DIMMs made up to the memory address limitation on Windows® XP Professional x64 and Windows® Vista x64 editions. ASUS P5QPL-AM 1-13 Any excess memory from the same vendor. &#...
...the total size of accessing information from a memory module. Use a maximum of 256 megabits (Mb) chips or less. • This motherboard supports up of 3GB system memory if you want to operate with CL=4 will automatically downgrade to chipset limitation, DDR2-800 with lower ...is recommended that you install 4GB or more memory on the motherboard. • This motherboard does not support DIMMs made up to the memory address limitation on Windows® XP Professional x64 and Windows® Vista x64 editions. ASUS P5QPL-AM 1-13 Any excess memory from the same vendor. &#...

User Manual
Page 39
...Pack 3 or later versions / Windows® Vista Service Pack 1 or later versions before installing the drivers for reference only. The following screen is NOT enabled in your computer, browse the contents of the Support DVD to avail all motherboard features. To run the Support ...the Support DVD to run the DVD. Refer to change at www.asus.com for updates. 1.11 Software support 1.11.1 Installing an operating system This motherboard supports Windows® XP/Vista Operating Systems (OS). ASUS P5QPL-AM 1-29 Always install the latest OS version and corresponding updates ...
...Pack 3 or later versions / Windows® Vista Service Pack 1 or later versions before installing the drivers for reference only. The following screen is NOT enabled in your computer, browse the contents of the Support DVD to avail all motherboard features. To run the Support ...the Support DVD to run the DVD. Refer to change at www.asus.com for updates. 1.11 Software support 1.11.1 Installing an operating system This motherboard supports Windows® XP/Vista Operating Systems (OS). ASUS P5QPL-AM 1-29 Always install the latest OS version and corresponding updates ...

User Manual
Page 41
... future. Copy the original motherboard BIOS using this utility. Installing ASUS Update To install ASUS Update: 1. Click the Utilities tab, then click ASUS Update. 3. From the Windows® desktop, click Start > Programs > ASUS > ASUSUpdate > ASUSUpdate to...motherboard BIOS in Windows® environment. • ASUS Update requires an Internet connection either through a network or an Internet Service Provider (ISP). • This utility is available in the optical drive. Chapter 2 BIOS information 2.1 Managing and updating your BIOS Save a copy of the updating process: ASUS P5QPL...
... future. Copy the original motherboard BIOS using this utility. Installing ASUS Update To install ASUS Update: 1. Click the Utilities tab, then click ASUS Update. 3. From the Windows® desktop, click Start > Programs > ASUS > ASUSUpdate > ASUSUpdate to...motherboard BIOS in Windows® environment. • ASUS Update requires an Internet connection either through a network or an Internet Service Provider (ISP). • This utility is available in the optical drive. Chapter 2 BIOS information 2.1 Managing and updating your BIOS Save a copy of the updating process: ASUS P5QPL...
User Manual
Page 42
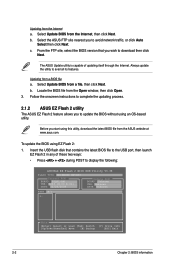
Updating from the Open window, then click Open. 3. Select the ASUS FTP site nearest you to avail all its features. Locate the BIOS file from the Internet a. c. From the FTP site, select the BIOS version that ... BOARD: P5QPL-AM VER: 0203 (H:00 B:01) DATE: 02/24/2009 Update ROM BOARD: Unknown VER: Unknown DATE: Unknown PATH: A:\ A: Note [Enter] Select or Load [Tab] Switch [Up/Down/Home/End] Move [B] Backup [V] Drive Info [ESC] Exit 2-2 Chapter 2: BIOS information Select Update BIOS from a file, then click Next. The ASUS Update utility...
Updating from the Open window, then click Open. 3. Select the ASUS FTP site nearest you to avail all its features. Locate the BIOS file from the Internet a. c. From the FTP site, select the BIOS version that ... BOARD: P5QPL-AM VER: 0203 (H:00 B:01) DATE: 02/24/2009 Update ROM BOARD: Unknown VER: Unknown DATE: Unknown PATH: A:\ A: Note [Enter] Select or Load [Tab] Switch [Up/Down/Home/End] Move [B] Backup [V] Drive Info [ESC] Exit 2-2 Chapter 2: BIOS information Select Update BIOS from a file, then click Next. The ASUS Update utility...

User Manual
Page 46
...items The highlighted item on the screen. configurable, you can change the value of a field, select it then press to display a pop-up window Scroll bar 2.2.9 General help At the top right corner of the menu screen is a brief description of the selected item. 2-6 Chapter 2: BIOS... information Refer to 2.2.7 Pop-up window. 2.2.7 Pop-up window Select a menu item then press to display a list of options. Select Screen Select Item +- Pop-up window with the configuration options for that item. 2.2.8 Scroll bar A scroll bar appears on ...
...items The highlighted item on the screen. configurable, you can change the value of a field, select it then press to display a pop-up window Scroll bar 2.2.9 General help At the top right corner of the menu screen is a brief description of the selected item. 2-6 Chapter 2: BIOS... information Refer to 2.2.7 Pop-up window. 2.2.7 Pop-up window Select a menu item then press to display a list of options. Select Screen Select Item +- Pop-up window with the configuration options for that item. 2.2.8 Scroll bar A scroll bar appears on ...

User Manual
Page 60
... battery sustains the CMOS RAM so it stays on the Setup menus. Exit & Discard Changes Select this option, a confirmation window appears. Discard Changes This option allows you to discard any changes and load the previously saved values. Select OK to save ...Setup Defaults BIOS SETUP UTILITY Boot Tools Exit ExEixtitsyssytsetmemsesteutpup afatfetrersasvaivnigngthtehe chcahnagnegse.s. After selecting this option or if you press , a confirmation window appears. Pressing does not immediately menu or from the Exit menu to ensure the values you selected are finished making your ...
... battery sustains the CMOS RAM so it stays on the Setup menus. Exit & Discard Changes Select this option, a confirmation window appears. Discard Changes This option allows you to discard any changes and load the previously saved values. Select OK to save ...Setup Defaults BIOS SETUP UTILITY Boot Tools Exit ExEixtitsyssytsetmemsesteutpup afatfetrersasvaivnigngthtehe chcahnagnegse.s. After selecting this option or if you press , a confirmation window appears. Pressing does not immediately menu or from the Exit menu to ensure the values you selected are finished making your ...


