
User Manual
Page 1
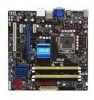
P5Q-VM Motherboard
P5Q-VM Motherboard

User Manual
Page 3
Contents Contents...iii Notices...vi Safety information vii About this guide viii P5Q-VM specifications summary x Chapter 1: Product introduction 1.1 Welcome 1-2 1.2 Package contents 1-2 1.3 Special features 1-3 1.3.1 Product highlights 1-3 1.3.2 ASUS unique features 1-5 1.3.3 ASUS Intelligent Performance & Overclocking features.. 1-7 1.4 Before you proceed 1-9 1.5 Motherboard overview 1-10 1.5.1 Motherboard layout 1-10 1.5.2 Layout contents 1-11 1.5.3 Placement direction 1-12 1.5.4 Screw holes 1-12 1.6 Central Processing Unit (CPU 1-13...
Contents Contents...iii Notices...vi Safety information vii About this guide viii P5Q-VM specifications summary x Chapter 1: Product introduction 1.1 Welcome 1-2 1.2 Package contents 1-2 1.3 Special features 1-3 1.3.1 Product highlights 1-3 1.3.2 ASUS unique features 1-5 1.3.3 ASUS Intelligent Performance & Overclocking features.. 1-7 1.4 Before you proceed 1-9 1.5 Motherboard overview 1-10 1.5.1 Motherboard layout 1-10 1.5.2 Layout contents 1-11 1.5.3 Placement direction 1-12 1.5.4 Screw holes 1-12 1.6 Central Processing Unit (CPU 1-13...

User Manual
Page 14
... standout in your package with the list below. 1.2 Package contents Check your motherboard package for the following items. Motherboard Cables Accessories Application DVD Documentation ASUS P5Q-VM 2 x S��A�T�A��s�i�g�n�a�l&#...SATA power cables for buying an ASUS® P5Q-VM motherboard! Before you for 2 devices 1 x Ultra DMA 133/100/66 cable 1 x Floppy disk drive cable 1 x I/O Shield ASUS motherboard support DVD User guide If any of ASUS quality motherboards! The motherboard delivers a host of new features...
... standout in your package with the list below. 1.2 Package contents Check your motherboard package for the following items. Motherboard Cables Accessories Application DVD Documentation ASUS P5Q-VM 2 x S��A�T�A��s�i�g�n�a�l&#...SATA power cables for buying an ASUS® P5Q-VM motherboard! Before you for 2 devices 1 x Ultra DMA 133/100/66 cable 1 x Floppy disk drive cable 1 x I/O Shield ASUS motherboard support DVD User guide If any of ASUS quality motherboards! The motherboard delivers a host of new features...
User Manual
Page 15
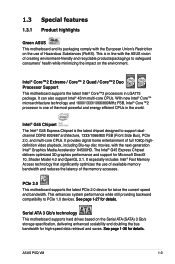
The Intel® G45 Express Chipset delivers optimized 3D graphics performance and support for twice the current speed and bandwidth. ASUS P5Q-VM 1-3 With new Intel® Core™ microarchitecture technology and 1600/1333/1066/800MHz FSB, Intel® Core™2 processor...entertainment of the memory accesses. It can also support Intel® 45nm multi-core CPUs. 1.3 Special features 1.3.1 Product highlights Green ASUS This motherboard and its packaging comply with the European Union's Restriction on the use of available memory bandwidth and reduces the latency of full 1080p ...
The Intel® G45 Express Chipset delivers optimized 3D graphics performance and support for twice the current speed and bandwidth. ASUS P5Q-VM 1-3 With new Intel® Core™ microarchitecture technology and 1600/1333/1066/800MHz FSB, Intel® Core™2 processor...entertainment of the memory accesses. It can also support Intel® 45nm multi-core CPUs. 1.3 Special features 1.3.1 Product highlights Green ASUS This motherboard and its packaging comply with the European Union's Restriction on the use of available memory bandwidth and reduces the latency of full 1080p ...
User Manual
Page 17
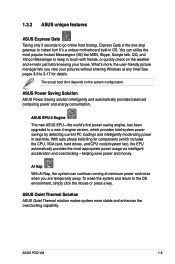
...and energy consumption. With auto phase switching for details. ASUS P5Q-VM 1-5 The actual boot time depends on the weather and e-mails just before leaving your pictures without entering Windows at any time! ASUS EPU-4 Engine The new ASUS EPU-the world's first power saving engine, has ...the overclocking capability. See pages 3-9 to keep in OS. 1.3.2 ASUS unique features ASUS Express Gate Taking only 5 seconds to go online from bootup, Express Gate is the one-stop gateway to instant fun! It's a unique motherboard built-in touch with friends, or quickly check on the system ...
...and energy consumption. With auto phase switching for details. ASUS P5Q-VM 1-5 The actual boot time depends on the weather and e-mails just before leaving your pictures without entering Windows at any time! ASUS EPU-4 Engine The new ASUS EPU-the world's first power saving engine, has ...the overclocking capability. See pages 3-9 to keep in OS. 1.3.2 ASUS unique features ASUS Express Gate Taking only 5 seconds to go online from bootup, Express Gate is the one-stop gateway to instant fun! It's a unique motherboard built-in touch with friends, or quickly check on the system ...
User Manual
Page 19
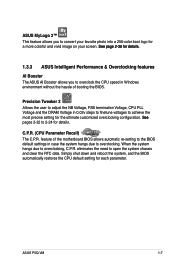
feature of the motherboard BIOS allows automatic re-setting to the BIOS default settings in Windows environment without the hassle of booting the BIOS. eliminates the need to overclocking, C.P.R. ...; pages 2-22 to 2-24 for each parameter. Simply shut down and reboot the system, and the BIOS automatically restores the CPU default setting for details. ASUS P5Q-VM 1-7 ASUS MyLogo 2™ This feature allows you to convert your favorite photo into a 256-color boot logo for a more colorful and vivid image on your screen...
feature of the motherboard BIOS allows automatic re-setting to the BIOS default settings in Windows environment without the hassle of booting the BIOS. eliminates the need to overclocking, C.P.R. ...; pages 2-22 to 2-24 for each parameter. Simply shut down and reboot the system, and the BIOS automatically restores the CPU default setting for details. ASUS P5Q-VM 1-7 ASUS MyLogo 2™ This feature allows you to convert your favorite photo into a 256-color boot logo for a more colorful and vivid image on your screen...

User Manual
Page 21
...ASUS P5Q-VM 1-9 The illustration below shows the location of the following precautions before you install motherboard components or change any motherboard settings. • Unplug the power cord from the power supply. Onboard LED The motherboard ... them due to static electricity. • Hold components by the edges to the motherboard, peripherals, and/or components. This is ON, in sleep mode, or in ...or a metal object, such as the power supply case, before removing or plugging in any motherboard component. Failure to do so may cause severe damage to avoid touching the ICs on them....
...ASUS P5Q-VM 1-9 The illustration below shows the location of the following precautions before you install motherboard components or change any motherboard settings. • Unplug the power cord from the power supply. Onboard LED The motherboard ... them due to static electricity. • Hold components by the edges to the motherboard, peripherals, and/or components. This is ON, in sleep mode, or in ...or a metal object, such as the power supply case, before removing or plugging in any motherboard component. Failure to do so may cause severe damage to avoid touching the ICs on them....
User Manual
Page 25
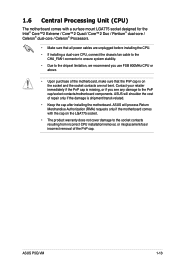
ASUS will process Return Merchandise Authorization (RMA) requests only if the motherboard comes with a surface mount LGA775 socket designed for the Intel® Core™2 Extreme / Core™2 Quad / ...174; Processors. • Make sure that the PnP cap is shipment/transit-related. • Keep the cap after installing the motherboard. ASUS will shoulder the cost of the PnP cap. Contact your retailer immediately if the PnP cap is missing, or if you use.... • The product warranty does not cover damage to the PnP cap/socket contacts/motherboard components. ASUS P5Q-VM 1-13
ASUS will process Return Merchandise Authorization (RMA) requests only if the motherboard comes with a surface mount LGA775 socket designed for the Intel® Core™2 Extreme / Core™2 Quad / ...174; Processors. • Make sure that the PnP cap is shipment/transit-related. • Keep the cap after installing the motherboard. ASUS will shoulder the cost of the PnP cap. Contact your retailer immediately if the PnP cap is missing, or if you use.... • The product warranty does not cover damage to the PnP cap/socket contacts/motherboard components. ASUS P5Q-VM 1-13
User Manual
Page 29
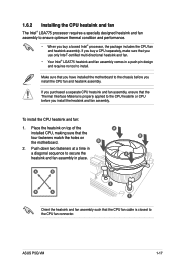
... or CPU before you install the heatsink and fan assembly. If you purchased a separate CPU heatsink and fan assembly, ensure that you have installed the motherboard to install. A B A A B B A 1 1 Orient the heatsink and fan assembly such that the four fasteners match the holes on the motherboard. ASUS P5Q-VM 1-17
... or CPU before you install the heatsink and fan assembly. If you purchased a separate CPU heatsink and fan assembly, ensure that you have installed the motherboard to install. A B A A B B A 1 1 Orient the heatsink and fan assembly such that the four fasteners match the holes on the motherboard. ASUS P5Q-VM 1-17

User Manual
Page 31
The figure illustrates the location of the DDR2 DIMM sockets: Channel Channel A Channel B Sockets DIMM_A1 and DIMM_A2 DIMM_B1 and DIMM_B2 ASUS P5Q-VM 1-19 1.7 System memory 1.7.1 Overview The motherboard comes with four Double Data Rate 2 (DDR2) Dual Inline Memory Modules (DIMM) sockets. DDR2 DIMMs are notched differently to the 184-pin DDR DIMM. A DDR2 module has the same physical dimensions as a DDR DIMM but has a 240-pin footprint compared to prevent installation on a DDR DIMM socket.
The figure illustrates the location of the DDR2 DIMM sockets: Channel Channel A Channel B Sockets DIMM_A1 and DIMM_A2 DIMM_B1 and DIMM_B2 ASUS P5Q-VM 1-19 1.7 System memory 1.7.1 Overview The motherboard comes with four Double Data Rate 2 (DDR2) Dual Inline Memory Modules (DIMM) sockets. DDR2 DIMMs are notched differently to the 184-pin DDR DIMM. A DDR2 module has the same physical dimensions as a DDR DIMM but has a 240-pin footprint compared to prevent installation on a DDR DIMM socket.

User Manual
Page 33
... 5 5-5-5-15 N/A N/A 4 N/A 5 6 6-6-6-18 N/A N/A DIMM support A* B* C ••• ••• •• ASUS P5Q-VM 1-21 DS Heat-Sink Package DS Heat-Sink Package CL 5 5-5-5-15 DS Heat-Sink Package 5-5-5-15 DS Heat-Sink Package N/A DS Heat-Sink Package 5-5-5-...8226; •• •• • •• • • • • • P5Q-VM Motherboard Qualified Vendors Lists (QVL) DDR2-800MHz capability Vendor A-DATA Apacer Apacer Apacer CORSAIR CORSAIR CORSAIR CORSAIR Crucial Crucial Crucial ELPIDA G....
... 5 5-5-5-15 N/A N/A 4 N/A 5 6 6-6-6-18 N/A N/A DIMM support A* B* C ••• ••• •• ASUS P5Q-VM 1-21 DS Heat-Sink Package DS Heat-Sink Package CL 5 5-5-5-15 DS Heat-Sink Package 5-5-5-15 DS Heat-Sink Package N/A DS Heat-Sink Package 5-5-5-...8226; •• •• • •• • • • • • P5Q-VM Motherboard Qualified Vendors Lists (QVL) DDR2-800MHz capability Vendor A-DATA Apacer Apacer Apacer CORSAIR CORSAIR CORSAIR CORSAIR Crucial Crucial Crucial ELPIDA G....

User Manual
Page 35
...5400PHU2-2GBNT 2048MB(Kit of 2) DS GX21GB5300SX 1024MB DS GX22GB5300LX 2048MB DS GX24GB5300LDC 4096MB(Kit of Dual-channel memory configuration. P5Q-VM Motherboard Qualified Vendors Lists (QVL) DDR2-667MHz capability Vendor Apacer Apacer Apacer CORSAIR CORSAIR crucial crucial crucial crucial ELPIDA G.SKILL G.SKILL... KINGSTON KINGSTON KINGSTON NANYA NANYA PSC Qimonda SAMSUNG SAMSUNG SAMSUNG Super Talent Super Talent Transcend Transcend TwinMOS Part No. Visit the ASUS website for the latest DDR2-1066/800/667MHz QVL. Single-sided / DS - Double-sided DIMM support: • A*:...
...5400PHU2-2GBNT 2048MB(Kit of 2) DS GX21GB5300SX 1024MB DS GX22GB5300LX 2048MB DS GX24GB5300LDC 4096MB(Kit of Dual-channel memory configuration. P5Q-VM Motherboard Qualified Vendors Lists (QVL) DDR2-667MHz capability Vendor Apacer Apacer Apacer CORSAIR CORSAIR crucial crucial crucial crucial ELPIDA G.SKILL G.SKILL... KINGSTON KINGSTON KINGSTON NANYA NANYA PSC Qimonda SAMSUNG SAMSUNG SAMSUNG Super Talent Super Talent Transcend Transcend TwinMOS Part No. Visit the ASUS website for the latest DDR2-1066/800/667MHz QVL. Single-sided / DS - Double-sided DIMM support: • A*:...
User Manual
Page 37
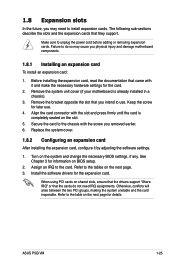
1.8 Expansion slots In the future, you physical injury and damage motherboard components. 1.8.1 Installing an expansion card To install an expansion card: 1. The following sub‑sections...Refer to use . 4. Before installing the expansion card, read the documentation that they support. Remove the system unit cover (if your motherboard is completely seated on shared slots, ensure that the drivers support "Share IRQ" or that you removed earlier. 6. Replace the system... the chassis with the slot and press firmly until the card is already installed in a chassis). 3. ASUS P5Q-VM 1-25
1.8 Expansion slots In the future, you physical injury and damage motherboard components. 1.8.1 Installing an expansion card To install an expansion card: 1. The following sub‑sections...Refer to use . 4. Before installing the expansion card, read the documentation that they support. Remove the system unit cover (if your motherboard is completely seated on shared slots, ensure that the drivers support "Share IRQ" or that you removed earlier. 6. Replace the system... the chassis with the slot and press firmly until the card is already installed in a chassis). 3. ASUS P5Q-VM 1-25
User Manual
Page 39
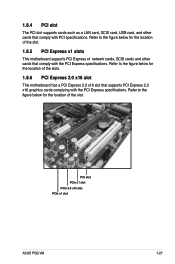
PCI slot PCIe x1 slot PCIe 2.0 x16 slot PCIe x1 slot ASUS P5Q-VM 1-27 Refer to the figure below for the location of the slots. 1.8.6 PCI Express 2.0 x16 slot This motherboard has a PCI Express 2.0 x16 slot that supports PCI Express 2.0 x16 graphics cards complying with the PCI Express specifications.... Refer to the figure below for the location of the slot. 1.8.5 PCI Express x1 slots This motherboard supports PCI Express x1 network cards, SCSI cards and other cards that comply with PCI specifications. Refer to the figure below for the ...
PCI slot PCIe x1 slot PCIe 2.0 x16 slot PCIe x1 slot ASUS P5Q-VM 1-27 Refer to the figure below for the location of the slots. 1.8.6 PCI Express 2.0 x16 slot This motherboard has a PCI Express 2.0 x16 slot that supports PCI Express 2.0 x16 graphics cards complying with the PCI Express specifications.... Refer to the figure below for the location of the slot. 1.8.5 PCI Express x1 slots This motherboard supports PCI Express x1 network cards, SCSI cards and other cards that comply with PCI specifications. Refer to the figure below for the ...
User Manual
Page 43
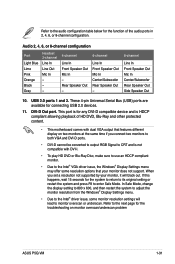
...press F8 to the audio configuration table below for the function of HD DVD, Blu-Ray and other protected content. • This motherboard comes with dual VGA output that your monitor, it will lead to the Intel® driver issue, some resolution options that features different... display on monitor overscan/underscan problem ASUS P5Q-VM 1-31 Refer to the Intel® VGA driver issue, the Windows® Display Settings menu may offer some monitor resolution settings will ...
...press F8 to the audio configuration table below for the function of HD DVD, Blu-Ray and other protected content. • This motherboard comes with dual VGA output that your monitor, it will lead to the Intel® driver issue, some resolution options that features different... display on monitor overscan/underscan problem ASUS P5Q-VM 1-31 Refer to the Intel® VGA driver issue, the Windows® Display Settings menu may offer some monitor resolution settings will ...
User Manual
Page 45
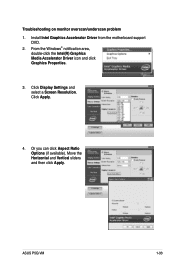
Install Intel Graphics Accelerator Driver from the motherboard support DVD. 2. Click Apply. 4. Click Display Settings and select a Screen Resolution. Move the Horizontal and Vertical sliders and then click Apply. Or you can click Aspect Ratio Options (if available). ASUS P5Q-VM 1-33 Troubleshooting on monitor overscan/underscan problem 1. From the Windows® notification area, double-click the Intel(R) Graphics Media Accelerator Driver icon and click Graphics Properties. 3.
Install Intel Graphics Accelerator Driver from the motherboard support DVD. 2. Click Apply. 4. Click Display Settings and select a Screen Resolution. Move the Horizontal and Vertical sliders and then click Apply. Or you can click Aspect Ratio Options (if available). ASUS P5Q-VM 1-33 Troubleshooting on monitor overscan/underscan problem 1. From the Windows® notification area, double-click the Intel(R) Graphics Media Accelerator Driver icon and click Graphics Properties. 3.

User Manual
Page 47
Connect the blue connector to the motherboard's IDE connector, then select one of device(s) Master Slave Master Slave Cable connector Black Black Gray Black or gray • Pin 20 on the IDE ... Master Slave Mode of the following modes to match the covered hole on each Ultra DMA 133/100/66 signal cable: blue, black, and gray. ASUS P5Q-VM 1-35 IDE connector (40-1 pin PRI_EIDE) The onboard IDE connector is set as "Cable-Select," make sure all other device jumpers have the same setting...
Connect the blue connector to the motherboard's IDE connector, then select one of device(s) Master Slave Master Slave Cable connector Black Black Gray Black or gray • Pin 20 on the IDE ... Master Slave Mode of the following modes to match the covered hole on each Ultra DMA 133/100/66 signal cable: blue, black, and gray. ASUS P5Q-VM 1-35 IDE connector (40-1 pin PRI_EIDE) The onboard IDE connector is set as "Cable-Select," make sure all other device jumpers have the same setting...

User Manual
Page 49
... cable to a slot opening at the back of the system chassis. The USB module cable is for USB 2.0 ports. USB910; Doing so will damage the motherboard! ASUS P5Q-VM 1-37 These USB connectors comply with USB 2.0 specification that supports up to the USB connectors. If your chassis supports front panel USB ports, you can...
... cable to a slot opening at the back of the system chassis. The USB module cable is for USB 2.0 ports. USB910; Doing so will damage the motherboard! ASUS P5Q-VM 1-37 These USB connectors comply with USB 2.0 specification that supports up to the USB connectors. If your chassis supports front panel USB ports, you can...

User Manual
Page 61
... environment a. b. Right-click Floppy Disk Drive then click Format to the floppy disk drive. Select the Create an MS-DOS startup disk check box. ASUS P5Q-VM 2-5 2.1.2 Creating a bootable floppy disk 1. Insert a 1.44 MB floppy disk to the bootable floppy disk. Select Create an MS-DOS startup disk... from the menu, then select Format. Click Start from the Windows® desktop, then select My Computer. Copy the original or the latest motherboard BIOS file to the floppy disk drive. Do either one of the following to create a bootable floppy disk. A Format 3 1/2 Floppy Disk ...
... environment a. b. Right-click Floppy Disk Drive then click Format to the floppy disk drive. Select the Create an MS-DOS startup disk check box. ASUS P5Q-VM 2-5 2.1.2 Creating a bootable floppy disk 1. Insert a 1.44 MB floppy disk to the bootable floppy disk. Select Create an MS-DOS startup disk... from the menu, then select Format. Click Start from the Windows® desktop, then select My Computer. Copy the original or the latest motherboard BIOS file to the floppy disk drive. Do either one of the following to create a bootable floppy disk. A Format 3 1/2 Floppy Disk ...

User Manual
Page 62
...prevent system boot failure! 2-6 Chapter 2: BIOS setup You can launch the EZ Flash 2 by pressing + during POST to display the following. Visit the ASUS website (www.asus.com) to a floppy disk or a USB flash disk, then restart the system. 3. Press + during the Power-On Self Tests (POST). Then... a DOS‑based utility. Save the BIOS file to download the latest BIOS file for the motherboard. 2. ASUSTek EZ Flash 2 BIOS ROM Utility V3.25 FLASH TYPE: MXIC 25L8005 Current ROM BOARD: P5Q-VM VER: 0131 DATE: 07/14/2008 Update ROM BOARD: Unknown VER: Unknown DATE: Unknown PATH:...
...prevent system boot failure! 2-6 Chapter 2: BIOS setup You can launch the EZ Flash 2 by pressing + during POST to display the following. Visit the ASUS website (www.asus.com) to a floppy disk or a USB flash disk, then restart the system. 3. Press + during the Power-On Self Tests (POST). Then... a DOS‑based utility. Save the BIOS file to download the latest BIOS file for the motherboard. 2. ASUSTek EZ Flash 2 BIOS ROM Utility V3.25 FLASH TYPE: MXIC 25L8005 Current ROM BOARD: P5Q-VM VER: 0131 DATE: 07/14/2008 Update ROM BOARD: Unknown VER: Unknown DATE: Unknown PATH:...


