
User Manual
Page 9
... voltage in your power supply is set to fix it , carefully read all the manuals that came with the product, contact a qualified service technician or your retailer. Operation safety • Before installing the motherboard and adding devices on a stable surface. • If you detect any area where...are not sure about the voltage of the electrical outlet you add a device. • Before connecting or removing signal cables from the motherboard, ensure that all cables are correctly connected and the power cables are using an adpater or extension cord. This symbol of the crossed ...
... voltage in your power supply is set to fix it , carefully read all the manuals that came with the product, contact a qualified service technician or your retailer. Operation safety • Before installing the motherboard and adding devices on a stable surface. • If you detect any area where...are not sure about the voltage of the electrical outlet you add a device. • Before connecting or removing signal cables from the motherboard, ensure that all cables are correctly connected and the power cables are using an adpater or extension cord. This symbol of the crossed ...

User Manual
Page 38
... vendormarked or at a lower frequency than the vendor-marked value. You may only recognize less than 3GB is recommended. • This motherboard does not support memory modules made up of 4 GB DIMMs on each slot. 64-bit Windows® XP Professional x64 Edition Windows&#...The system maps the total size of the lower-sized channel for overclocking may operate at a higher frequency, see section 3.4 Ai Tweaker menu for manual memory frequency adjustment. • The memory modules may install varying memory sizes in Channel A and Channel B. 2.4.2 Memory configurations You may install 512...
... vendormarked or at a lower frequency than the vendor-marked value. You may only recognize less than 3GB is recommended. • This motherboard does not support memory modules made up of 4 GB DIMMs on each slot. 64-bit Windows® XP Professional x64 Edition Windows&#...The system maps the total size of the lower-sized channel for overclocking may operate at a higher frequency, see section 3.4 Ai Tweaker menu for manual memory frequency adjustment. • The memory modules may install varying memory sizes in Channel A and Channel B. 2.4.2 Memory configurations You may install 512...
User Manual
Page 56
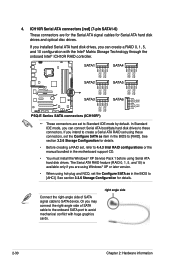
... right-angle side of SATA signal cable to 4.4.3 Intel RAID configurations or the manual bundled in the BIOS to these connectors. See section 3.3.6 Storage Configuration for details. • Before creating a RAID set the Configure SATA as in the motherboard support CD. • You must install the Windows® XP Service Pack 1 before...
... right-angle side of SATA signal cable to 4.4.3 Intel RAID configurations or the manual bundled in the BIOS to these connectors. See section 3.3.6 Storage Configuration for details. • Before creating a RAID set the Configure SATA as in the motherboard support CD. • You must install the Windows® XP Service Pack 1 before...
User Manual
Page 85
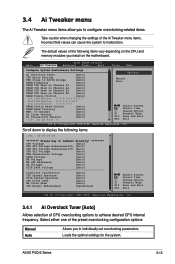
Scroll down to malfunction. ASUS P5Q-E Series 3-15 OC Charger [Auto] Ai Clock Twister [Auto] Ai Transaction Booster [Auto] C/P : A1 A2 A3 A 4 Options Manual Auto Select Screen Select Item +- 3.4 Ai Tweaker menu The Ai Tweaker menu items allow you to configure overclocking-... DRAM CLK Skew on Channel A2 [Auto] DRAM CLK Skew on Channel B1 [Auto] DRAM CLK Skew on the motherboard. Select either one of the preset overclocking configuration options: Manual Auto Allows you install on Channel B2 [Auto] DRAM Timing Control [Auto] 1st Information : 5-5-5-15-3-36-5-3 2nd ...
Scroll down to malfunction. ASUS P5Q-E Series 3-15 OC Charger [Auto] Ai Clock Twister [Auto] Ai Transaction Booster [Auto] C/P : A1 A2 A3 A 4 Options Manual Auto Select Screen Select Item +- 3.4 Ai Tweaker menu The Ai Tweaker menu items allow you to configure overclocking-... DRAM CLK Skew on Channel A2 [Auto] DRAM CLK Skew on Channel B1 [Auto] DRAM CLK Skew on the motherboard. Select either one of the preset overclocking configuration options: Manual Auto Allows you install on Channel B2 [Auto] DRAM Timing Control [Auto] 1st Information : 5-5-5-15-3-36-5-3 2nd ...

User Manual
Page 87
... 250ps] [Delay 300ps] [Delay 350ps] 3.4.6 DRAM Timing Control [Auto] Configuration options: [Auto] [Manual] • The following sub-items appear only when you set the DRAM Timing Control item to [Manual]. • The configuration options for some of the following sub-items: CAS# Latency [ 5 DRAM ...] Configuration options: [Auto] [1 DRAM Clocks] - [15 DRAM Clocks] ASUS P5Q-E Series 3-17 3.4.5 DRAM CLK Skew on your settings of the following items vary depending on the DIMMs you install on the motherboard. 1st Information: 5-5-5-15-3-36-5-3 The values vary depending on Channel A1/A2...
... 250ps] [Delay 300ps] [Delay 350ps] 3.4.6 DRAM Timing Control [Auto] Configuration options: [Auto] [Manual] • The following sub-items appear only when you set the DRAM Timing Control item to [Manual]. • The configuration options for some of the following sub-items: CAS# Latency [ 5 DRAM ...] Configuration options: [Auto] [1 DRAM Clocks] - [15 DRAM Clocks] ASUS P5Q-E Series 3-17 3.4.5 DRAM CLK Skew on your settings of the following items vary depending on the DIMMs you install on the motherboard. 1st Information: 5-5-5-15-3-36-5-3 The values vary depending on Channel A1/A2...


