
User Manual
Page 1
Motherboard
Motherboard

User Manual
Page 1
P5N7A-VM Motherboard
P5N7A-VM Motherboard
User Manual
Page 3
Contents Notices...vi Safety information vii About this guide viii P5N7A-VM specifications summary x Chapter 1: Product introduction 1.1 Welcome 1-2 1.2 Package contents 1-2 1.3 Special features 1-2 1.3.1 Product highlights 1-2 1.3.2 ASUS Special Features 1-5 1.3.3 ASUS Stylish Features 1-7 1.3.4 ASUS Intelligent Overclocking features 1-7 1.4 Before you proceed 1-8 1.5 Motherboard overview 1-9 1.5.1 Placement direction 1-9 1.5.2 Screw holes 1-9 1.5.3 Motherboard layout 1-10 1.6 Central Processing Unit (CPU 1-11 1.6.1 Installling the CPU 1-11 1.6.2 Installling the CPU...
Contents Notices...vi Safety information vii About this guide viii P5N7A-VM specifications summary x Chapter 1: Product introduction 1.1 Welcome 1-2 1.2 Package contents 1-2 1.3 Special features 1-2 1.3.1 Product highlights 1-2 1.3.2 ASUS Special Features 1-5 1.3.3 ASUS Stylish Features 1-7 1.3.4 ASUS Intelligent Overclocking features 1-7 1.4 Before you proceed 1-8 1.5 Motherboard overview 1-9 1.5.1 Placement direction 1-9 1.5.2 Screw holes 1-9 1.5.3 Motherboard layout 1-10 1.6 Central Processing Unit (CPU 1-11 1.6.1 Installling the CPU 1-11 1.6.2 Installling the CPU...
User Manual
Page 7
...the product, ensure that came with the product, contact a qualified service technician or your area. Operation safety • Before installing the motherboard and adding devices on a stable surface. • If you detect any area where it may become wet. • Place the product...a qualified service technician or your dealer immediately. • To avoid short circuits, keep paper clips, screws, and staples away from the motherboard, ensure that all power cables from the existing system before you are connected. If you encounter technical problems with the package. • ...
...the product, ensure that came with the product, contact a qualified service technician or your area. Operation safety • Before installing the motherboard and adding devices on a stable surface. • If you detect any area where it may become wet. • Place the product...a qualified service technician or your dealer immediately. • To avoid short circuits, keep paper clips, screws, and staples away from the motherboard, ensure that all power cables from the existing system before you are connected. If you encounter technical problems with the package. • ...
User Manual
Page 8
It also lists the hardware setup procedures that you need when installing and configuring the motherboard. ASUS websites The ASUS website provides updated information on the motherboard. • Chapter 2: BIOS setup This chapter tells how to perform when installing system components. Detailed descriptions of the BIOS parameters are not part of the ...
It also lists the hardware setup procedures that you need when installing and configuring the motherboard. ASUS websites The ASUS website provides updated information on the motherboard. • Chapter 2: BIOS setup This chapter tells how to perform when installing system components. Detailed descriptions of the BIOS parameters are not part of the ...

User Manual
Page 13
Chapter 1: 1Product introduction This chapter describes the motherboard features and the new technologies it supports.
Chapter 1: 1Product introduction This chapter describes the motherboard features and the new technologies it supports.
User Manual
Page 14
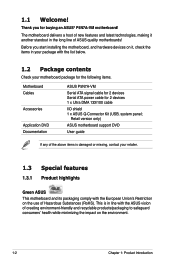
... of Hazardous Substances (RoHS). 1.1 Welcome! Thank you start installing the motherboard, and hardware devices on it another standout in line with the ASUS vision of ASUS quality motherboards! This is in the long line of creating environment-friendly and recyclable products...Restriction on the environment. 1-2 Chapter 1: Product Introduction The motherboard delivers a host of new features and latest technologies, making it , check the items in your motherboard package for the following items. Motherboard ASUS P5N7A-VM Cables Serial ATA signal cable for 2 devices Serial ATA ...
... of Hazardous Substances (RoHS). 1.1 Welcome! Thank you start installing the motherboard, and hardware devices on it another standout in line with the ASUS vision of ASUS quality motherboards! This is in the long line of creating environment-friendly and recyclable products...Restriction on the environment. 1-2 Chapter 1: Product Introduction The motherboard delivers a host of new features and latest technologies, making it , check the items in your motherboard package for the following items. Motherboard ASUS P5N7A-VM Cables Serial ATA signal cable for 2 devices Serial ATA ...
User Manual
Page 15
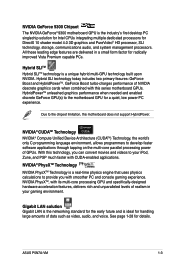
...features, delivers rich and unparalleled levels of NVIDIA descrete graphics cards when combined with smoother PC and console gaming experience. ASUS P5N7A-VM 1-3 HybridPowerTM unleashed graphics performance when needed and enabled discrete GeForce GPU(s) to provide you can convert movies and videos ... Boost turbo-charges performance of realism in a small form factor for a quiet, low power PC experience. With this motherboard does not support HybridPower. Hybrid SLITM Hybrid SLITM technology is the industry's first desktop PC singlechip solution for Intel CPUs integrating...
...features, delivers rich and unparalleled levels of NVIDIA descrete graphics cards when combined with smoother PC and console gaming experience. ASUS P5N7A-VM 1-3 HybridPowerTM unleashed graphics performance when needed and enabled discrete GeForce GPU(s) to provide you can convert movies and videos ... Boost turbo-charges performance of realism in a small form factor for a quiet, low power PC experience. With this motherboard does not support HybridPower. Hybrid SLITM Hybrid SLITM technology is the industry's first desktop PC singlechip solution for Intel CPUs integrating...
User Manual
Page 16
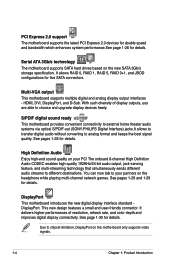
...new digital display interface standard DisplayPort. Due to analog format and keeps the best signal quality. Multi-VGA output This motherboard supports multiple digital and analog display output interfaces - You can now talk to choose and upgrade display devices freely. With... delivers higher performances of display outputs, you are able to your PC! HDMI, DVI, DisplayPort, and D-Sub. PCI Express 2.0 support The motherboard supports the latest PCI Express 2.0 devices for double speed and bandwidth which enhances system performance.See page 1-26 for details. This new design features...
...new digital display interface standard DisplayPort. Due to analog format and keeps the best signal quality. Multi-VGA output This motherboard supports multiple digital and analog display output interfaces - You can now talk to choose and upgrade display devices freely. With... delivers higher performances of display outputs, you are able to your PC! HDMI, DVI, DisplayPort, and D-Sub. PCI Express 2.0 support The motherboard supports the latest PCI Express 2.0 devices for double speed and bandwidth which enhances system performance.See page 1-26 for details. This new design features...
User Manual
Page 17
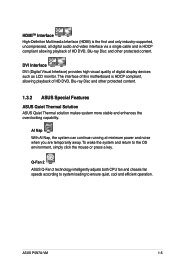
...return to ensure quiet, cool and efficient operation. ASUS P5N7A-VM 1-5 The interface of this motherboard is HDCP compliant allowing playback of HD DVD, Blu-ray Disc and other protected content. 1.3.2 ASUS Special Features ASUS Quiet Thermal Solution ASUS Quiet Thermal solution makes system more stable and enhances ... DVI Interface DVI (Digital Visual Interface) provides high visual quality of digital display devices such as LCD monitor. Q-Fan 2 ASUS Q-Fan 2 technology intelligently adjusts both CPU fan and chassis fan speeds according to system loading to the OS environment, simply ...
...return to ensure quiet, cool and efficient operation. ASUS P5N7A-VM 1-5 The interface of this motherboard is HDCP compliant allowing playback of HD DVD, Blu-ray Disc and other protected content. 1.3.2 ASUS Special Features ASUS Quiet Thermal Solution ASUS Quiet Thermal solution makes system more stable and enhances ... DVI Interface DVI (Digital Visual Interface) provides high visual quality of digital display devices such as LCD monitor. Q-Fan 2 ASUS Q-Fan 2 technology intelligently adjusts both CPU fan and chassis fan speeds according to system loading to the OS environment, simply ...
User Manual
Page 18
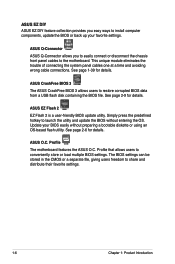
... DIY feature collection provides you to easily connect or disconnect the chassis front panel cables to the motherboard. ASUS CrashFree BIOS 3 The ASUS CrashFree BIOS 3 allows users to conveniently store or load multiple BIOS settings. Profile that allows users... time and avoiding wrong cable connections. Profile The motherboard features the ASUS O.C. See page 2-9 for details. See page 2-6 for details. Update your favorite settings. ASUS EZ Flash 2 EZ Flash 2 is a user-friendly BIOS update utility. ASUS Q-Connector ASUS Q-Connector allows you easy ways to share and ...
... DIY feature collection provides you to easily connect or disconnect the chassis front panel cables to the motherboard. ASUS CrashFree BIOS 3 The ASUS CrashFree BIOS 3 allows users to conveniently store or load multiple BIOS settings. Profile that allows users... time and avoiding wrong cable connections. Profile The motherboard features the ASUS O.C. See page 2-9 for details. See page 2-6 for details. Update your favorite settings. ASUS EZ Flash 2 EZ Flash 2 is a user-friendly BIOS update utility. ASUS Q-Connector ASUS Q-Connector allows you easy ways to share and ...

User Manual
Page 19
..., and the BIOS automatically restores the CPU default setting for details. See page 2-34 for each parameter. You can easily monitor the condition of the motherboard BIOS allows automatic re-setting to the BIOS default settings in OS. What's more colorful and vivid image on the weather and e-mails just before... , the user-friendly picture manager lets you view your pictures without entering Windows at 1 meter accuracy. See pages 2-38, and 3-10 to USB drives only. 1.3.4 ASUS Intelligent Overclocking features C.P.R. (CPU Parameter Recall) The C.P.R. ASUS P5N7A-VM 1-7
..., and the BIOS automatically restores the CPU default setting for details. See page 2-34 for each parameter. You can easily monitor the condition of the motherboard BIOS allows automatic re-setting to the BIOS default settings in OS. What's more colorful and vivid image on the weather and e-mails just before... , the user-friendly picture manager lets you view your pictures without entering Windows at 1 meter accuracy. See pages 2-38, and 3-10 to USB drives only. 1.3.4 ASUS Intelligent Overclocking features C.P.R. (CPU Parameter Recall) The C.P.R. ASUS P5N7A-VM 1-7
User Manual
Page 20
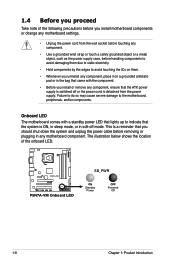
...power supply case, before removing or plugging in any motherboard component. The illustration below shows the location of the following precautions before you install motherboard components or change any component, ensure that the ATX power supply is switched off or the power cord is...before handling components to avoid damaging them due to static electricity. • Hold components by the edges to the motherboard, peripherals, and/or components. P5N7A-VM P5N7A-VM Onboard LED SB_PWR ON Standby Power OFF Powered Off 1-8 Chapter 1: Product Introduction 1.4 Before you proceed Take note...
...power supply case, before removing or plugging in any motherboard component. The illustration below shows the location of the following precautions before you install motherboard components or change any component, ensure that the ATX power supply is switched off or the power cord is...before handling components to avoid damaging them due to static electricity. • Hold components by the edges to the motherboard, peripherals, and/or components. P5N7A-VM P5N7A-VM Onboard LED SB_PWR ON Standby Power OFF Powered Off 1-8 Chapter 1: Product Introduction 1.4 Before you proceed Take note...
User Manual
Page 21
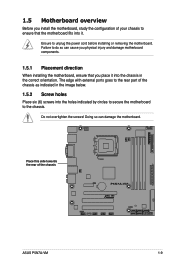
... external ports goes to the rear part of the chassis P5N7A-VM ASUS P5N7A-VM 1-9 Do not overtighten the screws! Doing so can cause you place it into the chassis in the image below. 1.5.2 Screw holes Place six (6) screws into it. 1.5 Motherboard overview Before you install the motherboard, study the configuration of your chassis to ensure that...
... external ports goes to the rear part of the chassis P5N7A-VM ASUS P5N7A-VM 1-9 Do not overtighten the screws! Doing so can cause you place it into the chassis in the image below. 1.5.2 Screw holes Place six (6) screws into it. 1.5 Motherboard overview Before you install the motherboard, study the configuration of your chassis to ensure that...
User Manual
Page 22
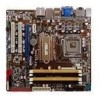
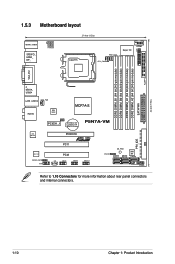
...-pin module) LPT EATXPWR FLOPPY 24.4cm (9.6in) 1.5.3 Motherboard layout 23.4cm (9.2in) KB/MS_USB56 SPDIFO_ HDMI_ DP_ ATX12V LGA775 PWR_FAN CPU_FAN Super I/O COM1 VGA_DVI F_ ESATA_ USB34 LAN1_USB12 CHA_FAN AUDIO 8Mb BIOS MCP7A-S CLRTC PCIEX1_1 CR2032 3V Lithium Cell CMOS Power P5N7A-VM RTL 8211CL PCIEX16 PRI_IDE ALC1200 SPDIF_OUT AAFP PCI1 PCI2...
...-pin module) LPT EATXPWR FLOPPY 24.4cm (9.6in) 1.5.3 Motherboard layout 23.4cm (9.2in) KB/MS_USB56 SPDIFO_ HDMI_ DP_ ATX12V LGA775 PWR_FAN CPU_FAN Super I/O COM1 VGA_DVI F_ ESATA_ USB34 LAN1_USB12 CHA_FAN AUDIO 8Mb BIOS MCP7A-S CLRTC PCIEX1_1 CR2032 3V Lithium Cell CMOS Power P5N7A-VM RTL 8211CL PCIEX16 PRI_IDE ALC1200 SPDIF_OUT AAFP PCI1 PCI2...
User Manual
Page 23
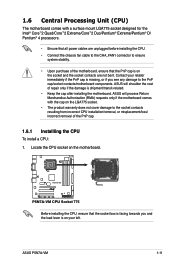
... incorrect CPU installation/removal, or misplacement/loss/ incorrect removal of the PnP cap. 1.6.1 Installling the CPU To install a CPU: 1. ASUS P5N7A-VM 1-11 Locate the CPU socket on the motherboard. 1.6 Central Processing Unit (CPU) The motherboard comes with the cap on the LGA775 socket. • The product warranty does not cover damage to the PnP...
... incorrect CPU installation/removal, or misplacement/loss/ incorrect removal of the PnP cap. 1.6.1 Installling the CPU To install a CPU: 1. ASUS P5N7A-VM 1-11 Locate the CPU socket on the motherboard. 1.6 Central Processing Unit (CPU) The motherboard comes with the cap on the LGA775 socket. • The product warranty does not cover damage to the PnP...
User Manual
Page 25
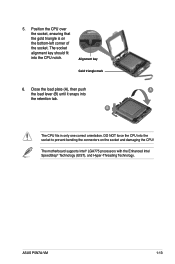
The motherboard supports Intel® LGA775 processors with the Enhanced Intel SpeedStep® Technology (EIST), and Hyper‑Threading Technology. 5. Position the CPU over the socket, ensuring ... one correct orientation. DO NOT force the CPU into the socket to prevent bending the connectors on the bottom‑left corner of the socket. ASUS P5N7A-VM 1-13 Alignment key Gold triangle mark 6. Close the load plate (A), then push A the load lever (B) until it snaps into the CPU notch. The socket alignment...
The motherboard supports Intel® LGA775 processors with the Enhanced Intel SpeedStep® Technology (EIST), and Hyper‑Threading Technology. 5. Position the CPU over the socket, ensuring ... one correct orientation. DO NOT force the CPU into the socket to prevent bending the connectors on the bottom‑left corner of the socket. ASUS P5N7A-VM 1-13 Alignment key Gold triangle mark 6. Close the load plate (A), then push A the load lever (B) until it snaps into the CPU notch. The socket alignment...
User Manual
Page 26
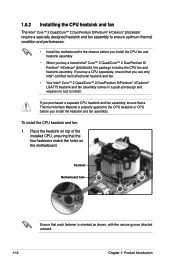
...™ 2 Duo/Pentium D/Pentium® 4/Celeron® processor require a specially designed heatsink and fan assembly to ensure optimum thermal condition and performance. • Install the motherboard to install. If you purchased a separate CPU heatsink and fan assembly, ensure that you use only Intel®‑certified multi‑directional heatsink and... to the CPU heatsink or CPU before you install the CPU fan and heatsink assembly • When you install the heatsink and fan assembly. Fastener Motherboard hole Ensure that the four fasteners match the holes on the...
...™ 2 Duo/Pentium D/Pentium® 4/Celeron® processor require a specially designed heatsink and fan assembly to ensure optimum thermal condition and performance. • Install the motherboard to install. If you purchased a separate CPU heatsink and fan assembly, ensure that you use only Intel®‑certified multi‑directional heatsink and... to the CPU heatsink or CPU before you install the CPU fan and heatsink assembly • When you install the heatsink and fan assembly. Fastener Motherboard hole Ensure that the four fasteners match the holes on the...
User Manual
Page 27
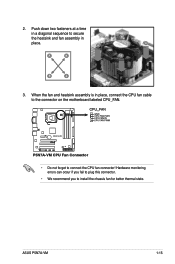
2. A A A B B B A 3. ASUS P5N7A-VM 1-15 P5N7A-VM P5N7A-VM CPU Fan Connector • Do not forget to the connector on the motherboard labeled CPU_FAN. When the fan and heatsink assembly is in place, connect the CPU fan cable to connect the CPU fan connector! Hardware monitoring errors can occur if you fail to plug this connector. • We recommend you to secure the heatsink and fan assembly in a diagonal sequence to install the chassis fan for better thermal state. Push down two fasteners at a time in B place.
2. A A A B B B A 3. ASUS P5N7A-VM 1-15 P5N7A-VM P5N7A-VM CPU Fan Connector • Do not forget to the connector on the motherboard labeled CPU_FAN. When the fan and heatsink assembly is in place, connect the CPU fan cable to connect the CPU fan connector! Hardware monitoring errors can occur if you fail to plug this connector. • We recommend you to secure the heatsink and fan assembly in a diagonal sequence to install the chassis fan for better thermal state. Push down two fasteners at a time in B place.
User Manual
Page 28
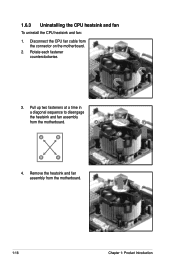
Remove the heatsink and fan assembly from the motherboard. Pull up two fasteners at a time in a diagonal sequence to disengage the heatsink and fan assembly B from the motherboard. 1-16 Chapter 1: Product Introduction A A B A B B A 4. Rotate each fastener counterclockwise. 3. 1.6.3 Uninstalling the CPU heatsink and fan To uninstall the CPU heatsink and fan: 1. Disconnect the CPU fan cable from the connector on the motherboard. 2.
Remove the heatsink and fan assembly from the motherboard. Pull up two fasteners at a time in a diagonal sequence to disengage the heatsink and fan assembly B from the motherboard. 1-16 Chapter 1: Product Introduction A A B A B B A 4. Rotate each fastener counterclockwise. 3. 1.6.3 Uninstalling the CPU heatsink and fan To uninstall the CPU heatsink and fan: 1. Disconnect the CPU fan cable from the connector on the motherboard. 2.


