Motherboard Installation Guide
Page 4
Contents 1.10 Connectors 1-24 1.10.1 Rear panel connectors 1-24 1.10.2 Internal connectors 1-26 Chapter 2: BIOS setup 2.1 Managing and updating your BIOS 2-2 2.1.1 Creating a bootable floppy disk 2-2 2.1.2 ASUS EZ Flash utility 2-3 2.1.3 AFUDOS utility 2-4 2.1.4 ASUS CrashFree BIOS 2 utility 2-6 2.1.5 ASUS Update utility 2-8 2.2 BIOS setup program 2-11 2.2.1 BIOS menu screen 2-12 2.2.2 Menu bar 2-12 2.2.3 Navigation keys 2-12 2.2.4 Menu items 2-13 2.2.5 Sub-menu items 2-13...
Contents 1.10 Connectors 1-24 1.10.1 Rear panel connectors 1-24 1.10.2 Internal connectors 1-26 Chapter 2: BIOS setup 2.1 Managing and updating your BIOS 2-2 2.1.1 Creating a bootable floppy disk 2-2 2.1.2 ASUS EZ Flash utility 2-3 2.1.3 AFUDOS utility 2-4 2.1.4 ASUS CrashFree BIOS 2 utility 2-6 2.1.5 ASUS Update utility 2-8 2.2 BIOS setup program 2-11 2.2.1 BIOS menu screen 2-12 2.2.2 Menu bar 2-12 2.2.3 Navigation keys 2-12 2.2.4 Menu items 2-13 2.2.5 Sub-menu items 2-13...
Motherboard Installation Guide
Page 8
... Where to find more information Refer to perform when installing system components. ASUS websites The ASUS website provides updated information on the motherboard. • Chapter 2: BIOS setup This chapter tells how to the ASUS contact information. 2. Optional documentation Your product package may have to the following...documents are also provided. • Chapter 3: Software support This chapter describes the contents of the jumpers and connectors on ASUS hardware and software products. How this guide This user guide contains the information you have been added by your dealer. ...
... Where to find more information Refer to perform when installing system components. ASUS websites The ASUS website provides updated information on the motherboard. • Chapter 2: BIOS setup This chapter tells how to the ASUS contact information. 2. Optional documentation Your product package may have to the following...documents are also provided. • Chapter 3: Software support This chapter describes the contents of the jumpers and connectors on ASUS hardware and software products. How this guide This user guide contains the information you have been added by your dealer. ...

Motherboard Installation Guide
Page 11
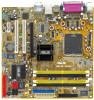
xi P5LD2-VM DH specifications summary BIOS features 8 Mb Flash ROM, AMI BIOS, PnP, WfM2.0, DMI2.0, SM BIOS 2.3, ASUS EZ Flash, CrashFree BIOS2, Intel Quick Resume Special features ASUS EZ Flash ASUS CrashFree BIOS 2 ASUS MyLogo™ ASUS CPR (CPU Parameter Recall) I n d u s t r y s t a n d a r d PCI 2.2, USB 2.0 Manageability WOR by Ring, WOL/WOR by PME, WO ...plugs) Form Factor Micro-ATX form factor: 9.6 in x 9.6 in Support CD contents Device drivers ASUS PC Probe II ASUS Live Update utility Anti-virus software (OEM version) *Specifications are subject to change without notice.
xi P5LD2-VM DH specifications summary BIOS features 8 Mb Flash ROM, AMI BIOS, PnP, WfM2.0, DMI2.0, SM BIOS 2.3, ASUS EZ Flash, CrashFree BIOS2, Intel Quick Resume Special features ASUS EZ Flash ASUS CrashFree BIOS 2 ASUS MyLogo™ ASUS CPR (CPU Parameter Recall) I n d u s t r y s t a n d a r d PCI 2.2, USB 2.0 Manageability WOR by Ring, WOL/WOR by PME, WO ...plugs) Form Factor Micro-ATX form factor: 9.6 in x 9.6 in Support CD contents Device drivers ASUS PC Probe II ASUS Live Update utility Anti-virus software (OEM version) *Specifications are subject to change without notice.

Motherboard Installation Guide
Page 15
...The GMCH provides the interface for details. You also need to the BIOS screen on page 2-33. See pages 3-4 and 3-5 for a processor in the BIOS. DDR2 memory support The motherboard supports DDR2 memory which features data transfer...cores with dedicated L2 caches to meet the higher bandwidth requirements of up to 8.5 GB/s. The Intel® ICH7 DH Southbridge represents the seventh generation I /O controller hub provide the vital interfaces for a thinner, lighter design without compromising... playback, and support for PCI Express and 8-channel high definition audio. ASUS P5LD2-VM DH 1-3
...The GMCH provides the interface for details. You also need to the BIOS screen on page 2-33. See pages 3-4 and 3-5 for a processor in the BIOS. DDR2 memory support The motherboard supports DDR2 memory which features data transfer...cores with dedicated L2 caches to meet the higher bandwidth requirements of up to 8.5 GB/s. The Intel® ICH7 DH Southbridge represents the seventh generation I /O controller hub provide the vital interfaces for a thinner, lighter design without compromising... playback, and support for PCI Express and 8-channel high definition audio. ASUS P5LD2-VM DH 1-3
Motherboard Installation Guide
Page 17
...When the system hangs due to use a DOS-based utility or boot from the support CD in case when the BIOS codes and data are corrupted. ASUS P5LD2-VM DH 1-5 ASUS MyLogo™ This new feature present in case the system hangs due to your system with customizable boot logos. See... page 2-35. feature of the motherboard BIOS allows automatic re-setting to the BIOS default settings in the motherboard ...
...When the system hangs due to use a DOS-based utility or boot from the support CD in case when the BIOS codes and data are corrupted. ASUS P5LD2-VM DH 1-5 ASUS MyLogo™ This new feature present in case the system hangs due to your system with customizable boot logos. See... page 2-35. feature of the motherboard BIOS allows automatic re-setting to the BIOS default settings in the motherboard ...

Motherboard Installation Guide
Page 32
... is completely seated on the next page. 3. Assign an IRQ to the tables on the slot. 5. Turn on BIOS setup. 2. Install the software drivers for information on the system and change the necessary BIOS settings, if any. The following sub-sections describe the slots and the expansion cards that they support. Make...
... is completely seated on the next page. 3. Assign an IRQ to the tables on the slot. 5. Turn on BIOS setup. 2. Install the software drivers for information on the system and change the necessary BIOS settings, if any. The following sub-sections describe the slots and the expansion cards that they support. Make...

Motherboard Installation Guide
Page 35
... on pins 2-3 for about 5~10 seconds, then move the cap back to pins 1-2. 4. Removing the cap will cause system boot failure! ® P5LD2-VM DH P5LD2-VM DH Clear RTC RAM CLRTC 12 23 Normal (Default) Clear CMOS You do not need to clear the RTC when the system hangs due to pins... the onboard battery. 3. Re-install the battery. 5. Shut down the key during the boot process and enter BIOS setup to default values. ASUS P5LD2-VM DH 1-23 Hold down and reboot the system so the BIOS can clear the CMOS memory of date, time, and system setup parameters by erasing the CMOS RTC RAM data...
... on pins 2-3 for about 5~10 seconds, then move the cap back to pins 1-2. 4. Removing the cap will cause system boot failure! ® P5LD2-VM DH P5LD2-VM DH Clear RTC RAM CLRTC 12 23 Normal (Default) Clear CMOS You do not need to clear the RTC when the system hangs due to pins... the onboard battery. 3. Re-install the battery. 5. Shut down the key during the boot process and enter BIOS setup to default values. ASUS P5LD2-VM DH 1-23 Hold down and reboot the system so the BIOS can clear the CMOS memory of date, time, and system setup parameters by erasing the CMOS RTC RAM data...

Motherboard Installation Guide
Page 46
... connector is for the system power LED. The system power LED lights up or flashes when data is read from or written to this connector. P5LD2-VM DH System panel connector The sytem panel connector is for the system power button. Pressing the power switch for more than four seconds while the system... LED connector (2-pin PWRLED) This 2-pin connector is color-coded for the HDD Activity LED. The IDE LED lights up when you turn on the BIOS settings. Pressing the power button turns the system ON or puts the system in SLEEP or SOFT-OFF mode depending on the system power, and...
... connector is for the system power LED. The system power LED lights up or flashes when data is read from or written to this connector. P5LD2-VM DH System panel connector The sytem panel connector is for the system power button. Pressing the power switch for more than four seconds while the system... LED connector (2-pin PWRLED) This 2-pin connector is color-coded for the HDD Activity LED. The IDE LED lights up when you turn on the BIOS settings. Pressing the power button turns the system ON or puts the system in SLEEP or SOFT-OFF mode depending on the system power, and...

Motherboard Installation Guide
Page 47
This chapter tells how to change the system settings through the BIOS Setup menus. Detailed descriptions of the BIOS parameters are also provided. 2 BIOS setup ASUS P5LD2-VM DH 2-1
This chapter tells how to change the system settings through the BIOS Setup menus. Detailed descriptions of the BIOS parameters are also provided. 2 BIOS setup ASUS P5LD2-VM DH 2-1

Motherboard Installation Guide
Page 48
...® 2000 environment To create a set of the following utilities allow you need to the optical drive. A S U S U p d a t e (Updates the BIOS in case you to create a bootable floppy disk. d. b. c. A S U S C r a s h F r e e B I O S 2 (Updates the BIOS using the ASUS Update or AFUDOS utilities. 2.1.1 Creating a bootable floppy disk 1. At the DOS prompt, type format A:/S then press . Insert a 1.44 MB...
...® 2000 environment To create a set of the following utilities allow you need to the optical drive. A S U S U p d a t e (Updates the BIOS in case you to create a bootable floppy disk. d. b. c. A S U S C r a s h F r e e B I O S 2 (Updates the BIOS using the ASUS Update or AFUDOS utilities. 2.1.1 Creating a bootable floppy disk 1. At the DOS prompt, type format A:/S then press . Insert a 1.44 MB...

Motherboard Installation Guide
Page 49
... successfully. error message appears if the correct BIOS file is found, EZ Flash performs the BIOS update process and automatically reboots the system when done. Make sure that you to update the BIOS without having to download the latest BIOS file for floppy... 4. ASUS P5LD2-VM DH 2-3 Visit the ASUS website (www.asus.com) to go through the long process...
... successfully. error message appears if the correct BIOS file is found, EZ Flash performs the BIOS update process and automatically reboots the system when done. Make sure that you to update the BIOS without having to download the latest BIOS file for floppy... 4. ASUS P5LD2-VM DH 2-3 Visit the ASUS website (www.asus.com) to go through the long process...

Motherboard Installation Guide
Page 50
... floppy disk you can use as shown. 1. Boot the system in DOS mode, then at least 600 KB free space to update the BIOS file in DOS environment using the AFUDOS utility: • Make sure that you created earlier. 2. Press . A:\>afudos /oOLDBIOS1.ROM AMI... reserved. Reading flash ..... A:\>afudos /oOLDBIOS1.ROM Main filename Extension name 3. The utility copies the current BIOS file to the DOS prompt after copying the current BIOS file. 2-4 Chapter 2: BIOS setup done A:\> The utility returns to the floppy disk. 2.1.3 AFUDOS utility The AFUDOS utility allows you ...
... floppy disk you can use as shown. 1. Boot the system in DOS mode, then at least 600 KB free space to update the BIOS file in DOS environment using the AFUDOS utility: • Make sure that you created earlier. 2. Press . A:\>afudos /oOLDBIOS1.ROM AMI... reserved. Reading flash ..... A:\>afudos /oOLDBIOS1.ROM Main filename Extension name 3. The utility copies the current BIOS file to the DOS prompt after copying the current BIOS file. 2-4 Chapter 2: BIOS setup done A:\> The utility returns to the floppy disk. 2.1.3 AFUDOS utility The AFUDOS utility allows you ...

Motherboard Installation Guide
Page 51
... American Megatrends, Inc. Updating the BIOS file To update the BIOS file using the AFUDOS utility: 1. Copy the AFUDOS utility (afudos.exe) from the hard disk drive. done Writing flash .... 0x0008CC00 (9%) Verifying flash .. Boot the system in DOS mode, then at the DOS prompt. 2. done A:\> ASUS P5LD2-VM DH 2-5 Save the BIOS file to prevent system boot...
... American Megatrends, Inc. Updating the BIOS file To update the BIOS file using the AFUDOS utility: 1. Copy the AFUDOS utility (afudos.exe) from the hard disk drive. done Writing flash .... 0x0008CC00 (9%) Verifying flash .. Boot the system in DOS mode, then at the DOS prompt. 2. done A:\> ASUS P5LD2-VM DH 2-5 Save the BIOS file to prevent system boot...

Motherboard Installation Guide
Page 52
...8226; Make sure that allows you rename the original or updated BIOS file in the floppy disk to P 5 L D 2 V M . Starting BIOS recovery... Floppy found , the utility reads the BIOS file and starts flashing the corrupted BIOS file. Reading file "P5LD2VM.ROM". DO NOT shut down or... with the original or updated BIOS file to restore the BIOS file when it fails or gets corrupted during the updating process. Restart the system after the utility completes the updating process. 2-6 Chapter 2: BIOS setup 2.1.4 ASUS CrashFree BIOS 2 utility The ASUS CrashFree BIOS 2 is an auto recovery tool...
...8226; Make sure that allows you rename the original or updated BIOS file in the floppy disk to P 5 L D 2 V M . Starting BIOS recovery... Floppy found , the utility reads the BIOS file and starts flashing the corrupted BIOS file. Reading file "P5LD2VM.ROM". DO NOT shut down or... with the original or updated BIOS file to restore the BIOS file when it fails or gets corrupted during the updating process. Restart the system after the utility completes the updating process. 2-6 Chapter 2: BIOS setup 2.1.4 ASUS CrashFree BIOS 2 utility The ASUS CrashFree BIOS 2 is an auto recovery tool...

Motherboard Installation Guide
Page 53
... the following message and automatically checks the floppy disk for floppy... ASUS P5LD2-VM DH 2-7 Bad BIOS checksum. Starting BIOS recovery... Checking for the original or updated BIOS file. Start flashing... DO NOT shut down or reset the system while updating the BIOS! Checking for this motherboard. Bad BIOS checksum. Restart the system after the utility completes the updating...
... the following message and automatically checks the floppy disk for floppy... ASUS P5LD2-VM DH 2-7 Bad BIOS checksum. Starting BIOS recovery... Checking for the original or updated BIOS file. Start flashing... DO NOT shut down or reset the system while updating the BIOS! Checking for this motherboard. Bad BIOS checksum. Restart the system after the utility completes the updating...

Motherboard Installation Guide
Page 54
... information. This utility is available in the support CD that allows you to manage, save, and update the motherboard BIOS in the optical drive. 2.1.5 ASUS Update utility The ASUS Update is a utility that comes with the motherboard package. Click the U t i l i t i e s tab, then click I n s t a l l A S U S U p d a t e V X . Quit all Windows® applications before you to your system...
... information. This utility is available in the support CD that allows you to manage, save, and update the motherboard BIOS in the optical drive. 2.1.5 ASUS Update utility The ASUS Update is a utility that comes with the motherboard package. Click the U t i l i t i e s tab, then click I n s t a l l A S U S U p d a t e V X . Quit all Windows® applications before you to your system...

Motherboard Installation Guide
Page 55
Click N e x t. ASUS P5LD2-VM DH 2-9 Launch the ASUS Update utility from the nearest you to avoid network drop-down menu, then click traffic, or click A u t o S e l e c t. N e x t. Updating the BIOS through the Internet To update the BIOS through the Internet: 1. Select the ASUS FTP site t h e I O S f r o m 3. Select U p d a t e B I n t e r n e t option from the Windows® desktop by clicking S t a r t > P r o g r a m s > A S U S > A S U S U p d a t e > A S U S U p d a t e. The ASUS Update main window appears. 2.
Click N e x t. ASUS P5LD2-VM DH 2-9 Launch the ASUS Update utility from the nearest you to avoid network drop-down menu, then click traffic, or click A u t o S e l e c t. N e x t. Updating the BIOS through the Internet To update the BIOS through the Internet: 1. Select the ASUS FTP site t h e I O S f r o m 3. Select U p d a t e B I n t e r n e t option from the Windows® desktop by clicking S t a r t > P r o g r a m s > A S U S > A S U S U p d a t e > A S U S U p d a t e. The ASUS Update main window appears. 2.

Motherboard Installation Guide
Page 56
... that you wish to complete the update process. Updating the BIOS through a BIOS file To update the BIOS through the Internet. Always update the utility to complete the update process. 2-10 Chapter 2: BIOS setup Launch the ASUS Update utility from the O p e n window, then click S a v e. 4. Follow the screen instructions to avail all its features. Click Next...
... that you wish to complete the update process. Updating the BIOS through a BIOS file To update the BIOS through the Internet. Always update the utility to complete the update process. 2-10 Chapter 2: BIOS setup Launch the ASUS Update utility from the O p e n window, then click S a v e. 4. Follow the screen instructions to avail all its features. Click Next...

Motherboard Installation Guide
Page 57
...system by pressing , or by turning the system off and then back on the motherboard stores the Setup utility. ASUS P5LD2-VM DH 2-11 Use the BIOS Setup program when you with its test routines. When you start up the computer, the system provides you are for...u l t S e t t i n g s item under the Exit Menu. This section explains how to configure your screen. • Visit the ASUS website (www.asus.com) to download the latest BIOS file for most conditions to "Run Setup". The firmware hub on . You can change the power management settings. Being a menu-driven program, it as easy ...
...system by pressing , or by turning the system off and then back on the motherboard stores the Setup utility. ASUS P5LD2-VM DH 2-11 Use the BIOS Setup program when you with its test routines. When you start up the computer, the system provides you are for...u l t S e t t i n g s item under the Exit Menu. This section explains how to configure your screen. • Visit the ASUS website (www.asus.com) to download the latest BIOS file for most conditions to "Run Setup". The firmware hub on . You can change the power management settings. Being a menu-driven program, it as easy ...

Motherboard Installation Guide
Page 58
Use the navigation keys to select a field. 2.2.1 BIOS menu screen Menu items Menu bar Configuration fields General help System Time System Date Legacy Diskette A Primary IDE Master Primary IDE Slave Third IDE Master .... 2.2.3 Navigation keys At the bottom right corner of the navigation keys differ from one screen to configure system time. Use [+] or [-] to another. 2-12 Chapter 2: BIOS setup
Use the navigation keys to select a field. 2.2.1 BIOS menu screen Menu items Menu bar Configuration fields General help System Time System Date Legacy Diskette A Primary IDE Master Primary IDE Slave Third IDE Master .... 2.2.3 Navigation keys At the bottom right corner of the navigation keys differ from one screen to configure system time. Use [+] or [-] to another. 2-12 Chapter 2: BIOS setup


