
User Manual
Page 12
... with the cap on the socket and the socket contacts are not bent. Optical drive audio connector (4-pin CD) 1-12 16. ASUS will shoulder the cost of the PnP cap. IDE connector (40-1 pin PRI_IDE) 8. Floppy disk drive connector (34-1 pin FLOPPY...14. ASUS will process Return Merchandise Authorization (RMA) requests only if the motherboard comes with the Intel® Enhanced Intel SpeedStep® Technology (EIST) and Hyper-Threading Technology. 1-3 ASUS P5G41T-M LX2 Series ATX power connectors (24-pin EATXPWR, 4-pin ATX12V) 3. Keyboard power (3-pin KBPWR) 2. Clear RTC RAM (3-pin...
... with the cap on the socket and the socket contacts are not bent. Optical drive audio connector (4-pin CD) 1-12 16. ASUS will shoulder the cost of the PnP cap. IDE connector (40-1 pin PRI_IDE) 8. Floppy disk drive connector (34-1 pin FLOPPY...14. ASUS will process Return Merchandise Authorization (RMA) requests only if the motherboard comes with the Intel® Enhanced Intel SpeedStep® Technology (EIST) and Hyper-Threading Technology. 1-3 ASUS P5G41T-M LX2 Series ATX power connectors (24-pin EATXPWR, 4-pin ATX12V) 3. Keyboard power (3-pin KBPWR) 2. Clear RTC RAM (3-pin...
User Manual
Page 16
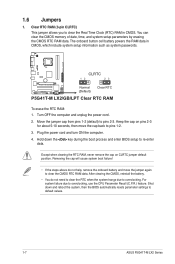
...key during the boot process and enter BIOS setup to default values. 1-7 ASUS P5G41T-M LX2 Series 1.6 Jumpers 1. You can clear the CMOS memory of date, time, and system setup parameters by erasing the CMOS RTC RAM data. Move the jumper cap from pins 1-2 (default) to overclocking, ...3. Turn OFF the computer and unplug the power cord. 2. CLRTC 12 23 P5G41T-M LX2/GB/LPT Normal (Default) Clear RTC P5G41T-M LX2/GB/LPT Clear RTC RAM To erase the RTC RAM: 1. The onboard button cell battery powers the RAM data in CMOS. After clearing the CMOS, reinstall the battery. • You ...
...key during the boot process and enter BIOS setup to default values. 1-7 ASUS P5G41T-M LX2 Series 1.6 Jumpers 1. You can clear the CMOS memory of date, time, and system setup parameters by erasing the CMOS RTC RAM data. Move the jumper cap from pins 1-2 (default) to overclocking, ...3. Turn OFF the computer and unplug the power cord. 2. CLRTC 12 23 P5G41T-M LX2/GB/LPT Normal (Default) Clear RTC P5G41T-M LX2/GB/LPT Clear RTC RAM To erase the RTC RAM: 1. The onboard button cell battery powers the RAM data in CMOS. After clearing the CMOS, reinstall the battery. • You ...
User Manual
Page 39
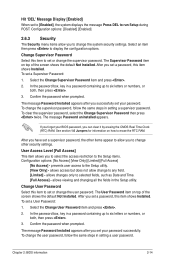
... to set or change the supervisor password. Select the Change User Password item and press . 2. The Supervisor Password item on how to erase the RTC RAM. In the password box, key in a password containing up to six letters or numbers, or both , then press . 3. To clear the supervisor ... user access to display the configuration options. The message Password Installed appears after you can clear it by erasing the CMOS Real Time Clock (RTC) RAM. To change the system security settings. Select an item then press to the Setup utility. [View Only] - After you set a password, this ...
... to set or change the supervisor password. Select the Change User Password item and press . 2. The Supervisor Password item on how to erase the RTC RAM. In the password box, key in a password containing up to six letters or numbers, or both , then press . 3. To clear the supervisor ... user access to display the configuration options. The message Password Installed appears after you can clear it by erasing the CMOS Real Time Clock (RTC) RAM. To change the system security settings. Select an item then press to the Setup utility. [View Only] - After you set a password, this ...


