User Manual
Page 11
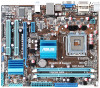
...you start installing the motherboard, and hardware devices on it another standout in the 45nm manufacturing process. ASUS P5G41T-M LE 1-1 This motherboard also supports Intel® CPUs in the long line of the above items is ... with the list below. 1.2 Package contents Check your motherboard package for buying an ASUS® P5G41T-M LE motherboard! Chapter 1 Product introduction 1.1 Welcome! Before you for the following items. Motherboard Cables Accessories Application DVD Documentation ASUS P5G41T-M LE motherboard 2 x Serial ATA cables 1 x Ultra DMA 100/66/33 cable ...
...you start installing the motherboard, and hardware devices on it another standout in the 45nm manufacturing process. ASUS P5G41T-M LE 1-1 This motherboard also supports Intel® CPUs in the long line of the above items is ... with the list below. 1.2 Package contents Check your motherboard package for buying an ASUS® P5G41T-M LE motherboard! Chapter 1 Product introduction 1.1 Welcome! Before you for the following items. Motherboard Cables Accessories Application DVD Documentation ASUS P5G41T-M LE motherboard 2 x Serial ATA cables 1 x Ultra DMA 100/66/33 cable ...
User Manual
Page 13
... flash disk that allows you to safeguard consumers' health while minimizing the impact on your screen. ASUS MyLogo2™ This feature allows you to 100 meters at least 1.2GB free disk space. ASUS P5G41T-M LE 1-3 ASUS AI NET2 ASUS AI NET2 remotely detects the cable connection immediately after turning on SATA HDDs, USB HDDs and flash...
... flash disk that allows you to safeguard consumers' health while minimizing the impact on your screen. ASUS MyLogo2™ This feature allows you to 100 meters at least 1.2GB free disk space. ASUS P5G41T-M LE 1-3 ASUS AI NET2 ASUS AI NET2 remotely detects the cable connection immediately after turning on SATA HDDs, USB HDDs and flash...
User Manual
Page 15
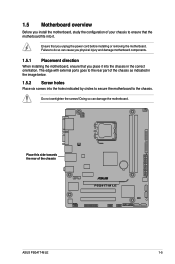
... six screws into the holes indicated by circles to secure the motherboard to ensure that you install the motherboard, study the configuration of the chassis ASUS P5G41T-M LE 1-5
... six screws into the holes indicated by circles to secure the motherboard to ensure that you install the motherboard, study the configuration of the chassis ASUS P5G41T-M LE 1-5
User Manual
Page 17
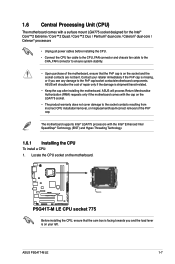
... processors with the cap on the LGA775 socket. • The product warranty does not cover damage to the PnP cap/socket contacts/motherboard components. ASUS P5G41T-M LE 1-7 1.6 Central Processing Unit (CPU) The motherboard comes with a surface mount LGA775 socket designed for the Intel® Core™2 Extreme /... of repair only if the damage is on the socket and the socket contacts are not bent. ASUS will shoulder the cost of the PnP cap. ASUS will process Return Merchandise Authorization (RMA) requests only if the motherboard comes with the Intel® Enhanced...
... processors with the cap on the LGA775 socket. • The product warranty does not cover damage to the PnP cap/socket contacts/motherboard components. ASUS P5G41T-M LE 1-7 1.6 Central Processing Unit (CPU) The motherboard comes with a surface mount LGA775 socket designed for the Intel® Core™2 Extreme /... of repair only if the damage is on the socket and the socket contacts are not bent. ASUS will shoulder the cost of the PnP cap. ASUS will process Return Merchandise Authorization (RMA) requests only if the motherboard comes with the Intel® Enhanced...

User Manual
Page 19
... step. Close the load plate (A), then push the load lever (B) until it gets into the A retention tab. Some heatsinks come with pre-applied thermal paste. B ASUS P5G41T-M LE 1-9
... step. Close the load plate (A), then push the load lever (B) until it gets into the A retention tab. Some heatsinks come with pre-applied thermal paste. B ASUS P5G41T-M LE 1-9
User Manual
Page 21
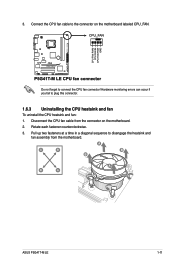
3. Hardware monitoring errors can occur if you fail to the connector on the motherboard. 2. A A B B B A B A ASUS P5G41T-M LE 1-11 Rotate each fastener counterclockwise. 3. Disconnect the CPU fan cable from the motherboard. Pull up two fasteners at a time in a diagonal sequence to connect the CPU fan connector! Connect the CPU fan cable to plug this connector. 1.6.3 Uninstalling the CPU heatsink and fan To uninstall the CPU heatsink and fan: 1. Do not forget to disengage the heatsink and fan assembly from the connector on the motherboard labeled CPU_FAN.
3. Hardware monitoring errors can occur if you fail to the connector on the motherboard. 2. A A B B B A B A ASUS P5G41T-M LE 1-11 Rotate each fastener counterclockwise. 3. Disconnect the CPU fan cable from the motherboard. Pull up two fasteners at a time in a diagonal sequence to connect the CPU fan connector! Connect the CPU fan cable to plug this connector. 1.6.3 Uninstalling the CPU heatsink and fan To uninstall the CPU heatsink and fan: 1. Do not forget to disengage the heatsink and fan assembly from the connector on the motherboard labeled CPU_FAN.
User Manual
Page 23
...; • Micron 9HF22D9KPT 7- • • Samsung SEC 901 HCF8 K4B1G0846E - - • • SAMSUNG 846 K4B2G0846B-HCF8 -- • • ASUS P5G41T-M LE 1-13 Install a 64-bit Windows® OS when you want to install 4GB or more efficient cooling system to the memory address limitation on 32...-bit Windows® OS, when you are using a 32-bit Windows® OS. - P5G41T-M LE Motherboard Qualified Vendors Lists (QVL) DDR3-1066 MHz capability Vendor Part No. Use a maximum of the following: - 1.7.2 Memory configurations...
...; • Micron 9HF22D9KPT 7- • • Samsung SEC 901 HCF8 K4B1G0846E - - • • SAMSUNG 846 K4B2G0846B-HCF8 -- • • ASUS P5G41T-M LE 1-13 Install a 64-bit Windows® OS when you want to install 4GB or more efficient cooling system to the memory address limitation on 32...-bit Windows® OS, when you are using a 32-bit Windows® OS. - P5G41T-M LE Motherboard Qualified Vendors Lists (QVL) DDR3-1066 MHz capability Vendor Part No. Use a maximum of the following: - 1.7.2 Memory configurations...

User Manual
Page 25
... one direction. Support the DIMM lightly with a notch so that it flips out with extra force. 1 2. Remove the DIMM from the socket. 2 1 DDR3 DIMM notch ASUS P5G41T-M LE 1-15 Failure to do so can cause severe damage to unlock a DDR3 DIMM socket. 2. Align a DIMM on the socket such that the notch on the...
... one direction. Support the DIMM lightly with a notch so that it flips out with extra force. 1 2. Remove the DIMM from the socket. 2 1 DDR3 DIMM notch ASUS P5G41T-M LE 1-15 Failure to do so can cause severe damage to unlock a DDR3 DIMM socket. 2. Align a DIMM on the socket such that the notch on the...
User Manual
Page 27
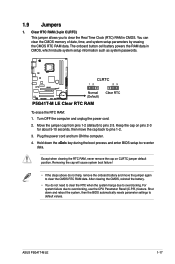
... pins 1-2. 3. After clearing the CMOS, reinstall the battery. • You do not help, remove the onboard battery and move the cap back to default values. ASUS P5G41T-M LE 1-17 1.9 Jumpers 1. To erase the RTC RAM: 1. Plug the power cord and turn ON the computer. 4. The onboard button cell battery powers the RAM data...
... pins 1-2. 3. After clearing the CMOS, reinstall the battery. • You do not help, remove the onboard battery and move the cap back to default values. ASUS P5G41T-M LE 1-17 1.9 Jumpers 1. To erase the RTC RAM: 1. Plug the power cord and turn ON the computer. 4. The onboard button cell battery powers the RAM data...
User Manual
Page 29
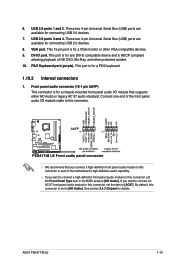
... in the BIOS setup to [AC97]. See section 2.4.3 Chipset for connecting USB 2.0 devices. 7. These two 4-pin Universal Serial Bus (USB) ports are available for details. ASUS P5G41T-M LE 1-19 Connect one end of the front panel audio I /O module that you want to connect a high-definition front panel audio module to this connector, set...
... in the BIOS setup to [AC97]. See section 2.4.3 Chipset for connecting USB 2.0 devices. 7. These two 4-pin Universal Serial Bus (USB) ports are available for details. ASUS P5G41T-M LE 1-19 Connect one end of the front panel audio I /O module that you want to connect a high-definition front panel audio module to this connector, set...
User Manual
Page 31
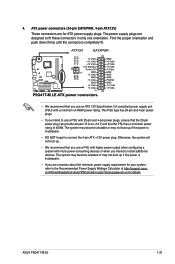
... intend to the Recommended Power Supply Wattage Calculator at least 15 A on +12 V and that the PSU has a minimum power rating of 400W power rating. ASUS P5G41T-M LE 1-21 Otherwise, the system will not boot up if the power is inadequate. • DO NOT forget to install additional devices. 4. The power supply plugs...
... intend to the Recommended Power Supply Wattage Calculator at least 15 A on +12 V and that the PSU has a minimum power rating of 400W power rating. ASUS P5G41T-M LE 1-21 Otherwise, the system will not boot up if the power is inadequate. • DO NOT forget to install additional devices. 4. The power supply plugs...
User Manual
Page 33
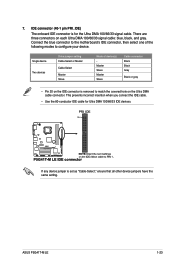
... or gray • Pin 20 on the IDE connector is removed to configure your device. There are three connectors on the Ultra DMA cable connector. ASUS P5G41T-M LE 1-23
... or gray • Pin 20 on the IDE connector is removed to configure your device. There are three connectors on the Ultra DMA cable connector. ASUS P5G41T-M LE 1-23

User Manual
Page 35
ASUS P5G41T-M LE 1-25 These USB connectors comply with USB 2.0 specification that supports up to the USB connectors. LPT connector (26-1 pin LPT) The LPT (Line Printing Terminal) ...
ASUS P5G41T-M LE 1-25 These USB connectors comply with USB 2.0 specification that supports up to the USB connectors. LPT connector (26-1 pin LPT) The LPT (Line Printing Terminal) ...
User Manual
Page 37
... allows you need to avoid network traffic, or click Auto Select then click Next. Copy the original motherboard BIOS using this utility. ASUS P5G41T-M LE 2-1 Place the support DVD in the future. Updating the BIOS To update the BIOS: 1. Follow the onscreen instructions to manage, ...save, and update the motherboard BIOS in Windows® environment. • ASUS Update requires an Internet connection either through a network or an Internet Service Provider (ISP). • This utility is a utility that you to...
... allows you need to avoid network traffic, or click Auto Select then click Next. Copy the original motherboard BIOS using this utility. ASUS P5G41T-M LE 2-1 Place the support DVD in the future. Updating the BIOS To update the BIOS: 1. Follow the onscreen instructions to manage, ...save, and update the motherboard BIOS in Windows® environment. • ASUS Update requires an Internet connection either through a network or an Internet Service Provider (ISP). • This utility is a utility that you to...
User Manual
Page 39
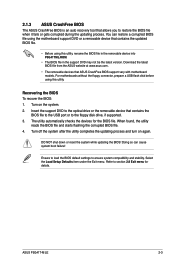
...again. The utility automatically checks the devices for details. Select the Load Setup Defaults item under the Exit menu. ASUS P5G41T-M LE 2-3 Download the latest BIOS file from the ASUS website at www.asus.com. • The removable devices that contains the BIOS file to the USB port or to the optical ...drive or the removable device that ASUS CrashFree BIOS support vary with motherboard models. Turn off the system after the utility completes the updating process and turn on the system. ...
...again. The utility automatically checks the devices for details. Select the Load Setup Defaults item under the Exit menu. ASUS P5G41T-M LE 2-3 Download the latest BIOS file from the ASUS website at www.asus.com. • The removable devices that contains the BIOS file to the USB port or to the optical ...drive or the removable device that ASUS CrashFree BIOS support vary with motherboard models. Turn off the system after the utility completes the updating process and turn on the system. ...
User Manual
Page 41
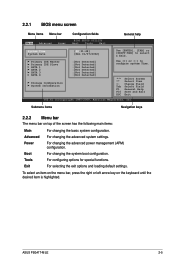
... Item +- Exit For selecting the exit options and loading default settings. Advanced For changing the advanced system settings. Boot For changing the system boot configuration. ASUS P5G41T-M LE 2-5 Power For changing the advanced power management (APM) configuration. Primary IDE Master :[Not Detected] Primary IDE Slave :[Not Detected] SATA 1 :[Not Detected] SATA 2 :[Not Detected...
... Item +- Exit For selecting the exit options and loading default settings. Advanced For changing the advanced system settings. Boot For changing the system boot configuration. ASUS P5G41T-M LE 2-5 Power For changing the advanced power management (APM) configuration. Primary IDE Master :[Not Detected] Primary IDE Slave :[Not Detected] SATA 1 :[Not Detected] SATA 2 :[Not Detected...
User Manual
Page 43
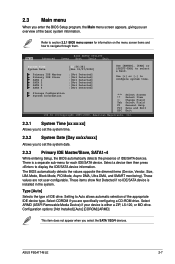
... for each IDE/SATA device. Refer to configure system time. These items show Not Detected if no IDE/SATA device is installed in the system. ASUS P5G41T-M LE 2-7
... for each IDE/SATA device. Refer to configure system time. These items show Not Detected if no IDE/SATA device is installed in the system. ASUS P5G41T-M LE 2-7
User Manual
Page 45
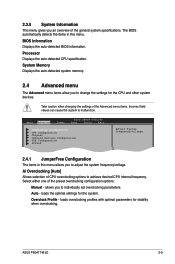
Take caution when changing the settings of the general system specifications. loads the optimal settings for stability when overclocking. ASUS P5G41T-M LE 2-9 Processor Displays the auto-detected CPU specification. Select either one of CPU overclocking options to malfunction. loads overclocking profiles with optimal parameters for the system. ...
Take caution when changing the settings of the general system specifications. loads the optimal settings for stability when overclocking. ASUS P5G41T-M LE 2-9 Processor Displays the auto-detected CPU specification. Select either one of CPU overclocking options to malfunction. loads overclocking profiles with optimal parameters for the system. ...
User Manual
Page 47
... 1.12500V to adjust the voltage. Configuration option: [Auto] • If an invalid ratio is set in the value directly or use +/- Configuration options: [Disabled] [Enabled] ASUS P5G41T-M LE 2-11 to 0.6300V with extended CPUID functions. Configuration options: [1.5V] [1.6V] Auto PSI [Enabled] Allows you to enable or disable the Auto PSI mode. Configuration...
... 1.12500V to adjust the voltage. Configuration option: [Auto] • If an invalid ratio is set in the value directly or use +/- Configuration options: [Disabled] [Enabled] ASUS P5G41T-M LE 2-11 to 0.6300V with extended CPUID functions. Configuration options: [1.5V] [1.6V] Auto PSI [Enabled] Allows you to enable or disable the Auto PSI mode. Configuration...
User Manual
Page 49
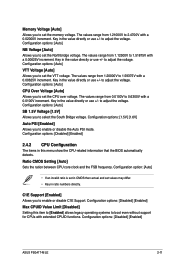
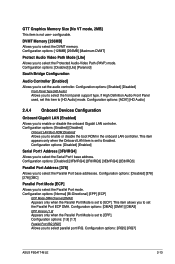
...] [2F8/IRQ3] [3E8/IRQ4] [2E8/IRQ3] Parallel Port Address [378] Allows you to enable or disable the onboard Gigabit LAN controller. Configuration options: [IRQ5] [IRQ7] ASUS P5G41T-M LE 2-13 GTT Graphics Memory Size [No VT mode, 2MB] This item is set to [EPP]. configurable. Configuration options: [DMA0] [DMA1] [DMA3] EPP Version [1.9] Appears only...
...] [2F8/IRQ3] [3E8/IRQ4] [2E8/IRQ3] Parallel Port Address [378] Allows you to enable or disable the onboard Gigabit LAN controller. Configuration options: [IRQ5] [IRQ7] ASUS P5G41T-M LE 2-13 GTT Graphics Memory Size [No VT mode, 2MB] This item is set to [EPP]. configurable. Configuration options: [DMA0] [DMA1] [DMA3] EPP Version [1.9] Appears only...


