User Manual
Page 4
...11 Software support 1-26 1.11.1 Installing an operating system 1-26 1.11.2 Support DVD information 1-26 Chapter 2: BIOS information 2.1 Managing and updating your BIOS 2-1 2.1.1 ASUS Update utility 2-1 2.1.2 ASUS EZ Flash 2 2-2 2.1.3 ASUS CrashFree BIOS 2-3 2.2 BIOS setup program 2-4 2.2.1 BIOS menu screen 2-5 2.2.2 Menu bar 2-5 2.2.3 Navigation keys 2-6 2.2.4 Menu items 2-6 2.2.5 Submenu items 2-6 2.2.6 Configuration fields 2-6 2.2.7 Pop-up window 2-6 2.2.8 Scroll bar 2-6 2.2.9 General help 2-6 2.3 Main menu 2-7 2.3.1 System Time 2-7 2.3.2 System Date 2-7 2.3.3 Primary IDE...
...11 Software support 1-26 1.11.1 Installing an operating system 1-26 1.11.2 Support DVD information 1-26 Chapter 2: BIOS information 2.1 Managing and updating your BIOS 2-1 2.1.1 ASUS Update utility 2-1 2.1.2 ASUS EZ Flash 2 2-2 2.1.3 ASUS CrashFree BIOS 2-3 2.2 BIOS setup program 2-4 2.2.1 BIOS menu screen 2-5 2.2.2 Menu bar 2-5 2.2.3 Navigation keys 2-6 2.2.4 Menu items 2-6 2.2.5 Submenu items 2-6 2.2.6 Configuration fields 2-6 2.2.7 Pop-up window 2-6 2.2.8 Scroll bar 2-6 2.2.9 General help 2-6 2.3 Main menu 2-7 2.3.1 System Time 2-7 2.3.2 System Date 2-7 2.3.3 Primary IDE...
User Manual
Page 10
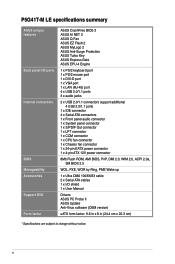
... ASUS Turbo Key ASUS Express Gate ASUS EPU-4 Engine 1 x PS/2 keyboard port 1 x PS/2 mouse port 1 x DVI-D port 1 x VGA port 1 x LAN (RJ-45) port 4 x USB 2.0/1.1 ports 3 x audio jacks 2 x USB 2.0/1.1 connectors support additional 4 USB 2.0/1.1 ports 1 x IDE connector 4 x Serial ATA connectors 1 x Front panel audio connector 1 x System panel connector 1 x S/PDIF Out connector 1 x LPT connector 1 x COM connector 1 x CPU fan connector 1 x Chassis fan connector 1 x 24-pin EATX power connector 1 x 4-pin ATX 12V power connector 8Mb Flash ROM, AMI BIOS, PnP, DMI 2.0, WfM 2.0, ACPI 2.0a, SM BIOS 2.5 WOL...
... ASUS Turbo Key ASUS Express Gate ASUS EPU-4 Engine 1 x PS/2 keyboard port 1 x PS/2 mouse port 1 x DVI-D port 1 x VGA port 1 x LAN (RJ-45) port 4 x USB 2.0/1.1 ports 3 x audio jacks 2 x USB 2.0/1.1 connectors support additional 4 USB 2.0/1.1 ports 1 x IDE connector 4 x Serial ATA connectors 1 x Front panel audio connector 1 x System panel connector 1 x S/PDIF Out connector 1 x LPT connector 1 x COM connector 1 x CPU fan connector 1 x Chassis fan connector 1 x 24-pin EATX power connector 1 x 4-pin ATX 12V power connector 8Mb Flash ROM, AMI BIOS, PnP, DMI 2.0, WfM 2.0, ACPI 2.0a, SM BIOS 2.5 WOL...
User Manual
Page 12
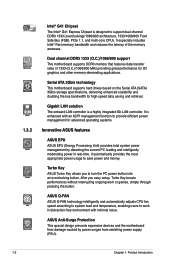
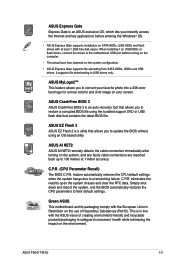
... Express Chipset is designed to turn the PC power button into an overclocking button. Serial ATA 3Gb/s technology This motherboard supports hard drives based on the Serial ATA (SATA) 3Gb/s storage specifications, delivering enhanced scalability and doubling the bus bandwidth for 3D graphics and other memory-demanding applications. Gigabit LAN solution The onboard LAN controller is a highly integrated Gb LAN controller. After you to support dual-channel DDR3 1333 (overclocking)/1066/800 architecture, 1333/1066/800 Front Side Bus (FSB), PCIe 1.1, and mutli-core...
... Express Chipset is designed to turn the PC power button into an overclocking button. Serial ATA 3Gb/s technology This motherboard supports hard drives based on the Serial ATA (SATA) 3Gb/s storage specifications, delivering enhanced scalability and doubling the bus bandwidth for 3D graphics and other memory-demanding applications. Gigabit LAN solution The onboard LAN controller is a highly integrated Gb LAN controller. After you to support dual-channel DDR3 1333 (overclocking)/1066/800 architecture, 1333/1066/800 Front Side Bus (FSB), PCIe 1.1, and mutli-core...
User Manual
Page 13
... BIOS automatically restores the CPU parameters to USB drives only. This is an auto-recovery tool that contains the latest BIOS file. When installing it on USB HDDs or flash drives, connect the drives to update the BIOS without using the bundled support DVD or USB flash disk that allows you to the motherboard USB port before entering the Windows® OS. • ASUS Express Gate supports installation on SATA HDDs, USB HDDs and flash drives with the ASUS vision of Hazardous Substances (RoHS). C.P.R. It supports file downloading to their default settings. ASUS AI NET2 ASUS...
... BIOS automatically restores the CPU parameters to USB drives only. This is an auto-recovery tool that contains the latest BIOS file. When installing it on USB HDDs or flash drives, connect the drives to update the BIOS without using the bundled support DVD or USB flash disk that allows you to the motherboard USB port before entering the Windows® OS. • ASUS Express Gate supports installation on SATA HDDs, USB HDDs and flash drives with the ASUS vision of Hazardous Substances (RoHS). C.P.R. It supports file downloading to their default settings. ASUS AI NET2 ASUS...
User Manual
Page 23
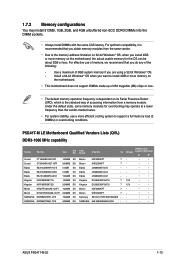
...; ASUS P5G41T-M LE 1-13 Use a maximum of 3GB system memory if you want to install 4GB or more memory on the motherboard. • This motherboard does not support DIMMs made up of 256 megabits (Mb) chips or less. • The default memory operation frequency is dependent on its Serial Presence Detect (SPD), which is recommended that you install 4GB or more efficient cooling system to support a full memory load...
...; ASUS P5G41T-M LE 1-13 Use a maximum of 3GB system memory if you want to install 4GB or more memory on the motherboard. • This motherboard does not support DIMMs made up of 256 megabits (Mb) chips or less. • The default memory operation frequency is dependent on its Serial Presence Detect (SPD), which is recommended that you install 4GB or more efficient cooling system to support a full memory load...
User Manual
Page 26
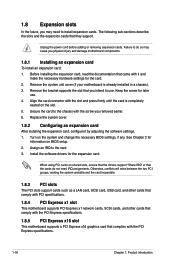
... use . 4. Install the software drivers for information on the system and change the necessary BIOS settings, if any. Remove the bracket opposite the slot that complies with the screw you removed earlier. 6. Otherwise, conflicts will arise between the two PCI groups, making the system unstable and the card inoperable. 1.8.3 PCI slots The PCI slots support cards such as a LAN card, SCSI card, USB card, and other cards that comply with PCI specifications. 1.8.4 PCI Express x1 slot This motherboard supports PCI Express x1 network cards, SCSI cards...
... use . 4. Install the software drivers for information on the system and change the necessary BIOS settings, if any. Remove the bracket opposite the slot that complies with the screw you removed earlier. 6. Otherwise, conflicts will arise between the two PCI groups, making the system unstable and the card inoperable. 1.8.3 PCI slots The PCI slots support cards such as a LAN card, SCSI card, USB card, and other cards that comply with PCI specifications. 1.8.4 PCI Express x1 slot This motherboard supports PCI Express x1 network cards, SCSI cards...
User Manual
Page 36
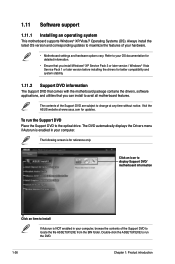
...; Motherboard settings and hardware options vary. Double-click the ASSETUP.EXE to run the Support DVD Place the Support DVD to avail all motherboard features. Always install the latest OS version and corresponding updates to maximize the features of the Support DVD to change at www.asus.com for updates. The DVD automatically displays the Drivers menu if Autorun is enabled in your computer. 1.11 Software support 1.11.1 Installing an operating system This motherboard supports Windows®...
...; Motherboard settings and hardware options vary. Double-click the ASSETUP.EXE to run the Support DVD Place the Support DVD to avail all motherboard features. Always install the latest OS version and corresponding updates to maximize the features of the Support DVD to change at www.asus.com for updates. The DVD automatically displays the Drivers menu if Autorun is enabled in your computer. 1.11 Software support 1.11.1 Installing an operating system This motherboard supports Windows®...
User Manual
Page 37
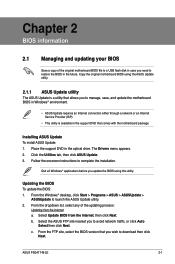
... click Auto Select then click Next. From the dropdown list, select any of the original motherboard BIOS file to a USB flash disk in case you need to manage, save, and update the motherboard BIOS in Windows® environment. • ASUS Update requires an Internet connection either through a network or an Internet Service Provider (ISP). • This utility is a utility that allows you to launch the ASUS Update utility. 2. The Drivers menu appears. 2. Select the ASUS FTP...
... click Auto Select then click Next. From the dropdown list, select any of the original motherboard BIOS file to a USB flash disk in case you need to manage, save, and update the motherboard BIOS in Windows® environment. • ASUS Update requires an Internet connection either through a network or an Internet Service Provider (ISP). • This utility is a utility that allows you to launch the ASUS Update utility. 2. The Drivers menu appears. 2. Select the ASUS FTP...
User Manual
Page 38
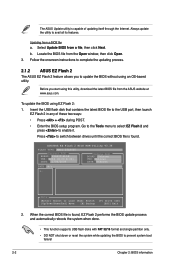
... Flash 2 BIOS ROM Utility V3.36 FLASH TYPE: MXIC 25L8005 Current ROM BOARD: P5G41T-M-LE VER: 0204 (H:00 B:02) DATE: 11/04/2009 Update ROM BOARD: Unknown VER: Unknown DATE: Unknown PATH: A:\ A: Note [Enter] Select or Load [Tab] Switch [Up/Down/Home/End] Move [B] Backup [V] Drive Info [ESC] Exit 2. The ASUS Update utility is capable of these two ways: • Press + during POST. • Enter the BIOS setup program. Before you to prevent system boot failure...
... Flash 2 BIOS ROM Utility V3.36 FLASH TYPE: MXIC 25L8005 Current ROM BOARD: P5G41T-M-LE VER: 0204 (H:00 B:02) DATE: 11/04/2009 Update ROM BOARD: Unknown VER: Unknown DATE: Unknown PATH: A:\ A: Note [Enter] Select or Load [Tab] Switch [Up/Down/Home/End] Move [B] Backup [V] Drive Info [ESC] Exit 2. The ASUS Update utility is capable of these two ways: • Press + during POST. • Enter the BIOS setup program. Before you to prevent system boot failure...
User Manual
Page 39
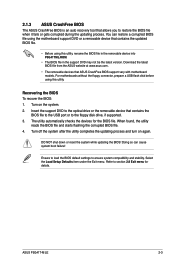
... motherboards without the floppy connector, prepare a USB flash disk before using this utility. 2.1.3 ASUS CrashFree BIOS The ASUS CrashFree BIOS is an auto recovery tool that allows you to the floppy disk drive, if supported. 3. Insert the support DVD to the optical drive or the removable device that ASUS CrashFree BIOS support vary with motherboard models. Select the Load Setup Defaults item under the Exit menu. Download the latest BIOS file from the ASUS website at www.asus.com. • The removable devices that contains the BIOS file to the USB port or...
... motherboards without the floppy connector, prepare a USB flash disk before using this utility. 2.1.3 ASUS CrashFree BIOS The ASUS CrashFree BIOS is an auto recovery tool that allows you to the floppy disk drive, if supported. 3. Insert the support DVD to the optical drive or the removable device that ASUS CrashFree BIOS support vary with motherboard models. Select the Load Setup Defaults item under the Exit menu. Download the latest BIOS file from the ASUS website at www.asus.com. • The removable devices that contains the BIOS file to the USB port or...
User Manual
Page 42
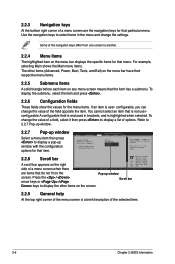
... (C)Copyright 1985-2009, American, American Megatrends, Inc. are the navigation keys for that particular menu. Main Advanced BIOS SETUP UTILITY Power Boot Tools Exit Suspend Mode ACPI 2.0 Support ACPI APIC support APM Configuration Hardware Monitor [Auto] [Disabled] [EDniOsapabtbilloendesd] Enabled Use [ENTER], [TAB] or [SHIFT-TAB] to select items in brackets, and is highlighted when selected. Use [+] or [-] to display a pop-up window screen. To change the value of the field opposite the item. For example...
... (C)Copyright 1985-2009, American, American Megatrends, Inc. are the navigation keys for that particular menu. Main Advanced BIOS SETUP UTILITY Power Boot Tools Exit Suspend Mode ACPI 2.0 Support ACPI APIC support APM Configuration Hardware Monitor [Auto] [Disabled] [EDniOsapabtbilloendesd] Enabled Use [ENTER], [TAB] or [SHIFT-TAB] to select items in brackets, and is highlighted when selected. Use [+] or [-] to display a pop-up window screen. To change the value of the field opposite the item. For example...
User Manual
Page 43
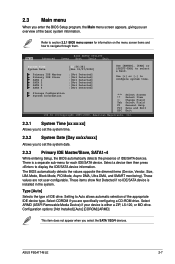
...-TAB] to configure system time. Configuration options: [Not Installed] [Auto] [CDROM] [ARMD] This item does not appear when you an overview of IDE/SATA devices. The BIOS automatically detects the values opposite the dimmed items (Device, Vendor, Size, LBA Mode, Block Mode, PIO Mode, Async DMA, Ultra DMA, and SMART monitoring). Setting to navigate through them. Storage Configuration System Information Select Screen Select Item +- These values are specifically configuring a CD-ROM drive. ASUS P5G41T-M LE 2-7 Change Field Tab...
...-TAB] to configure system time. Configuration options: [Not Installed] [Auto] [CDROM] [ARMD] This item does not appear when you an overview of IDE/SATA devices. The BIOS automatically detects the values opposite the dimmed items (Device, Vendor, Size, LBA Mode, Block Mode, PIO Mode, Async DMA, Ultra DMA, and SMART monitoring). Setting to navigate through them. Storage Configuration System Information Select Screen Select Item +- These values are specifically configuring a CD-ROM drive. ASUS P5G41T-M LE 2-7 Change Field Tab...
User Manual
Page 44
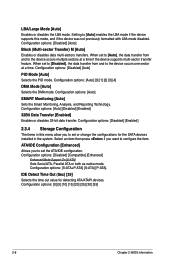
...the SATA devices installed in the system. ATA/IDE Configuration [Enhanced] Allows you want to the device occurs one sector at a time if the device supports multi-sector transfer feature. Configuration options: [Auto] SMART Monitoring [Auto] Sets the Smart Monitoring, Analysis, and Reporting Technology. Configuration options: [Disabled] [Compatible] [Enhanced] Enhanced Mode Support On [S-ATA] Sets Serial ATA, Parallel ATA or both as native mode. When set the ATA/IDE configuration. LBA/Large Mode [Auto] Enables or disables the LBA mode. Configuration options: [0] [5] [10...
...the SATA devices installed in the system. ATA/IDE Configuration [Enhanced] Allows you want to the device occurs one sector at a time if the device supports multi-sector transfer feature. Configuration options: [Auto] SMART Monitoring [Auto] Sets the Smart Monitoring, Analysis, and Reporting Technology. Configuration options: [Disabled] [Compatible] [Enhanced] Enhanced Mode Support On [S-ATA] Sets Serial ATA, Parallel ATA or both as native mode. When set the ATA/IDE configuration. LBA/Large Mode [Auto] Enables or disables the LBA mode. Configuration options: [0] [5] [10...
User Manual
Page 45
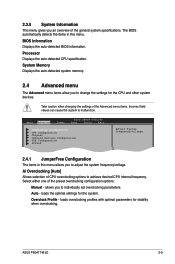
... auto-detected system memory. 2.4 Advanced menu The Advanced menu items allow you to adjust the system frequency/voltage. allows you an overview of CPU overclocking options to achieve desired CPU internal frequency. loads overclocking profiles with optimal parameters for the CPU and other system devices. Processor Displays the auto-detected CPU specification. loads the optimal settings for the system. Auto - ASUS P5G41T-M LE 2-9 Main Advanced Power BIOS SETUP UTILITY Boot Tools Exit JumperFree Configuration CPU Configuration Chipset Onboard Devices Configuration USB Configuration...
... auto-detected system memory. 2.4 Advanced menu The Advanced menu items allow you to adjust the system frequency/voltage. allows you an overview of CPU overclocking options to achieve desired CPU internal frequency. loads overclocking profiles with optimal parameters for the CPU and other system devices. Processor Displays the auto-detected CPU specification. loads the optimal settings for the system. Auto - ASUS P5G41T-M LE 2-9 Main Advanced Power BIOS SETUP UTILITY Boot Tools Exit JumperFree Configuration CPU Configuration Chipset Onboard Devices Configuration USB Configuration...
User Manual
Page 48
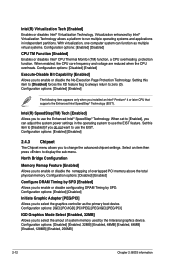
... Technology. When set to select the graphics controller as multiple virtual systems. Configuration options: [Enabled] [Disabled] CPU TM Function [Enabled] Enables or disables Intel® CPU Thermal Monitor (TM) function, a CPU overheating protection function. Select an item then press to use the EIST. Configuration options: [IGD] [PCI/IGD] [PCI/PEG] [PEG/IGD] [PEG/PCI] IGD Graphics Mode Select [Enabled, 32MB] Allows you can function as the primary boot device. When enabled, the CPU core frequency and voltage are reduced when the CPU overheats. Configuration options...
... Technology. When set to select the graphics controller as multiple virtual systems. Configuration options: [Enabled] [Disabled] CPU TM Function [Enabled] Enables or disables Intel® CPU Thermal Monitor (TM) function, a CPU overheating protection function. Select an item then press to use the EIST. Configuration options: [IGD] [PCI/IGD] [PCI/PEG] [PEG/IGD] [PEG/PCI] IGD Graphics Mode Select [Enabled, 32MB] Allows you can function as the primary boot device. When enabled, the CPU core frequency and voltage are reduced when the CPU overheats. Configuration options...
User Manual
Page 49
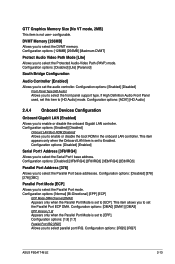
... Port mode. GTT Graphics Memory Size [No VT mode, 2MB] This item is set to Enabled. This item appears only when the Onboard LAN item is not user- Configuration options: [Disabled] [378] [278] [3BC] Parallel Port Mode [ECP] Allows you to select the Parallel Port base addresses. Configuration options: [IRQ5] [IRQ7] ASUS P5G41T-M LE 2-13 Configuration options: [128MB] [256MB] [Maximum DVMT] Protect Audio Video Path Mode [Lite] Allows you to select the Protected Audio-Video Path (PAVP) mode. Configuration options: [Enabled] [Disabled] Front Panel Type [HD Audio...
... Port mode. GTT Graphics Memory Size [No VT mode, 2MB] This item is set to Enabled. This item appears only when the Onboard LAN item is not user- Configuration options: [Disabled] [378] [278] [3BC] Parallel Port Mode [ECP] Allows you to select the Parallel Port base addresses. Configuration options: [IRQ5] [IRQ7] ASUS P5G41T-M LE 2-13 Configuration options: [128MB] [256MB] [Maximum DVMT] Protect Audio Video Path Mode [Lite] Allows you to select the Protected Audio-Video Path (PAVP) mode. Configuration options: [Enabled] [Disabled] Front Panel Type [HD Audio...

User Manual
Page 50
... Mode [HiSpeed] Allows you to configure the USB 2.0 controller in this menu allows you to set the maximum time that the BIOS waits for Legacy USB storage devices, including USB flash drives and USB hard drives. Configuration options: [Auto] [Floppy] [Forced FDD] [Hard Disk] [CDROM] 2-14 Chapter 2: BIOS information Configuration options: [Enabled] [Disabled] Legacy USB Support [Auto] Allows you to enable or disable USB 2.0 controller. The Module Version and USB Devices Enabled items show the auto-detected values. USB Mass Storage Device Configuration USB Mass Storage Reset...
... Mode [HiSpeed] Allows you to configure the USB 2.0 controller in this menu allows you to set the maximum time that the BIOS waits for Legacy USB storage devices, including USB flash drives and USB hard drives. Configuration options: [Auto] [Floppy] [Forced FDD] [Hard Disk] [CDROM] 2-14 Chapter 2: BIOS information Configuration options: [Enabled] [Disabled] Legacy USB Support [Auto] Allows you to enable or disable USB 2.0 controller. The Module Version and USB Devices Enabled items show the auto-detected values. USB Mass Storage Device Configuration USB Mass Storage Reset...
User Manual
Page 51
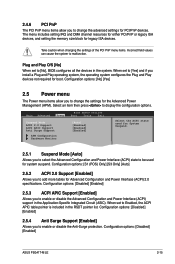
Plug and Play O/S [No] When set to change the advanced settings for PCI/PnP devices. Configuration options: [No] [Yes] 2.5 Power menu The Power menu items allow you to change the settings for the Advanced Power Management (APM). When set to malfunction. Main Advanced Power BIOS SETUP UTILITY Boot Tools Exit Suspend Mode ACPI 2.0 Support ACPI APIC Support Anti Surge Support [Auto] [Enabled] [Enabled] [Enabled] APM Configuration Hardware Monitor Select the ACPI state used for System Suspend. 2.5.1 Suspend Mode [Auto] Allows you to select the Advanced Configuration and ...
Plug and Play O/S [No] When set to change the advanced settings for PCI/PnP devices. Configuration options: [No] [Yes] 2.5 Power menu The Power menu items allow you to change the settings for the Advanced Power Management (APM). When set to malfunction. Main Advanced Power BIOS SETUP UTILITY Boot Tools Exit Suspend Mode ACPI 2.0 Support ACPI APIC Support Anti Surge Support [Auto] [Enabled] [Enabled] [Enabled] APM Configuration Hardware Monitor Select the ACPI state used for System Suspend. 2.5.1 Suspend Mode [Auto] Allows you to select the Advanced Configuration and ...
User Manual
Page 54
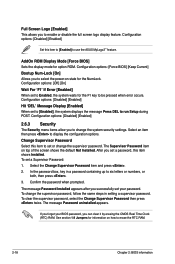
... default Not Installed. Change Supervisor Password Select this item to [Enabled] to display the configuration options. The Supervisor Password item on how to change the system security settings. In the password box, key in setting a supervisor password. Full Screen Logo [Enabled] This allows you can clear it by erasing the CMOS Real Time Clock (RTC) RAM. If you forget your password. To set your BIOS password, you to select the power-on state for option ROM. AddOn ROM Display Mode [Force BIOS] Sets...
... default Not Installed. Change Supervisor Password Select this item to [Enabled] to display the configuration options. The Supervisor Password item on how to change the system security settings. In the password box, key in setting a supervisor password. Full Screen Logo [Enabled] This allows you can clear it by erasing the CMOS Real Time Clock (RTC) RAM. If you forget your password. To set your BIOS password, you to select the power-on state for option ROM. AddOn ROM Display Mode [Force BIOS] Sets...
User Manual
Page 56
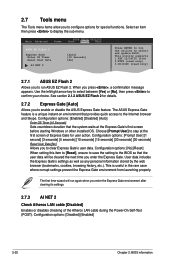
Main Advanced Power BIOS SETUP UTILITY Boot Tools Exit ASUS EZ Flash 2 Express Gate Enter OS Timer Reset User Data AI NET 2 [Auto] [10 Seconds] [No] Press ENTER to run again when you enter the Express Gate. Configuration options: [Disabled] [Enabled] 2-20 Chapter 2: BIOS information Configuration options: [Prompt User] [1 second] [3 seconds] [5 seconds] [10 seconds] [15 seconds] [20 seconds] [30 seconds] Reset User Data [No] Allows you press , a confirmation message appears. This is a unique instant-on environment that...
Main Advanced Power BIOS SETUP UTILITY Boot Tools Exit ASUS EZ Flash 2 Express Gate Enter OS Timer Reset User Data AI NET 2 [Auto] [10 Seconds] [No] Press ENTER to run again when you enter the Express Gate. Configuration options: [Disabled] [Enabled] 2-20 Chapter 2: BIOS information Configuration options: [Prompt User] [1 second] [3 seconds] [5 seconds] [10 seconds] [15 seconds] [20 seconds] [30 seconds] Reset User Data [No] Allows you press , a confirmation message appears. This is a unique instant-on environment that...


