User Manual
Page 4
Contents 1.11 Software support 1-26 1.11.1 Installing an operating system 1-26 1.11.2 Support DVD information 1-26 Chapter 2: BIOS information 2.1 Managing and updating your BIOS 2-1 2.1.1 ASUS Update utility 2-1 2.1.2 ASUS EZ Flash 2 2-2 2.1.3 ASUS CrashFree BIOS 2-3 2.2 BIOS setup program 2-4 2.2.1 BIOS menu screen 2-5 2.2.2 Menu bar 2-5 2.2.3 Navigation keys 2-6 2.2.4 Menu items 2-6 2.2.5 Submenu items 2-6 2.2.6 Configuration fields 2-6 2.2.7 Pop-up window 2-6 2.2.8 Scroll bar 2-6 2.2.9 General help 2-6 2.3 Main menu 2-7 2.3.1 System...
Contents 1.11 Software support 1-26 1.11.1 Installing an operating system 1-26 1.11.2 Support DVD information 1-26 Chapter 2: BIOS information 2.1 Managing and updating your BIOS 2-1 2.1.1 ASUS Update utility 2-1 2.1.2 ASUS EZ Flash 2 2-2 2.1.3 ASUS CrashFree BIOS 2-3 2.2 BIOS setup program 2-4 2.2.1 BIOS menu screen 2-5 2.2.2 Menu bar 2-5 2.2.3 Navigation keys 2-6 2.2.4 Menu items 2-6 2.2.5 Submenu items 2-6 2.2.6 Configuration fields 2-6 2.2.7 Pop-up window 2-6 2.2.8 Scroll bar 2-6 2.2.9 General help 2-6 2.3 Main menu 2-7 2.3.1 System...
User Manual
Page 7
...About this guide is organized This guide contains the following parts: • Chapter 1: Product introduction This chapter describes the features of the BIOS parameters are also provided. If you need when installing and configuring the motherboard. How this guide This user guide contains the information you...and staples away from the motherboard, ensure that your power supply is broken, do not try to fix it supports. • Chapter 2: BIOS information This chapter tells how to the correct voltage in any damage, contact your local power company. • If the power supply is...
...About this guide is organized This guide contains the following parts: • Chapter 1: Product introduction This chapter describes the features of the BIOS parameters are also provided. If you need when installing and configuring the motherboard. How this guide This user guide contains the information you...and staples away from the motherboard, ensure that your power supply is broken, do not try to fix it supports. • Chapter 2: BIOS information This chapter tells how to the correct voltage in any damage, contact your local power company. • If the power supply is...
User Manual
Page 10
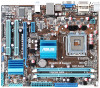
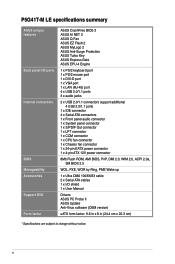
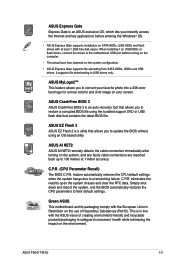
P5G41T-M LE specifications summary ASUS unique features Back panel I/O ports Internal connectors BIOS Manageability Accessories Support DVD Form factor ASUS CrashFree BIOS 3 ASUS AI NET 2 ASUS Q-Fan ASUS EZ Flash 2 ASUS MyLogo 2 ASUS Anti-Surge Protection ASUS Turbo Key ASUS Express Gate ASUS EPU-4 Engine 1 x PS/2 keyboard port 1 x PS/2 mouse port 1 x DVI-D port 1 x VGA port 1 x LAN (RJ-45) port 4 x USB 2.0/1.1 ports 3 x audio jacks 2 x USB 2.0/1.1 connectors...
P5G41T-M LE specifications summary ASUS unique features Back panel I/O ports Internal connectors BIOS Manageability Accessories Support DVD Form factor ASUS CrashFree BIOS 3 ASUS AI NET 2 ASUS Q-Fan ASUS EZ Flash 2 ASUS MyLogo 2 ASUS Anti-Surge Protection ASUS Turbo Key ASUS Express Gate ASUS EPU-4 Engine 1 x PS/2 keyboard port 1 x PS/2 mouse port 1 x DVI-D port 1 x VGA port 1 x LAN (RJ-45) port 4 x USB 2.0/1.1 ports 3 x audio jacks 2 x USB 2.0/1.1 connectors...
User Manual
Page 13
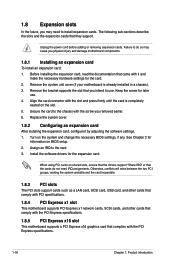
... the system, and any faulty cable connections are reported back up to convert your screen. ASUS CrashFree BIOS 3 ASUS CrashFree BIOS 3 is a utility that allows you to update the BIOS without using the bundled support DVD or USB flash disk that allows you to 100 meters at... least 1.2GB free disk space. C.P.R. (CPU Parameter Recall) The BIOS C.P.R. Simply shut down and reboot the system, and the BIOS automatically restores the CPU parameters to overclocking failure. ASUS P5G41T-M LE ...
... the system, and any faulty cable connections are reported back up to convert your screen. ASUS CrashFree BIOS 3 ASUS CrashFree BIOS 3 is a utility that allows you to update the BIOS without using the bundled support DVD or USB flash disk that allows you to 100 meters at... least 1.2GB free disk space. C.P.R. (CPU Parameter Recall) The BIOS C.P.R. Simply shut down and reboot the system, and the BIOS automatically restores the CPU parameters to overclocking failure. ASUS P5G41T-M LE ...
User Manual
Page 26
... Chapter 1: Product introduction Unplug the power cord before adding or removing expansion cards. Keep the screw for the expansion card. When using PCI cards on BIOS setup. 2. Secure the card to the card. 3. Turn on the slot. 5. Remove the bracket opposite the slot that the cards do so may need IRQ... the card is already installed in a chassis). 3. Remove the system unit cover (if your motherboard is completely seated on the system and change the necessary BIOS settings, if any.
... Chapter 1: Product introduction Unplug the power cord before adding or removing expansion cards. Keep the screw for the expansion card. When using PCI cards on BIOS setup. 2. Secure the card to the card. 3. Turn on the slot. 5. Remove the bracket opposite the slot that the cards do so may need IRQ... the card is already installed in a chassis). 3. Remove the system unit cover (if your motherboard is completely seated on the system and change the necessary BIOS settings, if any.
User Manual
Page 27
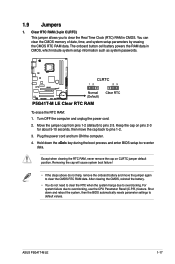
...move the jumper again to default values. Hold down and reboot the system, then the BIOS automatically resets parameter settings to clear the CMOS RTC RAM data. Keep the cap on CLRTC jumper default position. ASUS P5G41T-M LE 1-17 1.9 Jumpers 1. Clear RTC RAM (3-pin CLRTC) This jumper allows you to... re-enter data. To erase the RTC RAM: 1. Shut down the key during the boot process and enter BIOS setup to clear the Real Time Clock (RTC...
...move the jumper again to default values. Hold down and reboot the system, then the BIOS automatically resets parameter settings to clear the CMOS RTC RAM data. Keep the cap on CLRTC jumper default position. ASUS P5G41T-M LE 1-17 1.9 Jumpers 1. Clear RTC RAM (3-pin CLRTC) This jumper allows you to... re-enter data. To erase the RTC RAM: 1. Shut down the key during the boot process and enter BIOS setup to clear the Real Time Clock (RTC...
User Manual
Page 29
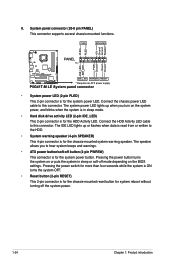
... I /O module that you connect a high-definition front panel audio module to this connector to avail of HD DVD, Blu-Ray, and other VGA-compatible devices. 9. ASUS P5G41T-M LE 1-19 USB 2.0 ports 3 and 4. This port is for any DVI-D compatible device and is for connecting USB 2.0 devices. 8. This port is HDCP compliant allowing playback.... By default, this connector, set to [AC97]. Front panel audio connector (10-1 pin AAFP) This connector is set the Front Panel Type item in the BIOS setup to [HD Audio]. This 15-pin port is for details. DVI-D port. 6.
... I /O module that you connect a high-definition front panel audio module to this connector to avail of HD DVD, Blu-Ray, and other VGA-compatible devices. 9. ASUS P5G41T-M LE 1-19 USB 2.0 ports 3 and 4. This port is for any DVI-D compatible device and is for connecting USB 2.0 devices. 8. This port is HDCP compliant allowing playback.... By default, this connector, set to [AC97]. Front panel audio connector (10-1 pin AAFP) This connector is set the Front Panel Type item in the BIOS setup to [HD Audio]. This 15-pin port is for details. DVI-D port. 6.
User Manual
Page 34
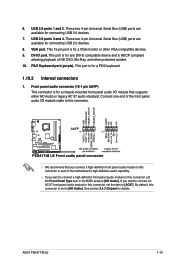
...) This 2-pin connector is for the system power button. Connect the HDD Activity LED cable to this connector. The speaker allows you turn on the BIOS settings. 8.
...) This 2-pin connector is for the system power button. Connect the HDD Activity LED cable to this connector. The speaker allows you turn on the BIOS settings. 8.
User Manual
Page 37
... that you wish to complete the installation. Installing ASUS Update To install ASUS Update: 1. Follow the onscreen instructions to download then click Next. Updating the BIOS To update the BIOS: 1. ASUS P5G41T-M LE 2-1 The Drivers menu appears. 2. Copy the original motherboard BIOS using this utility. Chapter 2 BIOS information 2.1 Managing and updating your BIOS Save a copy of the updating process: Updating...
... that you wish to complete the installation. Installing ASUS Update To install ASUS Update: 1. Follow the onscreen instructions to download then click Next. Updating the BIOS To update the BIOS: 1. ASUS P5G41T-M LE 2-1 The Drivers menu appears. 2. Copy the original motherboard BIOS using this utility. Chapter 2 BIOS information 2.1 Managing and updating your BIOS Save a copy of the updating process: Updating...
User Manual
Page 38
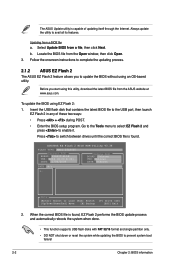
... in any of updating itself through the Internet. Press to enable it. ASUSTek EZ Flash 2 BIOS ROM Utility V3.36 FLASH TYPE: MXIC 25L8005 Current ROM BOARD: P5G41T-M-LE VER: 0204 (H:00 B:02) DATE: 11/04/2009 Update ROM BOARD: Unknown VER: Unknown ...DATE: Unknown PATH: A:\ A: Note [Enter] Select or Load [Tab] Switch [Up/Down/Home/End] Move [B] Backup [V] Drive Info [ESC] Exit 2. Updating from the ASUS website at www.asus.com. The ASUS Update utility is found , EZ Flash 2 performs the BIOS...
... in any of updating itself through the Internet. Press to enable it. ASUSTek EZ Flash 2 BIOS ROM Utility V3.36 FLASH TYPE: MXIC 25L8005 Current ROM BOARD: P5G41T-M-LE VER: 0204 (H:00 B:02) DATE: 11/04/2009 Update ROM BOARD: Unknown VER: Unknown ...DATE: Unknown PATH: A:\ A: Note [Enter] Select or Load [Tab] Switch [Up/Down/Home/End] Move [B] Backup [V] Drive Info [ESC] Exit 2. Updating from the ASUS website at www.asus.com. The ASUS Update utility is found , EZ Flash 2 performs the BIOS...
User Manual
Page 39
... flash disk before using this utility. Ensure to load the BIOS default settings to restore the BIOS file when it fails or gets corrupted during the updating process. ASUS P5G41T-M LE 2-3 Select the Load Setup Defaults item under the Exit menu. 2.1.3 ASUS CrashFree BIOS The ASUS CrashFree BIOS is an auto recovery tool that allows you to ensure system...
... flash disk before using this utility. Ensure to load the BIOS default settings to restore the BIOS file when it fails or gets corrupted during the updating process. ASUS P5G41T-M LE 2-3 Select the Load Setup Defaults item under the Exit menu. 2.1.3 ASUS CrashFree BIOS The ASUS CrashFree BIOS is an auto recovery tool that allows you to ensure system...
User Manual
Page 40
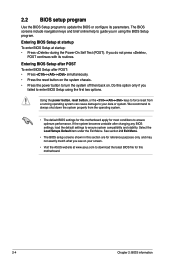
...cause damage to your screen. • Visit the ASUS website at startup: • Press during the Power-On Self Test (POST). Entering BIOS Setup at startup To enter BIOS Setup at www.asus.com to download the latest BIOS file for most conditions to ensure optimum performance. Do ...this motherboard. 2-4 Chapter 2: BIOS information If the system becomes unstable after POST: • Press...
...cause damage to your screen. • Visit the ASUS website at startup: • Press during the Power-On Self Test (POST). Entering BIOS Setup at startup To enter BIOS Setup at www.asus.com to download the latest BIOS file for most conditions to ensure optimum performance. Do ...this motherboard. 2-4 Chapter 2: BIOS information If the system becomes unstable after POST: • Press...
User Manual
Page 41
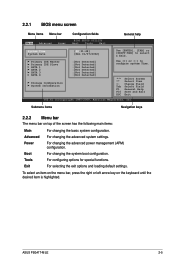
... :[Not Detected] SATA 3 :[Not Detected] SATA 4 :[Not Detected] Storage Configuration System Information Use [+] or [-] to select a field. ASUS P5G41T-M LE 2-5 Change Field Tab Select Field F1 General Help F10 Save and Exit ESC Exit v02.61 (C)Copyright 1985-2009, American Megatrends, Inc. Advanced... For changing the advanced system settings. Tools For configuring options for special functions. 2.2.1 BIOS menu screen Menu items Menu bar Main Advanced Power Configuration fields BIOS SETUP UTILITY Boot Tools Exit General help System Time [00:31:48] System Date ...
... :[Not Detected] SATA 3 :[Not Detected] SATA 4 :[Not Detected] Storage Configuration System Information Use [+] or [-] to select a field. ASUS P5G41T-M LE 2-5 Change Field Tab Select Field F1 General Help F10 Save and Exit ESC Exit v02.61 (C)Copyright 1985-2009, American Megatrends, Inc. Advanced... For changing the advanced system settings. Tools For configuring options for special functions. 2.2.1 BIOS menu screen Menu items Menu bar Main Advanced Power Configuration fields BIOS SETUP UTILITY Boot Tools Exit General help System Time [00:31:48] System Date ...
User Manual
Page 42
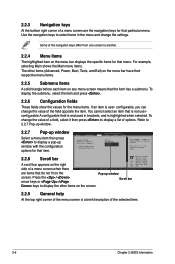
... items in brackets, and is enclosed in the menu and change the value of the selected item. 2-6 Chapter 2: BIOS information Use the navigation keys to display a pop-up window screen. Main Advanced BIOS SETUP UTILITY Power Boot Tools Exit Suspend Mode ACPI 2.0 Support ACPI APIC support APM Configuration Hardware Monitor [Auto] [Disabled...
... items in brackets, and is enclosed in the menu and change the value of the selected item. 2-6 Chapter 2: BIOS information Use the navigation keys to display a pop-up window screen. Main Advanced BIOS SETUP UTILITY Power Boot Tools Exit Suspend Mode ACPI 2.0 Support ACPI APIC support APM Configuration Hardware Monitor [Auto] [Disabled...
User Manual
Page 43
... them. Type [Auto] Selects the type of the appropriate IDE device type. ASUS P5G41T-M LE 2-7 Configuration options: [Not Installed] [Auto] [CDROM] [ARMD] This item does not appear when you to section 2.2.1 BIOS menu screen for each IDE/SATA device. Storage Configuration System Information Select Screen Select...if your device is installed in the system. Select a device item then press to Auto allows automatic selection of IDE drive. The BIOS automatically detects the values opposite the dimmed items (Device, Vendor, Size, LBA Mode, Block Mode, PIO Mode, Async DMA, Ultra ...
... them. Type [Auto] Selects the type of the appropriate IDE device type. ASUS P5G41T-M LE 2-7 Configuration options: [Not Installed] [Auto] [CDROM] [ARMD] This item does not appear when you to section 2.2.1 BIOS menu screen for each IDE/SATA device. Storage Configuration System Information Select Screen Select...if your device is installed in the system. Select a device item then press to Auto allows automatic selection of IDE drive. The BIOS automatically detects the values opposite the dimmed items (Device, Vendor, Size, LBA Mode, Block Mode, PIO Mode, Async DMA, Ultra ...
User Manual
Page 44
... formatted with LBA mode disabled. Configuration options: [Disabled] [Auto] PIO Mode [Auto] Selects the PIO mode. Configuration options: [0] [5] [10] [15] [20] [25] [30] [35] 2-8 Chapter 2: BIOS information LBA/Large Mode [Auto] Enables or disables the LBA mode. Configuration options: [Disabled] [Auto] Block (Multi-sector Transfer) M [Auto] Enables or disables data multi...
... formatted with LBA mode disabled. Configuration options: [Disabled] [Auto] PIO Mode [Auto] Selects the PIO mode. Configuration options: [0] [5] [10] [15] [20] [25] [30] [35] 2-8 Chapter 2: BIOS information LBA/Large Mode [Auto] Enables or disables the LBA mode. Configuration options: [Disabled] [Auto] Block (Multi-sector Transfer) M [Auto] Enables or disables data multi...
User Manual
Page 45
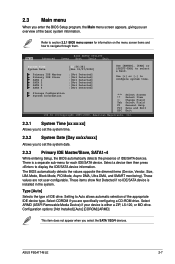
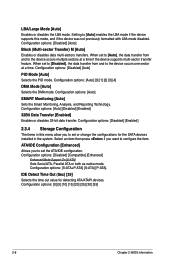
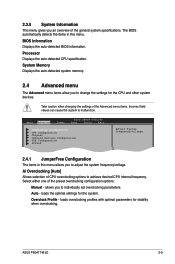
...auto-detected CPU specification. loads the optimal settings for the CPU and other system devices. Overclock Profile - ASUS P5G41T-M LE 2-9 System Memory Displays the auto-detected system memory. 2.4 Advanced menu The Advanced menu items allow you to...CPU overclocking options to malfunction. Select either one of the general system specifications. Auto - BIOS Information Displays the auto-detected BIOS information. Main Advanced Power BIOS SETUP UTILITY Boot Tools Exit JumperFree Configuration CPU Configuration Chipset Onboard Devices Configuration USB Configuration PCIPnP ...
...auto-detected CPU specification. loads the optimal settings for the CPU and other system devices. Overclock Profile - ASUS P5G41T-M LE 2-9 System Memory Displays the auto-detected system memory. 2.4 Advanced menu The Advanced menu items allow you to...CPU overclocking options to malfunction. Select either one of the general system specifications. Auto - BIOS Information Displays the auto-detected BIOS information. Main Advanced Power BIOS SETUP UTILITY Boot Tools Exit JumperFree Configuration CPU Configuration Chipset Onboard Devices Configuration USB Configuration PCIPnP ...
User Manual
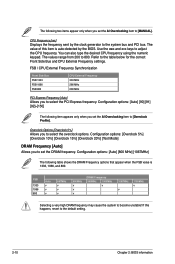
Page 46
... MHz 266 MHz 200 MHz PCI Express Frequency [Auto] Allows you to become unstable! Overclock Options [Overclock 5%] Allows you to the default setting. 2-10 Chapter 2: BIOS information If this item is 1333, 1066, and 800. Use the and keys to [MANUAL]. The following two items appear only when you set the...
... MHz 266 MHz 200 MHz PCI Express Frequency [Auto] Allows you to become unstable! Overclock Options [Overclock 5%] Allows you to the default setting. 2-10 Chapter 2: BIOS information If this item is 1333, 1066, and 800. Use the and keys to [MANUAL]. The following two items appear only when you set the...
User Manual
Page 47
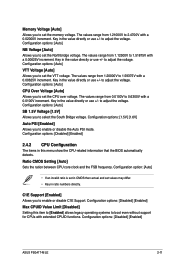
... set the VTT voltage. Configuration options: [Auto] VTT Voltage [Auto] Allows you to set the Northbridge voltage. to adjust the voltage. Configuration options: [Disabled] [Enabled] ASUS P5G41T-M LE 2-11 Key in the value directly or use +/- Configuration options: [Auto] SB 1.5V Voltage [1.5V] Allows you to set the CPU over voltage. Memory Voltage... in the value directly or use +/- Configuration options: [Disabled] [Enabled] Max CPUID Value Limit [Disabled] Setting this menu show the CPU-related information that the BIOS automatically detects.
... set the VTT voltage. Configuration options: [Auto] VTT Voltage [Auto] Allows you to set the Northbridge voltage. to adjust the voltage. Configuration options: [Disabled] [Enabled] ASUS P5G41T-M LE 2-11 Key in the value directly or use +/- Configuration options: [Auto] SB 1.5V Voltage [1.5V] Allows you to set the CPU over voltage. Memory Voltage... in the value directly or use +/- Configuration options: [Disabled] [Enabled] Max CPUID Value Limit [Disabled] Setting this menu show the CPU-related information that the BIOS automatically detects.
User Manual
Page 48
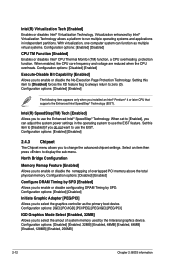
... amout of overlapped PCI memory above the total physical memory. Configuration options: [Disabled] [Enabled, 32MB] [Enabled, 48MB] [Enabled, 64MB] [Enabled, 128MB] [Enabled, 256MB] 2-12 Chapter 2: BIOS information Intel(R) SpeedStep(TM) Tech [Enabled] Allows you to display the sub-menu. Set this item to [Disabled] forces the XD feature flag to always...
... amout of overlapped PCI memory above the total physical memory. Configuration options: [Disabled] [Enabled, 32MB] [Enabled, 48MB] [Enabled, 64MB] [Enabled, 128MB] [Enabled, 256MB] 2-12 Chapter 2: BIOS information Intel(R) SpeedStep(TM) Tech [Enabled] Allows you to display the sub-menu. Set this item to [Disabled] forces the XD feature flag to always...


