User Manual
Page 2
... serial number of these licenses are used only for which will be registered trademarks or copyrights of this manual, including the products and software described in it shipped to, by sending a request to the owners' benefit, without any problems in writing by downloading it from http://support.asus.com/download; The source code will be much obliged if you . SPECIFICATIONS AND...
... serial number of these licenses are used only for which will be registered trademarks or copyrights of this manual, including the products and software described in it shipped to, by sending a request to the owners' benefit, without any problems in writing by downloading it from http://support.asus.com/download; The source code will be much obliged if you . SPECIFICATIONS AND...
User Manual
Page 12
... you to support 1333/1066/800MHz Front Side Bus (FSB), PCIe 1.1, and mutli-core CPUs. ASUS Q-FAN ASUS Q-FAN technology intelligently and automatically adjusts the CPU fan speed according to system load and temperature, enabling users to save power and money. Dual channel DDR3 1333(O.C.) / DDR2 1066(O.C.) support This motherboard supports DDR3 1333(O.C.)/1066/800MHz and DDR2 1066(O.C.)/800/667MHz memory providing great performance for high-speed data saving and retrieval. It is a highly integrated Gb LAN controller.
... you to support 1333/1066/800MHz Front Side Bus (FSB), PCIe 1.1, and mutli-core CPUs. ASUS Q-FAN ASUS Q-FAN technology intelligently and automatically adjusts the CPU fan speed according to system load and temperature, enabling users to save power and money. Dual channel DDR3 1333(O.C.) / DDR2 1066(O.C.) support This motherboard supports DDR3 1333(O.C.)/1066/800MHz and DDR2 1066(O.C.)/800/667MHz memory providing great performance for high-speed data saving and retrieval. It is a highly integrated Gb LAN controller.
User Manual
Page 13
... convert your screen. C.P.R. (CPU Parameter Recall) The BIOS C.P.R. When installing it on USB HDDs or flash drives, connect the drives to the motherboard USB port before entering the Windows® OS. • ASUS Express Gate supports installation on the system configuration. • ASUS Express Gate supports file uploading from SATA HDDs, ODDs and USB drives. ASUS P5G41C-M 1-3 eliminates the need to overclocking failure. ASUS Express Gate Express Gate is an ASUS exclusive OS, which lets you instantly access the Internet and key applications before turning on the computer...
... convert your screen. C.P.R. (CPU Parameter Recall) The BIOS C.P.R. When installing it on USB HDDs or flash drives, connect the drives to the motherboard USB port before entering the Windows® OS. • ASUS Express Gate supports installation on the system configuration. • ASUS Express Gate supports file uploading from SATA HDDs, ODDs and USB drives. ASUS P5G41C-M 1-3 eliminates the need to overclocking failure. ASUS Express Gate Express Gate is an ASUS exclusive OS, which lets you instantly access the Internet and key applications before turning on the computer...
User Manual
Page 16
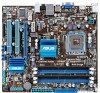
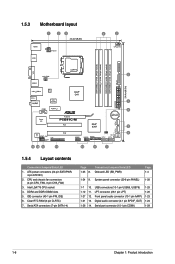
...1-26 14. Clear RTC RAM (3-pin CLRTC) 7. USB connectors (10-1 pin USB56, USB78) 1-29 1-12 11. CPU and chassis fan connectors (4-pin CPU_FAN, 3-pin CHA_FAN) 3. DDR2 and DDR3 DIMM slots 5. Front panel audio connector (10-1 pin AAFP) 1-23 1-21 13. ATX power connectors (24-pin EATXPWR, 4-pin ATX12V) 2. IDE connector (40-1 pin PRI_IDE) 6. 1.5.3 Motherboard layout 1.5.4 Layout contents Connectors/Jumpers/Slots/LED 1. Intel LGA775 CPU socket 4. System panel connector (20-8 pin PANEL) 1-28 1-7 10. LPT connector (26-1 pin LPT) 1-26 1-27 12. Serial port connector (10-1 pin COM1...
...1-26 14. Clear RTC RAM (3-pin CLRTC) 7. USB connectors (10-1 pin USB56, USB78) 1-29 1-12 11. CPU and chassis fan connectors (4-pin CPU_FAN, 3-pin CHA_FAN) 3. DDR2 and DDR3 DIMM slots 5. Front panel audio connector (10-1 pin AAFP) 1-23 1-21 13. ATX power connectors (24-pin EATXPWR, 4-pin ATX12V) 2. IDE connector (40-1 pin PRI_IDE) 6. 1.5.3 Motherboard layout 1.5.4 Layout contents Connectors/Jumpers/Slots/LED 1. Intel LGA775 CPU socket 4. System panel connector (20-8 pin PANEL) 1-28 1-7 10. LPT connector (26-1 pin LPT) 1-26 1-27 12. Serial port connector (10-1 pin COM1...
User Manual
Page 23
... or more efficient cooling system to the memory address limitation on the motherboard, the actual usable memory for single-channel operation. • Always install DIMMs with the same CAS latency. For effective use a more memory on 32-bit Windows® OS, when you are using a 32-bit Windows® OS. - Size SS/ DS Chip Brand Chip NO. Timing Voltage DIMM socket support (Optional) A* B* Crucial CT12864BA1067.8FF 1024MB SS Micron...
... or more efficient cooling system to the memory address limitation on the motherboard, the actual usable memory for single-channel operation. • Always install DIMMs with the same CAS latency. For effective use a more memory on 32-bit Windows® OS, when you are using a 32-bit Windows® OS. - Size SS/ DS Chip Brand Chip NO. Timing Voltage DIMM socket support (Optional) A* B* Crucial CT12864BA1067.8FF 1024MB SS Micron...

User Manual
Page 30
... use . 4. Before installing the expansion card, read the documentation that came with the PCI Express specifications. 1-20 Chapter 1: Product introduction Install the software drivers for information on the slot. 5. Remove the system unit cover (if your motherboard is completely seated on BIOS setup. 2. Replace the system cover. 1.8.2 Configuring an expansion card After installing the expansion card, configure it and make the necessary hardware settings for later use . Turn on shared slots, ensure that the drivers support...
... use . 4. Before installing the expansion card, read the documentation that came with the PCI Express specifications. 1-20 Chapter 1: Product introduction Install the software drivers for information on the slot. 5. Remove the system unit cover (if your motherboard is completely seated on BIOS setup. 2. Replace the system cover. 1.8.2 Configuring an expansion card After installing the expansion card, configure it and make the necessary hardware settings for later use . Turn on shared slots, ensure that the drivers support...
User Manual
Page 40
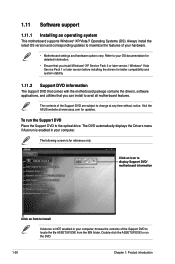
.... 1.11 Software support 1.11.1 Installing an operating system This motherboard supports Windows® XP/Vista/7 Operating Systems (OS). Always install the latest OS version and corresponding updates to avail all motherboard features. Refer to your hardware. • Motherboard settings and hardware options vary. The DVD automatically displays the Drivers menu if Autorun is for updates. Visit the ASUS website at any time without notice. The following screen is enabled in your...
.... 1.11 Software support 1.11.1 Installing an operating system This motherboard supports Windows® XP/Vista/7 Operating Systems (OS). Always install the latest OS version and corresponding updates to avail all motherboard features. Refer to your hardware. • Motherboard settings and hardware options vary. The DVD automatically displays the Drivers menu if Autorun is for updates. Visit the ASUS website at any time without notice. The following screen is enabled in your...
User Manual
Page 41
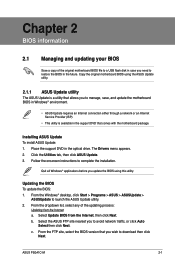
...Drivers menu appears. 2. Follow the onscreen instructions to launch the ASUS Update utility. 2. From the Windows® desktop, click Start > Programs > ASUS > ASUSUpdate > ASUSUpdate to complete the installation. b. ASUS P5G41C-M 2-1 Installing ASUS Update To install ASUS Update: 1. From the dropdown list, select any of the original motherboard BIOS file to a USB flash disk in case you wish to manage, save, and update the motherboard BIOS in Windows® environment. • ASUS Update requires an Internet connection either through a network or an Internet Service...
...Drivers menu appears. 2. Follow the onscreen instructions to launch the ASUS Update utility. 2. From the Windows® desktop, click Start > Programs > ASUS > ASUSUpdate > ASUSUpdate to complete the installation. b. ASUS P5G41C-M 2-1 Installing ASUS Update To install ASUS Update: 1. From the dropdown list, select any of the original motherboard BIOS file to a USB flash disk in case you wish to manage, save, and update the motherboard BIOS in Windows® environment. • ASUS Update requires an Internet connection either through a network or an Internet Service...

User Manual
Page 42
...;based utility. ASUSTek EZ Flash 2 BIOS ROM Utility V3.36 FLASH TYPE: MXIC 25L8005 Current ROM BOARD: P5G41C-M VER: 0310 (H:00 B:07) DATE: 12/14/2009 Update ROM BOARD: Unknown VER: Unknown DATE: Unknown PATH: A:\ A: Note [Enter] Select or Load [Tab] Switch [Up/Down/Home/End] Move [B] Backup [V] Drive Info [ESC] Exit 2. Select Update BIOS from the Open window, then click Open. 3. Insert the USB flash disk that contains the latest BIOS file to the USB port...
...;based utility. ASUSTek EZ Flash 2 BIOS ROM Utility V3.36 FLASH TYPE: MXIC 25L8005 Current ROM BOARD: P5G41C-M VER: 0310 (H:00 B:07) DATE: 12/14/2009 Update ROM BOARD: Unknown VER: Unknown DATE: Unknown PATH: A:\ A: Note [Enter] Select or Load [Tab] Switch [Up/Down/Home/End] Move [B] Backup [V] Drive Info [ESC] Exit 2. Select Update BIOS from the Open window, then click Open. 3. Insert the USB flash disk that contains the latest BIOS file to the USB port...

User Manual
Page 43
... BIOS default settings to section 2.8 Exit menu for the BIOS file. Select the Load Setup Defaults item under the Exit menu. When found, the utility reads the BIOS file and starts flashing the corrupted BIOS file. 4. Doing so can restore a corrupted BIOS file using the motherboard support DVD or a removable device that allows you to the optical drive or the removable device that ASUS CrashFree BIOS support vary with motherboard models. Recovering the BIOS To recover the BIOS: 1. You can cause system boot failure! Turn on again. ASUS P5G41C-M 2-3 The utility...
... BIOS default settings to section 2.8 Exit menu for the BIOS file. Select the Load Setup Defaults item under the Exit menu. When found, the utility reads the BIOS file and starts flashing the corrupted BIOS file. 4. Doing so can restore a corrupted BIOS file using the motherboard support DVD or a removable device that allows you to the optical drive or the removable device that ASUS CrashFree BIOS support vary with motherboard models. Recovering the BIOS To recover the BIOS: 1. You can cause system boot failure! Turn on again. ASUS P5G41C-M 2-3 The utility...

User Manual
Page 46
Main Advanced BIOS SETUP UTILITY Power Boot Tools Exit Suspend Mode ACPI 2.0 Support ACPI APIC support APM Configuration Hardware Monitor [Auto] [Disabled] [EDniOsapabtbilloendesd] Enabled Use [ENTER], [TAB] or [SHIFT-TAB] to configure system Time. 2.2.3 Navigation keys At the bottom right corner of a menu screen are items that menu. To display the submenu, select the item and press . 2.2.6 Configuration fields These fields show the values for the menu items. If an item is a brief description of the menu screen is...
Main Advanced BIOS SETUP UTILITY Power Boot Tools Exit Suspend Mode ACPI 2.0 Support ACPI APIC support APM Configuration Hardware Monitor [Auto] [Disabled] [EDniOsapabtbilloendesd] Enabled Use [ENTER], [TAB] or [SHIFT-TAB] to configure system Time. 2.2.3 Navigation keys At the bottom right corner of a menu screen are items that menu. To display the submenu, select the item and press . 2.2.6 Configuration fields These fields show the values for the menu items. If an item is a brief description of the menu screen is...

User Manual
Page 47
... you enter the BIOS Setup program, the Main menu screen appears, giving you select the SATA 1/2/3/4 devices. Main Advanced BIOS SETUP UTILITY Power Boot Tools Exit System Time System Date Primary IDE Master Primary IDE Slave SATA 1 SATA 2 SATA 3 SATA 4 [12:56:38] [Tue 01/08/2002] :[Not Detected] :[Not Detected] :[Not Detected] :[Not Detected] :[Not Detected] :[Not Detected] Use [ENTER], [TAB] or [SHIFT-TAB] to configure system time. ASUS P5G41C-M 2-7 These values are specifically configuring a CD-ROM drive...
... you enter the BIOS Setup program, the Main menu screen appears, giving you select the SATA 1/2/3/4 devices. Main Advanced BIOS SETUP UTILITY Power Boot Tools Exit System Time System Date Primary IDE Master Primary IDE Slave SATA 1 SATA 2 SATA 3 SATA 4 [12:56:38] [Tue 01/08/2002] :[Not Detected] :[Not Detected] :[Not Detected] :[Not Detected] :[Not Detected] :[Not Detected] Use [ENTER], [TAB] or [SHIFT-TAB] to configure system time. ASUS P5G41C-M 2-7 These values are specifically configuring a CD-ROM drive...
User Manual
Page 48
...Smart Monitoring, Analysis, and Reporting Technology. Configuration options: [Disabled] [Enabled] 2.3.4 Storage Configuration The items in the system. When set the ATA/IDE configuration. Configuration options: [Auto] [Disabled] [Enabled] 32Bit Data Transfer [Enabled] Enables or disables 32-bit data transfer. Configuration options: [Disabled] [Compatible] [Enhanced] Enhanced Mode Support On [S-ATA] Sets Serial ATA, Parallel ATA or both as native mode. LBA/Large Mode [Auto] Enables or disables the LBA mode. IDE Detect Time Out (Sec) [35] Selects the time out value for the SATA...
...Smart Monitoring, Analysis, and Reporting Technology. Configuration options: [Disabled] [Enabled] 2.3.4 Storage Configuration The items in the system. When set the ATA/IDE configuration. Configuration options: [Auto] [Disabled] [Enabled] 32Bit Data Transfer [Enabled] Enables or disables 32-bit data transfer. Configuration options: [Disabled] [Compatible] [Enhanced] Enhanced Mode Support On [S-ATA] Sets Serial ATA, Parallel ATA or both as native mode. LBA/Large Mode [Auto] Enables or disables the LBA mode. IDE Detect Time Out (Sec) [35] Selects the time out value for the SATA...
User Manual
Page 49
... for the system. Main Advanced Power BIOS SETUP UTILITY Boot Tools Exit JumperFree Configuration CPU Configuration Chipset Onboard Devices Configuration USB Configuration PCIPnP Adjust System frequency/voltage. 2.4.1 JumperFree Configuration The items in this menu allows you to change the settings for the CPU and other system devices. Select either one of the general system specifications. BIOS Information Displays the auto-detected BIOS information. allows you to adjust the system frequency/voltage. ASUS P5G41C-M 2-9 System Memory Displays the auto-detected system...
... for the system. Main Advanced Power BIOS SETUP UTILITY Boot Tools Exit JumperFree Configuration CPU Configuration Chipset Onboard Devices Configuration USB Configuration PCIPnP Adjust System frequency/voltage. 2.4.1 JumperFree Configuration The items in this menu allows you to change the settings for the CPU and other system devices. Select either one of the general system specifications. BIOS Information Displays the auto-detected BIOS information. allows you to adjust the system frequency/voltage. ASUS P5G41C-M 2-9 System Memory Displays the auto-detected system...
User Manual
Page 52
...use the Enhanced Intel® SpeedStep® Technology. Configuration options: [Enabled] [Disabled] Initiate Graphic Adapter [PEG/PCI] Allows you to select the graphics controller as multiple virtual systems. Configuration options: [Enabled] [Disabled] CPU TM Function [Enabled] Enables or disables Intel® CPU Thermal Monitor (TM) function, a CPU overheating protection function. Set this item to [Disabled] forces the XD feature flag to always return to enable or disable configurating DRAM Timing by the Interanal graphics device. Configuration options: [IGD] [PCI/IGD] [PCI...
...use the Enhanced Intel® SpeedStep® Technology. Configuration options: [Enabled] [Disabled] Initiate Graphic Adapter [PEG/PCI] Allows you to select the graphics controller as multiple virtual systems. Configuration options: [Enabled] [Disabled] CPU TM Function [Enabled] Enables or disables Intel® CPU Thermal Monitor (TM) function, a CPU overheating protection function. Set this item to [Disabled] forces the XD feature flag to always return to enable or disable configurating DRAM Timing by the Interanal graphics device. Configuration options: [IGD] [PCI/IGD] [PCI...
User Manual
Page 53
... Serial Port1 base address. Configuration options: [AC97] [HD Audio] 2.4.4 Onboard Devices Configuration Onboard Gigabit LAN [Enabled] Allows you to select the DVMT memory. Configuration options: [DMA0] [DMA1] [DMA3] EPP Version [1.9] Appears only when the Parallel Port Mode is set to Enabled. Configuration options: [IRQ5] [IRQ7] ASUS P5G41C-M 2-13 DVMT Memory [256MB] Allows you to enable or disable the onboard Gigabit LAN controller. Configuration options: [Disabled] [378] [278] [3BC] Parallel Port Mode [ECP] Allows you to enable or disable the boot ROM in the onboard LAN...
... Serial Port1 base address. Configuration options: [AC97] [HD Audio] 2.4.4 Onboard Devices Configuration Onboard Gigabit LAN [Enabled] Allows you to select the DVMT memory. Configuration options: [DMA0] [DMA1] [DMA3] EPP Version [1.9] Appears only when the Parallel Port Mode is set to Enabled. Configuration options: [IRQ5] [IRQ7] ASUS P5G41C-M 2-13 DVMT Memory [256MB] Allows you to enable or disable the onboard Gigabit LAN controller. Configuration options: [Disabled] [378] [278] [3BC] Parallel Port Mode [ECP] Allows you to enable or disable the boot ROM in the onboard LAN...
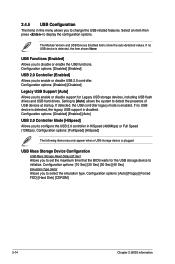
User Manual
Page 54
... of USB devices at startup. If no USB device is detected, the legacy USB support is detected, the item shows None. Setting to [Auto] allows the system to display the configuration options. If detected, the USB controller legacy mode is plugged. Configuration options: [Auto] [Floppy] [Forced FDD] [Hard Disk] [CDROM] 2-14 Chapter 2: BIOS information The Module Version and USB Devices Enabled items show the auto-detected values. Configuration options: [Disabled] [Enabled] [Auto] USB 2.0 Controller Mode [HiSpeed] Allows you to enable or disable USB 2.0 controller.
... of USB devices at startup. If no USB device is detected, the legacy USB support is detected, the item shows None. Setting to [Auto] allows the system to display the configuration options. If detected, the USB controller legacy mode is plugged. Configuration options: [Auto] [Floppy] [Forced FDD] [Hard Disk] [CDROM] 2-14 Chapter 2: BIOS information The Module Version and USB Devices Enabled items show the auto-detected values. Configuration options: [Disabled] [Enabled] [Auto] USB 2.0 Controller Mode [HiSpeed] Allows you to enable or disable USB 2.0 controller.
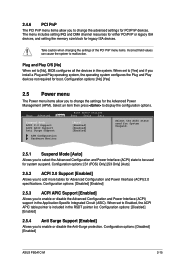
User Manual
Page 55
... operating system configures the Plug and Play devices not required for boot. Main Advanced Power BIOS SETUP UTILITY Boot Tools Exit Suspend Mode ACPI 2.0 Support ACPI APIC Support Anti Surge Support [Auto] [Enabled] [Enabled] [Enabled] APM Configuration Hardware Monitor Select the ACPI state used for System Suspend. 2.5.1 Suspend Mode [Auto] Allows you to change the advanced settings for PCI/PnP devices. When set to [Yes] and if you to enable or disable the Anti-Surge protection. Configuration options: [Disabled] [Enabled] 2.5.4 Anti Surge Support [Enabled] Allows you...
... operating system configures the Plug and Play devices not required for boot. Main Advanced Power BIOS SETUP UTILITY Boot Tools Exit Suspend Mode ACPI 2.0 Support ACPI APIC Support Anti Surge Support [Auto] [Enabled] [Enabled] [Enabled] APM Configuration Hardware Monitor Select the ACPI state used for System Suspend. 2.5.1 Suspend Mode [Auto] Allows you to change the advanced settings for PCI/PnP devices. When set to [Yes] and if you to enable or disable the Anti-Surge protection. Configuration options: [Disabled] [Enabled] 2.5.4 Anti Surge Support [Enabled] Allows you...
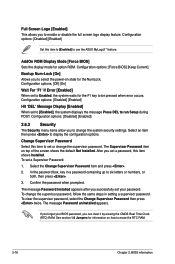
User Manual
Page 58
... the default Not Installed. Select the Change Supervisor Password item and press . 2. Configuration options: [Off] [On] Wait For 'F1' If Error [Enabled] When set or change the supervisor password. Configuration options: [Disabled] [Enabled] 2.6.3 Security The Security menu items allow you to be pressed when error occurs. Change Supervisor Password Select this item shows Installed. Confirm the password when prompted. To clear the supervisor password, select the Change Supervisor Password then press twice. AddOn ROM Display Mode [Force BIOS] Sets the display mode...
... the default Not Installed. Select the Change Supervisor Password item and press . 2. Configuration options: [Off] [On] Wait For 'F1' If Error [Enabled] When set or change the supervisor password. Configuration options: [Disabled] [Enabled] 2.6.3 Security The Security menu items allow you to be pressed when error occurs. Change Supervisor Password Select this item shows Installed. Confirm the password when prompted. To clear the supervisor password, select the Change Supervisor Password then press twice. AddOn ROM Display Mode [Force BIOS] Sets the display mode...
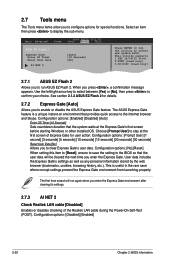
User Manual
Page 60
... screen before starting Windows or other installed OS. Configuration options: [Prompt User] [1 second] [3 seconds] [5 seconds] [10 seconds] [15 seconds] [20 seconds] [30 seconds] Reset User Data [No] Allows you to confirm your choice. Use the left/right arrow key to select between [Yes] or [No], then press to clear Express Gate's user data. 2.7 Tools menu The Tools menu items allow you to select and update BIOS. Main Advanced Power BIOS SETUP UTILITY Boot Tools...
... screen before starting Windows or other installed OS. Configuration options: [Prompt User] [1 second] [3 seconds] [5 seconds] [10 seconds] [15 seconds] [20 seconds] [30 seconds] Reset User Data [No] Allows you to confirm your choice. Use the left/right arrow key to select between [Yes] or [No], then press to clear Express Gate's user data. 2.7 Tools menu The Tools menu items allow you to select and update BIOS. Main Advanced Power BIOS SETUP UTILITY Boot Tools...


