User Manual
Page 11
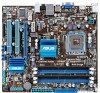
... installing the motherboard, and hardware devices on it another standout in the long line of ASUS quality motherboards! Before you for buying an ASUS® P5G41C-M motherboard! ASUS P5G41C-M 1-1 Chapter 1 Product introduction 1.1 Welcome! This motherboard also supports Intel® CPUs ... which are excellent for the following items. Motherboard Cables Accessories Application DVD Documentation ASUS P5G41C-M motherboard 2 x Serial ATA cables 1 x Ultra DMA 100/66/33 cable 1 x I/O shield ASUS motherboard support DVD User Manual If any of new features and latest technologies, ...
... installing the motherboard, and hardware devices on it another standout in the long line of ASUS quality motherboards! Before you for buying an ASUS® P5G41C-M motherboard! ASUS P5G41C-M 1-1 Chapter 1 Product introduction 1.1 Welcome! This motherboard also supports Intel® CPUs ... which are excellent for the following items. Motherboard Cables Accessories Application DVD Documentation ASUS P5G41C-M motherboard 2 x Serial ATA cables 1 x Ultra DMA 100/66/33 cable 1 x I/O shield ASUS motherboard support DVD User Manual If any of new features and latest technologies, ...
User Manual
Page 13
...the Windows® OS. • ASUS Express Gate supports installation on SATA HDDs, USB HDDs and flash drives with the European Union's Restriction on the use of creating environment-friendly and recyclable products/packaging to USB drives only. ASUS P5G41C-M 1-3 When installing it on USB ...HDDs or flash drives, connect the drives to their default settings. ASUS CrashFree BIOS 3 ASUS CrashFree BIOS 3 is an auto-recovery tool that allows you to convert ...
...the Windows® OS. • ASUS Express Gate supports installation on SATA HDDs, USB HDDs and flash drives with the European Union's Restriction on the use of creating environment-friendly and recyclable products/packaging to USB drives only. ASUS P5G41C-M 1-3 When installing it on USB ...HDDs or flash drives, connect the drives to their default settings. ASUS CrashFree BIOS 3 ASUS CrashFree BIOS 3 is an auto-recovery tool that allows you to convert ...
User Manual
Page 15
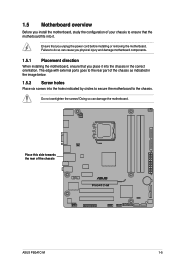
... to the rear part of the chassis as indicated in the correct orientation. Ensure that you install the motherboard, study the configuration of the chassis ASUS P5G41C-M 1-5 Failure to do so can damage the motherboard.
... to the rear part of the chassis as indicated in the correct orientation. Ensure that you install the motherboard, study the configuration of the chassis ASUS P5G41C-M 1-5 Failure to do so can damage the motherboard.
User Manual
Page 17
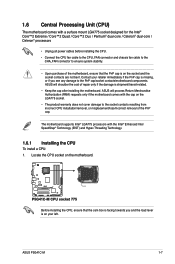
... the motherboard comes with the Intel® Enhanced Intel SpeedStep® Technology (EIST) and Hyper-Threading Technology. 1.6.1 Installing the CPU To install a CPU: 1. ASUS P5G41C-M 1-7 Contact your left. ASUS will shoulder the cost of repair only if the damage is on your retailer immediately if the PnP cap is on the socket and...
... the motherboard comes with the Intel® Enhanced Intel SpeedStep® Technology (EIST) and Hyper-Threading Technology. 1.6.1 Installing the CPU To install a CPU: 1. ASUS P5G41C-M 1-7 Contact your left. ASUS will shoulder the cost of repair only if the damage is on your retailer immediately if the PnP cap is on the socket and...

User Manual
Page 19
... your finger directly. 7. Apply some Thermal Interface Material to the exposed area of the CPU that the heatsink will be in an even thin layer. B ASUS P5G41C-M 1-9 If so, skip this step. DO NOT eat the Thermal Interface Material. If it off immediately, and seek professional medical help.
... your finger directly. 7. Apply some Thermal Interface Material to the exposed area of the CPU that the heatsink will be in an even thin layer. B ASUS P5G41C-M 1-9 If so, skip this step. DO NOT eat the Thermal Interface Material. If it off immediately, and seek professional medical help.
User Manual
Page 21
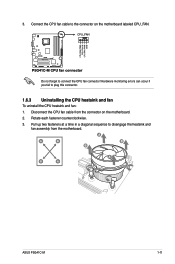
A A B B B A B A ASUS P5G41C-M 1-11 Disconnect the CPU fan cable from the motherboard. Rotate each fastener counterclockwise. 3. Pull up two fasteners at a time in a diagonal sequence to the connector on the motherboard. 2. 3. Connect the CPU fan cable to disengage the heatsink and fan assembly from the connector on the motherboard labeled CPU_FAN. Hardware monitoring errors can occur if you fail to connect the CPU fan connector! Do not forget to plug this connector. 1.6.3 Uninstalling the CPU heatsink and fan To uninstall the CPU heatsink and fan: 1.
A A B B B A B A ASUS P5G41C-M 1-11 Disconnect the CPU fan cable from the motherboard. Rotate each fastener counterclockwise. 3. Pull up two fasteners at a time in a diagonal sequence to the connector on the motherboard. 2. 3. Connect the CPU fan cable to disengage the heatsink and fan assembly from the connector on the motherboard labeled CPU_FAN. Hardware monitoring errors can occur if you fail to connect the CPU fan connector! Do not forget to plug this connector. 1.6.3 Uninstalling the CPU heatsink and fan To uninstall the CPU heatsink and fan: 1.
User Manual
Page 23
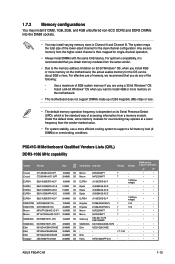
... 2048MB DS Elixir - - - • • Kingtiger 2GB DIMM PC3-8500 2048MB DS Hynix H5TQ1G83AFP G7C - - • • ASUS P5G41C-M 1-13 For optimum compatibility, it is recommended that you are using a 32-bit Windows® OS. - P5G41C-M Motherboard Qualified Vendors Lists (QVL) DDR3-1066 MHz capability Vendor Part No. 1.7.2 Memory configurations You may install...
... 2048MB DS Elixir - - - • • Kingtiger 2GB DIMM PC3-8500 2048MB DS Hynix H5TQ1G83AFP G7C - - • • ASUS P5G41C-M 1-13 For optimum compatibility, it is recommended that you are using a 32-bit Windows® OS. - P5G41C-M Motherboard Qualified Vendors Lists (QVL) DDR3-1066 MHz capability Vendor Part No. 1.7.2 Memory configurations You may install...
User Manual
Page 25
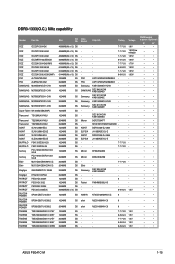
... K4B1G0846D - N2CB1680AN-C6 - 9 - 7-7-7-20 1.5V 8-8-8-24 1.5V 7-7-7-20 1.5V 8-8-8-24 1.5V 8-8-8-24 1.5V • • • • • • • • • • • • ASUS P5G41C-M 1-15 ASINT DDRII1208-DJ 0844 - Samsung K4B1G0846D-HCH9 - PSC A3P1GF3DGF928M9B05 - ASINT DDRII1208-DJ 0844 - ELPIDA J1108BASE-DJ-E - Samsung SEC 913 HCH9 K4B1G0846E - - - - - OCZ OCZ3P13334GK OCZ...
... K4B1G0846D - N2CB1680AN-C6 - 9 - 7-7-7-20 1.5V 8-8-8-24 1.5V 7-7-7-20 1.5V 8-8-8-24 1.5V 8-8-8-24 1.5V • • • • • • • • • • • • ASUS P5G41C-M 1-15 ASINT DDRII1208-DJ 0844 - Samsung K4B1G0846D-HCH9 - PSC A3P1GF3DGF928M9B05 - ASINT DDRII1208-DJ 0844 - ELPIDA J1108BASE-DJ-E - Samsung SEC 913 HCH9 K4B1G0846E - - - - - OCZ OCZ3P13334GK OCZ...

User Manual
Page 27
... 5 - • • Transced TQ243PCF8 5 - • • Elpida E1108ACBG-8E-E 5 - • • V-Data VD29608A8A-25EG20813 - - • • Samsung K4T51083QE - - • • Hynix H5PS1G83EFRS6C 852AK - - • • ASUS P5G41C-M 1-17 Size SS/ DS GEIL GE24GB800C5QC 1024MB DS GEIL GX22GB6400DC 1024MB DS GEIL GX22GB6400UDC 1024MB DS GEIL GB24GB6400C4DC 2048MB DS GEIL GB24GB6400C5DC 2048MB DS GEIL...
... 5 - • • Transced TQ243PCF8 5 - • • Elpida E1108ACBG-8E-E 5 - • • V-Data VD29608A8A-25EG20813 - - • • Samsung K4T51083QE - - • • Hynix H5PS1G83EFRS6C 852AK - - • • ASUS P5G41C-M 1-17 Size SS/ DS GEIL GE24GB800C5QC 1024MB DS GEIL GX22GB6400DC 1024MB DS GEIL GX22GB6400UDC 1024MB DS GEIL GB24GB6400C4DC 2048MB DS GEIL GB24GB6400C5DC 2048MB DS GEIL...
User Manual
Page 29
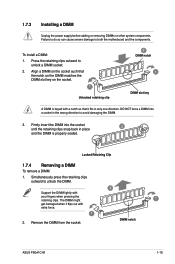
... socket. 1 Unlocked retaining clip 2 DIMM notch 1 DIMM slot key A DIMM is properly seated. Firmly insert the DIMM into a socket in only one direction. DIMM notch ASUS P5G41C-M 1-19 Failure to do so can cause severe damage to unlock a DIMM socket. 2. Press the retaining clips outward to both the motherboard and the components...
... socket. 1 Unlocked retaining clip 2 DIMM notch 1 DIMM slot key A DIMM is properly seated. Firmly insert the DIMM into a socket in only one direction. DIMM notch ASUS P5G41C-M 1-19 Failure to do so can cause severe damage to unlock a DIMM socket. 2. Press the retaining clips outward to both the motherboard and the components...
User Manual
Page 31
...! • If the steps above do not need to clear the RTC when the system hangs due to default values. To erase the RTC RAM: 1. ASUS P5G41C-M 1-21 Keep the cap on CLRTC jumper default position. 1.9 Jumpers 1. Turn OFF the computer and unplug the power cord. 2. You can clear the CMOS memory...
...! • If the steps above do not need to clear the RTC when the system hangs due to default values. To erase the RTC RAM: 1. ASUS P5G41C-M 1-21 Keep the cap on CLRTC jumper default position. 1.9 Jumpers 1. Turn OFF the computer and unplug the power cord. 2. You can clear the CMOS memory...
User Manual
Page 33
... you connect a high-definition front panel audio module to this connector, set to avail of HD DVD, Blu-ray, and other VGA-compatible devices. 10. ASUS P5G41C-M 1-23 These two 4-pin Universal Serial Bus (USB) ports are available for connecting USB 2.0 devices. 8. PS/2 Keyboard port (purple). See section 2.4.3 Chipset for a PS/2 keyboard...
... you connect a high-definition front panel audio module to this connector, set to avail of HD DVD, Blu-ray, and other VGA-compatible devices. 10. ASUS P5G41C-M 1-23 These two 4-pin Universal Serial Bus (USB) ports are available for connecting USB 2.0 devices. 8. PS/2 Keyboard port (purple). See section 2.4.3 Chipset for a PS/2 keyboard...
User Manual
Page 35
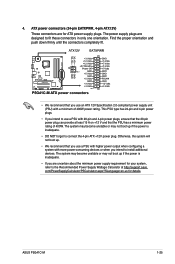
.../PowerSupplyCalculator/PSCalculator.aspx?SLanguage=en-us for ATX power supply plugs. ATX power connectors (24-pin EATXPWR, 4-pin ATX12V) These connectors are for details. ASUS P5G41C-M 1-25 Find the proper orientation and push down firmly until the connectors completely fit. • We recommend that you are designed to install additional devices. ...
.../PowerSupplyCalculator/PSCalculator.aspx?SLanguage=en-us for ATX power supply plugs. ATX power connectors (24-pin EATXPWR, 4-pin ATX12V) These connectors are for details. ASUS P5G41C-M 1-25 Find the proper orientation and push down firmly until the connectors completely fit. • We recommend that you are designed to install additional devices. ...
User Manual
Page 37
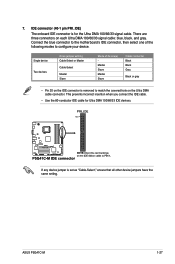
... Master Slave Mode of the following modes to match the covered hole on each Ultra DMA 100/66/33 signal cable: blue, black, and gray. ASUS P5G41C-M 1-27 There are three connectors on the Ultra DMA cable connector. Connect the blue connector to the motherboard's IDE connector, then select one of device...
... Master Slave Mode of the following modes to match the covered hole on each Ultra DMA 100/66/33 signal cable: blue, black, and gray. ASUS P5G41C-M 1-27 There are three connectors on the Ultra DMA cable connector. Connect the blue connector to the motherboard's IDE connector, then select one of device...

User Manual
Page 39
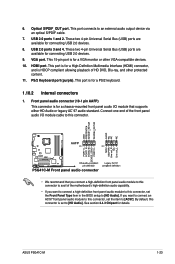
... of the system chassis. Never connect a 1394 cable to 480 Mbps connection speed. Serial port connector (10-1 pin COM1) The connector is purchased separately. 10. ASUS P5G41C-M 1-29 9. The USB module cable is for USB 2.0 ports. The serial port module is purchased separately. USB connectors (10-1 pin USB56, USB78) These connectors are...
... of the system chassis. Never connect a 1394 cable to 480 Mbps connection speed. Serial port connector (10-1 pin COM1) The connector is purchased separately. 10. ASUS P5G41C-M 1-29 9. The USB module cable is for USB 2.0 ports. The serial port module is purchased separately. USB connectors (10-1 pin USB56, USB78) These connectors are...
User Manual
Page 41
... original motherboard BIOS file to a USB flash disk in case you need to manage, save, and update the motherboard BIOS in Windows® environment. • ASUS Update requires an Internet connection either through a network or an Internet Service Provider (ISP). • This utility is a utility that you wish to complete the... BIOS from the Internet a. Chapter 2 BIOS information 2.1 Managing and updating your BIOS Save a copy of the updating process: Updating from the Internet, then click Next. ASUS P5G41C-M 2-1
... original motherboard BIOS file to a USB flash disk in case you need to manage, save, and update the motherboard BIOS in Windows® environment. • ASUS Update requires an Internet connection either through a network or an Internet Service Provider (ISP). • This utility is a utility that you wish to complete the... BIOS from the Internet a. Chapter 2 BIOS information 2.1 Managing and updating your BIOS Save a copy of the updating process: Updating from the Internet, then click Next. ASUS P5G41C-M 2-1

User Manual
Page 43
...menu for the BIOS file. Select the Load Setup Defaults item under the Exit menu. Refer to the floppy disk drive, if supported. 3. ASUS P5G41C-M 2-3 For motherboards without the floppy connector, prepare a USB flash disk before using this utility, rename the BIOS file in the removable device...process. Doing so can restore a corrupted BIOS file using this utility. Turn on again. Download the latest BIOS file from the ASUS website at www.asus.com. • The removable devices that contains the updated BIOS file. • Before using the motherboard support DVD or a ...
...menu for the BIOS file. Select the Load Setup Defaults item under the Exit menu. Refer to the floppy disk drive, if supported. 3. ASUS P5G41C-M 2-3 For motherboards without the floppy connector, prepare a USB flash disk before using this utility, rename the BIOS file in the removable device...process. Doing so can restore a corrupted BIOS file using this utility. Turn on again. Download the latest BIOS file from the ASUS website at www.asus.com. • The removable devices that contains the updated BIOS file. • Before using the motherboard support DVD or a ...
User Manual
Page 45
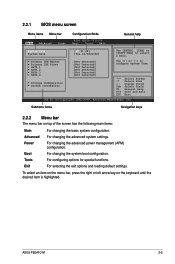
... IDE Slave :[Not Detected] SATA 1 :[Not Detected] SATA 2 :[Not Detected] SATA 3 :[Not Detected] SATA 4 :[Not Detected] Storage Configuration System Information Use [+] or [-] to select a field. ASUS P5G41C-M 2-5 Exit For selecting the exit options and loading default settings. Change Field Tab Select Field F1 General Help F10 Save and Exit ESC Exit v02...
... IDE Slave :[Not Detected] SATA 1 :[Not Detected] SATA 2 :[Not Detected] SATA 3 :[Not Detected] SATA 4 :[Not Detected] Storage Configuration System Information Use [+] or [-] to select a field. ASUS P5G41C-M 2-5 Exit For selecting the exit options and loading default settings. Change Field Tab Select Field F1 General Help F10 Save and Exit ESC Exit v02...

User Manual
Page 47
... [-] to set the system date. 2.3.3 Primary IDE Master/Slave, SATA1~4 While entering Setup, the BIOS automatically detects the presence of the appropriate IDE device type. ASUS P5G41C-M 2-7 Select CDROM if you an overview of IDE drive.
... [-] to set the system date. 2.3.3 Primary IDE Master/Slave, SATA1~4 While entering Setup, the BIOS automatically detects the presence of the appropriate IDE device type. ASUS P5G41C-M 2-7 Select CDROM if you an overview of IDE drive.
User Manual
Page 49
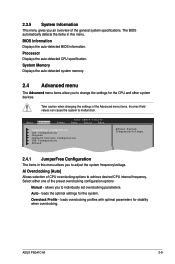
.... BIOS Information Displays the auto-detected BIOS information. Processor Displays the auto-detected CPU specification. Ai Overclocking [Auto] Allows selection of the general system specifications. ASUS P5G41C-M 2-9 Auto - loads the optimal settings for the CPU and other system devices. loads overclocking profiles with optimal parameters for stability when overclocking. The BIOS automatically...
.... BIOS Information Displays the auto-detected BIOS information. Processor Displays the auto-detected CPU specification. Ai Overclocking [Auto] Allows selection of the general system specifications. ASUS P5G41C-M 2-9 Auto - loads the optimal settings for the CPU and other system devices. loads overclocking profiles with optimal parameters for stability when overclocking. The BIOS automatically...


