User Manual
Page 7
... system, ensure that the power cables for the devices are unplugged before you add a device. • Before connecting or removing signal cables from connectors, slots, sockets and circuitry. • Avoid dust, humidity, and temperature extremes. About this guide is organized This guide contains the following parts: • Chapter 1: Product introduction This...
... system, ensure that the power cables for the devices are unplugged before you add a device. • Before connecting or removing signal cables from connectors, slots, sockets and circuitry. • Avoid dust, humidity, and temperature extremes. About this guide is organized This guide contains the following parts: • Chapter 1: Product introduction This...
User Manual
Page 9
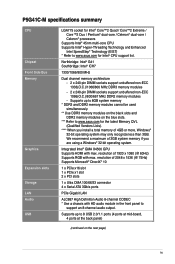
...memory of 4GB or more, Windows® 32-bit operating system may only recognize less than 3GB. P5G41C-M specifications summary CPU Chipset Front Side Bus Memory Graphics Expansion slots Storage LAN Audio USB LGA775 socket for Intel® Core™2 Quad / Core™2 Extreme / Core™2 Duo / Pentium&#... ATA 3Gb/s ports PCIe Gigabit LAN ALC887 High Definition Audio 8-channel CODEC * Use a chassis with HD audio module in the front panel to www.asus.com for Intel® CPU support list. resolution of 1920 x 1080 (@ 60Hz) Supports RGB with max. Supports up to 8GB system memory * ...
...memory of 4GB or more, Windows® 32-bit operating system may only recognize less than 3GB. P5G41C-M specifications summary CPU Chipset Front Side Bus Memory Graphics Expansion slots Storage LAN Audio USB LGA775 socket for Intel® Core™2 Quad / Core™2 Extreme / Core™2 Duo / Pentium&#... ATA 3Gb/s ports PCIe Gigabit LAN ALC887 High Definition Audio 8-channel CODEC * Use a chassis with HD audio module in the front panel to www.asus.com for Intel® CPU support list. resolution of 1920 x 1080 (@ 60Hz) Supports RGB with max. Supports up to 8GB system memory * ...
User Manual
Page 14
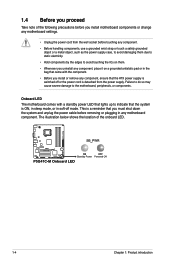
... sleep mode, or in the bag that came with a standby power LED that lights up to indicate that the system is detached from the wall socket before removing or plugging in any component, place it on a grounded antistatic pad or in soft-off mode. 1.4 Before you proceed Take note of the...
... sleep mode, or in the bag that came with a standby power LED that lights up to indicate that the system is detached from the wall socket before removing or plugging in any component, place it on a grounded antistatic pad or in soft-off mode. 1.4 Before you proceed Take note of the...
User Manual
Page 16
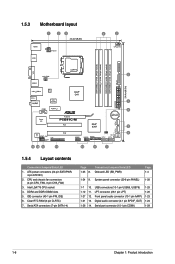
... 1-21 13. CPU and chassis fan connectors (4-pin CPU_FAN, 3-pin CHA_FAN) 3. Serial ATA connectors (7-pin SATA1-4) Page Connectors/Jumpers/Slots/LED 1-25 8. Intel LGA775 CPU socket 4. USB connectors (10-1 pin USB56, USB78) 1-29 1-12 11.
... 1-21 13. CPU and chassis fan connectors (4-pin CPU_FAN, 3-pin CHA_FAN) 3. Serial ATA connectors (7-pin SATA1-4) Page Connectors/Jumpers/Slots/LED 1-25 8. Intel LGA775 CPU socket 4. USB connectors (10-1 pin USB56, USB78) 1-29 1-12 11.
User Manual
Page 17
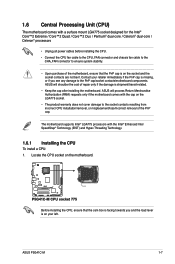
... if the motherboard comes with the cap on the socket and the socket contacts are not bent. The motherboard supports Intel® LGA775 processors with the Intel® Enhanced Intel SpeedStep® Technology (EIST) and Hyper-Threading Technology. 1.6.1 Installing the CPU To install a CPU: 1. ASUS P5G41C-M 1-7 ASUS will shoulder the cost of repair only if...
... if the motherboard comes with the cap on the socket and the socket contacts are not bent. The motherboard supports Intel® LGA775 processors with the Intel® Enhanced Intel SpeedStep® Technology (EIST) and Hyper-Threading Technology. 1.6.1 Installing the CPU To install a CPU: 1. ASUS P5G41C-M 1-7 ASUS will shoulder the cost of repair only if...

User Manual
Page 18
...to remove (4B). Retention tab A B Load lever PnP cap Load plate 4B 4A 3 5. Lift the load lever in the direction of the socket then fit the socket alignment key into the CPU notch. CPU notch Gold triangle mark Alignment key 1-8 Chapter 1: Product introduction Press the load lever with your thumb (A),... the arrow to a 100º angle (4A), then push the PnP cap from the retention tab. 2. Position the CPU over the socket, ensuring that the gold triangle is released from the load plate window to the socket pins, do not remove the PnP cap unless you are installing a CPU. 3.
...to remove (4B). Retention tab A B Load lever PnP cap Load plate 4B 4A 3 5. Lift the load lever in the direction of the socket then fit the socket alignment key into the CPU notch. CPU notch Gold triangle mark Alignment key 1-8 Chapter 1: Product introduction Press the load lever with your thumb (A),... the arrow to a 100º angle (4A), then push the PnP cap from the retention tab. 2. Position the CPU over the socket, ensuring that the gold triangle is released from the load plate window to the socket pins, do not remove the PnP cap unless you are installing a CPU. 3.

User Manual
Page 22
The figure illustrates the location of the DIMM sockets: Channel Channel A Channel B Sockets DDR3_A1 and DDR2_A1 DDR3_B1 and DDR2_B1 1-12 Chapter 1: Product introduction Carefully remove the heatsink and fan assembly from the motherboard. 5. 4. Rotate each fastener clockwise to ensure correct orientation when reinstalling. 1.7 System memory 1.7.1 Overview The motherboard comes with two Double Data Rate 2 (DDR2) and two Double Data Rate 3 (DDR3) Dual Inline Memory Modules (DIMM) sockets.
The figure illustrates the location of the DIMM sockets: Channel Channel A Channel B Sockets DDR3_A1 and DDR2_A1 DDR3_B1 and DDR2_B1 1-12 Chapter 1: Product introduction Carefully remove the heatsink and fan assembly from the motherboard. 5. 4. Rotate each fastener clockwise to ensure correct orientation when reinstalling. 1.7 System memory 1.7.1 Overview The motherboard comes with two Double Data Rate 2 (DDR2) and two Double Data Rate 3 (DDR3) Dual Inline Memory Modules (DIMM) sockets.
User Manual
Page 23
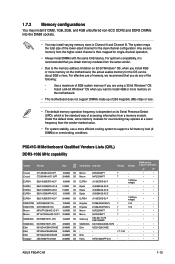
...less. 1.7.2 Memory configurations You may install 512MB, 1GB, 2GB, and 4GB unbuffered non‑ECC DDR2 and DDR3 DIMMs into the DIMM sockets. • You may operate at a lower frequency than the vendor-marked value. • For system stability, use of memory, ...8226; • Elixir M2Y2G64CBHC9N-BE 2048MB DS Elixir - - - • • Kingtiger 2GB DIMM PC3-8500 2048MB DS Hynix H5TQ1G83AFP G7C - - • • ASUS P5G41C-M 1-13 Install a 64-bit Windows® OS when you are using a 32-bit Windows® OS. - Use a maximum of the following: - Size SS/ ...
...less. 1.7.2 Memory configurations You may install 512MB, 1GB, 2GB, and 4GB unbuffered non‑ECC DDR2 and DDR3 DIMMs into the DIMM sockets. • You may operate at a lower frequency than the vendor-marked value. • For system stability, use of memory, ...8226; • Elixir M2Y2G64CBHC9N-BE 2048MB DS Elixir - - - • • Kingtiger 2GB DIMM PC3-8500 2048MB DS Hynix H5TQ1G83AFP G7C - - • • ASUS P5G41C-M 1-13 Install a 64-bit Windows® OS when you are using a 32-bit Windows® OS. - Use a maximum of the following: - Size SS/ ...
User Manual
Page 25
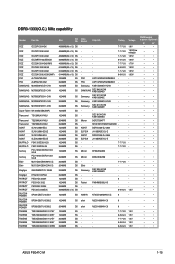
...24 1.5V • • • • • • • • • • • • ASUS P5G41C-M 1-15 Samsung K4B1G0846D-HCH9 - NANYA 8DD22D9JNM SEC 904 HCH9 K4B1G0846D PM64M8D38U-15 - OCZ OCZ3P13334GK OCZ OCZ3P1333LV4GK OCZ OCZ OCZ OCZ OCZ OCZ PSC ...of 2) DS 1024MB SS Micron Elixir Samsung Patriot - SAMSUNG SEC 846 HCH9 K4B1G08460 - Micron 9GF27D9KPT - - Samsung SEC 913 HCH9 K4B1G0846E - DIMM socket support (Optional) A* B* • • • • • • • • • • •...
...24 1.5V • • • • • • • • • • • • ASUS P5G41C-M 1-15 Samsung K4B1G0846D-HCH9 - NANYA 8DD22D9JNM SEC 904 HCH9 K4B1G0846D PM64M8D38U-15 - OCZ OCZ3P13334GK OCZ OCZ3P1333LV4GK OCZ OCZ OCZ OCZ OCZ OCZ PSC ...of 2) DS 1024MB SS Micron Elixir Samsung Patriot - SAMSUNG SEC 846 HCH9 K4B1G08460 - Micron 9GF27D9KPT - - Samsung SEC 913 HCH9 K4B1G0846E - DIMM socket support (Optional) A* B* • • • • • • • • • • •...

User Manual
Page 27
DIMM socket support (Optional) A* B* • • GEIL - 5 1.8V • • GEIL - 4 - • • GEIL - 5 - • • GEIL GL2L128M88BA25AB 5 - •...-E 5 - • • V-Data VD29608A8A-25EG20813 - - • • Samsung K4T51083QE - - • • Hynix H5PS1G83EFRS6C 852AK - - • • ASUS P5G41C-M 1-17 GEIL - Timing 5 Voltage - Size SS/ DS GEIL GE24GB800C5QC 1024MB DS GEIL GX22GB6400DC 1024MB DS GEIL GX22GB6400UDC 1024MB DS GEIL GB24GB6400C4DC 2048MB DS GEIL GB24GB6400C5DC...
DIMM socket support (Optional) A* B* • • GEIL - 5 1.8V • • GEIL - 4 - • • GEIL - 5 - • • GEIL GL2L128M88BA25AB 5 - •...-E 5 - • • V-Data VD29608A8A-25EG20813 - - • • Samsung K4T51083QE - - • • Hynix H5PS1G83EFRS6C 852AK - - • • ASUS P5G41C-M 1-17 GEIL - Timing 5 Voltage - Size SS/ DS GEIL GE24GB800C5QC 1024MB DS GEIL GX22GB6400DC 1024MB DS GEIL GX22GB6400UDC 1024MB DS GEIL GB24GB6400C4DC 2048MB DS GEIL GB24GB6400C5DC...

User Manual
Page 28
... or the blue slots as one pair of 2) DS Chip Brand - Chip NO. GL2L128M88BA18BW GL2L128M88BA25AB GL2L128M88BA25AB - Visit the ASUS website at www.asus.com for the latest QVL. 1-18 Chapter 1: Product introduction Timing Voltage DIMM socket support (Optional) A* B* 5-5-5-15 - • • 5-5-5-15 2.1V-2.3V • • 5-5-5-15 2.10V • • - - - - - - - - - - DDR2-1066 (O.C.) MHz...
... or the blue slots as one pair of 2) DS Chip Brand - Chip NO. GL2L128M88BA18BW GL2L128M88BA25AB GL2L128M88BA25AB - Visit the ASUS website at www.asus.com for the latest QVL. 1-18 Chapter 1: Product introduction Timing Voltage DIMM socket support (Optional) A* B* 5-5-5-15 - • • 5-5-5-15 2.1V-2.3V • • 5-5-5-15 2.10V • • - - - - - - - - - - DDR2-1066 (O.C.) MHz...
User Manual
Page 29
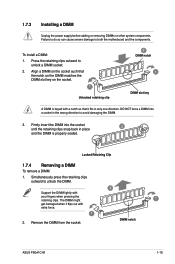
... retaining clip 2 DIMM notch 1 DIMM slot key A DIMM is properly seated. Remove the DIMM from the socket. To install a DIMM: 1. DIMM notch ASUS P5G41C-M 1-19 Firmly insert the DIMM into a socket in place 3 and the DIMM is keyed with extra force. 1 2. Failure to do so can cause severe damage to unlock the DIMM. 2 Support...
... retaining clip 2 DIMM notch 1 DIMM slot key A DIMM is properly seated. Remove the DIMM from the socket. To install a DIMM: 1. DIMM notch ASUS P5G41C-M 1-19 Firmly insert the DIMM into a socket in place 3 and the DIMM is keyed with extra force. 1 2. Failure to do so can cause severe damage to unlock the DIMM. 2 Support...


