
User Manual
Page 30
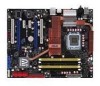
Clear RTC RAM Rear panel connectors 1. LAN (RJ-45) port 4. Center/Subwoofer port (orange) 8. Optical S/PDIF Out port 14. Rear Speaker Out port (black) 9. IEEE 1394a port 13. ...
Clear RTC RAM Rear panel connectors 1. LAN (RJ-45) port 4. Center/Subwoofer port (orange) 8. Optical S/PDIF Out port 14. Rear Speaker Out port (black) 9. IEEE 1394a port 13. ...

User Manual
Page 48
... For system failure due to Enable. Shut down the key during the boot process and enter BIOS setup to clear the Real Time Clock (RTC) RAM in CMOS, which include system setup information such as system passwords. You can automatically reset parameter settings to default values. • Due to the chipset... move the switch back to overclocking. You must turn ON the computer. 6. To erase the RTC RAM: 1. 2.6 Switch 1. The onboard button cell battery powers the RAM data in CMOS. Hold down and reboot the system so the BIOS can clear the CMOS memory of date, time, and system setup ...
... For system failure due to Enable. Shut down the key during the boot process and enter BIOS setup to clear the Real Time Clock (RTC) RAM in CMOS, which include system setup information such as system passwords. You can automatically reset parameter settings to default values. • Due to the chipset... move the switch back to overclocking. You must turn ON the computer. 6. To erase the RTC RAM: 1. 2.6 Switch 1. The onboard button cell battery powers the RAM data in CMOS. Hold down and reboot the system so the BIOS can clear the CMOS memory of date, time, and system setup ...
User Manual
Page 74
...BIOS setup program This motherboard supports a programmable Serial Peripheral Interface (SPI) chip that the computer can recognize these changes and record them in the CMOS RAM of your computer in the future. The SPI chip on your screen. • Visit the ASUS website (www.asus.com) to download the... Exit Menu. • The BIOS setup screens shown in section "4.1 Managing and updating your system using the provided utility described in this motherboard. 4-8 Chapter 4: BIOS setup Use the BIOS Setup program when you are for reference purposes only, and may not exactly match what you...
...BIOS setup program This motherboard supports a programmable Serial Peripheral Interface (SPI) chip that the computer can recognize these changes and record them in the CMOS RAM of your computer in the future. The SPI chip on your screen. • Visit the ASUS website (www.asus.com) to download the... Exit Menu. • The BIOS setup screens shown in section "4.1 Managing and updating your system using the provided utility described in this motherboard. 4-8 Chapter 4: BIOS setup Use the BIOS Setup program when you are for reference purposes only, and may not exactly match what you...
User Manual
Page 100
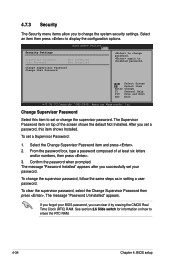
... Installed Change Supervisor Password Change User Password to set a password, this item shows Installed. To set your BIOS password, you to erase the RTC RAM. 4-34 Chapter 4: BIOS setup See section 2.6 Slide switch for information on top of at least six letters and/or numbers, then press . ...-2008, American Megatrends, Inc. 4.7.3 Security The Security menu items allow you can clear it by erasing the CMOS Real Time Clock (RTC) RAM. Confirm the password when prompted. The Supervisor Password item on how to change password. From the password box, type a password composed of the...
... Installed Change Supervisor Password Change User Password to set a password, this item shows Installed. To set your BIOS password, you to erase the RTC RAM. 4-34 Chapter 4: BIOS setup See section 2.6 Slide switch for information on top of at least six letters and/or numbers, then press . ...-2008, American Megatrends, Inc. 4.7.3 Security The Security menu items allow you can clear it by erasing the CMOS Real Time Clock (RTC) RAM. Confirm the password when prompted. The Supervisor Password item on how to change password. From the password box, type a password composed of the...

User Manual
Page 105
... discard your selections, choose this option, a confirmation window appears. After selecting this menu. When you press , a confirmation window appears. ASUS P5E Deluxe 4-39 Select Screen Select Item Enter Go to discard the selections you made changes to discard any changes and load the previously saved values... before exiting. If you made and restore the previously saved values. Load Setup Defaults This option allows you to the non-volatile RAM. Select Exit & Save Changes or make other than System Date, System Time, and Password, the BIOS asks for a confirmation ...
... discard your selections, choose this option, a confirmation window appears. After selecting this menu. When you press , a confirmation window appears. ASUS P5E Deluxe 4-39 Select Screen Select Item Enter Go to discard the selections you made changes to discard any changes and load the previously saved values... before exiting. If you made and restore the previously saved values. Load Setup Defaults This option allows you to the non-volatile RAM. Select Exit & Save Changes or make other than System Date, System Time, and Password, the BIOS asks for a confirmation ...


