User Manual
Page 6
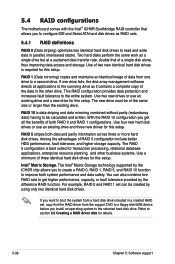
... RAID definitions 5-36 5.4.2 Installing Serial ATA hard disks 5-37 5.4.3 Intel® RAID configurations 5-37 5.5 Creating a RAID driver disk 5-45 5.5.1 Creating a RAID driver disk without entering the OS.... 5-45 5.5.2 Creating a RAID/SATA driver disk in Windows 5-45 Chapter 6: ATI® CrossFire™ technology support 6.1 Overview 6-1 6.1.1 Requirements 6-1 6.1.2 Before you begin 6-1 6.2 Installing CrossFire™ graphics cards 6-2 6.3 Software information 6-5 6.3.1 Installing the device drivers 6-5 6.3.2 Using the Catalyst™ Control Center 6-7 Appendix: CPU features...
... RAID definitions 5-36 5.4.2 Installing Serial ATA hard disks 5-37 5.4.3 Intel® RAID configurations 5-37 5.5 Creating a RAID driver disk 5-45 5.5.1 Creating a RAID driver disk without entering the OS.... 5-45 5.5.2 Creating a RAID/SATA driver disk in Windows 5-45 Chapter 6: ATI® CrossFire™ technology support 6.1 Overview 6-1 6.1.1 Requirements 6-1 6.1.2 Before you begin 6-1 6.2 Installing CrossFire™ graphics cards 6-2 6.3 Software information 6-5 6.3.1 Installing the device drivers 6-5 6.3.2 Using the Catalyst™ Control Center 6-7 Appendix: CPU features...
User Manual
Page 21
... does not have lifetime problems as a chipset fan does. Gaming Level Audio Design: Supreme FX II Supreme FX II delivers an excellent high definition audio experience to ensure quiet, cool and efficient operation. Q-Fan 2 ASUS Q-Fan 2 technology intelligently adjusts both CPU fan and chassis fan speeds according to system loading to the gamers of the innovative heat pipe design on this motherboard is utilized, ensuring effective heat dissipation...
... does not have lifetime problems as a chipset fan does. Gaming Level Audio Design: Supreme FX II Supreme FX II delivers an excellent high definition audio experience to ensure quiet, cool and efficient operation. Q-Fan 2 ASUS Q-Fan 2 technology intelligently adjusts both CPU fan and chassis fan speeds according to system loading to the gamers of the innovative heat pipe design on this motherboard is utilized, ensuring effective heat dissipation...
User Manual
Page 23
... from a USB flash disk containing the BIOS file. ASUS MyLogo3™ This feature allows you to select the language of the computer. The localized BIOS setup menu helps you can be stored in the CMOS or a separate file, giving users freedom to conveniently store or load multiple BIOS settings. ASUS EZ Flash 2 EZ Flash 2 is a user-friendly BIOS update utility. See page 4-11 for details. Update your system easier and faster. ASUS P5E Deluxe 1-7 Smart Support DVD It provides...
... from a USB flash disk containing the BIOS file. ASUS MyLogo3™ This feature allows you to select the language of the computer. The localized BIOS setup menu helps you can be stored in the CMOS or a separate file, giving users freedom to conveniently store or load multiple BIOS settings. ASUS EZ Flash 2 EZ Flash 2 is a user-friendly BIOS update utility. See page 4-11 for details. Update your system easier and faster. ASUS P5E Deluxe 1-7 Smart Support DVD It provides...
User Manual
Page 41
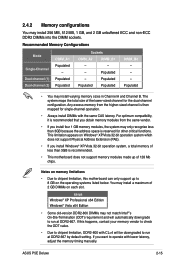
... slot. 64-bit Windows® XP Professional x64 Edition Windows® Vista x64 Edition • Some old-version DDR2-800 DIMMs may install a maximum of less than 3GB because the address space is then mapped for the dual-channel configuration. If this motherboard can only support up of the lower-sized channel for single-channel operation. • Always install DIMMs with the same CAS latency. ASUS P5E Deluxe...
... slot. 64-bit Windows® XP Professional x64 Edition Windows® Vista x64 Edition • Some old-version DDR2-800 DIMMs may install a maximum of less than 3GB because the address space is then mapped for the dual-channel configuration. If this motherboard can only support up of the lower-sized channel for single-channel operation. • Always install DIMMs with the same CAS latency. ASUS P5E Deluxe...

User Manual
Page 45
... installing the expansion card, configure it and make the necessary hardware settings for the card. 2. Refer to unplug the power cord before adding or removing expansion cards. Make sure to the tables on shared slots, ensure that the drivers support "Share IRQ" or that you removed earlier. 6. 2.5 Expansion slots In the future, you physical injury and damage motherboard components. 2.5.1 Installing an expansion card To install an expansion card: 1. ASUS P5E Deluxe...
... installing the expansion card, configure it and make the necessary hardware settings for the card. 2. Refer to unplug the power cord before adding or removing expansion cards. Make sure to the tables on shared slots, ensure that the drivers support "Share IRQ" or that you removed earlier. 6. 2.5 Expansion slots In the future, you physical injury and damage motherboard components. 2.5.1 Installing an expansion card To install an expansion card: 1. ASUS P5E Deluxe...
User Manual
Page 47
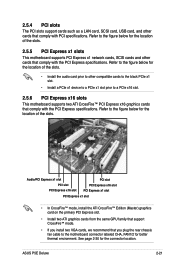
... rear chassis fan cable to a PCIe x16 slot. 2.5.6 PCI Express x16 slots This motherboard supports two ATI CrossFire™ PCI Express x16 graphics cards that comply with the PCI Express specifications. See page 2-30 for better thermal environment. Refer to the figure below for the location of the slots. • Install the audio card prior to other compatible cards to the black PCIe x1 slot. • Install a PCIe x1 device to a PCIe x1 slot prior to the motherboard connector labeled CHA_FAN1/2 for the connector location. ASUS P5E Deluxe...
... rear chassis fan cable to a PCIe x16 slot. 2.5.6 PCI Express x16 slots This motherboard supports two ATI CrossFire™ PCI Express x16 graphics cards that comply with the PCI Express specifications. See page 2-30 for better thermal environment. Refer to the figure below for the location of the slots. • Install the audio card prior to other compatible cards to the black PCIe x1 slot. • Install a PCIe x1 device to a PCIe x1 slot prior to the motherboard connector labeled CHA_FAN1/2 for the connector location. ASUS P5E Deluxe...
User Manual
Page 58
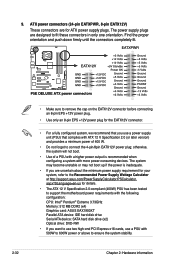
... 600W power or above to support the motherboard power requirements with the following configuration: CPU: Intel® Pentium® Extreme 3.73GHz Memory: 512 MB DDR2 (x4) Graphics card: ASUS EAX1900XT Parallel ATA device: IDE hard disk drive Serial ATA device: SATA hard disk drive (x2) Optical drive: DVD-RW • If you use a power supply unit (PSU) that complies with ATX 12 V Specification 2.0 (or later version) and provides a minimum power of a PSU with more power-consuming devices. ATX power connectors (24-pin EATXPWR, 8-pin EATX12V) These connectors are...
... 600W power or above to support the motherboard power requirements with the following configuration: CPU: Intel® Pentium® Extreme 3.73GHz Memory: 512 MB DDR2 (x4) Graphics card: ASUS EAX1900XT Parallel ATA device: IDE hard disk drive Serial ATA device: SATA hard disk drive (x2) Optical drive: DVD-RW • If you use a power supply unit (PSU) that complies with ATX 12 V Specification 2.0 (or later version) and provides a minimum power of a PSU with more power-consuming devices. ATX power connectors (24-pin EATXPWR, 8-pin EATX12V) These connectors are...
User Manual
Page 67
... USB flash disk in case you to manage, save, and update the motherboard BIOS in the future. The ASUS Update utility is copied to your BIOS The following utilities allow you to : • Save the current BIOS file • Download the latest BIOS file from the Internet • Update the BIOS from an updated BIOS file • Update the BIOS directly from the Internet, and • View the BIOS version information. The Drivers menu appears. 2. ASUS P5E Deluxe 4-1 Place the support DVD in Windows...
... USB flash disk in case you to manage, save, and update the motherboard BIOS in the future. The ASUS Update utility is copied to your BIOS The following utilities allow you to : • Save the current BIOS file • Download the latest BIOS file from the Internet • Update the BIOS from an updated BIOS file • Update the BIOS directly from the Internet, and • View the BIOS version information. The Drivers menu appears. 2. ASUS P5E Deluxe 4-1 Place the support DVD in Windows...
User Manual
Page 78
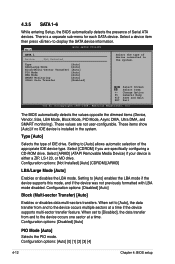
...specifically configuring a CD-ROM drive. Configuration options: [Disabled] [Auto] Block (Multi-sector Transfer) [Auto] Enables or disables data multi-sectors transfers. When set to [Auto], the data transfer from and to [Auto] allows automatic selection of device connected to display the SATA device information. Configuration options: [Disabled] [Auto] PIO Mode [Auto] Selects the PIO mode. Configuration options: [Auto] [0] [1] [2] [3] [4] 4-12 Chapter 4: BIOS setup Main BIOS SETUP UTILITY SATA 1 Device :Not Detected Select the type of the appropriate IDE device type. Type [Auto...
...specifically configuring a CD-ROM drive. Configuration options: [Disabled] [Auto] Block (Multi-sector Transfer) [Auto] Enables or disables data multi-sectors transfers. When set to [Auto], the data transfer from and to [Auto] allows automatic selection of device connected to display the SATA device information. Configuration options: [Disabled] [Auto] PIO Mode [Auto] Selects the PIO mode. Configuration options: [Auto] [0] [1] [2] [3] [4] 4-12 Chapter 4: BIOS setup Main BIOS SETUP UTILITY SATA 1 Device :Not Detected Select the type of the appropriate IDE device type. Type [Auto...
User Manual
Page 79
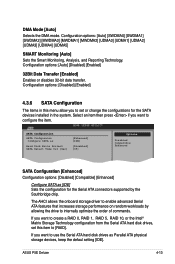
...UDMA2] [UDMA3] [UDMA4] [UDMA5] SMART Monitoring [Auto] Sets the Smart Monitoring, Analysis, and Reporting Technology. SATA Configuration SATA Configuraton Configure SATA as [Enhanced] [IDE] Hard Disk Write Protect [Disabled] SATA Detect Time Out (Sec) [35] Options Disabled Compatible Enhanced SATA Configuration [Enhanced] Configuration options: [Disabled] [Compatible] [Enhanced] Configure SATA as Parallel ATA physical storage devices, keep the defaul setting [IDE]. ASUS P5E Deluxe 4-13 Configuration options: [Disabled] [Enabled] 4.3.6 SATA Configuration The items in the system...
...UDMA2] [UDMA3] [UDMA4] [UDMA5] SMART Monitoring [Auto] Sets the Smart Monitoring, Analysis, and Reporting Technology. SATA Configuration SATA Configuraton Configure SATA as [Enhanced] [IDE] Hard Disk Write Protect [Disabled] SATA Detect Time Out (Sec) [35] Options Disabled Compatible Enhanced SATA Configuration [Enhanced] Configuration options: [Disabled] [Compatible] [Enhanced] Configure SATA as Parallel ATA physical storage devices, keep the defaul setting [IDE]. ASUS P5E Deluxe 4-13 Configuration options: [Disabled] [Enabled] 4.3.6 SATA Configuration The items in the system...
User Manual
Page 82
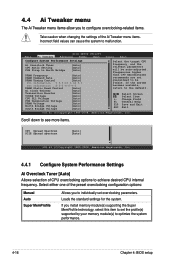
... Control [Auto] Ai Clock Twister [Auto] Transaction Booster [Auto] VCORE Voltage [Auto] CPU PLL Voltage [Auto] FSB Termination Voltage [Auto] DRAM Voltage [Auto] North Bridge Voltage [Auto] South Bridge Voltage [Auto] Select the target CPU frequency, and the relevant parameters will be stable. Main Ai Tweaker BIOS SETUP UTILITY Advanced Power Boot Tools Exit Configure System Performance Settings Ai Overclock Tuner [Auto] CPU Ratio Setting [Auto] FSB Strap to achieve desired CPU internal frequency. If the system becomes unstable, return to malfunction. Loads...
... Control [Auto] Ai Clock Twister [Auto] Transaction Booster [Auto] VCORE Voltage [Auto] CPU PLL Voltage [Auto] FSB Termination Voltage [Auto] DRAM Voltage [Auto] North Bridge Voltage [Auto] South Bridge Voltage [Auto] Select the target CPU frequency, and the relevant parameters will be stable. Main Ai Tweaker BIOS SETUP UTILITY Advanced Power Boot Tools Exit Configure System Performance Settings Ai Overclock Tuner [Auto] CPU Ratio Setting [Auto] FSB Strap to achieve desired CPU internal frequency. If the system becomes unstable, return to malfunction. Loads...
User Manual
Page 88
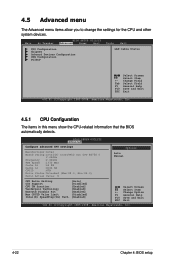
Main Ai Tweaker BIOS SETUP UTILITY Advanced Power Boot Tools Exit CPU Configuration Chipset Onboard Devices Configuration USB Configuration PCIPnP LAN Cable Status Select Screen Select Item +- Change Option F1 General Help F10 Save and Exit ESC Exit v02.61 (C)Copyright 1985-2008, American Megatrends, Inc. 4-22 Chapter 4: BIOS setup BIOS SETUP UTILITY Advanced Configure advanced CPU settings Manufacturer:Intel Brand String:Intel(R) Core(TM)2 Duo CPU E6750 @ 2.66GHz Frequency :2.66GHz FSB Speed :1333 MHz Cache L1 :64 KB Cache L2 :4096 KB...
Main Ai Tweaker BIOS SETUP UTILITY Advanced Power Boot Tools Exit CPU Configuration Chipset Onboard Devices Configuration USB Configuration PCIPnP LAN Cable Status Select Screen Select Item +- Change Option F1 General Help F10 Save and Exit ESC Exit v02.61 (C)Copyright 1985-2008, American Megatrends, Inc. 4-22 Chapter 4: BIOS setup BIOS SETUP UTILITY Advanced Configure advanced CPU settings Manufacturer:Intel Brand String:Intel(R) Core(TM)2 Duo CPU E6750 @ 2.66GHz Frequency :2.66GHz FSB Speed :1333 MHz Cache L1 :64 KB Cache L2 :4096 KB...
User Manual
Page 92
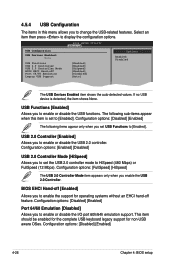
... you to enable or disable the USB functions. Configuration options: [Disabled] [Enabled] The following sub-items appear when this menu allows you enable the USB 2.0 Controller. Configuration options: [Disabled] [Enabled] 4-26 Chapter 4: BIOS setup USB 2.0 Controller [Enabled] Allows you set the USB 2.0 controller mode to enable or disable the USB 2.0 controller. Configuration options: [Disabled] [Enabled] Port 64/60 Emulation [Disabled] Allows you to display the configuration options. This item should be enabled for the complete USB keyboard legacy support for operating...
... you to enable or disable the USB functions. Configuration options: [Disabled] [Enabled] The following sub-items appear when this menu allows you enable the USB 2.0 Controller. Configuration options: [Disabled] [Enabled] 4-26 Chapter 4: BIOS setup USB 2.0 Controller [Enabled] Allows you set the USB 2.0 controller mode to enable or disable the USB 2.0 controller. Configuration options: [Disabled] [Enabled] Port 64/60 Emulation [Disabled] Allows you to display the configuration options. This item should be enabled for the complete USB keyboard legacy support for operating...
User Manual
Page 94
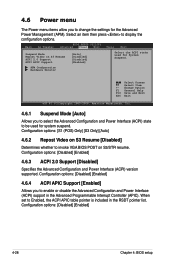
... Configuration and Power Interface (ACPI) support in the RSDT pointer list. Main Ai Tweaker BIOS SETUP UTILITY Advanced Power Boot Tools Exit Suspend Mode Repost Video on S3/STR resume. Configuration options: [Disabled] [Enabled] 4.6.3 ACPI 2.0 Support [Disabled] Specifies the Advanced Configuration and Power Interface (ACPI) version supported. APM Configuration Hardware Monitor Select Screen Select Item +- Select an item then press to invoke VGA BIOS POST on S3 Resume ACPI 2.0 Support ACPI APIC Support [Auto] [Disabled] [Disabled] [Enabled] Select the ACPI state used...
... Configuration and Power Interface (ACPI) support in the RSDT pointer list. Main Ai Tweaker BIOS SETUP UTILITY Advanced Power Boot Tools Exit Suspend Mode Repost Video on S3/STR resume. Configuration options: [Disabled] [Enabled] 4.6.3 ACPI 2.0 Support [Disabled] Specifies the Advanced Configuration and Power Interface (ACPI) version supported. APM Configuration Hardware Monitor Select Screen Select Item +- Select an item then press to invoke VGA BIOS POST on S3 Resume ACPI 2.0 Support ACPI APIC Support [Auto] [Disabled] [Disabled] [Enabled] Select the ACPI state used...
User Manual
Page 100
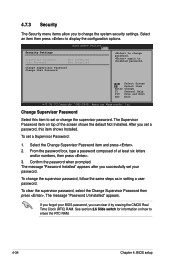
Select the Change Supervisor Password item and press . 2. From the password box, type a password composed of the screen shows the default Not Installed. To clear the supervisor password, select the Change Supervisor Password then press . See section 2.6 Slide switch for information on top of at least six letters and/or numbers, then press . 3. Security Settings BIOS SETUP UTILITY Boot Supervisor Password User Password :Not Installed :Not Installed Change Supervisor Password Change User Password to change the supervisor password. The Supervisor Password item...
Select the Change Supervisor Password item and press . 2. From the password box, type a password composed of the screen shows the default Not Installed. To clear the supervisor password, select the Change Supervisor Password then press . See section 2.6 Slide switch for information on top of at least six letters and/or numbers, then press . 3. Security Settings BIOS SETUP UTILITY Boot Supervisor Password User Password :Not Installed :Not Installed Change Supervisor Password Change User Password to change the supervisor password. The Supervisor Password item...
User Manual
Page 110
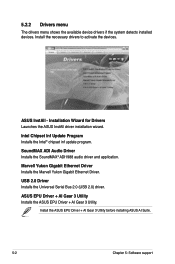
5.2.2 Drivers menu The drivers menu shows the available device drivers if the system detects installed devices. SoundMAX ADI Audio Driver Installs the SoundMAX® ADI1988 audio driver and application. Installation Wizard for Drivers Launches the ASUS InstAll driver installation wizard. USB 2.0 Driver Installs the Universal Serial Bus 2.0 (USB 2.0) driver. Intel Chipset Inf Update Program Installs the Intel® chipset inf update program. ASUS InstAll - Marvell Yukon Gigabit Ethernet Driver Installs the Marvell Yukon Gigabit Ethernet Driver. ASUS EPU Driver + AI Gear 3 Utility ...
5.2.2 Drivers menu The drivers menu shows the available device drivers if the system detects installed devices. SoundMAX ADI Audio Driver Installs the SoundMAX® ADI1988 audio driver and application. Installation Wizard for Drivers Launches the ASUS InstAll driver installation wizard. USB 2.0 Driver Installs the Universal Serial Bus 2.0 (USB 2.0) driver. Intel Chipset Inf Update Program Installs the Intel® chipset inf update program. ASUS InstAll - Marvell Yukon Gigabit Ethernet Driver Installs the Marvell Yukon Gigabit Ethernet Driver. ASUS EPU Driver + AI Gear 3 Utility ...
User Manual
Page 144
... support DVD to a floppy disk/USB device before you install an operating system to the selected hard disk drive. The RAID 5 configuration is data striping and data mirroring combined without parity (redundancy data) having to be of the same size or larger than the existing drive. You can be created by using only two identical hard disk drives. For example, RAID 0 and RAID 1 set , copy first the RAID driver from one drive fails, the disk...
... support DVD to a floppy disk/USB device before you install an operating system to the selected hard disk drive. The RAID 5 configuration is data striping and data mirroring combined without parity (redundancy data) having to be of the same size or larger than the existing drive. You can be created by using only two identical hard disk drives. For example, RAID 0 and RAID 1 set , copy first the RAID driver from one drive fails, the disk...
User Manual
Page 145
... display the configuration options. 4. Select [RAID] from the Configure SATA as , then press to the Main Menu, select SATA Configuration, then press . 3. Refer to the power connector on entering and navigating through the Intel® ICH9R Southbridge chip. For optimal performance, install identical drives of the same model and capacity when creating a disk array. ASUS P5E Deluxe 5-37 Connect the SATA signal cables. 3. Save your changes, then exit the BIOS Setup. Connect a SATA power cable to the system or the motherboard user guide for a RAID configuration...
... display the configuration options. 4. Select [RAID] from the Configure SATA as , then press to the Main Menu, select SATA Configuration, then press . 3. Refer to the power connector on entering and navigating through the Intel® ICH9R Southbridge chip. For optimal performance, install identical drives of the same model and capacity when creating a disk array. ASUS P5E Deluxe 5-37 Connect the SATA signal cables. 3. Save your changes, then exit the BIOS Setup. Connect a SATA power cable to the system or the motherboard user guide for a RAID configuration...
User Manual
Page 153
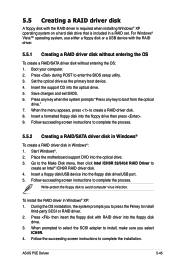
.... 5.5.2 Creating a RAID/SATA driver disk in Windows® To create a RAID driver disk in Windows® XP: 1. Insert a floppy disk/USB device into the optical drive. 3. To install the RAID driver in Windows®: 1. Follow the succeeding screen instructions to complete the process. Set the optical drive as the primary boot device. 4. Follow succeeding screen instructions to complete the installation. Save changes and exit BIOS. 6. Place the motherboard support DVD into the floppy disk drive/USB port. 5. Write-protect the floppy disk to boot from the optical drive." 7. When...
.... 5.5.2 Creating a RAID/SATA driver disk in Windows® To create a RAID driver disk in Windows® XP: 1. Insert a floppy disk/USB device into the optical drive. 3. To install the RAID driver in Windows®: 1. Follow the succeeding screen instructions to complete the process. Set the optical drive as the primary boot device. 4. Follow succeeding screen instructions to complete the installation. Save changes and exit BIOS. 6. Place the motherboard support DVD into the floppy disk drive/USB port. 5. Write-protect the floppy disk to boot from the optical drive." 7. When...
User Manual
Page 154
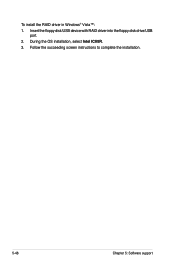
Insert the floppy disk/USB device with RAID driver into the floppy disk drive/USB port. 2. Follow the succeeding screen instructions to complete the installation. 5-46 Chapter 5: Software support During the OS installation, select Intel ICH9R. 3. To install the RAID driver in Windows® Vista™: 1.
Insert the floppy disk/USB device with RAID driver into the floppy disk drive/USB port. 2. Follow the succeeding screen instructions to complete the installation. 5-46 Chapter 5: Software support During the OS installation, select Intel ICH9R. 3. To install the RAID driver in Windows® Vista™: 1.


