
User Guide
Page 17
... 2-28 for details. Temperature, fan, and voltage monitoring The CPU temperature is software compatible with USB 1.1. USB 2.0 technology The motherboard implements the Universal Serial Bus (USB) 2.0 specification, dramatically increasing the connection speed from the 12 Mbps bandwidth on USB 2.0. See page 2-17 for details. The onboard Broadcom BCM5721 controllers use the PCI Express interface with onboard dual Gigabit LAN controllers to Gigabit bandwidth. This high speed interface is monitored by carrying data in packets. ASUS P5CR-VM 1-3 PCI Express features point-to...
... 2-28 for details. Temperature, fan, and voltage monitoring The CPU temperature is software compatible with USB 1.1. USB 2.0 technology The motherboard implements the Universal Serial Bus (USB) 2.0 specification, dramatically increasing the connection speed from the 12 Mbps bandwidth on USB 2.0. See page 2-17 for details. The onboard Broadcom BCM5721 controllers use the PCI Express interface with onboard dual Gigabit LAN controllers to Gigabit bandwidth. This high speed interface is monitored by carrying data in packets. ASUS P5CR-VM 1-3 PCI Express features point-to...
User Guide
Page 18
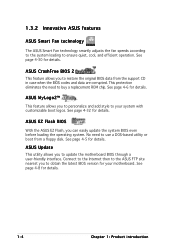
... the ASUS EZ Flash, you to use a DOS-based utility or boot from the support CD in case when the BIOS codes and data are corrupted. This protection eliminates the need to update the motherboard BIOS through a user-friendly interface. ASUS Update This utility allows you can easily update the system BIOS even before loading the operating system. ASUS CrashFree BIOS 2 This feature allows you to restore the original BIOS data from a floppy disk. Connect...
... the ASUS EZ Flash, you to use a DOS-based utility or boot from the support CD in case when the BIOS codes and data are corrupted. This protection eliminates the need to update the motherboard BIOS through a user-friendly interface. ASUS Update This utility allows you can easily update the system BIOS even before loading the operating system. ASUS CrashFree BIOS 2 This feature allows you to restore the original BIOS data from a floppy disk. Connect...

User Guide
Page 35
... expansion card: 1. Failure to do not need to the chassis with it by adjusting the software settings. 1. Remove the system unit cover (if your motherboard is completely seated on the slot. 5. Secure the card to install expansion cards. Turn on the next page. 3. Before installing the expansion card, read the documentation that the cards do so may need IRQ assignments. Install the software drivers for later use . When using PCI cards on BIOS setup...
... expansion card: 1. Failure to do not need to the chassis with it by adjusting the software settings. 1. Remove the system unit cover (if your motherboard is completely seated on the slot. 5. Secure the card to install expansion cards. Turn on the next page. 3. Before installing the expansion card, read the documentation that the cards do so may need IRQ assignments. Install the software drivers for later use . When using PCI cards on BIOS setup...
User Guide
Page 37
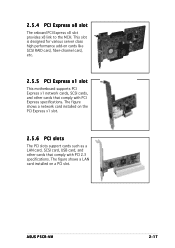
... a network card installed on a PCI slot. ASUS P5CR-VM 2-17 The figure shows a LAN card installed on the PCI Express x1 slot. 2.5.6 PCI slots The PCI slots support cards such as a LAN card, SCSI card, USB card, and other cards that comply with PCI Express specifications. This slot is designed for various server class high performance add-on cards like SCSI RAID card, fiber-channel card, etc. 2.5.5 PCI Express x1 slot This motherboard supports PCI Express x1 network cards, SCSI cards, and other cards that comply with PCI 2.3 specifications. 2.5.4 PCI Express x8 slot The onboard PCI...
... a network card installed on a PCI slot. ASUS P5CR-VM 2-17 The figure shows a LAN card installed on the PCI Express x1 slot. 2.5.6 PCI slots The PCI slots support cards such as a LAN card, SCSI card, USB card, and other cards that comply with PCI Express specifications. This slot is designed for various server class high performance add-on cards like SCSI RAID card, fiber-channel card, etc. 2.5.5 PCI Express x1 slot This motherboard supports PCI Express x1 network cards, SCSI cards, and other cards that comply with PCI 2.3 specifications. 2.5.4 PCI Express x8 slot The onboard PCI...

User Guide
Page 62
... the motherboard support CD to the bootable floppy disk you to update the BIOS file in DOS mode, then at least 600 KB free space to copy the current BIOS file that the floppy disk is not write-protected and has at the prompt type: afudos /o[filename] where the [filename] is your optical drive letter. Insert the Windows® 2000 CD to continue. 2. Press , then follow screen instructions...
... the motherboard support CD to the bootable floppy disk you to update the BIOS file in DOS mode, then at least 600 KB free space to copy the current BIOS file that the floppy disk is not write-protected and has at the prompt type: afudos /o[filename] where the [filename] is your optical drive letter. Insert the Windows® 2000 CD to continue. 2. Press , then follow screen instructions...

User Guide
Page 68
... the support CD that allows you to manage, save, and update the motherboard BIOS in the optical drive. ASUS Update requires an Internet connection either through a network or an Internet Service Provider (ISP). The D r i v e r s menu appears. 2. Click the U t i l i t i e s tab, then click I n s t a l l A S U S U p d a t e V X . The ASUS Update utility is copied to : • Save the current BIOS file • Download the latest BIOS file from the Internet • Update the BIOS from an updated BIOS file • Update the BIOS...
... the support CD that allows you to manage, save, and update the motherboard BIOS in the optical drive. ASUS Update requires an Internet connection either through a network or an Internet Service Provider (ISP). The D r i v e r s menu appears. 2. Click the U t i l i t i e s tab, then click I n s t a l l A S U S U p d a t e V X . The ASUS Update utility is copied to : • Save the current BIOS file • Download the latest BIOS file from the Internet • Update the BIOS from an updated BIOS file • Update the BIOS...

User Guide
Page 73
... Detected] : [Not Detected] Main menu items 4.2.5 Sub-menu items A solid triangle before each item on the menu bar displays the specific items for that menu. A configurable field is enclosed in brackets, and is not user-configurable. Plug And Play O/S PCI Latency Timer Allocate IRQ to PCI VGA Palette Snooping PCI IDE BusMaster [No] [64] [Yes] [Disabled] [Enabled] 4.2.9 General help Pop-up window with the configuration options for the menu items. If an...
... Detected] : [Not Detected] Main menu items 4.2.5 Sub-menu items A solid triangle before each item on the menu bar displays the specific items for that menu. A configurable field is enclosed in brackets, and is not user-configurable. Plug And Play O/S PCI Latency Timer Allocate IRQ to PCI VGA Palette Snooping PCI IDE BusMaster [No] [64] [Yes] [Disabled] [Enabled] 4.2.9 General help Pop-up window with the configuration options for the menu items. If an...

User Guide
Page 75
... Mode, Block Mode, PIO Mode, Async DMA, Ultra DMA, and SMART monitoring). Configuration options: [Disabled] [Auto] ASUS P5CR-VM 4-15 Type [Auto] Selects the type of IDE devices. When set to [Disabled], the data transfer from and to Auto allows automatic selection of device connected to the device occurs one sector at a time if the device supports multi-sector transfer feature. Select CDROM if you are not user-configurable. 4.3.4 Primary, Third, and Fourth IDE Master/Slave While entering Setup, the BIOS...
... Mode, Block Mode, PIO Mode, Async DMA, Ultra DMA, and SMART monitoring). Configuration options: [Disabled] [Auto] ASUS P5CR-VM 4-15 Type [Auto] Selects the type of IDE devices. When set to [Disabled], the data transfer from and to Auto allows automatic selection of device connected to the device occurs one sector at a time if the device supports multi-sector transfer feature. Select CDROM if you are not user-configurable. 4.3.4 Primary, Third, and Fourth IDE Master/Slave While entering Setup, the BIOS...

User Guide
Page 76
... options: [Disabled] [Compatible Mode] [Enhanced Mode] 4-16 Chapter 4: BIOS setup Configuration options: [Auto] [Disabled] [Enabled] 32Bit Data Transfer [Disabled] Enables or disables 32-bit data transfer. Set to Enhanced Mode if you want to configure the item. PIO Mode [Auto] Selects the PIO mode. Configuration options: [Disabled] [Enabled] 4.3.5 IDE Configuration The items in this menu allow you installed. When set in Advanced Host Controller Interface (AHCI) or RAID mode the SATA controller is set or change the configurations for the IDE devices installed in AHCI/RAID mode, SATA...
... options: [Disabled] [Compatible Mode] [Enhanced Mode] 4-16 Chapter 4: BIOS setup Configuration options: [Auto] [Disabled] [Enabled] 32Bit Data Transfer [Disabled] Enables or disables 32-bit data transfer. Set to Enhanced Mode if you want to configure the item. PIO Mode [Auto] Selects the PIO mode. Configuration options: [Disabled] [Enabled] 4.3.5 IDE Configuration The items in this menu allow you installed. When set in Advanced Host Controller Interface (AHCI) or RAID mode the SATA controller is set or change the configurations for the IDE devices installed in AHCI/RAID mode, SATA...

User Guide
Page 77
...: [Disabled] [Enabled] AHCI Port 3 Interlock Switch [Disabled] Enables or disables the Advanced Host Controller Interface (AHCI) Port 3 interlock switch. Configuration options: [0] [5] [10] [15] [20] [25] [30] [35] ASUS P5CR-VM 4-17 Configuration options: [Disabled] [Enabled] The O n b o a r d S e r i a l - Enhanced Mode Support On [S-ATA] The default setting SATA allows you to RAID. Configuration options: [S-ATA+P-ATA] [S-ATA] [P-ATA] The O n b o a r d I D E O p e r a t e M o d e and its submenu items appear only when the C o n f i g u r e S A T A A s item is set to use legacy OS...
...: [Disabled] [Enabled] AHCI Port 3 Interlock Switch [Disabled] Enables or disables the Advanced Host Controller Interface (AHCI) Port 3 interlock switch. Configuration options: [0] [5] [10] [15] [20] [25] [30] [35] ASUS P5CR-VM 4-17 Configuration options: [Disabled] [Enabled] The O n b o a r d S e r i a l - Enhanced Mode Support On [S-ATA] The default setting SATA allows you to RAID. Configuration options: [S-ATA+P-ATA] [S-ATA] [P-ATA] The O n b o a r d I D E O p e r a t e M o d e and its submenu items appear only when the C o n f i g u r e S A T A A s item is set to use legacy OS...

User Guide
Page 79
... Allows you to display the configuration options. USB Configuration MPS Configuration Remote Access Configuration CPU Configuration Chipset Onboard Devices Configuration PCI PnP Adjust system frequency/voltage 4.4.1 USB Configuration The items in this menu allow you to change the USB-related features. USB Configuration Module Version - 2.23.2-9.4 USB Devices Enabled: None USB Function Legacy USB Support USB 2.0 Controller USB 2.0 Controller Mode [Enabled] [Auto] [Enabled] [HiSpeed] Enables USB host controllers. Configuration options: [Disabled] [Enabled] ASUS P5CR-VM 4-19 Select an...
... Allows you to display the configuration options. USB Configuration MPS Configuration Remote Access Configuration CPU Configuration Chipset Onboard Devices Configuration PCI PnP Adjust system frequency/voltage 4.4.1 USB Configuration The items in this menu allow you to change the USB-related features. USB Configuration Module Version - 2.23.2-9.4 USB Devices Enabled: None USB Function Legacy USB Support USB 2.0 Controller USB 2.0 Controller Mode [Enabled] [Auto] [Enabled] [HiSpeed] Enables USB host controllers. Configuration options: [Disabled] [Enabled] ASUS P5CR-VM 4-19 Select an...

User Guide
Page 80
... [Enabled] [Auto] USB 2.0 Controller [Enabled] Allows you to display the configuration options. Select an item then press to enable or disable the USB 2.0 controller. Configuration options: [1.1] [1.4] 4-20 Chapter 4: BIOS setup Configuration options: [FullSpeed ] [HiSpeed ] 4.4.2 MPS Configuration This menu allows you to enable or disable support for legacy USB devices. Legacy USB Support [Auto] Allows you to configure the Multi-Processor table. Setting to Auto allows the system to detect the presence of USB devices at startup. If detected, the USB controller legacy mode is...
... [Enabled] [Auto] USB 2.0 Controller [Enabled] Allows you to display the configuration options. Select an item then press to enable or disable the USB 2.0 controller. Configuration options: [1.1] [1.4] 4-20 Chapter 4: BIOS setup Configuration options: [FullSpeed ] [HiSpeed ] 4.4.2 MPS Configuration This menu allows you to enable or disable support for legacy USB devices. Legacy USB Support [Auto] Allows you to configure the Multi-Processor table. Setting to Auto allows the system to detect the presence of USB devices at startup. If detected, the USB controller legacy mode is...

User Guide
Page 81
... to select the flow control for console redirection. 4.4.3 Remote Access Configuration The items in this menu allow you to select the serial port mode settings. Serial port number [COM1] Sets the serial port for console redirection. This item is auto-detected and is enabled. Configuration options: [Disabled] [Enabled] The succeeding items appear when the item R e m o t e A c c e s s is set to display the configuration options. Remote Access [Disabled] Enables or disables the remote access feature. Configuration options: [None [Hardware] [Software] ASUS P5CR-VM 4-21 Select an item...
... to select the flow control for console redirection. 4.4.3 Remote Access Configuration The items in this menu allow you to select the serial port mode settings. Serial port number [COM1] Sets the serial port for console redirection. This item is auto-detected and is enabled. Configuration options: [Disabled] [Enabled] The succeeding items appear when the item R e m o t e A c c e s s is set to display the configuration options. Remote Access [Disabled] Enables or disables the remote access feature. Configuration options: [None [Hardware] [Software] ASUS P5CR-VM 4-21 Select an item...

User Guide
Page 82
... Setting: VID CMOS Setting: Microcode Updation: Max CPUID Value Limit: Enhanced C1 Control CPU Internal Thermal Control [ 24] [ 62] [Enabled] [Disabled] [Auto] [Auto] Hyper Threading Technology [Enabled] Sets the ratio between the CPU Core Clock and the Front Side Bus frequency. Configuration options: [Disabled] [Enabled] Sredir Memory Display Delay [No Delay] Gives the delay period (in CMOS then actual and setpoint values may not work when this item is auto-detected by BIOS. Configuration options: [ANSI] [VT100] [VT-UTF8] VT-UTF8 Combo Key Support [Enabled] Enables or disables...
... Setting: VID CMOS Setting: Microcode Updation: Max CPUID Value Limit: Enhanced C1 Control CPU Internal Thermal Control [ 24] [ 62] [Enabled] [Disabled] [Auto] [Auto] Hyper Threading Technology [Enabled] Sets the ratio between the CPU Core Clock and the Front Side Bus frequency. Configuration options: [Disabled] [Enabled] Sredir Memory Display Delay [No Delay] Gives the delay period (in CMOS then actual and setpoint values may not work when this item is auto-detected by BIOS. Configuration options: [ANSI] [VT100] [VT-UTF8] VT-UTF8 Combo Key Support [Enabled] Enables or disables...

User Guide
Page 83
... is auto-detected by BIOS. In C1E mode, the CPU power consumption is to run. Configuration options: [Disabled] [Enabled] ASUS P5CR-VM 4-23 VID CMOS Setting [ 62] Allows you to set to [Auto], the BIOS will automatically check the CPU's capability to enable the C1E support. You can only adjust the R a t i o C M O S and the V I D C M O S setting if you to adjust the values. Use the < + > or < - > keys to enable or disable the processor Hyper-Threading Technology. Configuration options: [Auto] [Disabled] CPU Internal Thermal Control [Auto] Disables or sets the CPU internal thermal...
... is auto-detected by BIOS. In C1E mode, the CPU power consumption is to run. Configuration options: [Disabled] [Enabled] ASUS P5CR-VM 4-23 VID CMOS Setting [ 62] Allows you to set to [Auto], the BIOS will automatically check the CPU's capability to enable the C1E support. You can only adjust the R a t i o C M O S and the V I D C M O S setting if you to adjust the values. Use the < + > or < - > keys to enable or disable the processor Hyper-Threading Technology. Configuration options: [Auto] [Disabled] CPU Internal Thermal Control [Auto] Disables or sets the CPU internal thermal...

User Guide
Page 84
...to display the sub-menu. Configuration options: [5 Clocks] [4 Clocks] [3 Clocks] DRAM RAS# Precharge [4 Clocks] Controls the idle clocks after issuing a precharge command to change the advanced chipset settings. Configuration options: [2 Clocks] [3 Clocks] [4 Clocks] [5 Clocks] 4-24 Chapter 4: BIOS setup Advanced Chipset Settings Configure DRAM Timing by SPD DRAM ECC Mode Hyper Path 2 Booting Graphic Priority Onboard LAN Boot ROM [Enabled] [Enabled] [Auto] [Internal VGA] [Disabled] Enable or disable DRAM timing. 4.4.5 Chipset The Chipset menu allows you can manually set...
...to display the sub-menu. Configuration options: [5 Clocks] [4 Clocks] [3 Clocks] DRAM RAS# Precharge [4 Clocks] Controls the idle clocks after issuing a precharge command to change the advanced chipset settings. Configuration options: [2 Clocks] [3 Clocks] [4 Clocks] [5 Clocks] 4-24 Chapter 4: BIOS setup Advanced Chipset Settings Configure DRAM Timing by SPD DRAM ECC Mode Hyper Path 2 Booting Graphic Priority Onboard LAN Boot ROM [Enabled] [Enabled] [Auto] [Internal VGA] [Disabled] Enable or disable DRAM timing. 4.4.5 Chipset The Chipset menu allows you can manually set...

User Guide
Page 85
Configuration options: [Auto] [Disabled] Hyper Path 2 [Auto] Allows you to enable or disable DRAM timing. DRAM ECC Mode [Auto] Allows you to enable or disable the ASUS Hyper Path 2 feature. Configuration options: [Disabled] [Enabled] ASUS P5CR-VM 4-25 Configuration options: [Internal VGA] [PCI/Int-VGA] Onboard LAN Boot ROM [Disabled] Allows you to use as primary boot device. Configuration options: [Disabled] [Enabled] [Auto] Booting Graphic Priority [Internal VGA] Allows selection of the graphics controller to enable or disable the option ROM in the onboard LAN controller.
Configuration options: [Auto] [Disabled] Hyper Path 2 [Auto] Allows you to enable or disable DRAM timing. DRAM ECC Mode [Auto] Allows you to enable or disable the ASUS Hyper Path 2 feature. Configuration options: [Disabled] [Enabled] ASUS P5CR-VM 4-25 Configuration options: [Internal VGA] [PCI/Int-VGA] Onboard LAN Boot ROM [Disabled] Allows you to use as primary boot device. Configuration options: [Disabled] [Enabled] [Auto] Booting Graphic Priority [Internal VGA] Allows selection of the graphics controller to enable or disable the option ROM in the onboard LAN controller.

User Guide
Page 89
... system goes into On/Off or Suspend when Power button is included in the Application-Specific Integrated Circuit (ASIC). Configuration options: [Disabled] [Enabled] 4.5.2 APM Configuration APM Configuration Restore on state, whatever the system state was before the AC power loss. Configuration options: [Power Off] [Power On] [Last State] ASUS P5CR-VM 4-29 Select an item then press to Enabled, the ACPI APIC table pointer is pressed. When set to display the configuration options.
... system goes into On/Off or Suspend when Power button is included in the Application-Specific Integrated Circuit (ASIC). Configuration options: [Disabled] [Enabled] 4.5.2 APM Configuration APM Configuration Restore on state, whatever the system state was before the AC power loss. Configuration options: [Power Off] [Power On] [Last State] ASUS P5CR-VM 4-29 Select an item then press to Enabled, the ACPI APIC table pointer is pressed. When set to display the configuration options.

User Guide
Page 94
... setting a user password. Select an item then press to trap Interrupt 19. To clear the supervisor password, select the Change Supervisor Password then press . Configuration options: [Disabled] [Enabled] Interrupt 19 Capture [Disabled] When set to [Enabled], this function allows the option ROMs to display the configuration options. After you successfully set a Supervisor Password: 1. The message "Password Uninstalled" appears. 4-34 Chapter 4: BIOS setup Hit 'DEL' Message Display [Enabled] When set to Enabled, the system displays the message "Press DEL to disabled password...
... setting a user password. Select an item then press to trap Interrupt 19. To clear the supervisor password, select the Change Supervisor Password then press . Configuration options: [Disabled] [Enabled] Interrupt 19 Capture [Disabled] When set to [Enabled], this function allows the option ROMs to display the configuration options. After you successfully set a Supervisor Password: 1. The message "Password Uninstalled" appears. 4-34 Chapter 4: BIOS setup Hit 'DEL' Message Display [Enabled] When set to Enabled, the system displays the message "Press DEL to disabled password...

User Guide
Page 95
... Time. User Access Level (Full Access] This item allows you can clear it by erasing the CMOS Real Time Clock (RTC) RAM. ASUS P5CR-VM 4-35 To set or change password. On the password box that appears, type a password composed of the screen shows the default N o t I n s t a l l e d. If you forget your BIOS password, you to select the access restriction to the Setup items. Configuration options: [No Access] [View Only] [Limited] [Full Access] N o A c c e s s prevents user access to the Setup utility. The User Password item...
... Time. User Access Level (Full Access] This item allows you can clear it by erasing the CMOS Real Time Clock (RTC) RAM. ASUS P5CR-VM 4-35 To set or change password. On the password box that appears, type a password composed of the screen shows the default N o t I n s t a l l e d. If you forget your BIOS password, you to select the access restriction to the Setup items. Configuration options: [No Access] [View Only] [Limited] [Full Access] N o A c c e s s prevents user access to the Setup utility. The User Password item...


