User Manual
Page 1
Motherboard ® P4S333 User Guide
Motherboard ® P4S333 User Guide

User Manual
Page 3
... viii Conventions used in this guide ix Where to find more information ix ASUS contact information x Chapter 1: Product introduction 1-1 1.1 Welcome 1-1 1.2 Package contents 1-1 1.3 Special features 1-2 1.3.1 Product highlights 1-2 1.3.2 Value-added solutions 1-3 1.4 Overview 1-4 1.4.1 Motherboard components 1-4 Chapter 2: Hardware information 2-1 2.1 Motherboard installation 2-1 2.1.1 Placement direction 2-1 2.1.2 Screw holes 2-1 2.2 Motherboard layout 2-2 2.3 Before you proceed 2-3 2.4 Central Processing Unit (CPU 2-4 2.4.1 Overview 2-4 2.4.2 Installing the CPU...
... viii Conventions used in this guide ix Where to find more information ix ASUS contact information x Chapter 1: Product introduction 1-1 1.1 Welcome 1-1 1.2 Package contents 1-1 1.3 Special features 1-2 1.3.1 Product highlights 1-2 1.3.2 Value-added solutions 1-3 1.4 Overview 1-4 1.4.1 Motherboard components 1-4 Chapter 2: Hardware information 2-1 2.1 Motherboard installation 2-1 2.1.1 Placement direction 2-1 2.1.2 Screw holes 2-1 2.2 Motherboard layout 2-2 2.3 Before you proceed 2-3 2.4 Central Processing Unit (CPU 2-4 2.4.1 Overview 2-4 2.4.2 Installing the CPU...
User Manual
Page 7
..., disconnect all cables are correctly connected and the power cables are using an adpater or extension cord. Operation safety • Before installing the motherboard and adding devices on a stable surface. • If you detect any area where it may become wet. • Place the product ... a qualified service technician or your dealer immediately. • To avoid short circuits, keep paper clips, screws, and staples away from the motherboard, ensure that all the manuals that came with the product, contact a qualified service technician or your power supply is broken, do not try...
..., disconnect all cables are correctly connected and the power cables are using an adpater or extension cord. Operation safety • Before installing the motherboard and adding devices on a stable surface. • If you detect any area where it may become wet. • Place the product ... a qualified service technician or your dealer immediately. • To avoid short circuits, keep paper clips, screws, and staples away from the motherboard, ensure that all the manuals that came with the product, contact a qualified service technician or your power supply is broken, do not try...
User Manual
Page 8
... provided. • Chapter 5: Software support This chapter describes the contents of the support CD that comes with the motherboard package. • Glossary This part lists the technical terms that you have to change system settings through the BIOS Setup...introduction This chapter describes the features of the P4S333 motherboard. It includes brief descriptions of the special attributes of the motherboard and the new technology it supports. • Chapter 2: Hardware information This chapter lists the hardware setup procedures that you need when installing the ASUS P4S333 motherboard.
... provided. • Chapter 5: Software support This chapter describes the contents of the support CD that comes with the motherboard package. • Glossary This part lists the technical terms that you have to change system settings through the BIOS Setup...introduction This chapter describes the features of the P4S333 motherboard. It includes brief descriptions of the special attributes of the motherboard and the new technology it supports. • Chapter 2: Hardware information This chapter lists the hardware setup procedures that you need when installing the ASUS P4S333 motherboard.

User Manual
Page 11
It includes brief explanations of the special attributes of the P4S333 motherboard. Product introduction Chapter 1 This chapter describes the features of the motherboard and the new technology it supports.
It includes brief explanations of the special attributes of the P4S333 motherboard. Product introduction Chapter 1 This chapter describes the features of the motherboard and the new technology it supports.

User Manual
Page 12
ASUS P4S333 motherboard
ASUS P4S333 motherboard
User Manual
Page 13
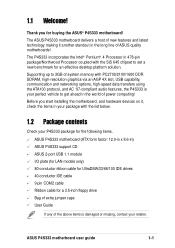
... and latest technology making it , check the items in your package with the list below. 1.2 Package contents Check your P4S333 package for the following items. ASUS P4S333 motherboard (ATX form factor: 12.0-in x 8.6-in 478-pin package/Northwood Processor coupled with PC2700/2100/1600 DDR SDRAM, high...benchmark for a 3.5-inch floppy drive Bag of extra jumper caps User Guide If any of power computing! ASUS P4S333 motherboard user guide 1-1 Before you for buying the ASUS® P4S333 motherboard! Supporting up to 3GB of system memory with the SiS 645 chipset to get ahead in the long ...
... and latest technology making it , check the items in your package with the list below. 1.2 Package contents Check your P4S333 package for the following items. ASUS P4S333 motherboard (ATX form factor: 12.0-in x 8.6-in 478-pin package/Northwood Processor coupled with PC2700/2100/1600 DDR SDRAM, high...benchmark for a 3.5-inch floppy drive Bag of extra jumper caps User Guide If any of power computing! ASUS P4S333 motherboard user guide 1-1 Before you for buying the ASUS® P4S333 motherboard! Supporting up to 3GB of system memory with the SiS 645 chipset to get ahead in the long ...
User Manual
Page 14
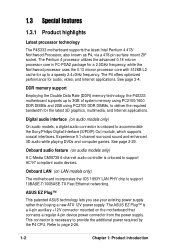
...channel surround sound and enhanced 3D audio while playing DVDs and computer games. 1.3 Special features 1.3.1 Product highlights Latest processor technology The P4S333 motherboard supports the latest Intel Pentium 4 478/ Northwood Processor, also known as P4, via a 478-pin surface mount ZIF socket. ...Onboard audio feature (on LAN models only) The motherboard incorporates the ICS 1893Y LAN PHY chip to page 2-26. 1-2 Chapter 1: Product introduction ASUS EZ Plug™ This patented ASUS technology lets you use your existing power supply rather than buying a...
...channel surround sound and enhanced 3D audio while playing DVDs and computer games. 1.3 Special features 1.3.1 Product highlights Latest processor technology The P4S333 motherboard supports the latest Intel Pentium 4 478/ Northwood Processor, also known as P4, via a 478-pin surface mount ZIF socket. ...Onboard audio feature (on LAN models only) The motherboard incorporates the ICS 1893Y LAN PHY chip to page 2-26. 1-2 Chapter 1: Product introduction ASUS EZ Plug™ This patented ASUS technology lets you use your existing power supply rather than buying a...
User Manual
Page 15
... allows you of the system boot status and causes of system status. Special Card Reader support The P4S333 includes special connectors that support optional readers for authenticating online transactions, editing IC-based information, and more. ASUS P4S333 motherboard user guide 1-3 Refer to customize the voice messages, and provides multi-language support. The Smart Card...
... allows you of the system boot status and causes of system status. Special Card Reader support The P4S333 includes special connectors that support optional readers for authenticating online transactions, editing IC-based information, and more. ASUS P4S333 motherboard user guide 1-3 Refer to customize the voice messages, and provides multi-language support. The Smart Card...
User Manual
Page 16
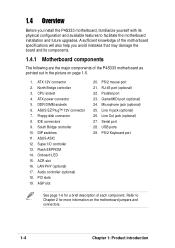
...P4S333 motherboard, familiarize yourself with its components. 1.4.1 Motherboard components The following are the major components of each component. DDR DIMM sockets 6. Floppy disk connector 8. IDE connectors 9. Audio controller (optional) 18. RJ-45 port (optional) 22. Parallel port 23. Refer to facilitate the motherboard installation and future upgrades. CPU socket 4. ASUS... features to Chapter 2 for a brief description of the P4S333 motherboard as pointed out in the picture on the motherboard jumpers and connectors. 1-4 Chapter 1: Product introduction North Bridge controller...
...P4S333 motherboard, familiarize yourself with its components. 1.4.1 Motherboard components The following are the major components of each component. DDR DIMM sockets 6. Floppy disk connector 8. IDE connectors 9. Audio controller (optional) 18. RJ-45 port (optional) 22. Parallel port 23. Refer to facilitate the motherboard installation and future upgrades. CPU socket 4. ASUS... features to Chapter 2 for a brief description of the P4S333 motherboard as pointed out in the picture on the motherboard jumpers and connectors. 1-4 Chapter 1: Product introduction North Bridge controller...

User Manual
Page 17
1 23 4 56 7 19 18 17 16 15 14 20 21 22 8 9 10 11 13 12 23 29 28 27 ASUS P4S333 motherboard user guide 26 25 24 1-5
1 23 4 56 7 19 18 17 16 15 14 20 21 22 8 9 10 11 13 12 23 29 28 27 ASUS P4S333 motherboard user guide 26 25 24 1-5
User Manual
Page 19
... chip also supports 24-bit S/PDIF In (0.5~5V) and S/PDIF Out (44.1K and 48K formats) professional digital audio interface. (on audio models only) ASUS P4S333 motherboard user guide 1-7 This 2Mb firmware contains the programmable BIOS program. 14 Onboard LED. This onboard LED lights up if there is for a PS/2 mouse. 21 ...
... chip also supports 24-bit S/PDIF In (0.5~5V) and S/PDIF Out (44.1K and 48K formats) professional digital audio interface. (on audio models only) ASUS P4S333 motherboard user guide 1-7 This 2Mb firmware contains the programmable BIOS program. 14 Onboard LED. This onboard LED lights up if there is for a PS/2 mouse. 21 ...

User Manual
Page 21
It includes details on the switches, jumpers, and connectors on the motherboard. Chapter 2 This chapter describes the hardware setup procedures that you have to perform when installing system components. Hardware information
It includes details on the switches, jumpers, and connectors on the motherboard. Chapter 2 This chapter describes the hardware setup procedures that you have to perform when installing system components. Hardware information

User Manual
Page 22
ASUS P4S333 motherboard
ASUS P4S333 motherboard
User Manual
Page 23
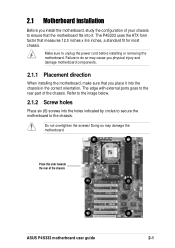
... correct orientation. Refer to the rear part of the chassis ASUS P4S333 motherboard user guide 2-1 The P4S333 uses the ATX form factor that the motherboard fits into the holes indicated by circles to secure the motherboard to unplug the power cord before installing or removing the motherboard. Do not overtighten the screws! Doing so may cause you...
... correct orientation. Refer to the rear part of the chassis ASUS P4S333 motherboard user guide 2-1 The P4S333 uses the ATX form factor that the motherboard fits into the holes indicated by circles to secure the motherboard to unplug the power cord before installing or removing the motherboard. Do not overtighten the screws! Doing so may cause you...

User Manual
Page 24
...23 45 PCI1 PCI2 SiS961 MuTLOL Media I/O JEN1 PWRTMP1 SIRQ1 PCI3 P4S333 PCI4 LED1 ® PCI5 PCI6 USB2 ACR1 CLRCMOS1 SMART CR2032 3V Lithium Cell CMOS Power Super I/O SMB1 SMARTCON1 IR1 CHASSIS1 ASUS ASIC with Hardware Monitor 2Mbit Firmware Hub CHASFAN1 USBV2 USBV3 USB1 ...IPANEL1 IDELED1 PANEL1 The audio and LAN features are grayed out in the above motherboard layout. MS1 DSW1 SD1 2-2 Chapter 2: Hardware information These ...
...23 45 PCI1 PCI2 SiS961 MuTLOL Media I/O JEN1 PWRTMP1 SIRQ1 PCI3 P4S333 PCI4 LED1 ® PCI5 PCI6 USB2 ACR1 CLRCMOS1 SMART CR2032 3V Lithium Cell CMOS Power Super I/O SMB1 SMARTCON1 IR1 CHASSIS1 ASUS ASIC with Hardware Monitor 2Mbit Firmware Hub CHASFAN1 USBV2 USBV3 USB1 ...IPANEL1 IDELED1 PANEL1 The audio and LAN features are grayed out in the above motherboard layout. MS1 DSW1 SD1 2-2 Chapter 2: Hardware information These ...
User Manual
Page 25
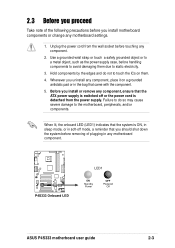
... . 4. 2.3 Before you proceed Take note of plugging in the bag that came with the component. 5. Before you install motherboard components or change any component. 2. P4S333 ® P4S333 Onboard LED LED1 ON Standby Power OFF Powered Off ASUS P4S333 motherboard user guide 2-3 When lit, the onboard LED (LED1) indicates that the system is ON, in sleep mode...
... . 4. 2.3 Before you proceed Take note of plugging in the bag that came with the component. 5. Before you install motherboard components or change any component. 2. P4S333 ® P4S333 Onboard LED LED1 ON Standby Power OFF Powered Off ASUS P4S333 motherboard user guide 2-3 When lit, the onboard LED (LED1) indicates that the system is ON, in sleep mode...
User Manual
Page 26
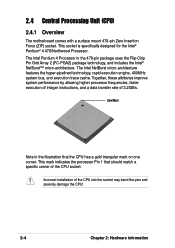
... the CPU! 2-4 Chapter 2: Hardware information This socket is specifically designed for the Intel® Pentium® 4 478/Northwood Processor. 2.4 Central Processing Unit (CPU) 2.4.1 Overview The motherboard comes with a surface mount 478-pin Zero Insertion Force (ZIF) socket.
... the CPU! 2-4 Chapter 2: Hardware information This socket is specifically designed for the Intel® Pentium® 4 478/Northwood Processor. 2.4 Central Processing Unit (CPU) 2.4.1 Overview The motherboard comes with a surface mount 478-pin Zero Insertion Force (ZIF) socket.
User Manual
Page 27
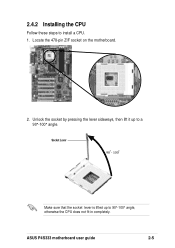
Socket Lever 90 - 100 Make sure that the socket lever is lifted up to a 90°-100° angle. 2.4.2 Installing the CPU Follow these steps to 90°-100° angle, otherwise the CPU does not fit in completely. ASUS P4S333 motherboard user guide 2-5 Locate the 478-pin ZIF socket on the motherboard. 2. Unlock the socket by pressing the lever sideways, then lift it up to install a CPU. 1.
Socket Lever 90 - 100 Make sure that the socket lever is lifted up to a 90°-100° angle. 2.4.2 Installing the CPU Follow these steps to 90°-100° angle, otherwise the CPU does not fit in completely. ASUS P4S333 motherboard user guide 2-5 Locate the 478-pin ZIF socket on the motherboard. 2. Unlock the socket by pressing the lever sideways, then lift it up to install a CPU. 1.

User Manual
Page 29
... package includes the heatsink, fan, and retention mechanism. The retention module base is already installed on the retention module base. ASUS P4S333 motherboard user guide 2-7 CPU Heatsink Retention Module Base Your boxed Intel Pentium 4 478/Northwood Processor package should come with installation instructions for... requires a specially designed heatsink and fan assembly to remove the retention module base when installing the CPU or installing other motherboard components. You do not match the CPU documentation, follow the latter. If the instructions in this section do not have...
... package includes the heatsink, fan, and retention mechanism. The retention module base is already installed on the retention module base. ASUS P4S333 motherboard user guide 2-7 CPU Heatsink Retention Module Base Your boxed Intel Pentium 4 478/Northwood Processor package should come with installation instructions for... requires a specially designed heatsink and fan assembly to remove the retention module base when installing the CPU or installing other motherboard components. You do not match the CPU documentation, follow the latter. If the instructions in this section do not have...


