User Manual
Page 1
Motherboard ® P4S333 User Guide
Motherboard ® P4S333 User Guide

User Manual
Page 3
... viii Conventions used in this guide ix Where to find more information ix ASUS contact information x Chapter 1: Product introduction 1-1 1.1 Welcome 1-1 1.2 Package contents 1-1 1.3 Special features 1-2 1.3.1 Product highlights 1-2 1.3.2 Value-added solutions 1-3 1.4 Overview 1-4 1.4.1 Motherboard components 1-4 Chapter 2: Hardware information 2-1 2.1 Motherboard installation 2-1 2.1.1 Placement direction 2-1 2.1.2 Screw holes 2-1 2.2 Motherboard layout 2-2 2.3 Before you proceed 2-3 2.4 Central Processing Unit (CPU 2-4 2.4.1 Overview 2-4 2.4.2 Installing the CPU...
... viii Conventions used in this guide ix Where to find more information ix ASUS contact information x Chapter 1: Product introduction 1-1 1.1 Welcome 1-1 1.2 Package contents 1-1 1.3 Special features 1-2 1.3.1 Product highlights 1-2 1.3.2 Value-added solutions 1-3 1.4 Overview 1-4 1.4.1 Motherboard components 1-4 Chapter 2: Hardware information 2-1 2.1 Motherboard installation 2-1 2.1.1 Placement direction 2-1 2.1.2 Screw holes 2-1 2.2 Motherboard layout 2-2 2.3 Before you proceed 2-3 2.4 Central Processing Unit (CPU 2-4 2.4.1 Overview 2-4 2.4.2 Installing the CPU...
User Manual
Page 7
... is broken, do not try to the correct voltage in any damage, contact your retailer. Operation safety • Before installing the motherboard and adding devices on a stable surface. • If you are not damaged. Do not place the product in your retailer. If...make sure all power cables are connected. vii Contact a qualified service technician or your area. If possible, disconnect all power cables from the motherboard, ensure that came with the product, contact a qualified service technician or your dealer immediately. • To avoid short circuits, keep paper...
... is broken, do not try to the correct voltage in any damage, contact your retailer. Operation safety • Before installing the motherboard and adding devices on a stable surface. • If you are not damaged. Do not place the product in your retailer. If...make sure all power cables are connected. vii Contact a qualified service technician or your area. If possible, disconnect all power cables from the motherboard, ensure that came with the product, contact a qualified service technician or your dealer immediately. • To avoid short circuits, keep paper...
User Manual
Page 8
...this guide is organized This manual contains the following parts: • Chapter 1: Product introduction This chapter describes the features of the P4S333 motherboard. Detailed descriptions of the BIOS parameters are also provided. • Chapter 5: Software support This chapter describes the contents of the... components. It includes description of the support CD that comes with the motherboard package. • Glossary This part lists the technical terms that you need when installing the ASUS P4S333 motherboard. About this guide This user guide contains the information you have to ...
...this guide is organized This manual contains the following parts: • Chapter 1: Product introduction This chapter describes the features of the P4S333 motherboard. Detailed descriptions of the BIOS parameters are also provided. • Chapter 5: Software support This chapter describes the contents of the... components. It includes description of the support CD that comes with the motherboard package. • Glossary This part lists the technical terms that you need when installing the ASUS P4S333 motherboard. About this guide This user guide contains the information you have to ...

User Manual
Page 11
Product introduction It includes brief explanations of the special attributes of the P4S333 motherboard. Chapter 1 This chapter describes the features of the motherboard and the new technology it supports.
Product introduction It includes brief explanations of the special attributes of the P4S333 motherboard. Chapter 1 This chapter describes the features of the motherboard and the new technology it supports.

User Manual
Page 12
ASUS P4S333 motherboard
ASUS P4S333 motherboard
User Manual
Page 13
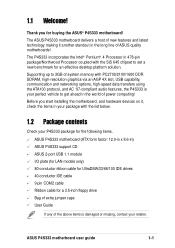
... with the list below. 1.2 Package contents Check your P4S333 package for the following items. ASUS P4S333 motherboard (ATX form factor: 12.0-in x 8.6-in the long line of power computing! ASUS P4S333 motherboard user guide 1-1 1.1 Welcome! The P4S333 incorporates the Intel® Pentium® 4 Processor in..., contact your perfect vehicle to set a new benchmark for buying the ASUS® P4S333 motherboard! Thank you start installing the motherboard, and hardware devices on it another standout in ) ASUS P4S333 support CD ASUS 2-port USB 1.1 module I/O plate (for LAN models only) 80...
... with the list below. 1.2 Package contents Check your P4S333 package for the following items. ASUS P4S333 motherboard (ATX form factor: 12.0-in x 8.6-in the long line of power computing! ASUS P4S333 motherboard user guide 1-1 1.1 Welcome! The P4S333 incorporates the Intel® Pentium® 4 Processor in..., contact your perfect vehicle to set a new benchmark for buying the ASUS® P4S333 motherboard! Thank you start installing the motherboard, and hardware devices on it another standout in ) ASUS P4S333 support CD ASUS 2-port USB 1.1 module I/O plate (for LAN models only) 80...
User Manual
Page 14
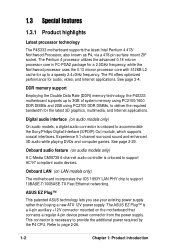
... new ATX 12V power supply. The ASUS EZ Plug™ is necessary to accommodate the Sony/Philips Digital Interface (S/PDIF) Out module, which supports coaxial interfaces. DDR memory support Employing the Double Data Rate (DDR) memory technology, the P4S333 motherboard supports up to deliver the required bandwidth ... and 2GB using PC2700 DDR DIMMs, to a speedy 2.4+GHz frequency. 1.3 Special features 1.3.1 Product highlights Latest processor technology The P4S333 motherboard supports the latest Intel Pentium 4 478/ Northwood Processor, also known as P4, via a 478-pin surface mount ZIF socket.
... new ATX 12V power supply. The ASUS EZ Plug™ is necessary to accommodate the Sony/Philips Digital Interface (S/PDIF) Out module, which supports coaxial interfaces. DDR memory support Employing the Double Data Rate (DDR) memory technology, the P4S333 motherboard supports up to deliver the required bandwidth ... and 2GB using PC2700 DDR DIMMs, to a speedy 2.4+GHz frequency. 1.3 Special features 1.3.1 Product highlights Latest processor technology The P4S333 motherboard supports the latest Intel Pentium 4 478/ Northwood Processor, also known as P4, via a 478-pin surface mount ZIF socket.
User Manual
Page 15
...VCORE and DDR memory voltage ASUS iPanel support The motherboard supports the ASUS iPanel to customize the voice messages, and provides multi-language support. Special Card Reader support The P4S333 includes special connectors that ...P4S333 offers a new exciting feature called the ASUS POST Reporter™ to page 5-3 and page 5-7. Through the system's internal speaker, or an added external speaker, you will hear the messages informing you to provide easy connectivity, one-touch management of various peripherals, and convenient monitoring of boot errors, if any. ASUS P4S333 motherboard...
...VCORE and DDR memory voltage ASUS iPanel support The motherboard supports the ASUS iPanel to customize the voice messages, and provides multi-language support. Special Card Reader support The P4S333 includes special connectors that ...P4S333 offers a new exciting feature called the ASUS POST Reporter™ to page 5-3 and page 5-7. Through the system's internal speaker, or an added external speaker, you will hear the messages informing you to provide easy connectivity, one-touch management of various peripherals, and convenient monitoring of boot errors, if any. ASUS P4S333 motherboard...
User Manual
Page 16
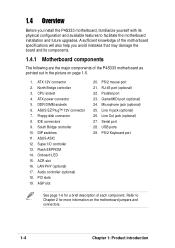
... you install the P4S333 motherboard, familiarize yourself with its components. 1.4.1 Motherboard components The following are the major components of each component. CPU socket 4. Flash EEPROM 14. PS/2 mouse port 21. Line In jack (optional) 26. PS/2 Keyboard port See page 1-6 for more information on page 1-5. 1. ATX power connector 5. North Bridge controller 3. ASUS EZ Plug...
... you install the P4S333 motherboard, familiarize yourself with its components. 1.4.1 Motherboard components The following are the major components of each component. CPU socket 4. Flash EEPROM 14. PS/2 mouse port 21. Line In jack (optional) 26. PS/2 Keyboard port See page 1-6 for more information on page 1-5. 1. ATX power connector 5. North Bridge controller 3. ASUS EZ Plug...

User Manual
Page 17
1 23 4 56 7 19 18 17 16 15 14 20 21 22 8 9 10 11 13 12 23 29 28 27 ASUS P4S333 motherboard user guide 26 25 24 1-5
1 23 4 56 7 19 18 17 16 15 14 20 21 22 8 9 10 11 13 12 23 29 28 27 ASUS P4S333 motherboard user guide 26 25 24 1-5
User Manual
Page 19
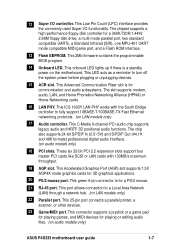
... or unplugging devices. 15 ACR slot. 12 Super I /O functionality. The chipset supports a high-performance floppy disk controller for playing or editing audio files. (on the motherboard. This 2Mb firmware contains the programmable BIOS program. 14 Onboard LED. This onboard LED lights up if there is for a PS/2 mouse. 21 RJ-45...-401 UART mode compatible MIDI/game port, and a Flash ROM interface. 13 Flash EEPROM. This green 6-pin connector is a standby power on audio models only) ASUS P4S333 motherboard user guide 1-7
... or unplugging devices. 15 ACR slot. 12 Super I /O functionality. The chipset supports a high-performance floppy disk controller for playing or editing audio files. (on the motherboard. This 2Mb firmware contains the programmable BIOS program. 14 Onboard LED. This onboard LED lights up if there is for a PS/2 mouse. 21 RJ-45...-401 UART mode compatible MIDI/game port, and a Flash ROM interface. 13 Flash EEPROM. This green 6-pin connector is a standby power on audio models only) ASUS P4S333 motherboard user guide 1-7

User Manual
Page 21
Hardware information It includes details on the switches, jumpers, and connectors on the motherboard. Chapter 2 This chapter describes the hardware setup procedures that you have to perform when installing system components.
Hardware information It includes details on the switches, jumpers, and connectors on the motherboard. Chapter 2 This chapter describes the hardware setup procedures that you have to perform when installing system components.

User Manual
Page 22
ASUS P4S333 motherboard
ASUS P4S333 motherboard
User Manual
Page 23
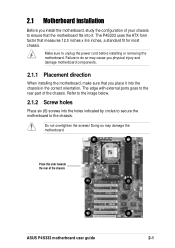
... you place it . Doing so may cause you physical injury and damage motherboard components. 2.1.1 Placement direction When installing the motherboard, make sure that you install the motherboard, study the configuration of your chassis to the rear part of the chassis ASUS P4S333 motherboard user guide 2-1 Do not overtighten the screws! Make sure to the chassis. Refer...
... you place it . Doing so may cause you physical injury and damage motherboard components. 2.1.1 Placement direction When installing the motherboard, make sure that you install the motherboard, study the configuration of your chassis to the rear part of the chassis ASUS P4S333 motherboard user guide 2-1 Do not overtighten the screws! Make sure to the chassis. Refer...

User Manual
Page 24
MS1 DSW1 SD1 2-2 Chapter 2: Hardware information 30.5cm (12.0in) 2.2 Motherboard layout PS/2KBMS T: Mouse B: Keyboard USB Top: T: USB1 RJ-45 B: USB2 COM1 VEN1 KBPWR1 USBV1 22cm (8.7in) ATX Power Connector PWRFAN1 AUX12V1 DDRVOL1 DDR DIMM1 (... Graphics Port AGP 01 23 45 PCI1 PCI2 SiS961 MuTLOL Media I/O JEN1 PWRTMP1 SIRQ1 PCI3 P4S333 PCI4 LED1 ® PCI5 PCI6 USB2 ACR1 CLRCMOS1 SMART CR2032 3V Lithium Cell CMOS Power Super I/O SMB1 SMARTCON1 IR1 CHASSIS1 ASUS ASIC with Hardware Monitor 2Mbit Firmware Hub CHASFAN1 USBV2 USBV3 USB1 IPANEL1 IDELED1 PANEL1 The...
MS1 DSW1 SD1 2-2 Chapter 2: Hardware information 30.5cm (12.0in) 2.2 Motherboard layout PS/2KBMS T: Mouse B: Keyboard USB Top: T: USB1 RJ-45 B: USB2 COM1 VEN1 KBPWR1 USBV1 22cm (8.7in) ATX Power Connector PWRFAN1 AUX12V1 DDRVOL1 DDR DIMM1 (... Graphics Port AGP 01 23 45 PCI1 PCI2 SiS961 MuTLOL Media I/O JEN1 PWRTMP1 SIRQ1 PCI3 P4S333 PCI4 LED1 ® PCI5 PCI6 USB2 ACR1 CLRCMOS1 SMART CR2032 3V Lithium Cell CMOS Power Super I/O SMB1 SMARTCON1 IR1 CHASSIS1 ASUS ASIC with Hardware Monitor 2Mbit Firmware Hub CHASFAN1 USBV2 USBV3 USB1 IPANEL1 IDELED1 PANEL1 The...
User Manual
Page 25
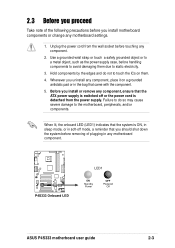
... system is detached from the wall socket before removing of the following precautions before handling components to avoid damaging them . 4. P4S333 ® P4S333 Onboard LED LED1 ON Standby Power OFF Powered Off ASUS P4S333 motherboard user guide 2-3 Use a grounded wrist strap or touch a safely grounded object or to a metal object, such as the power supply...
... system is detached from the wall socket before removing of the following precautions before handling components to avoid damaging them . 4. P4S333 ® P4S333 Onboard LED LED1 ON Standby Power OFF Powered Off ASUS P4S333 motherboard user guide 2-3 Use a grounded wrist strap or touch a safely grounded object or to a metal object, such as the power supply...
User Manual
Page 26
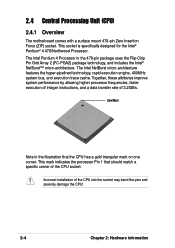
... hyper-pipelined technology, rapid execution engine, 400MHz system bus, and execution trace cache. Incorrect installation of the CPU socket. 2.4 Central Processing Unit (CPU) 2.4.1 Overview The motherboard comes with a surface mount 478-pin Zero Insertion Force (ZIF) socket. This mark indicates the processor Pin 1 that the CPU has a gold triangular mark on...
... hyper-pipelined technology, rapid execution engine, 400MHz system bus, and execution trace cache. Incorrect installation of the CPU socket. 2.4 Central Processing Unit (CPU) 2.4.1 Overview The motherboard comes with a surface mount 478-pin Zero Insertion Force (ZIF) socket. This mark indicates the processor Pin 1 that the CPU has a gold triangular mark on...
User Manual
Page 27
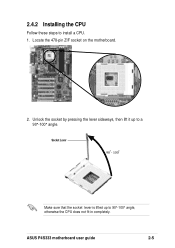
Socket Lever 90 - 100 Make sure that the socket lever is lifted up to a 90°-100° angle. 2.4.2 Installing the CPU Follow these steps to 90°-100° angle, otherwise the CPU does not fit in completely. ASUS P4S333 motherboard user guide 2-5 Locate the 478-pin ZIF socket on the motherboard. 2. Unlock the socket by pressing the lever sideways, then lift it up to install a CPU. 1.
Socket Lever 90 - 100 Make sure that the socket lever is lifted up to a 90°-100° angle. 2.4.2 Installing the CPU Follow these steps to 90°-100° angle, otherwise the CPU does not fit in completely. ASUS P4S333 motherboard user guide 2-5 Locate the 478-pin ZIF socket on the motherboard. 2. Unlock the socket by pressing the lever sideways, then lift it up to install a CPU. 1.

User Manual
Page 29
... heatsink and fan assembly to install the CPU heatsink and fan. 1. The retention module base is already installed on the retention module base. ASUS P4S333 motherboard user guide 2-7 In case you buy a boxed Intel Pentium 4 478/Northwood Processor, the package includes the heatsink, fan, and retention mechanism.... If the instructions in this section do not have to remove the retention module base when installing the CPU or installing other motherboard components. Place the heatsink on top of the installed CPU, making sure that you buy a CPU separately, make sure that the...
... heatsink and fan assembly to install the CPU heatsink and fan. 1. The retention module base is already installed on the retention module base. ASUS P4S333 motherboard user guide 2-7 In case you buy a boxed Intel Pentium 4 478/Northwood Processor, the package includes the heatsink, fan, and retention mechanism.... If the instructions in this section do not have to remove the retention module base when installing the CPU or installing other motherboard components. Place the heatsink on top of the installed CPU, making sure that you buy a CPU separately, make sure that the...


