
User Manual
Page 3
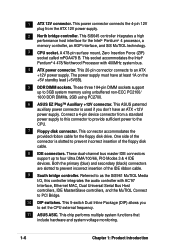
...guide viii How this guide is organized viii Conventions used in this guide ix Where to find more information ix ASUS contact information x Chapter 1: Product introduction 1-1 1.1 Welcome 1-1 1.2 Package contents 1-1 1.3 Special features 1-2 ...2-1 2.1.2 Screw holes 2-1 2.2 Motherboard layout 2-2 2.3 Before you proceed 2-3 2.4 Central Processing Unit (CPU 2-4 2.4.1 Overview 2-4 2.4.2 Installing the CPU 2-5 2.4.3 Installing the heatsink and fan 2-7 2.4.4 Connecting the CPU fan cable 2-9 2.5 System memory 2-10 2.5.1 Overview 2-10 2.5.2 Memory configurations 2-11 2.5.3 Installing ...
...guide viii How this guide is organized viii Conventions used in this guide ix Where to find more information ix ASUS contact information x Chapter 1: Product introduction 1-1 1.1 Welcome 1-1 1.2 Package contents 1-1 1.3 Special features 1-2 ...2-1 2.1.2 Screw holes 2-1 2.2 Motherboard layout 2-2 2.3 Before you proceed 2-3 2.4 Central Processing Unit (CPU 2-4 2.4.1 Overview 2-4 2.4.2 Installing the CPU 2-5 2.4.3 Installing the heatsink and fan 2-7 2.4.4 Connecting the CPU fan cable 2-9 2.5 System memory 2-10 2.5.1 Overview 2-10 2.5.2 Memory configurations 2-11 2.5.3 Installing ...
User Manual
Page 14
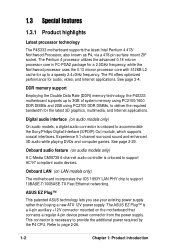
...and Internet applications. DDR memory support Employing the Double Data Rate (DDR) memory technology, the P4S333 motherboard supports up to a speedy 2.4+GHz frequency. ASUS EZ Plug™ This patented ASUS technology lets you use your existing power supply rather than buying a new ATX 12V power supply.... Refer to provide the additional power required by the P4 CPU. Experience 5.1-channel surround sound and ...
...and Internet applications. DDR memory support Employing the Double Data Rate (DDR) memory technology, the P4S333 motherboard supports up to a speedy 2.4+GHz frequency. ASUS EZ Plug™ This patented ASUS technology lets you use your existing power supply rather than buying a new ATX 12V power supply.... Refer to provide the additional power required by the P4 CPU. Experience 5.1-channel surround sound and ...
User Manual
Page 15
...capacity storage through the sophisticated SD and MS devices. 1.3.2 Value-added solutions Overclocking The P4S333 overclocking features: • adjustable CPU frequency multiple in BIOS using the ASUS JumperFree™ solution • adjustable FSB/MEM frequency ratio • Stepless Frequency ... adjustable CPU VCORE and DDR memory voltage ASUS iPanel support The motherboard supports the ASUS iPanel to customize the voice messages, and provides multi-language support. Refer to provide friendly voice messages and alerts during the Power-On SelfTests (POST). ASUS P4S333 motherboard ...
...capacity storage through the sophisticated SD and MS devices. 1.3.2 Value-added solutions Overclocking The P4S333 overclocking features: • adjustable CPU frequency multiple in BIOS using the ASUS JumperFree™ solution • adjustable FSB/MEM frequency ratio • Stepless Frequency ... adjustable CPU VCORE and DDR memory voltage ASUS iPanel support The motherboard supports the ASUS iPanel to customize the voice messages, and provides multi-language support. Refer to provide friendly voice messages and alerts during the Power-On SelfTests (POST). ASUS P4S333 motherboard ...
User Manual
Page 16
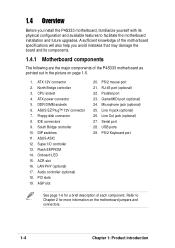
... knowledge of the motherboard specifications will also help you install the P4S333 motherboard, familiarize yourself with its components. 1.4.1 Motherboard components The following are the major components of the P4S333 motherboard as pointed out in the picture on the motherboard jumpers and... Bridge controller 10. Flash EEPROM 14. Refer to facilitate the motherboard installation and future upgrades. CPU socket 4. Serial port 28. ATX 12V connector 2. North Bridge controller 3. ASUS EZ Plug™ 12V connector 7. Floppy disk connector 8. DIP switches 11. Onboard LED 15...
... knowledge of the motherboard specifications will also help you install the P4S333 motherboard, familiarize yourself with its components. 1.4.1 Motherboard components The following are the major components of the P4S333 motherboard as pointed out in the picture on the motherboard jumpers and... Bridge controller 10. Flash EEPROM 14. Refer to facilitate the motherboard installation and future upgrades. CPU socket 4. Serial port 28. ATX 12V connector 2. North Bridge controller 3. ASUS EZ Plug™ 12V connector 7. Floppy disk connector 8. DIP switches 11. Onboard LED 15...
User Manual
Page 18
... host interface for the floppy disk drive. The power supply must have an ATX +12V power supply. This ASUS patented auxiliary power connector is slotted to set the CPU external frequency. 11 ASUS ASIC. These dual-channel bus master IDE connectors support up to four Ultra DMA/100/66, PIO Modes 3.... These three 184-pin DIMM sockets support up to 3GB system memory using unbuffered non-ECC PC2100/ 1600 DDR DIMMs, 2GB using PC2700. 6 ASUS EZ Plug™ Auxiliary +12V connector. Referred to as the SiS961 MuTIOL Media I/O, this connector to provide sufficient power to PCI Bridge. 10 DIP...
... host interface for the floppy disk drive. The power supply must have an ATX +12V power supply. This ASUS patented auxiliary power connector is slotted to set the CPU external frequency. 11 ASUS ASIC. These dual-channel bus master IDE connectors support up to four Ultra DMA/100/66, PIO Modes 3.... These three 184-pin DIMM sockets support up to 3GB system memory using unbuffered non-ECC PC2100/ 1600 DDR DIMMs, 2GB using PC2700. 6 ASUS EZ Plug™ Auxiliary +12V connector. Referred to as the SiS961 MuTIOL Media I/O, this connector to provide sufficient power to PCI Bridge. 10 DIP...
User Manual
Page 26
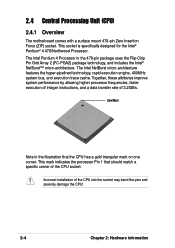
... Grid Array 2 (FC-PGA2) package technology, and includes the Intel® NetBurst™ micro-architecture. 2.4 Central Processing Unit (CPU) 2.4.1 Overview The motherboard comes with a surface mount 478-pin Zero Insertion Force (ZIF) socket. This mark indicates the processor Pin 1 that the... CPU has a gold triangular mark on one corner. Together, these attributes improve system performance by allowing higher processor frequencies, faster execution of...
... Grid Array 2 (FC-PGA2) package technology, and includes the Intel® NetBurst™ micro-architecture. 2.4 Central Processing Unit (CPU) 2.4.1 Overview The motherboard comes with a surface mount 478-pin Zero Insertion Force (ZIF) socket. This mark indicates the processor Pin 1 that the... CPU has a gold triangular mark on one corner. Together, these attributes improve system performance by allowing higher processor frequencies, faster execution of...
User Manual
Page 27
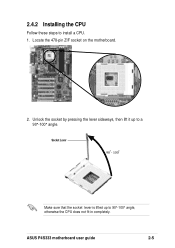
ASUS P4S333 motherboard user guide 2-5 Socket Lever 90 - 100 Make sure that the socket lever is lifted up to a 90°-100° angle. Unlock the socket by pressing the lever sideways, then lift it up to install a CPU. 1. 2.4.2 Installing the CPU Follow these steps to 90°-100° angle, otherwise the CPU does not fit in completely. Locate the 478-pin ZIF socket on the motherboard. 2.
ASUS P4S333 motherboard user guide 2-5 Socket Lever 90 - 100 Make sure that the socket lever is lifted up to a 90°-100° angle. Unlock the socket by pressing the lever sideways, then lift it up to install a CPU. 1. 2.4.2 Installing the CPU Follow these steps to 90°-100° angle, otherwise the CPU does not fit in completely. Locate the 478-pin ZIF socket on the motherboard. 2.

User Manual
Page 28
The CPU fits only in place. The lever clicks on the socket while you push down the socket lever to secure the CPU. When the CPU is in place, press it is locked. 2-6 Chapter 2: Hardware information DO NOT force the CPU into the socket until it fits in one correct orientation. Gold Mark 5. Carefully insert the CPU into the socket to indicate that its marked corner matches the base of the socket lever. 4. 3. Position the CPU above the socket such that it firmly on the side tab to prevent bending the pins and damaging the CPU!
The CPU fits only in place. The lever clicks on the socket while you push down the socket lever to secure the CPU. When the CPU is in place, press it is locked. 2-6 Chapter 2: Hardware information DO NOT force the CPU into the socket until it fits in one correct orientation. Gold Mark 5. Carefully insert the CPU into the socket to indicate that its marked corner matches the base of the socket lever. 4. 3. Position the CPU above the socket such that it firmly on the side tab to prevent bending the pins and damaging the CPU!

User Manual
Page 29
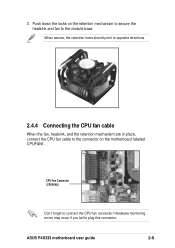
... ensure optimum thermal condition and performance. The retention module base is already installed on the retention module base. ASUS P4S333 motherboard user guide 2-7 CPU Heatsink Retention Module Base Your boxed Intel Pentium 4 478/Northwood Processor package should come with installation instructions for the... CPU, heatsink, and the retention mechanism. You do not match the CPU documentation, follow the latter. If the instructions in this section do not have to remove the...
... ensure optimum thermal condition and performance. The retention module base is already installed on the retention module base. ASUS P4S333 motherboard user guide 2-7 CPU Heatsink Retention Module Base Your boxed Intel Pentium 4 478/Northwood Processor package should come with installation instructions for the... CPU, heatsink, and the retention mechanism. You do not match the CPU documentation, follow the latter. If the instructions in this section do not have to remove the...
User Manual
Page 31
When secure, the retention locks should point to opposite directions. 2.4.4 Connecting the CPU fan cable When the fan, heatsink, and the retention mechanism are in place, connect the CPU fan cable to plug this connector. Hardware monitoring errors may occur if you fail to the connector on the retention mechanism to secure the heatsink and fan to connect the CPU fan connector! 3. CPU Fan Connector (CPUFAN1) Don't forget to the module base. Push down the locks on the motherboard labeled CPUFAN1. ASUS P4S333 motherboard user guide 2-9
When secure, the retention locks should point to opposite directions. 2.4.4 Connecting the CPU fan cable When the fan, heatsink, and the retention mechanism are in place, connect the CPU fan cable to plug this connector. Hardware monitoring errors may occur if you fail to the connector on the retention mechanism to secure the heatsink and fan to connect the CPU fan connector! 3. CPU Fan Connector (CPUFAN1) Don't forget to the module base. Push down the locks on the motherboard labeled CPUFAN1. ASUS P4S333 motherboard user guide 2-9
User Manual
Page 39
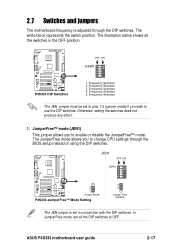
...jumper must be set to pins 1-2 (jumper mode) if you to use the DIP switches. JEN1 OFF ON DSW1 ON 12345 P4S333 ® 2 1 Jumper Mode P4S333 JumperFree™ Mode Setting 3 2 Jumper Free (Default) The JEN jumper is adjusted through the BIOS setup instead of using the ... position. The illustration below shows all the DIP switches to change CPU settings through the DIP switches. Otherwise, setting the switches does not produce any effect. 1. The JumperFree mode allows you to OFF. ASUS P4S333 motherboard user guide 2-17 Frequency Selection 5. Frequency Selection 4. OFF ...
...jumper must be set to pins 1-2 (jumper mode) if you to use the DIP switches. JEN1 OFF ON DSW1 ON 12345 P4S333 ® 2 1 Jumper Mode P4S333 JumperFree™ Mode Setting 3 2 Jumper Free (Default) The JEN jumper is adjusted through the BIOS setup instead of using the ... position. The illustration below shows all the DIP switches to change CPU settings through the DIP switches. Otherwise, setting the switches does not produce any effect. 1. The JumperFree mode allows you to OFF. ASUS P4S333 motherboard user guide 2-17 Frequency Selection 5. Frequency Selection 4. OFF ...
User Manual
Page 40
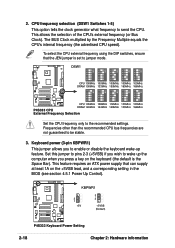
... frequency (or Bus Clock). The BUS Clock multiplied by the Frequency Multiple equals the CPU's internal frequency (the advertised CPU speed). KBPWR1 P4S333 ® 2 1 +5V 3 2 +5VSB (Default) P4S333 Keyboard Power Setting 2-18 Chapter 2: Hardware information 2. CPU frequency selection (DSW1 Switches 1-5) This option tells the clock generator what frequency to enable or disable the keyboard wake...
... frequency (or Bus Clock). The BUS Clock multiplied by the Frequency Multiple equals the CPU's internal frequency (the advertised CPU speed). KBPWR1 P4S333 ® 2 1 +5V 3 2 +5VSB (Default) P4S333 Keyboard Power Setting 2-18 Chapter 2: Hardware information 2. CPU frequency selection (DSW1 Switches 1-5) This option tells the clock generator what frequency to enable or disable the keyboard wake...
User Manual
Page 41
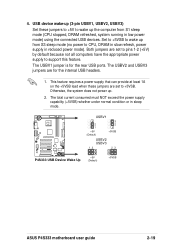
...up . 2. This feature requires a power supply that can provide at least 1A on the +5VSB lead when these jumpers to +5V to CPU, DRAM in slow refresh, power supply in reduced power mode). The total current consumed must NOT exceed the power supply capability (+5VSB) whether ...the computer from S1 sleep mode (CPU stopped, DRAM refreshed, system running in sleep mode. The USBV2 and USBV3 jumpers are for the rear USB ports. USBV1 2 1 +5V (Default) 3 2 +5VSB USBV2 USBV3 P4S333 ® 12 23 P4S333 USB Device Wake Up +5V (Default) +5VSB ASUS P4S333 motherboard user guide 2-19 4. ...
...up . 2. This feature requires a power supply that can provide at least 1A on the +5VSB lead when these jumpers to +5V to CPU, DRAM in slow refresh, power supply in reduced power mode). The total current consumed must NOT exceed the power supply capability (+5VSB) whether ...the computer from S1 sleep mode (CPU stopped, DRAM refreshed, system running in sleep mode. The USBV2 and USBV3 jumpers are for the rear USB ports. USBV1 2 1 +5V (Default) 3 2 +5VSB USBV2 USBV3 P4S333 ® 12 23 P4S333 USB Device Wake Up +5V (Default) +5VSB ASUS P4S333 motherboard user guide 2-19 4. ...

User Manual
Page 43
...include system setup information such as system passwords, is recommended that you to re-enter data. P4S333 ® P4S333 Clear RTC RAM CLRCMOS1 12 23 Normal (Default) Clear CMOS ASUS P4S333 motherboard user guide 2-21 7. Plug the power cord and turn ON the computer. 6. Short ...the jumper. 4. Turn OFF the computer and unplug the power cord. 2. It is powered by the onboard button cell battery. VEN1 2 1 CPU Rise 0.2V 3 2 Normal (Default) P4S333 ® P4S333 CPU ...
...include system setup information such as system passwords, is recommended that you to re-enter data. P4S333 ® P4S333 Clear RTC RAM CLRCMOS1 12 23 Normal (Default) Clear CMOS ASUS P4S333 motherboard user guide 2-21 7. Plug the power cord and turn ON the computer. 6. Short ...the jumper. 4. Turn OFF the computer and unplug the power cord. 2. It is powered by the onboard button cell battery. VEN1 2 1 CPU Rise 0.2V 3 2 Normal (Default) P4S333 ® P4S333 CPU ...
User Manual
Page 47
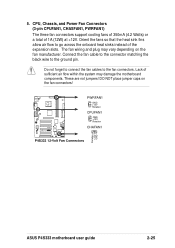
5. CPU, Chassis, and Power Fan Connectors (3-pin CPUFAN1, CHASFAN1, PWRFAN1) The three fan connectors support cooling fans of 350mA (4.2 Watts) or a total of the expansion slots. ... depending on the fan connectors! Do not forget to connect the fan cables to the ground pin. PWRFAN1 GND +12V Rotation CPUFAN1 GND +12V Rotation P4S333 ® CHAFAN1 P4S333 12-Volt Fan Connectors Rotation +12V GND ASUS P4S333 motherboard user guide 2-25
5. CPU, Chassis, and Power Fan Connectors (3-pin CPUFAN1, CHASFAN1, PWRFAN1) The three fan connectors support cooling fans of 350mA (4.2 Watts) or a total of the expansion slots. ... depending on the fan connectors! Do not forget to connect the fan cables to the ground pin. PWRFAN1 GND +12V Rotation CPUFAN1 GND +12V Rotation P4S333 ® CHAFAN1 P4S333 12-Volt Fan Connectors Rotation +12V GND ASUS P4S333 motherboard user guide 2-25
User Manual
Page 48
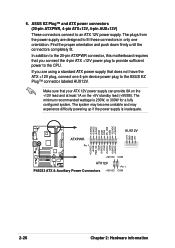
...GND +5V AUX12V +12.0VDC +5VSB PWR_OK COM +5.0VDC COM +5.0VDC COM +3.3VDC +3.3VDC P4S333 ® +12V DC ATX12V P4S333 ATX & Auxiliary Power Connectors +12V DC COM Pin 1 COM 2-26 Chapter 2: Hardware information 6. ASUS EZ Plug™ and ATX power connectors (20-pin ATXPWR, 4-pin ATX+12V, 4-pin... AUX+12V) These connectors connect to the CPU. The plugs from the power ...
...GND +5V AUX12V +12.0VDC +5VSB PWR_OK COM +5.0VDC COM +5.0VDC COM +3.3VDC +3.3VDC P4S333 ® +12V DC ATX12V P4S333 ATX & Auxiliary Power Connectors +12V DC COM Pin 1 COM 2-26 Chapter 2: Hardware information 6. ASUS EZ Plug™ and ATX power connectors (20-pin ATXPWR, 4-pin ATX+12V, 4-pin... AUX+12V) These connectors connect to the CPU. The plugs from the power ...
User Manual
Page 59
...is working Meaning No error during POST No DRAM installed or detected Video card not found or video card memory bad CPU overheated; System power (if you are using an ATX power supply, you turned on the power, the system may... One short beep when displaying logo Long beeps in the following order: a. You will not hear the BIOS beeps when the ASUS POST Reporter™ is equipped with a surge protector. 5. While the tests are off. 3. If you do not see ... and connections or call your monitor complies with the last device on tests. At power on . ASUS P4S333 motherboard user guide 3-1
...is working Meaning No error during POST No DRAM installed or detected Video card not found or video card memory bad CPU overheated; System power (if you are using an ATX power supply, you turned on the power, the system may... One short beep when displaying logo Long beeps in the following order: a. You will not hear the BIOS beeps when the ASUS POST Reporter™ is equipped with a surge protector. 5. While the tests are off. 3. If you do not see ... and connections or call your monitor complies with the last device on tests. At power on . ASUS P4S333 motherboard user guide 3-1
User Manual
Page 60
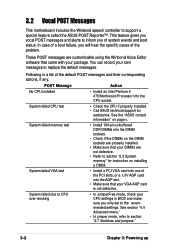
.... See section "4.4 Advanced menu." • In jumper mode, refer to support a special feature called the ASUS POST Reporter™. You can record your package. System failed CPU test • Check the CPU if properly installed. • Call ASUS technical support for instruction on page x. 3.2 Vocal POST Messages This motherboard includes the Winbond speech controller...
.... See section "4.4 Advanced menu." • In jumper mode, refer to support a special feature called the ASUS POST Reporter™. You can record your package. System failed CPU test • Check the CPU if properly installed. • Call ASUS technical support for instruction on page x. 3.2 Vocal POST Messages This motherboard includes the Winbond speech controller...
User Manual
Page 61
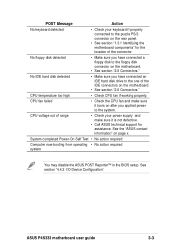
...Computer now booting from operating • No action required system You may disable the ASUS POST Reporter™ in the BIOS setup. See section "4.4.2 I/O Device Configuration". CPU fan failed • Check the CPU fan and make sure it turns on the motherboard. • See section "2.8 ...POST Message Action No keyboard detected • Check your power supply and make sure it is not defective. • Call ASUS technical support for assistance. CPU voltage out of the connector. See the "ASUS contact information" on page x. ASUS P4S333 motherboard user guide 3-3
...Computer now booting from operating • No action required system You may disable the ASUS POST Reporter™ in the BIOS setup. See section "4.4.2 I/O Device Configuration". CPU fan failed • Check the CPU fan and make sure it turns on the motherboard. • See section "2.8 ...POST Message Action No keyboard detected • Check your power supply and make sure it is not defective. • Call ASUS technical support for assistance. CPU voltage out of the connector. See the "ASUS contact information" on page x. ASUS P4S333 motherboard user guide 3-3

User Manual
Page 79
..., you cannot access this field allows you want to make changes to the CPU Frequency (MHz). Configuration options: [Auto] [1:1] [3:4] [3:5] ASUS P4S333 motherboard user guide 4-15 4.4 Advanced Menu CPU Speed [Manual] When the motherboard is for unlocked processors only. CPU Frequency Multiple (when CPU Speed is set to [Manual]) This field is set to [Manual]) This feature...
..., you cannot access this field allows you want to make changes to the CPU Frequency (MHz). Configuration options: [Auto] [1:1] [3:4] [3:5] ASUS P4S333 motherboard user guide 4-15 4.4 Advanced Menu CPU Speed [Manual] When the motherboard is for unlocked processors only. CPU Frequency Multiple (when CPU Speed is set to [Manual]) This field is set to [Manual]) This feature...


