
Motherboard DIY Troubleshooting Guide
Page 1
P4RD1-MX Motherboard
P4RD1-MX Motherboard

Motherboard DIY Troubleshooting Guide
Page 3
Contents Notices vi Safety information vii About this guide viii Typography ix P4RD1-MX specifications summary x Chapter 1: Product introduction 1.1 Welcome 1-2 1.2 Package contents 1-2 1.3 Special features 1-3 1.3.1 Product highlights 1-3 1.3.2 Innovative ASUS features 1-5 1.4 Before you proceed 1-6 1.5 Motherboard overview 1-7 1.5.1 Placement direction 1-7 1.5.2 Screw holes 1-7 1.5.3 Motherboard layout 1-8 1.6 Central Processing Unit (CPU 1-9 Installing the CPU 1-9 1.7 System memory 1-11 1.7.1 Overview 1-11 1.7.2 Memory Con...
Contents Notices vi Safety information vii About this guide viii Typography ix P4RD1-MX specifications summary x Chapter 1: Product introduction 1.1 Welcome 1-2 1.2 Package contents 1-2 1.3 Special features 1-3 1.3.1 Product highlights 1-3 1.3.2 Innovative ASUS features 1-5 1.4 Before you proceed 1-6 1.5 Motherboard overview 1-7 1.5.1 Placement direction 1-7 1.5.2 Screw holes 1-7 1.5.3 Motherboard layout 1-8 1.6 Central Processing Unit (CPU 1-9 Installing the CPU 1-9 1.7 System memory 1-11 1.7.1 Overview 1-11 1.7.2 Memory Con...
Motherboard DIY Troubleshooting Guide
Page 7
...circuit. • Make sure that your dealer immediately. • To avoid short circuits, keep paper clips, screws, and staples away from the motherboard, ensure that all power cables from the existing system before you are using, contact your local power company. • If the power supply ... all the manuals that came with the product, contact a qualified service technician or your retailer. Operation safety • Before installing the motherboard and adding devices on it may become wet. • Place the product on a stable surface. • If you detect any area where it...
...circuit. • Make sure that your dealer immediately. • To avoid short circuits, keep paper clips, screws, and staples away from the motherboard, ensure that all power cables from the existing system before you are using, contact your local power company. • If the power supply ... all the manuals that came with the product, contact a qualified service technician or your retailer. Operation safety • Before installing the motherboard and adding devices on it may become wet. • Place the product on a stable surface. • If you detect any area where it...
Motherboard DIY Troubleshooting Guide
Page 8
...ASUS websites The ASUS website provides updated information on the motherboard. • Chapter 2: BIOS setup This chapter tells how to perform when installing system components. These documents are also provided. • Chapter 3: Software support This chapter describes the contents of the standard package. It includes description of the motherboard...that may include optional documentation, such as warranty flyers, that comes with the motherboard package. Refer to the following parts: • Chapter 1: Product introduction This chapter describes the features of the...
...ASUS websites The ASUS website provides updated information on the motherboard. • Chapter 2: BIOS setup This chapter tells how to perform when installing system components. These documents are also provided. • Chapter 3: Software support This chapter describes the contents of the standard package. It includes description of the motherboard...that may include optional documentation, such as warranty flyers, that comes with the motherboard package. Refer to the following parts: • Chapter 1: Product introduction This chapter describes the features of the...

Motherboard DIY Troubleshooting Guide
Page 13
ASUS P4RD1-MX 1-1 This chapter describes the motherboard features and the new technologies introPdruoc1dtuiocnt it supports.
ASUS P4RD1-MX 1-1 This chapter describes the motherboard features and the new technologies introPdruoc1dtuiocnt it supports.

Motherboard DIY Troubleshooting Guide
Page 14
... technologies, making it , check the items in the long line of the above items is damaged or missing, contact your motherboard package for buying an ASUS® P4RD1-MX motherboard! Before you for the following items. Motherboard ASUS P4RD1-MX motherboard Cables 1 x Serial ATA signal cable 1 x Serial ATA power cable 1 x Ultra DMA 133/100/66 cable 1 x Floppy disk drive cable...
... technologies, making it , check the items in the long line of the above items is damaged or missing, contact your motherboard package for buying an ASUS® P4RD1-MX motherboard! Before you for the following items. Motherboard ASUS P4RD1-MX motherboard Cables 1 x Serial ATA signal cable 1 x Serial ATA power cable 1 x Ultra DMA 133/100/66 cable 1 x Floppy disk drive cable...

Motherboard DIY Troubleshooting Guide
Page 15
... and allows higher clockspeeds by carrying data in the 478-pin package with 512/256KB L2 cache on 0.13 or 0.09 micron process. ASUS P4RD1-MX 1-3 See page 1-23 for the motherboard. The ATi RADEON® XPRESS 200 Northbridge integrates the RADEON® X300, an integrated graphics processing unit (GPU) for discrete graphics card...
... and allows higher clockspeeds by carrying data in the 478-pin package with 512/256KB L2 cache on 0.13 or 0.09 micron process. ASUS P4RD1-MX 1-3 See page 1-23 for the motherboard. The ATi RADEON® XPRESS 200 Northbridge integrates the RADEON® X300, an integrated graphics processing unit (GPU) for discrete graphics card...

Motherboard DIY Troubleshooting Guide
Page 16
S/PDIF digital sound ready The motherboard supports the S/PDIF Out function through the S/PDIF interfaces on USB 2.0. USB 2.0 is backward compatible with the ADI AD1986A high-definition audio CODEC ... the ASIC (integrated in the ITE Super I/O) to a fast 480 Mbps on the rear panel and at midboard. 6-channel audio support The motherboard comes with USB 1.1. USB 2.0 technology The motherboard implements the Universal Serial Bus (USB) 2.0 specification, dramatically increasing the connection speed from the 12 Mbps bandwidth on USB 1.1 to...
S/PDIF digital sound ready The motherboard supports the S/PDIF Out function through the S/PDIF interfaces on USB 2.0. USB 2.0 is backward compatible with the ADI AD1986A high-definition audio CODEC ... the ASIC (integrated in the ITE Super I/O) to a fast 480 Mbps on the rear panel and at midboard. 6-channel audio support The motherboard comes with USB 1.1. USB 2.0 technology The motherboard implements the Universal Serial Bus (USB) 2.0 specification, dramatically increasing the connection speed from the 12 Mbps bandwidth on USB 1.1 to...

Motherboard DIY Troubleshooting Guide
Page 17
...2 This feature allows you to personalize and add style to your system with customizable boot logos. ASUS P4RD1-MX 1-5 See details on page 2-6. C.P.R. (CPU Parameter Recall) The C.P.R. feature of the motherboard BIOS allows automatic re-setting to the BIOS default settings in case when the BIOS codes and...corrupted. eliminates the need to overclocking, C.P.R. When the system hangs due to buy a replacement ROM chip. ASUS MyLogo™ This new feature present in the motherboard allows you to restore the original BIOS data from the support CD in case the system hangs due to...
...2 This feature allows you to personalize and add style to your system with customizable boot logos. ASUS P4RD1-MX 1-5 See details on page 2-6. C.P.R. (CPU Parameter Recall) The C.P.R. feature of the motherboard BIOS allows automatic re-setting to the BIOS default settings in case when the BIOS codes and...corrupted. eliminates the need to overclocking, C.P.R. When the system hangs due to buy a replacement ROM chip. ASUS MyLogo™ This new feature present in the motherboard allows you to restore the original BIOS data from the support CD in case the system hangs due to...

Motherboard DIY Troubleshooting Guide
Page 18
...touch a safely grounded object or to a metal object, such as the power supply case, before removing or plugging in any motherboard settings. • Unplug the power cord from the power supply. The illustration below shows the location of the following precautions before... that came with the component. • Before you install or remove any component, ensure that you install motherboard components or change any motherboard component. P4RD1-MX ® P4RD1-MX Onboard LED SB_PWR ON Standby Power OFF Powered Off 1-6 Chapter 1: Product introduction 1.4 Before you proceed Take ...
...touch a safely grounded object or to a metal object, such as the power supply case, before removing or plugging in any motherboard settings. • Unplug the power cord from the power supply. The illustration below shows the location of the following precautions before... that came with the component. • Before you install or remove any component, ensure that you install motherboard components or change any motherboard component. P4RD1-MX ® P4RD1-MX Onboard LED SB_PWR ON Standby Power OFF Powered Off 1-6 Chapter 1: Product introduction 1.4 Before you proceed Take ...

Motherboard DIY Troubleshooting Guide
Page 19
.... Place this side towards the rear of your chassis to unplug the power cord before installing or removing the motherboard. Make sure to ensure that you install the motherboard, study the configuration of the chassis P4RD1-MX ® ASUS P4RD1-MX 1-7 Do not overtighten the screws! Doing so can cause you physical injury and damage...
.... Place this side towards the rear of your chassis to unplug the power cord before installing or removing the motherboard. Make sure to ensure that you install the motherboard, study the configuration of the chassis P4RD1-MX ® ASUS P4RD1-MX 1-7 Do not overtighten the screws! Doing so can cause you physical injury and damage...

Motherboard DIY Troubleshooting Guide
Page 20
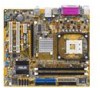
FLOPPY 1.5.3 Motherboard layout 21.8cm (8.6in) PS/2KBMS T: Mouse B: Keyboard COM1 KBPWR Socket 478 CPU_FAN Super I/O DDR DIMM_A1 (64 bit,184-pin module) DDR DIMM_B1 (64 bit,... PORT VGA USB12 USBPW12 USBPW34 LAN_USB34 Top:Line In Center:Line Out Below:Mic In ATX12V TV_C ATI RADEON XPRESS 200 PWR_FAN RTL8201CL PCIEX1_1 PCIEX16 P4RD1-MX ® CR2032 3V Lithium Cell CMOS Power PCI1 SPDIF_OUT AD1986A AAFP CD SB_PWR PCI2 USBPW78 USBPW56 USB78 ULI M1573 SATA4 SATA3 SATA2 SATA1 USB56 CLRTC...
FLOPPY 1.5.3 Motherboard layout 21.8cm (8.6in) PS/2KBMS T: Mouse B: Keyboard COM1 KBPWR Socket 478 CPU_FAN Super I/O DDR DIMM_A1 (64 bit,184-pin module) DDR DIMM_B1 (64 bit,... PORT VGA USB12 USBPW12 USBPW34 LAN_USB34 Top:Line In Center:Line Out Below:Mic In ATX12V TV_C ATI RADEON XPRESS 200 PWR_FAN RTL8201CL PCIEX1_1 PCIEX16 P4RD1-MX ® CR2032 3V Lithium Cell CMOS Power PCI1 SPDIF_OUT AD1986A AAFP CD SB_PWR PCI2 USBPW78 USBPW56 USB78 ULI M1573 SATA4 SATA3 SATA2 SATA1 USB56 CLRTC...

Motherboard DIY Troubleshooting Guide
Page 21
... To install a CPU: 1. Locate the CPU socket on one corner. Socket Lever 90 - 100 ASUS P4RD1-MX 1-9 If the instructions in completely. Make sure that the socket box is facing towards you and the...otherwise the CPU does not fit in this section do not match the CPU documentation, follow the latter. Gold Arrow P4RD1-MX ® P4RD1-MX CPU Socket 478 Before installing the CPU, make sure that the socket lever is on your left. 2. This mark indicates...1.6 Central Processing Unit (CPU) The Intel® Pentium® 4 processor has a gold triangular mark on the motherboard.
... To install a CPU: 1. Locate the CPU socket on one corner. Socket Lever 90 - 100 ASUS P4RD1-MX 1-9 If the instructions in completely. Make sure that the socket box is facing towards you and the...otherwise the CPU does not fit in this section do not match the CPU documentation, follow the latter. Gold Arrow P4RD1-MX ® P4RD1-MX CPU Socket 478 Before installing the CPU, make sure that the socket lever is on your left. 2. This mark indicates...1.6 Central Processing Unit (CPU) The Intel® Pentium® 4 processor has a gold triangular mark on the motherboard.

Motherboard DIY Troubleshooting Guide
Page 22
... Linux, use the Hyper-Threading compiler to the CPU fan connector on Intel® Hyper-Threading Technology • This motherboard supports Intel® Pentium® 4 processors with the heatsink package. 7. Notes on the motherboard. The CPU fits only in place. When the CPU is recommended. • Make sure to prevent bending...
... Linux, use the Hyper-Threading compiler to the CPU fan connector on Intel® Hyper-Threading Technology • This motherboard supports Intel® Pentium® 4 processors with the heatsink package. 7. Notes on the motherboard. The CPU fits only in place. When the CPU is recommended. • Make sure to prevent bending...

Motherboard DIY Troubleshooting Guide
Page 23
... Pentium® 4 CPU that the item Hyper-Threading Technology is set to Enabled. Reboot the computer. 1.7 System memory 1.7.1 Overview The motherboard comes with two 184-pin Double Data Rate (DDR) Dual Inline Memory Modules (DIMM) sockets. Power up the system and enter the BIOS... only if you installed a CPU that supports Hyper-Threading Technology. 3. The following figure illustrates the location of the sockets: P4RD1-MX ® P4RD1-MX 184-pin DDR DIMM sockets DIMM_A1 DIMM_B1 104 Pins 80 Pins ASUS P4RD1-MX 1-11 The motherboard supports dual channel memory architechture.
... Pentium® 4 CPU that the item Hyper-Threading Technology is set to Enabled. Reboot the computer. 1.7 System memory 1.7.1 Overview The motherboard comes with two 184-pin Double Data Rate (DDR) Dual Inline Memory Modules (DIMM) sockets. Power up the system and enter the BIOS... only if you installed a CPU that supports Hyper-Threading Technology. 3. The following figure illustrates the location of the sockets: P4RD1-MX ® P4RD1-MX 184-pin DDR DIMM sockets DIMM_A1 DIMM_B1 104 Pins 80 Pins ASUS P4RD1-MX 1-11 The motherboard supports dual channel memory architechture.
Motherboard DIY Troubleshooting Guide
Page 24
... are not supported in this section. • For dual channel configuration, the total size of the recommended configurations in this motherboard. • Visit the ASUS website for the latest DDR 400 MHz (FSB 800/533) Qualified Vendors Lists. Use any of memory module(s) installed per channel...
... are not supported in this section. • For dual channel configuration, the total size of the recommended configurations in this motherboard. • Visit the ASUS website for the latest DDR 400 MHz (FSB 800/533) Qualified Vendors Lists. Use any of memory module(s) installed per channel...

Motherboard DIY Troubleshooting Guide
Page 25
.... Simultaneously press the retaining clips outward to avoid damaging the DIMM. 3. Unlock a DIMM socket by pressing the retaining clips outward. 2. ASUS P4RD1-MX 1-13 Locked Retaining Clip 1.7.4 Removing a DIMM Follow these steps to unplug the power supply before adding or removing DIMMs or other system ... is properly seated. 1.7.3 Installing a DIMM Make sure to remove a DIMM. 2 1. Failure to do so may cause severe damage to both the motherboard and the components. 1. Align a DIMM on the socket such that the notch on the DIMM matches the break on the socket. 1 2 DDR...
.... Simultaneously press the retaining clips outward to avoid damaging the DIMM. 3. Unlock a DIMM socket by pressing the retaining clips outward. 2. ASUS P4RD1-MX 1-13 Locked Retaining Clip 1.7.4 Removing a DIMM Follow these steps to unplug the power supply before adding or removing DIMMs or other system ... is properly seated. 1.7.3 Installing a DIMM Make sure to remove a DIMM. 2 1. Failure to do so may cause severe damage to both the motherboard and the components. 1. Align a DIMM on the socket such that the notch on the DIMM matches the break on the socket. 1 2 DDR...
Motherboard DIY Troubleshooting Guide
Page 26
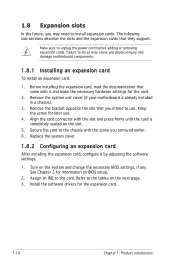
... 2 for the card. 2. Refer to the tables on BIOS setup. 2. Remove the bracket opposite the slot that you physical injury and damage motherboard components. 1.8.1 Installing an expansion card To install an expansion card: 1. Secure the card to the chassis with the screw you may cause you intend...figure it and make the necessary hardware settings for information on the next page. 3. Remove the system unit cover (if your motherboard is completely seated on the system and change the necessary BIOS settings, if any. Assign an IRQ to unplug the power cord before adding...
... 2 for the card. 2. Refer to the tables on BIOS setup. 2. Remove the bracket opposite the slot that you physical injury and damage motherboard components. 1.8.1 Installing an expansion card To install an expansion card: 1. Secure the card to the chassis with the screw you may cause you intend...figure it and make the necessary hardware settings for information on the next page. 3. Remove the system unit cover (if your motherboard is completely seated on the system and change the necessary BIOS settings, if any. Assign an IRQ to unplug the power cord before adding...

Motherboard DIY Troubleshooting Guide
Page 27
used - - - - - - - - - shared - - - - - - used - - - - - - - - - - - ASUS P4RD1-MX 1-15 1.8.3 Interrupt assignments Standard interrupt assignments IRQ Priority 0 1 1 2 2 • 3 12 5 13 6 14 7 15 8 3 9 4 10 5 11 6 12 7 13 8 14 9...for PCI steering* PS/2 Compatible Mouse Port* Numeric Data Processor Primary IDE Channel Secondary IDE Channel * These IRQs are usually available for this motherboard PCI slot 1 PCI slot 2 PCIe x1 slot PCIe x16 slot Onboard USB controller 1 Onboard USB controller 2 Onboard USB controller 3 Onboard USB...
used - - - - - - - - - shared - - - - - - used - - - - - - - - - - - ASUS P4RD1-MX 1-15 1.8.3 Interrupt assignments Standard interrupt assignments IRQ Priority 0 1 1 2 2 • 3 12 5 13 6 14 7 15 8 3 9 4 10 5 11 6 12 7 13 8 14 9...for PCI steering* PS/2 Compatible Mouse Port* Numeric Data Processor Primary IDE Channel Secondary IDE Channel * These IRQs are usually available for this motherboard PCI slot 1 PCI slot 2 PCIe x1 slot PCIe x16 slot Onboard USB controller 1 Onboard USB controller 2 Onboard USB controller 3 Onboard USB...
Motherboard DIY Troubleshooting Guide
Page 28
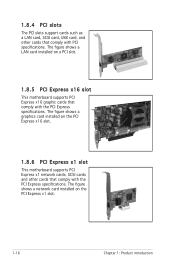
The figure shows a graphics card installed on the PCI Express x16 slot. 1.8.6 PCI Express x1 slot This motherboard supports PCI Express x1 network cards, SCSI cards and other cards that comply with the PCI Express specifications. The figure shows a network ...card installed on a PCI slot. 1.8.5 PCI Express x16 slot This motherboard supports PCI Express x16 graphic cards that comply with the PCI Express specifications. 1.8.4 PCI slots The PCI slots support cards such as a LAN...
The figure shows a graphics card installed on the PCI Express x16 slot. 1.8.6 PCI Express x1 slot This motherboard supports PCI Express x1 network cards, SCSI cards and other cards that comply with the PCI Express specifications. The figure shows a network ...card installed on a PCI slot. 1.8.5 PCI Express x16 slot This motherboard supports PCI Express x16 graphic cards that comply with the PCI Express specifications. 1.8.4 PCI slots The PCI slots support cards such as a LAN...


